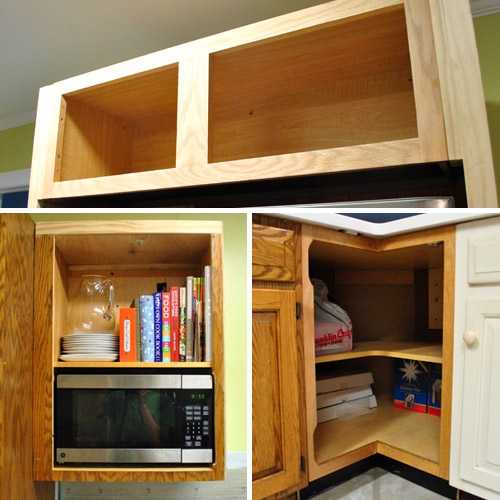
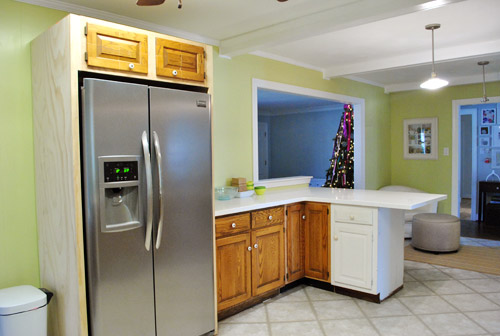
We knew from the moment that we decided to add new (secondhand) cabinets to our kitchen that the doors could be a challenge. Even though we only ended up with 5 missing doors, it was important that we get those to match with the rest of the kitchen for a seamless look (aka: so no one would look around and guess we had some mismatched thrift store cabinets among us). Here are the five doorless cabinets that we had to address:
We knew we had a few options to result in a kitchen full of matching doors, so one of them was bound to work. Here they are (in order of expense from most to least):
- Getting all new doors and drawer faces for the entire kitchen
- Ordering custom-made matching doors for just the few cabinets missing them
- Try to cut-down/repurpose leftover doors from the old cabinets that we’re no longer using (remember we took a bunch down here)
We actually investigated Option #1 first, because we do love a shaker style door (like the ones we chose for our last kitchen below):
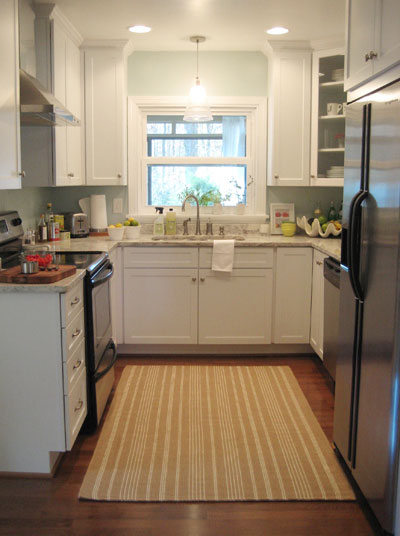
But as we started adding up the cost (best on a few different sources, from Home Depot to online door-making warehouses) and it started to look like it’d be upward of $2,000-3,000. So yeah…. next option?
Happily, option #2 was substantially less expensive. Our challenge here is that we have a very specific cabinet style. They’re extremely solid well-built custom oak cabinets and doors (which is nice – and we’re happy to have them)… but being custom means they’re a bit unusual (aka: haaard to find). They’re actually framed cabinets (i.e. there’s a small lip on the front of the cabinet box) and are partial inset doors (meaning part of them sit within the frame, part sit on top of the frame). This makes for an awesome seal that fits together amazingly (like one big puzzle) but it also makes hoping to somehow “find” matching doors in our custom style/size/depth virtually impossible.
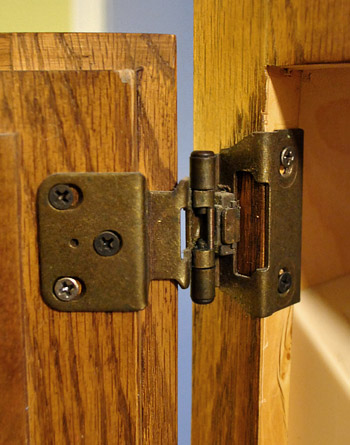
As for buying new ones “to order” in specific sizes that we request, no one that we dropped in on sold partial inset doors with the same detailing on the front (and we couldn’t use non-partial-inset doors because those would stick out about a half-inch more from the cabinet when closed, so they’d be really obvious and weird looking among the rest).
So next we called up the original manufacturer of the cabinets (a private company out of Pennsylvania called “Quaker Made” who specializes in custom cabinetry). They patched me through to an independent repair guy who makes new doors, so I gave him rough measurements and he quoted me about $800 to make new doors. Not bad, but a bit more than we were hoping to spend… especially when we had so many extra doors laying around. Including these five that were perfect candidates for being re-fitted.
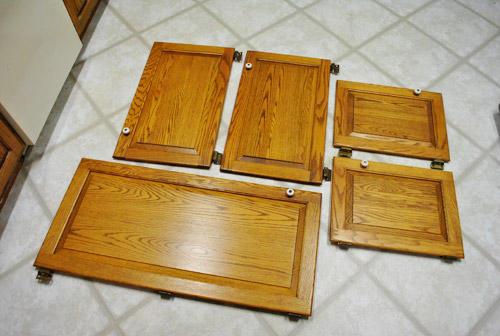
It kinda seemed stupid of us not to at least try to make these work first. If our attempt failed, we could always go to Option #2 as a back-up. And you know we like to work with what we have. So yeah, cue the power tools.
All of the doors were too big for their new cabinet-y homes, so we knew we had to cut them down. Cutting them down wasn’t going to be as straightforward as just slicing off the extra inches since I needed to maintain the raised border and the raised inner panel on each door (along with the inset edge around the perimeter). That meant I need to shave off the extra inches from the middle of the doors. Yikes.
To get super straight cuts, I used my table saw. For anyone wondering, our table saw of choice is this Skil one for $150, which we really like… maybe a little too much).
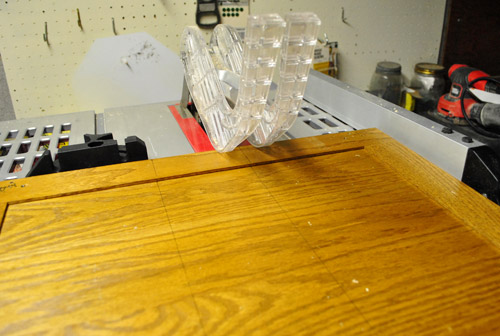
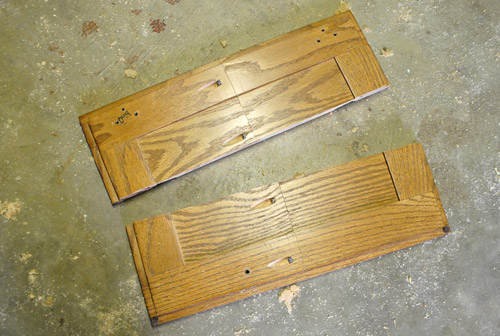
Two cuts later, I had removed a section from the middle and was left with two halves that would create the perfect door length.
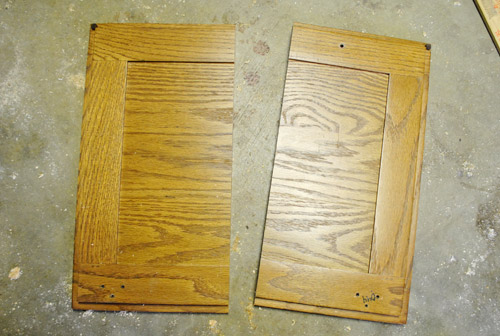
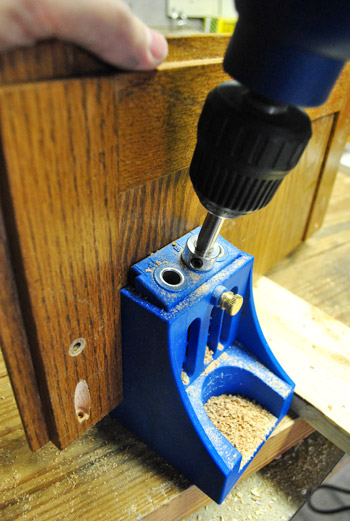
To secure the halves together, I made some pocket holes with one of my other BFF tools (my Kreg jig)…
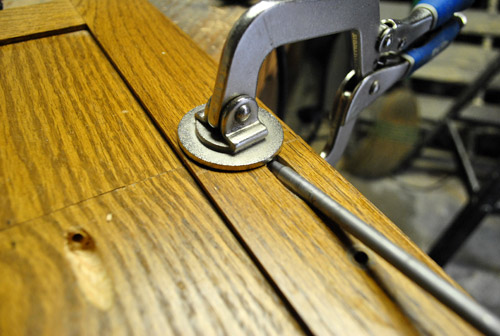
…then I carefully clamped them together before screwing everything tightly to secure them. I also use wood glue for the strongest possible hold, but I wipe the excess right away with a rag to keep things looking neat, which is why you don’t see it gushing out from the seam in this pic:
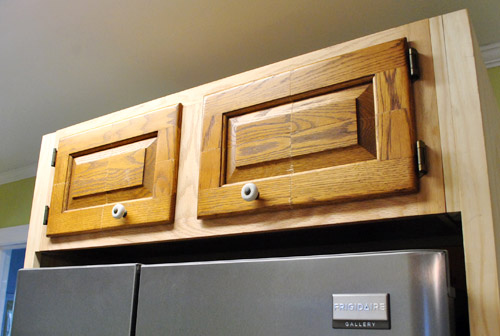
Now, for the doors above the fridge I had to repeat this cut-jig-screw step the other direction too, since the spare door was both too tall and too wide. Yup, I totally Frankensteined those babies.
But once it was all screwed together again (and the hinges were reattached), things were actually fitting together much better than I expected (full disclosure: I completely thought this method would flop, but it was still worth a try just in case it ended up saving us $800).
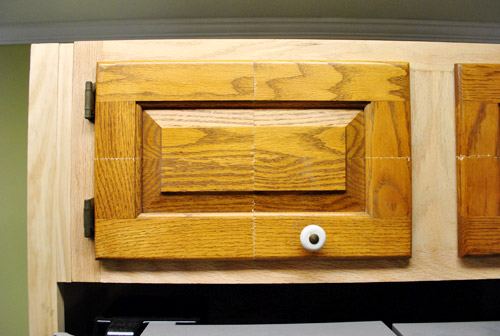
Now I know what some of you are thinking – because I was thinking the same thing: this isn’t looking so hot. But I reminded myself that once we add in some wood putty and sand those babies ’til they’re seamless we should be in ok shape. And once we use nice thick self leveling primer and paint, even things like the wood grain – and hopefully those hairline cracks should be undetectable (we used self leveling paint on the oak office cabinets that we painted and the wood grain doesn’t show through at all). Oh yeah, and we’re definitely moving the knob to a less awkward place (replacing it with new hardware actually)….
…and we’ll use wood putty to fill the screw holes in the back (it’s looking pretty treacherous back there).
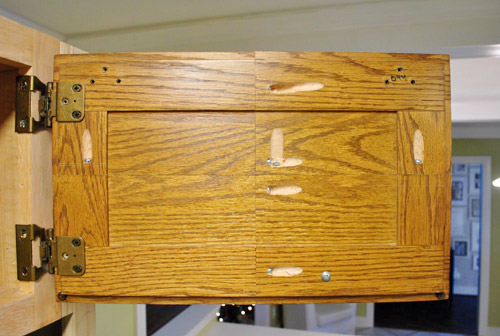
I probably made this process seem faster and easier than it really was. It took me all morning to do these two doors (and a third test door that I messed around with first to see what worked and what didn’t before moving on to a door that matters). And there weren’t just two cuts per door – there were definitely a few trims and recuts along the way to make sure things fit snugly, but not too snugly thanks to that inset-back edge.
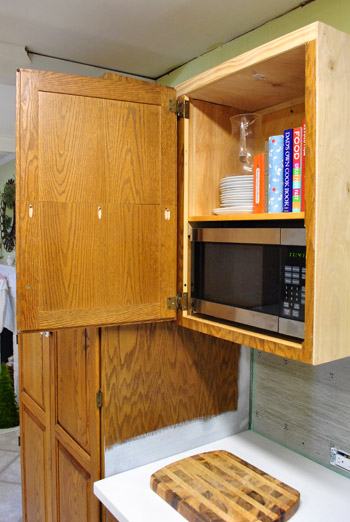
The microwave cabinet door was easier, since I was reusing the door that originally went on that once-taller cabinet. So it just took cutting a few inches out of the middle to make this door work.
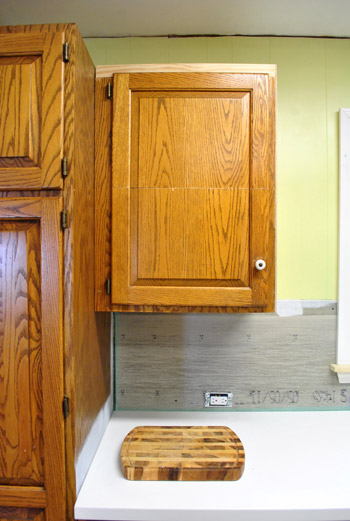
This one only took me an hour-ish to do. Progress! The reason even one cut takes so long is that I measure and remeasure and very nervously make my cuts on the conservative side (since you can always shave more off but it’s a lot harder to add stuff back in).
That progress got derailed a bit when I faced the corner cabinet. This secondhand cabinet came with bi-fold doors, but those hidden hinges wouldn’t work for our partial inset doors (which meant if we tried to use them those doors would stick out at least a half-inch more from the frame than the rest of the doors in our kitchen – which would look terrible). So we debated installing a pie-cut lazy susan and just affixing the doors directly to that (kinda like the one in our other corner cabinet across the way), but nixed that idea because after a bit of thought we decided one base cabinet with a lazy susan was enough for us – and we were actually enjoying all of the wide open space for bigger items (which would be lost if we sliced things up by adding a lazy susan).
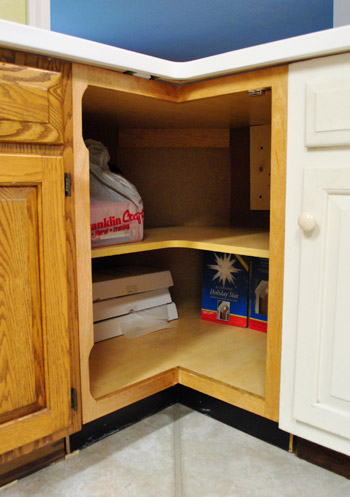
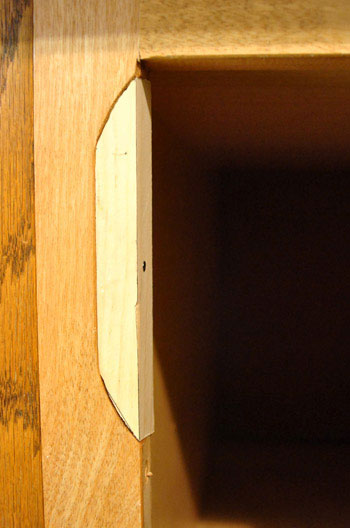
But before I could even start dealing with the doors, I had to fix these notches that were cut out of the frame to accommodate the old hinges.
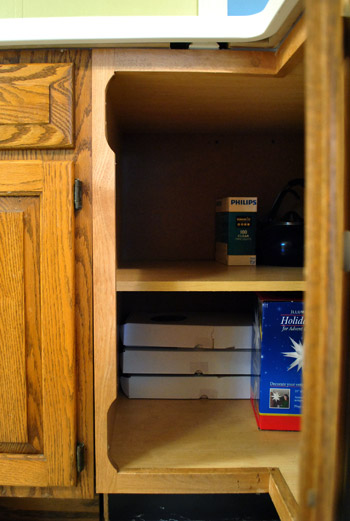
After a few tries, I finally was able to jigsaw a couple of pieces that fit into the notches (not perfectly, but wood putty thankfully covers a multitude of sins when you’re painting your cabinets). I just screwed them into place and was happy to finally have a place to attach my hinges (which will all be removed again for our wood-puttying and sanding step down the road – and most likely sprayed a new color to match our new hardware).
What we ended up doing with the door was the simplest solution that we could come up with using what we had: two separate doors, hinged on opposite sides.
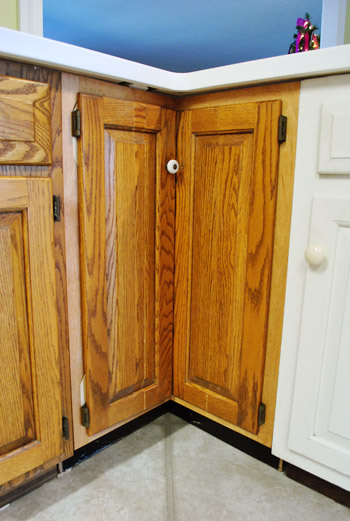
It took me the rest of the afternoon (plus part of the next morning) to get these to finally fit right, but you can see how they open below. The left door has a knob (that’s very awkwardly placed – which we’ll move) to open that side first. And once that door is open we can easily pull the other one open afterwards. We love that they still give us complete access to the wide shelves inside. Makes us very happy we didn’t go the lazy susan route since we already have one of those in another corner.
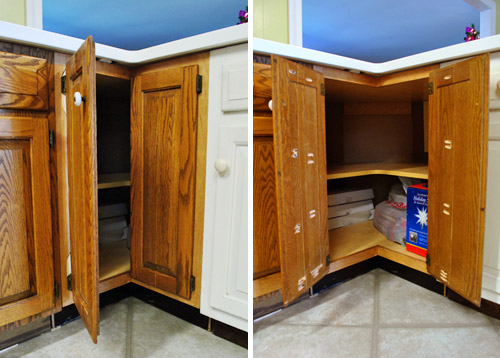
In the end, it definitely took longer than I hoped it would (mostly because of lots of noodling and trimming) but I think it came out pretty good. Everything fits. Everything closes nicely. And, once it’s all wood puttied / sanded / primed / painted, everything should look pretty much as good as new.
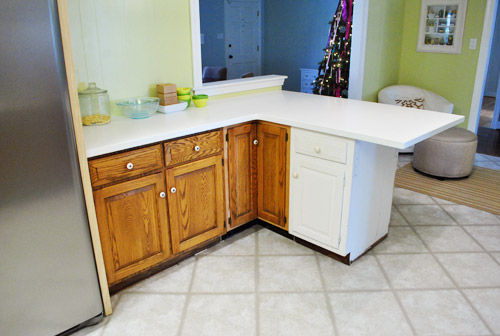
And, of course, if we don’t like how they look once they’re painted we can always call up the guy who’ll make us new doors for 800 beans if we have to (it’s not worth having a semi-ugly door situation to feast our eyes on every day in our new kitchen to save $800, so if it comes to that we’ll get ‘er done).
As for durability, joining solid oak doors with nails or glue alone would be a recipe for disaster – but making pocket holes and using heavy duty metal screws meant for the job along with wood glue is the permanent, strong, professional way to go (I like to do my research so things don’t fall apart later, which only adds up to more work for us). So there’s zero flex in the newly joined doors – they don’t close oddly or feel wiggly. They’re solid – and should function exactly the same way that our other solid oak doors do for the long haul.
As you can imagine, now we’re even more excited to get these suckers painted. Especially now that I’ve got all these ugly cuts that I want to hide going on. If only I didn’t have to do stuff like add toe-kick molding and other miscellaneous trim first. Although I did already add a new window sill and window trim (more on that later).
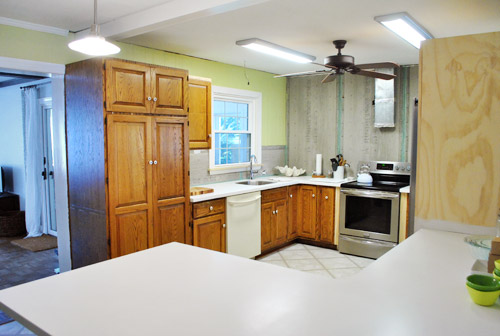
If we’re being realistic, it’s unlikely that we’ll get a painted cabinet update to you before Christmas in ten days (puttying and sanding and drying times for primer/paint would make that kinda impossible). But maybe we’ll recruit Santa to help us sand and prime when he drops down that chimney in 10 days. Sigh. If only these things could happen while we slept. Can you imagine how sweet that would be?

Kristine says
Awesome! So encouraged to see young people like yourselves being so resourceful and wise with your money.
Audrey says
John,
I feel for you. I have the exact same doors in my kitchen and when I replaced cabinets to make room for a microhood and a taller refrigerator I had to have doors custom made. :-(
Very cool solution and awesome work!
Audrey
Ruthy T. says
wow you guys are resourceful!! Really looking forward to seeing how they look–i’d totally help if i was near by!
amy good house says
Mad props to you guys for even attempting this!
I’m living vicariously through your kitchen renovation :)
kimberly says
You guys are crazy…crazy resourceful! I cannot believe how good your kitchen is looking…I have to admit–a cabinet here, a cabinet there had me a little scared that you would look like you’re living at the Goodwill, but I shouldn’t ever doubt the Petersiks!
Karen @ Aurelia Interiors says
I’m impressed with your “Frankensteining”! Wow! I never in a million years would have tried that!!! I also like that you titled your post “The Doors” because they’re my favorite band!!! I must admit I was a little disappointed there was nary a mention of Jim Morrison. ;)
Sarah says
You guys are seriously amazing. I never would’ve thought to do that at all. Awesome work. I’m sure you guys will make the seams and grain look blended in once it’s painted. I can definitely picture it looking great.
Peggy says
This looks like something I would think of doing, but would be afraid to actually try. But when you have nothing to lose, you certainly have more options!
I didn’t see any glue being used (maybe you just work a lot neater than I do), but it would make a much stronger join and would help keep the wood filler from falling out.
YoungHouseLove says
Oh yes, John got some glue in there before joining- he just drags a rag down to wipe it up before it dries. Haha.
xo,
s
Missy G. says
Haha, I waited to ask my question today! I was wondering if y’all used wood glue as well. :)
YoungHouseLove says
Haha- yes! We should have made that more clear in the post. Sorry!
xo,
s
Martha says
Now, this is where I admire your DIY ambition. I would look at that amount of puzzling and just say, “Nope – it’s worth it to pay for it!” But at least I know my own limits:)
Claire says
Wow, I never would have thought that could turn out so well! I’m sure once they’re primed and painted, they’ll blend seamlessly with the rest of the cabinets.
Pat E. says
I know that John lurves his Krieg Jig, but has he thought about a biscuit cutter? http://woodzone.com/Merchant2/articles/biscuit/biscuit_joiner.htm
Norm from This Old House and New Yankee Workshop uses one all the time. (I yell “biscuit” at the TV when he uses it in the same way I yell “butter” at Paula Dean on TV when she whips out the butter dish. Now I’m hungry. And weird.)
YoungHouseLove says
Haha- too funny. He might want one if I show him…. decisions…
xo,
s
Staci says
I am IN. AWE. of that Kreg Jig. I didn’t know it was possible to join wood together like that until John used it in the console table project. I WANT ONE!!
Nicole says
Wow, I am seriously impressed at your ingenuity and ability to work with what you have!
ShellyP says
WOW. I would have gone with option #1 (purchase new doors for all of the cabinets). You two are amazing.
GreenInOC says
Wow John, I’m impressed. That’s an incredible amount of tedious work and you did a great job!! I was overwhelmed just reading about all the obstacles!!
When I had my cabinetry re-painted white I was going to just have him paint the hinges again but I didn’t like that look from the first time. I decided to have all new silver hinges put on. I was a major pain the behind but it was oh so worth it! To this day they make me smile!
cheryl says
Okay, ever since you guys pointed it out I can’t look at your old cabinets and knobs without singing “I always feel like somebody’s watching me…” in my head.
Let’s just say I saw a lot of pirates in today’s post. Yar!
YoungHouseLove says
Haha- to me they look like they’re scared of us after all this shuffling. Haha.
xo,
s
Brianne says
Everyday I’m shufflin’…
haha, sorry, had to.
YoungHouseLove says
Seriously, it is every day!
xo,
s
Jim says
Building these from scratch would be very easy. All you would need is some wood and a router…which you can pick up for under $100.
YoungHouseLove says
Yup, just didn’t want to shell out 800-1K for materials and set back the timeline a month for five doors! It’s definitely a personal call though!
xo,
s
Ren says
uhh-may-zing.
seriously, big props for saving money AND DIY the right way.
Meagan says
Why didn’t you guys just cut and make your own shaker style cabinet doors? Custom doors, great price.
YoungHouseLove says
It would have been 800-1K for materials and it would have changed our timeline, so we were happy to use the oak doors that we have!
xo,
s
Vicky says
You guys are brilliant!! Great job I think the doors look AWESOME! :)
Katherine says
hmm… let’s see, what The Doors song would go appropriately with this post?
Magic Bus? (because john worked his magic?)
Hello I love you? (because you are saying that to your new cabinets doors?)
I got nothin’!
Lol… I am AMAZED at your handy-craftiness. Amazed.
YoungHouseLove says
Haha- hello I love you is perfect!
xo,
s
Melissa Evans says
…if only things could happen while you slept would be AWESOME!!…maybe Santa can help? :) The cabinets are looking GREAT!
Amy says
My lord, that is impressive! I have been a reader since the start and have only commented once before…but this one requires a huge pat on the back…and huge props for saving money! You are both so talented! WTG!
Ann says
I am really impressed! I would have been so nervous cutting. It’s going to look amazing when the cabinets are all painted.
Chelsea says
Wow – what a creative way to make it work (imagine that in my best Tim Gunn voice).
Paige says
I can’t get over this! Awesome job!
Missy says
Do you know the song lyric, “Women be wise, keep your mouth shut, don’t advertise your man…”
I know you and John are very happily married, but many ladies would swoon for a hubby with John’s carpentry skillz. Way to go! :)
YoungHouseLove says
Haha, I might have to fight for my man now.
xo,
s
Jessica says
Many men would swoon for a lady with Sherry’s skills too! ;) You rock with a power tool, woman!!!
YoungHouseLove says
Aw thanks Jessica!
xo,
s
Mona says
wow! I highly commend ya’ll for going this route. Freaking awesome. Ya’ll def. got all YHL-rigged & made it work. I’m so impressed. Not that that’s anything new. :)
Amy says
Do I spy a little furniture addition to the entry way? :)
YoungHouseLove says
Haha- good eye! That’s a night table we got and have some plans for someday (not sure where it’ll live, but not there). More details when we’re more decisive – haha!
xo,
s
Sarah @ Redhead in Ruffled Flats says
Okay, before I thought you were super smart and resourceful. Now I think you two are geniuses. Seriously, I never would have thought of that. Maybe I’ll surprise myself once I have a house, but right now I’ll just watch you change your kitchen in awe. Totally inspiring! I’m hoping they work because nothing is better than free, right?
YoungHouseLove says
Aw thanks so much guys! You’re all being so sweet. So proud of John – kitchen still looks crazy… but we can see the finished product when we squint!
xo,
s
Ryan says
So impressive. Excellent work you guys! : )
Tasha says
Hi, just wondering if you guys are going to paint the cabinet hardware (hinges) too? Do I smell some ORB? You two are such an inspiration.
YoungHouseLove says
Yes, we’re most likely going to spray them- just not sure what color since we haven’t picked final hardware!
xo,
s
Ross says
YHL-
A tip for the corner cabinet: Have you guys thought about adding 360 degree flag hinges between the two doors? Essentually you would have one pull knob on one of the doors and when you would pull othe door open the two doors would fold behind each other revealing entire inside of the corner cabinet. Sorta like a bi-fold closet door!!!! It would eliminate the open-one-door-to-get-to-the-other-door-situation. Here is a link to a hinge I am talking about. You might be able to find them cheaper too.
http://www.sourcingmap.com/door-window-pcs-360-degree-rotating-flag-hinge-p-130074.html?utm_source=google&utm_medium=froogle&utm_campaign=usfroogle
YoungHouseLove says
Oh yes, we looked into a few options like that but our doors weren’t the right thickness for them. It’s so hard to explain but they would need to be inset/routed out for those hinges but are too thin for it.
xo,
s
Mike says
Very resourceful. As a former finish carpenter, I’d suggest using glue on some of your joints in addition to the pocket screws. It will add a lot of strength to your doors. I have three young kids an am continually amazed at the abuse my cabinet doors are subjected to. Hanging on the doors is especially hard on them.
Additionally, these plugs are great for filling pocket screw holes. I prefer them to filling the holes with putty.
http://www.amazon.com/Kreg-P-OAK-Plugs-Pockets-50-Pack/dp/B00002240O/ref=sr_1_1?s=hi&ie=UTF8&qid=1323969279&sr=1-1
YoungHouseLove says
Oh yes – we used wood glue! John just wipes that before it can dry after joining them, so you don’t see it beading around the edges. Great tip though! Should probably point out the wood glue step in the post! And thanks for the link to those plugs!
xo,
s
Meg says
Incredible and inspiring. Hard work, some serious brainstorming and patience really paid off in this case. I tip my hat- scratch that. Hat is off.
Teri says
Did you ever think to do the corner cabinet with an accordion door like you have on the corner cabinet on the other side of the kitchen, but without the lazy susan? https://www.younghouselove.com/2009/04/how-ya-bin/
It would just mean a little extra hardware right?
YoungHouseLove says
That hardware sadly wouldn’t work with our door. It’s hard to explain, but it meant we needed to rout out the door to sink that hardware and our doors weren’t the right thickness for it to work.
xo,
s
Sew View says
Alright. This is impressive work. Just multiply by five every supportive, approving and encouraging comment from your previous commenters. Great thinking, great execution. Vaaaaastly well done.
Nicole S. says
I panicked for a second when I saw you cutting the doors, then I remembered that you are painting them. Ha!
YoungHouseLove says
Haha- oh yes! This method would NOT work with stain! Haha. All those grain-changes would show!
xo,
s
Blake says
That’s amazing! They look great. I hope you go light grey for the cabinet color. A slight contrast with the counters would look nice and tie back into the wall tile. It would be kind of the reverse of your last kitchen’s white cabinets with greyish counters.
So excited to see it all come together :)
michelle says
spend the 800 dollar$ on a great vacation, you guys have worked sooooo hard, you earned it!
Brittney Saffell says
Very clever! Good job John! *insert high five*
Erica says
Ana White just made plans for children’s art table and named the plan Clara. I think you guys should build it!
Also, I was waiting to see if John would actually cut the centers out of the doors, and he did it just like I would’ve! He can have an honorary engineering degree from me!
YoungHouseLove says
I could not love that girl more! Off to check it out! And then I’m off to award John his honorary degree. Haha.
xo,
s
Vonda says
John’s becoming quite the Carpenter!
alex says
Im loving how that worked out…and im enjoying picturing it all together…still not on board with the grellow though…the color you painted your bedroom would really set that soft grey penny tile off…but I shall be patient…are you going to add trim On the sink side between the tile and paint line or just let them line up together?
YoungHouseLove says
I think they’ll be seamless after we grout (aka: no trim needed), but we’ll have to see!
xo,
s
Jeanette says
Can you tell me more about thick “self leveling” primer and paint? I’ve never seen a paint that claimed to self level…I’m very interested!
YoungHouseLove says
Just click that link to the office post where we mention it and it’ll explain it all! It’s by Benjamin Moore- and it’s even low-VOC!
xo,
s
Kristin says
I am super impressed by your skills – and your patience!
Quick question since you seem to have worked with wood putty before: if you putty over existing hardware holes (hinges) and drill new holes that overlap slightly with the puttied sections, will the new hardware hold? We changed out the hardware on our kitchen cabinets, but using the new hinges in the old holes makes some of the doors hang slightly crooked. It’s been driving me crazy for months…
YoungHouseLove says
The trick for those areas is to use wood glue and tooth picks in those holes. Glue the tooth picks sticking out of the hole and break them off and then sand and putty the top so it’s seamless. Make sure it’s all dry for a while and then drill- the glue and toothpicks are a lot stronger for things to grab than just the putty. Hope it helps!
xo,
s
Tamar says
Great job! I’m constantly amazed by your ingenious and original DIY solutions.
Amy says
Very interesting! I think that you might have trouble with the corner cabinet doors though- it looks like once you put hardware on the door on the right, you might not have clearance to swing open the door on the left. Have you looked into this style of bifold hinge, no routing required?
http://www.hardwaresource.com/hinges/SPECIALTY+HINGES/No+Mortise+Hinges+-+Bi-Fold+Door+Hinge/
YoungHouseLove says
Oh no, there won’t be any hardware on the door to the right. See how in the pics you can pull the first door open with the knob? Well, once that one’s open you can just pull the other one out with your hand (no knob needed). We did look into those special corner hinges but our doors weren’t the right thickness for them.
xo
s
Amy says
I see. I know the type of hinges you are talking about, which require a hole for the hinge to fold it self into- but the type of hinge I posted (non-mortise) doesn’t require you to create a hole, so the thickness of the door is not an issue. They attach just like the hinges you have on the cabinet side. Anyway, glad you are happy with it, just wanted to give you a different option. Good luck with your project!
YoungHouseLove says
It’s really hard to explain, but the back of all of our doors around the perimeter is stepped down. Like two steps. So flat hinges like that won’t work with the thickness from the side because they’re flat if that makes sense. All of the hinges (like our side ones) are stepped- literally bent at a 90 degree angle to curve around the routed out perimeter. Hope it helps!
xo,
s
Kathy says
Not only is this the most ambitious, creative DIY project, but I think it’s really FANTASTIC that you’re reusing these doors rather than throwing them in a landfill somewhere—as so many people would do without even thinking! This post will make all of us think twice before simply replacing old with new. Thanks!
Bryanna S says
I feel like SUCH a creeper… Every time you guys post I’m always all THAT IS AMAZING I MUST HAVE THEIR HOUSE AND ALL THE THINGS! My style almost exactly. I’m so excited to see the kitchen finished… it’s going to look AMAZING. It already is looking amazing! The door thing is pure genius.
YoungHouseLove says
Aw thanks Bryanna. Man you’re nice. And we so appreciate that enthusiasm!
xo,
s