Last week during the blogiversary madness, there were requests for more fast & *almost* free projects – especially the ones that renters and homeowners alike can whip out in under an hour. So here’s an under $10 project that I took ten minutes, tops.
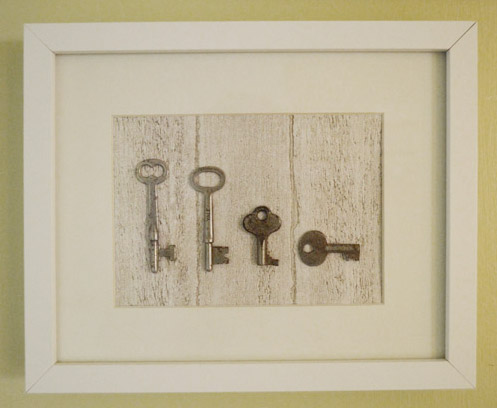
Do you get the hidden meaning behind the keys? Look a little closer. See how there’s one tall key, one medium key, and two small keys (one of which is horizontal while one’s vertical)? Well, that’s our little key family. Haha. Burger’s the horizontal guy.
When I saw a bowl of keys for $2 at an antique store on the way home from Granny’s, I stared at them for a while, literally thinking “what can I do with these?” When I saw some big ones and some small ones, it came to me. Why not get a daddy key, a momma key, a Clara key, and a Burger key? So eight bucks later I had my little key “muses” at home on my desk in a pile. It took me a few weeks to get to the craft store to grab some nice thick wood-grain-ish paper (I ended up finding it Michaels for 60 cents), which I decided would make a fun natural background for my rustic little old keys. So I got it home and cut it down to fit into the Ikea frame that I already had on hand.
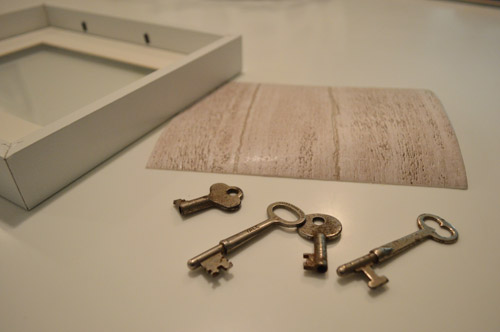
Then I just taped the paper in place behind the mat (which came with the frame).
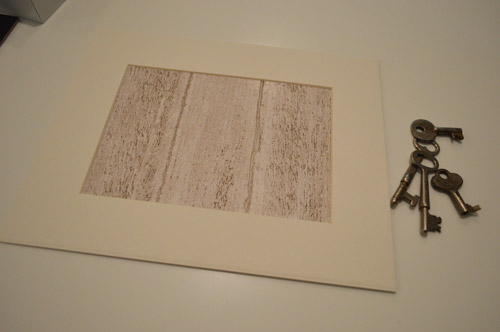
Next I laid out the keys in height order, and tipped the Burger key over since that’s more like his shape. After snickering for a minute at my little key family (yeah, I’m that ridiculous) I grabbed some Gorilla Glue and put a few dollops on the back of each key and pressed them down into the paper so they’d dry in that layout. You might want to do this on top of cardboard or a dropcloth, just in case the glue bleeds through the paper (ya don’t want to glue everything to the table/counter).
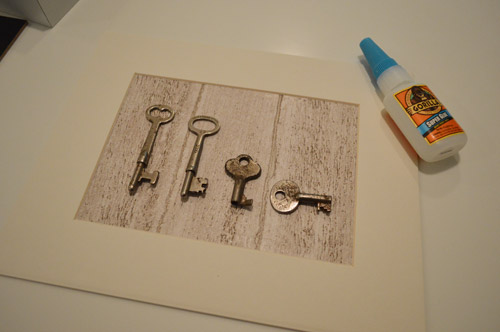
Oh and to anyone at home trying to glue something slightly heavy like a metal key to something, the key is to get thick enough paper – or if you have thin paper, try backing it with something thicker (like gluing it to cardboard or card stock) to stabilize it so it’ll hold those metal keys without buckling or sagging. Thankfully our paper was nice and thick- sort of like card stock.
Ta-daaa. The fun part about this was that it was so quick and easy that if we should ever add another little one (pooch or human) to the pack, I can always pop these off of the paper, choose a new background in any print or pattern, and grab a few more old keys at a thrift or antique store to glue on.
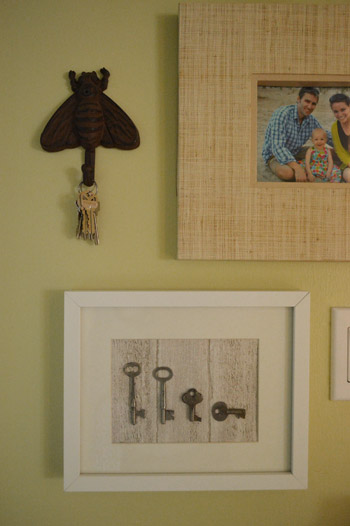
Oh and you can kind of tell from the picture, but there’s still glass in the frame. I wondered if the keys would be too thick for the glass to work (in which case I just would have used the frame without the glass, so they would be 3-D/exposed in the front) but I just tried securing the back of the frame with the glass in there and it latched, so it’s nice to know that I won’t have dust collecting on the keys. But if you have a more shallow frame that doesn’t allow the glass to remain once you add the thickness of the keys, getting a shadow box or just removing the glass is always an option.
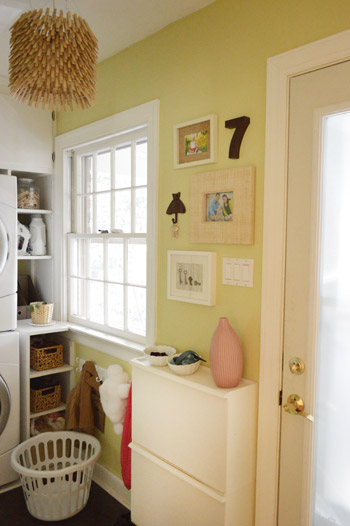
As for where we hung it, the wall in the laundry room right next to the door that we go in and out of everyday seemed like a nice spot since that’s where we have a few favorite personal/family pics along with other randomly meaningful items…
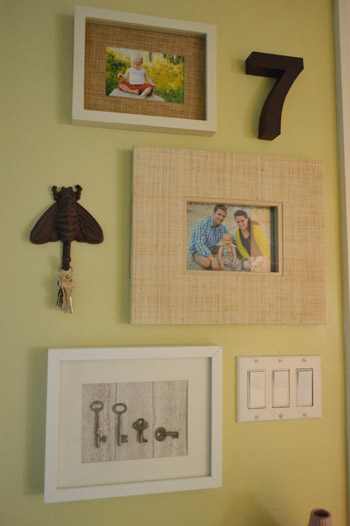
… like an iron bee hook that reminds us of the bees on our wedding invites and a metal 7, which is a nod to our wedding date (we actually picked that up at a local outlet, The Decorating Outlet, this weekend and I hung it when I hammered in my key art).
What are you guys popping into frames lately? Don’t you love that you can grab cool textured paper like the wood grain stuff that we used? I’m a happy camper in that paper aisle, I’m telling ya. Do any of you have old skeleton keys that actually work in a door or two in your home? That has always been a dream of mine. Well, that and living in the paper aisle…

HelloDoorSeven says
This is such a cute idea!
I am definitely doing this asap.
emily @ go haus go says
I saw this and thought, this could be such a fresh take on the vinyl family stickers on the backs of cars! Very unique. I love that it’s a little bit abstract.
Karen F says
Such a cute and creative project! I have a skeleton key that I used to wear on a chain as a necklace. I have no idea where I got the key or what it’s for. Also, our house was built in the 1920’s, and all the upstairs doors (which are original to the house) use skeleton keys and have those beautiful crystal doorknobs. Unfortunately, the previous owner didn’t leave us any keys, but since they doors neither close properly, let alone lock, that isn’t really a problem. (still wish I had the key, though, just because!)
On the topic of framing things, I have 3 pics of my girls that I’ve always loved, from when my youngest was a newborn, so I got a 3-picture frame from ikea and got the pics printed to the right size – just need to hang it! I’m going to hang it near my desk, so I can look at it every day!
YoungHouseLove says
That sounds adorable!
xo
s
Samantha R. says
I love that!
In other news, I always thought your key hanger was a dress! I like it even more now that I’ve seen it up close.
YoungHouseLove says
So funny!
xo
s
Caitlin @ Desert Domicile says
Very cool! I have some skeleton keys (not vintage/real, just props) but they’re way to big to fit into a frame. Maybe I can mount them to something sans frame instead!
Megan says
I am so jealous… I have been on the hunt for old keys like that. My plan was to paint them a bright color, but now seeing yours like they are I love them. Although – if I was to do that, would my 7 month old twins have to be also horizontal? :)
YoungHouseLove says
Hahah! Before you know it they’ll be vertical and running in circles around you!
xo
s
Amy @ a new old house says
I love quick little projects like this!
I rounded up a couple old keys and hung them from little hooks in our foyer.
http://www.new1790house.blogspot.com/2012/01/projects-from-un-decorating.html
They’re so much prettier than today’s keys, however it makes me think that one day those will be “collectible” too! (You know, when our grandkids are entering their houses through biometric scans)
YoungHouseLove says
Pretty!
xo
s
Maryanne says
Hi! love ur project! love ur blog! my husbandd says i shouldn’t read any it any more becuase i have too many ideas and projects i want to do now!!! :) anyway i am repainting some old bar stools and wondering how to prep them. i’ve already washed them and took a mr clean magic eraser to them. should i sand them lightly or use a liquid sander/deglosser? and if i use the deglosser do i need to wash it off before painting?
YoungHouseLove says
Oh yes, I’d lightly sand them and then degloss them and then prime & paint them (they sell spray paint with primer in it if that helps).
xo
s
Amanda says
I’m so impressed by your ability to go to Michael’s and not spend $50.
I always go in for 1-2 things and come out with at least $50 worth of stuff that I was meaning to get for other projects.
YoungHouseLove says
Haha, oh yes I have that yearning too! It’s usually John acting like the angel on my shoulder saying things like “resist the force!” and “keep it movin!”
xo
s
Addie says
Now I want my own little key family! I love it! More projects like these please!!! :)
Antonella @ Pretty House Things says
It’s really super cute.
Val says
So cute! I love when you guys post art projects — so nice for those of us who suck at taking pictures, but still want to have gallery walls. :)
The background paper reminds me of Regretsy. They used to have this premise that you could sell just about anything on Etsy, as long as you took a picure of it on top of some old barn wood. So people would send in pictures of all kinds of random junk on top of “barn wood,” like a chicken McNugget box or some broken crayons.
YoungHouseLove says
Hah! SO funny!
xo
s
Sarah says
I framed some of the paper my husband used to wrap my gifts for our first anniversary (paper anniversary). I think it’ll look cute in a baby room some day. http://www.flickr.com/photos/sarahgrace/8047820408/in/photostream
YoungHouseLove says
Such cute paper! Love that idea.
xo
s
Gina says
Really cute! I love the new picture of Clara and Burger on your blog header too :)
YoungHouseLove says
Thanks Gina!
xo
s
Erica Martens says
This project is so clever, I love it! I have Alice in Wonderland knobs with keyholes in almost all of the interior doors in my house – it was one of the reasons I fell in love with my 30s fixer-upper. We (the hubs and I) picked up some old skeleton keys from the hardware store when we moved in to test them and they work! I’ve been meaning to create some art similiar to your idea, thanks for the inspiration!
YoungHouseLove says
That’s amazing! I can’t believe they work!
xo
s
threadbndr says
Some of the doors in my old (c1930) house DO use the old school keys.
Funny story. I tried using one to lock the master bedroom door so that my son wouldn’t get into things when he was about Clara’s age. Worked great, except that it wouldn’t UN-lock. My dad and husband had to pry off the door stop and take a hacksaw and saw though the bolt. Now my bedroom door doesn’t lock at all LOL.
YoungHouseLove says
Oh gosh! That’s dramatic! Someone else mentioned she locked her hubby in the room for 30 minutes when playing with the key! Those old keys seem a little finicky! Haha.
xo
s
Alison says
My house came with a skeleton lock for the bathroom door plus a blank key. I took the lock apart and filed down the key to make it work (feeling just like burglar!). I rarely use it, but love that it is possible to lock the door.
YoungHouseLove says
That’s awesome! You’re totally my kind of girl for doing that.
xo
s
Bonnie says
What a cute idea!
Katy says
I love this! You two are so creative. As always, thanks for the great ideas! :)
Keelan says
This post just motivated me to do my own “Dude get on it already!” project! I got married in May and have the forks from our cake cutting. The forks have the date and Bride and Groom on them. I have been thinking about some how framing them and putting it up in the kitchen. Reading this post and seeing how to go about it has given me the motivation to finally do it. Thanks! Love the blog!
YoungHouseLove says
Love it!!
xo
s
Sarah@SBrandesDesigns says
This is super cute and yet soooo simple!
I’m not popping much into frames lately because our living arrangement is so temporary (only a year total, & halfway through that) so I worked with what we had right away in the beginning to make a frame wall above our bed that I love love love but not planning on adding to it until the next time we move (don’t need to accumulate anymore stuff for the movers to pack up). One frame did get a little updating though a couple weeks back. We started an anniversary picture tradition where we hold the framed picture from the year before, and since our yearly picture was a few weeks ago that is now hanging up in place of the previous one.
YoungHouseLove says
That’s so cute!
xo,
s
eileen marie says
Great idea!
Jocelyn Pascall says
Really cute. I have a bunch of old keys and I’ve been planning on doing something very similar. Great tips.
Barbara says
Sherry – while I love this and think it looks great, I do have to tell you that my mother did this in 1967 with keys she found at our local dump. Then, as now, it was a cool and cheap way to decorate!!
YoungHouseLove says
I LOVE your mom. So awesome.
xo
s
eileen marie says
All of the doors in our 1920s/30s (not sure which) era condo are original, so all of the keys to the various doors (bedrooms, bathroom, closet) look like the “John” key. I think once we sell (hopefully soon!), I’ll snag one of those -there’s usually 2/ring- to frame or hang on the wall at our new house (a 1940s ranch!).
YoungHouseLove says
Hahahaha!
xo
s
Leah says
I framed the key to the first apartment my boyfriend and I rented together. we had matching robot head key covers, so I stuck the key into the only one left (I lost the other) and glued that rubber cover to the glass of a small, deep-set frame with a blue paint swatch I liked as mounted inside background. I even wrote “our first place” with the address on the inside of the glass with a dry erase marker (so if I decided it was cheesy I could just wipe it off!)
YoungHouseLove says
So sweet.
xo
s
Anika says
I love that textured paper you used! I never seem to find any paper that special at michaels (even though I’ve seen some amazing bloggers create great art with them before), so I’ll have to give it another shot. BTW I am one of your readers who is still renting so I really appreciate these quick/simple/cheap projects.
Thanks for sharing your ideas with us!
YoungHouseLove says
Aw, thanks Anika! Happy paper hunting!
xo
s
Jennifer Harrup says
question! I really thought someone else would have asked this by now…but I noticed that the pictures in this post don’t look quite as amazing as the pictures you guys normally take. Different camera? different technique? or am I the crazy one?
YoungHouseLove says
Ugh, it’s because the reflection in the glass was hard to deal with, so we just couldn’t get great shots (if we got too close we got reflections/glare).
xo
s
Paige @ Little Nostalgia says
I’m so jealous of everybody who has skeleton keys for their house! Ours was built in 1970, well after those were in style. Womp, womp.
I did find a bunch of old keys at an antique mall once and turned them into necklaces for my holiday craft show last year. They sold like hot potatoes!
Susan S. says
You definitely need to pop out the glass so that you can stick a little tiny bow on the tiny Clara key and a scrap of fabric on the Burger key for a collar!
YoungHouseLove says
Haha- cute!
xo
s
Chrissy Henry says
Yes please!! I love these little easy projects; I love your big projects too. But as one of the above mentioned renters, I truly appreciate the little arts/crafts ideas and inspirations more then you know!
YoungHouseLove says
Aw, so glad Chrissy!
xo
s
Christina says
So very cute!! Great idea!
Jessica says
Very cute! I knew it was Burger right away! I wish I saved my keys from previous apartments…I love your other key project!
Hayley says
Me too!
Leah says
I make pictures out of old pages from books. I’ve done quite a number. Here’s the only one I have posted online: http://www.flickr.com/photos/lapenn/3977639936/
I take a page out of a book (either an old one from a thrift store, or if I find an antique store that sells pages out of old books), mount it on acid-free paper, and frame it up. I love using kid’s books for neat art in their rooms. This particular piece was a gift for a doctor friend upon his graduation (he wants to be a cardiologist). It is fairly simple yet high impact.
YoungHouseLove says
That’s so sweet! Wow- it looks awesome!
xo
s
Andrea J says
My hubby and I live in an updated 90-year-old house that still uses skeleton keys on the interior doors! It is the coolest thing ever, even though some of the locks don’t really function anymore. I absolutely love the character that these old doors/locks add to the house. I even like that the metal isn’t perfect-looking, but well worn with a few superficial flaws. :)
Kim P. says
What a cute idea! I am so amazed how you two can look at ordinary items and come up with such adorable and personal uses. I can’t wait to copy it ;)
Crystal @ 29 Rue House says
I’m so jealous of your creativity!!! Darn it! Okay done. I LOVE the paper and the key family is the cutest ever. And seriously, keep doing posts like these!
YoungHouseLove says
Aw thanks Crystal!
xo
s
mp says
I have four embroidered cards from Haiti — given to me by a friend a couple of years ago — and a small poster from the last presidential campaign — the famous Shepard Fairey image — that I need to pop into frames. I used to spend a fortune on getting art prints framed, but have backed off from that (ran out of wall space) and am going casual with small stuff from now on.
Anne says
I love that idea! It turned out very cute.
Hayley says
Totally inspired me to do my own little 10 min free update! Seriously, i read the post and then did the project and now im commenting.
Had a large frame with a 3 photo framing mat in it, that i was given, not into the 3 pictures in one frame thing, but suddenly i realised i could just put one big piece of art in, and ignore that 3 photo framing mat.
Put in a cute free map of my city (Melbourne) that i found ages ago and had wanted to hang, and now it is on the shelfs in my laundry. Putting art in laundry totally inspired by you too btw.
Love it! – makes a utility space look pretty! and it was free, my favourite.
Love you guys xo
[email protected] says
Such a cute idea! I love skeleton keys, and have them in my master bedroom(http://www.ahappyplacecalledhome.com/home/2012/5/27/picture-perfect.html) and family room (http://www.ahappyplacecalledhome.com/home/2012/4/24/the-keys-to-my-heart.html).
But lately, I’ve been a rebel, and have been hanging wardrobe doors as artwork (http://www.ahappyplacecalledhome.com/home/2012/10/2/when-a-door-closes.html). Call me crazy!
YoungHouseLove says
What a smart use for those yellow doors. Love that project!
-John
Amy says
All of you’re homemade art has helped inspire me as we try to fill the walls of our new house! And so funny you should ask what readers have been popping into frames lately- just last Sunday I cut up some paint swatches to serve as “matting” in some empty ikea frames so I could turn handmade, personalized gift cards- that came with a gift from a friend- into art for our home!
You can see them by scrolling down at the link- they are so sweet and charming, i’m amazed with her skills: http://roboticdog.tumblr.com/
The Burger key (and all of it) is really fantastic.
YoungHouseLove says
Love that art!
xo,
s
Elizabeth @Food Ramblings says
love it! I have saved all the keys of places I have lived…but they’re not as pretty as these keys!
Sharon says
I LOVE your clothes pin light fixture in the laundry room! Is that one of your own creations and, if so, will you share the secret to making it?
YoungHouseLove says
Yes, if you search “clothespin chandelier” on our sidebar search the whole tutorial should come up!
xo
s
Sharon says
Thank you for taking the time to respond! That chandelier is going to be this weekend’s project! Thanks for the great tips and inspiration!
YoungHouseLove says
Aw, you’re welcome Sharon! Good luck!
xo
s
Amme J says
I didn’t even see the “key family” coming. When I looked at it while reading the question “do you get the hidden meaning?” I totally thought it was a a play on your favorite number 7, just a mirror image and laying down. Wierd I know. The key family is a better way to go I think
YoungHouseLove says
Haha, so funny!
xo
s
Karah @ thespacebetweenblog says
That is super cute!
Claire @ Claire K Creations says
Pick up a few keys hey Sherry? Twins or triplets?! Hehe
Such a cute idea! I love how the timber look blends in with all the other frames. I would have had a chuckle setting it all up too.
Bonnie Grace says
Oh my goodness! Our old house (1946 bungalow) came with a box full of old skeleton keys. There are probably 20 in all and some actually do work in some doors. I’ve been working on a way of displaying them. I love the idea of backing it with an interesting paper (I, too, am obsessed with all things paper). Great idea! You’ve renewed my passion for my old keys.
Brooke says
Want to know something incredible? My front door key is a skeleton key. No joke! The house we live in was built in the late 1800’s and is my husband’s grandfather’s house and our front door is pretty original to the house. It cost me $8 when I moved in to get a copy maid.
When we finally buy our own place, I’m framing it :)
YoungHouseLove says
That’s so cool!
xo
s
Tricia says
I recently moved from Kentucky to Northern Ireland… and LOVE that 99% of the house / office keys on my keyring are skeleton keys!
Brandi says
For our first anniversary I bought my husband a cool vintage map and framed it but took it a step further. Using black sticker/pushpins I marked all the places we’d like to go together; China, Alaska, NY, Russia, Egypt etc. And using silver star pins I marked all the places we’ve already been together; Australia, Fiji, South Africa etc. It’s cool to see our travel bug out on paper and it’s a great conversation starter at our house!
YoungHouseLove says
So sweet!
xo,
s