Note: For those reading this post during happy hour, feel free to turn it into a drinking game and take a sip every time you read the word liriope. Or maybe just a half-sip. Don’t want things to get crazy.
Woot. We’ve officially started to attack the side patio (previously mentioned here and here) that we want to bang out in time for Clara’s big b-day bash in two short weeks.
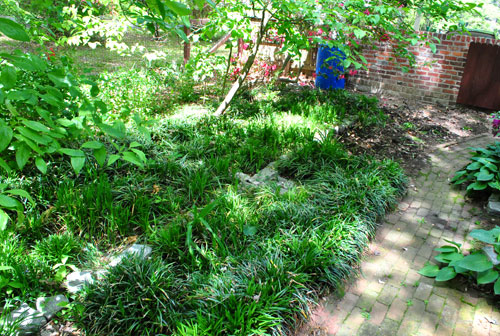
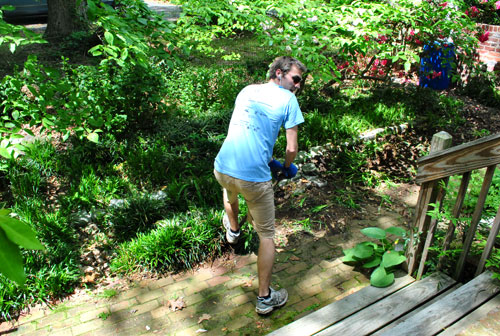
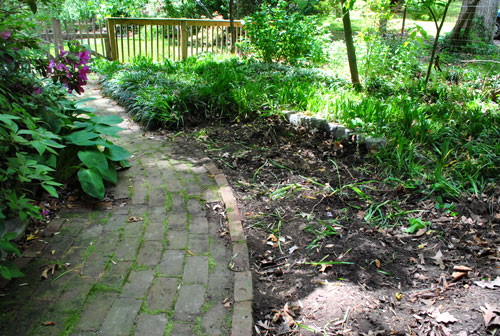
That’s right, in the words of Cee Lo we said “forget you” (yes, we prudes sing the PG version) to the insane ten-ish rows of liriope. And John only had to dig about half of it up thanks to two friends of ours who came over to help / steal some for their own homes in the liriope digging party to end all parties (we were happy to repay them with all the free liriope they could grab). Everyone used the shove-the-shovel-under-each-clump-and-step-on-it-to-pop-it-out method, and it worked like a charm. I think with three people the whole thing took a total of around 2.5 to 3 hours. And I got to hang out inside with Clara, except when we were making various patio-digging appearances to boost morale and bring ice water to the crew.
After the dirt settled we were left with a nice bare area that will soon become about two-thirds of our patio (the brick path still needs to be removed before we can begin digging out and leveling the soil for the next phase of the project which involves tamping, gravel, and sand).
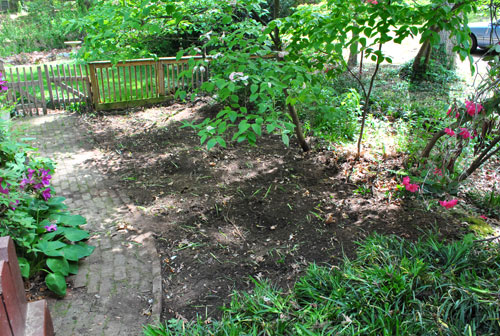
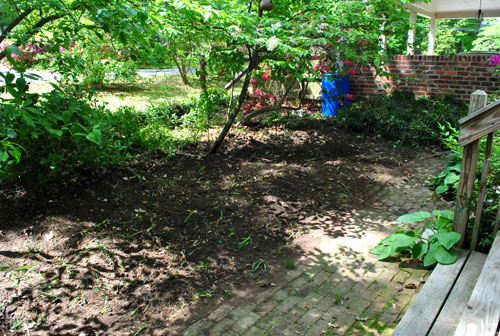
So although we have a lot ahead of us, we’re just happy to finally be getting started after lots of talk. And there’s something about looking at a newly bare area that enables you to envision things so much more easily (like, say, a patio) that you couldn’t quite picture as well with all that dastardly liriope around.
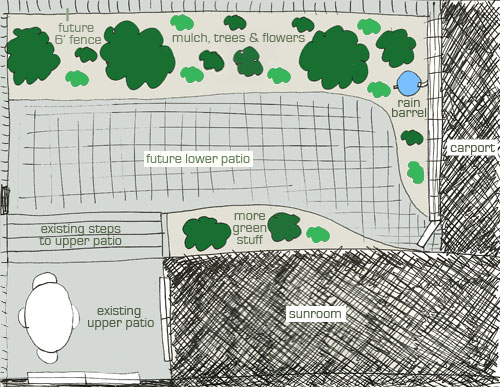
We already shared this odd little photoshopped sketch to give you a vague idea of what we’re envisioning…
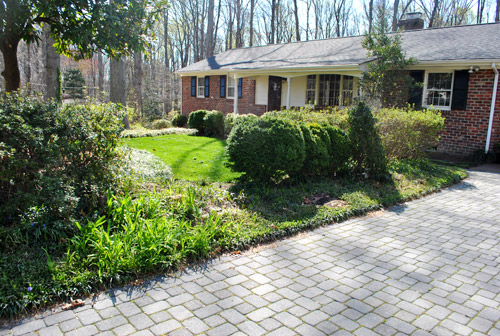
… and when it comes to the materials, we’re planning to use cobblestone pavers very similar to the ones in our driveway…
… but in order to get the best deal we priced some out at Home Depot, Lowe’s, and a local place called Southside Building Supply. The local guys won out with the best price per square foot by around 40 cents (and happily had just a two day delivery turnaround), but we’ll share more info, photos, and prices of the actual pavers once they arrive and we (hopefully) get ’em laid (that’s what she said). And you know we like to overshare when it comes to the deets, so here’s the boring stuff that we did first for anyone at home who’d like to play along with us patio-fy with us:
- talked for way too long about possible dimensions and even used a garden hose to map out possible shapes
- schlepped around to those paver places that we mentioned above to find the best deal (more on that when the pavers arrive)
- called Miss Utility to confirm that there’s nothing buried under that area that we could dig into and somehow ruin (Miss Utility might be the local name, but they’re a public service group who contacts gas and water and electrical companies who then come out to mark things that are underground)
- dug out that pesky liriope (but we still have to remove the brick path, dig out more dirt, level things, add gravel, add sand, etc)
- made sure our bank account could support a pretty pricey project (well at least to us – the stone and other supplies like gravel, sand, & tools along with delivery costs may be around 1K, but considering we paid nearly 3K for our last patio, which was smaller, to be put in by the pros just weeks before our backyard wedding, we’re psyched to hopefully save a lot by doing it ourselves this time)
Thankfully we got confirmation that there’s nothing lurking under that side of the house from Miss Utility and we think we’ve even finalized a plan when it comes to cobblestone paver type as well as patio shape. More info/pics/sweating/rambling as we go. In the meantime, have any of you guys laid your own patios complete with digging, leveling, tamping, and lots of gravel and sand? We’re obnoxiously excited about it. Seriously, we need to get a life.
Psst- We announced this week’s contest winners, so click here to see if you’re one of them.
Psssst- Liriope, liriope, liriope. Just kidding.

Jami Carlton says
I wish I had known you all were taking out all that liriope. I would have come and helped! I really wanted some of that for my front yard. This is kind of weird. I never realized how close you all live. I drive by the market where you all got the rain barrels all the time. lol.
Oh, if you all ever want some professional pictures of your house done let me know. I am a photographer and I would love to build my portfolio some more!
YoungHouseLove says
Aw thanks Jami! We have a no swag policy (just to keep it real and stuff) but thanks so much for the kind offer. And as for the liriope, we definitely plan to post any and all links to craigsist ads for the locals if we end up going that route with more liriope or bushes in the future!
xo,
s
heather s. says
You’ve mentioned this policy a few times but is it new? I remember you accepting a kitchen faucet and rug from FLOR to name a couple off the top of my head. Is this part of the ‘new’ blog style?
YoungHouseLove says
We instituted it about a half of a year ago. You can check out this post about it for more info. Anything after that post means our no-swag policy was in effect (the rug and faucet were about a year before it). Hope it helps!
xo,
s
Katie says
Ahhh. Great minds think alike! My hubby and I are doing this right now in our backyard, except we ripped out a wooden deck first. The deck was slowly moving and lifting the siding off our house. Bad news. Feels good to see that hunk of junk gone!
We checked out prices at Home Depot so far. Never realized how pricey a piece of stone could be! Sheesh!
We wish you luck and we’ll be following right along with you in the process! Cheers to home ownership! :)
YoungHouseLove says
I know right? We’re already realizing our 1K budget estimation isn’t nearly enough. Boo! But we’re still happy to save major loot doing it ourselves and I told John that we’ll just have to spend ten hours a day enjoying the patio (rain or shine) to give it lots of use. Haha.
xo,
s
Anna says
Funnily enough, we’re doing this right now, this very minute! We had a conservatory built last summer in our garden, over our old slabbed patio area, and I asked the builders to be gentle with the slabs as I wanted to reuse them. Said and done – it took us a while, but we are now using them to slab and gravel our front garden! No more carrying the lawn mower through the house – YAY! It is a BIG job though (even though it’s a small garden… Hmmm…) and we’ve ended up digging out MASSES of sand that we now have to find a way to dispose of… It will look great when it’s done, and I’m sure yours will too, but be warned – it is a BIG job! Good luck, and enjoy! :)
A x
Melissa says
Just make sure you get all of those roots up…any root left & they will come back. You can’t kill ’em!!
We dug ours up and threw them out behind our barn until we could haul them off but we started a deck project and didn’t get to them until the next spring and they were still living!
Hilary @ My So-Called Home says
Completely unrelated… But I love all the updates and photos on the sidebar! Very neat and organized.
YoungHouseLove says
Aw thanks Hilary. John will be trilled that you noticed (he spent a few hours sprucing things up with new pics and buttons, etc).
xo,
s
Cindy says
2.3-3 hours with three people? GROAN. This does not bode well for when I take on my own “digging up the lariope” project in the fall. The previous owners of our home planted it EVERYWHERE and it has been taking over in a major way that is going to make it unpleasant when it comes time to get digging.
I’m excited about your patio project, and can’t wait to hear/see the results and what you did to make this happen! I’m hoping to do something similar.
Ted says
Note that the variegated liriope grows better in shadier/lower sun areas and tends not to be so prolific. It doesn’t spread nearly as badly. The non-variegated type grows pretty much under any type of weather and grows much more wildly. When you are looking for general ground cover, people tend to use the non-variegated type for the spread. But when you are trying to do a more cultured look, say a bed or an edge for a driveway/sidewalk, etc, you want the variegated type unless you want to spend a lot of time caring for them. Also, for the variegated type, they are healthier if you raze them (yes, cut them down to about 1/2 inch to 1 inch above ground level)each Spring just before the growing season starts. We wait until we see the first light green shoots amongs the dead yellow and brown ones and then cut the dead leaves. they always bloom full and healthy green for a full season.
Elle says
I hope you are transplanting that loriope somewhere on your property or giving it to another homeowner. It’s hardy groundcover that is easy to maintain. Just mow it off at the end of the season.
YoungHouseLove says
Yes the two friends who helped us dig loaded up their cars with it (it was our “payment” for their help, haha) and we have a ton more of it around our property that we’ll be keeping for the reasons you mention (easy to maintain, great for shaded areas, etc). We just didn’t need a big side yard full of it because we have more use for a nice livable patio area!
xo,
s
Megan Brewer says
Wow! I definitely can see the potential in your back yard space. It’s really starting to take shape. That’s a lot of hard work! It’s so pretty and shady. You are going to LOVE entertaining back there.
Thank you for your feedback on my blogs. I took your advice and put out an unofficial voting challenge to my facebook friends. The winner was:
http://cottagebluedesigns.blogspot.com/p/decorating-projects.html
Thanks again. Happy decorating! Happy planting! Happy DYI-ing!
Megan
YoungHouseLove says
Sweet! So glad to help. Happy blogging!
xoxo,
s
Jennie says
i love the feeling i get after working outside all day on a beautiful day. it’s going to look wonderful for clara’s birthday!
angelina says
just found you- but will be tackling a similar project soon too! i’ll be watching carefully! thanks.
Brenda says
We did a path through our back yard last year. It was a lot of work, a little hard on the back. But extremely rewarding to see the finished product. We didn’t use pavers because we wanted a more rustic look and frankly less expense so we went with a compacted rundle stone. We are very happy with the dark grey colour (I know, I’m Canadian, that’s the way we spell them). Have fun. Oh, I don’t know if it was mentioned but don’t forget the landscape fabric.
Megan says
We laid a patio in our last house, it was in the running for the most difficult project we did, but it was doable. Remember to slope the patio away from the house if your area gets a lot of rain (our last house was in Seattle.) I think we sloped ours 1 inch down for every 3 feet of distance- something like that. I do remember that it was three inches lower at the far end of the patio away from the house.
Oh, and others are right, be prepared with some ibup.- you are in for the best arm/chest workout of your life.
Can’t wait to see it all done!
YoungHouseLove says
Yup! I think we’re doing one inch for every four feet or something. John’s really hyper about the whole don’t flood the foundation thing. Haha.
xo,
s
Alisa says
Hmmm, I wonder if that liriope stuff is what we have growing all over the back yard. I don’t hate it because it’s the only thing that will grow in our overly shaded yard! I might actually plant some along the side of the house since we can’t get any grass to grow. I woke up this morning to find our landscaping logs all over the ground after a heavy rain last night..I think we’ll be building a stone retaining wall soon enough! But since I’d rather be extending our patio, I’ll just live vicariously through you :)
Sarah says
I put in a paver patio in our back yard about 3 years ago. Off the top of my head, I think it’s about 10’x13′ (our yard is pretty small) and cost about $1k in materials and rentals. The hardest part for me was the digging out the dirt (lots of hard clay), but this was in August after a very dry summer. I did the whole thing on my own, and it was very doable if not exhausting. I spent 3 days digging and hauling dirt, and two days with the gravel, sand, and pavers. The plate compacter I rented from Home Depot was a lifesaver. I can’t imagine doing it with a hand tamper — even for such a small area.
I look forward to following your progress on this project! It’s not too often that I’ve already tackled a major project like this that you guys haven’t done already. :)
Brittany says
John looks exactly like the first guy in this picture! http://cdn.okcimg.com/blog/lies/ActiveUsers.jpg
YoungHouseLove says
I see it! He doesn’t. Haha. Well, he said “a little.”
xo,
s
matt says
completely unrelated to this post, I was browsing your links…Skulladay? Whats the reasoning behind this?
YoungHouseLove says
He’s a good friend of ours and we love his original project (he made a skull from everyday objects each day for a year – from snow to carving an apple it was really creative and he even has a book out now bout the project!).
xo,
s
Devon @ Green House, Good Life says
You have no idea — unless another commenter has already told you — how fabulous that mossy brick walkway is! We haven’t had a drop of rain in Austin in three forevers, so moss just isn’t happening down here. I’m sure you’re doing something fabulous, but it pained me a little to read that you’re taking it out.
YoungHouseLove says
Don’t worry Devon! If you scroll back to the post before this one you’ll see that we have them all around the perimeter of our house! And multiple mossy brick paths in the back! So we figure losing one in the same of some usable outdoor patio space makes sense since we’ll keep the rest in the back and on the other side of the house.
xo,
s
Jamie Lee says
In Illinois her name is JULIE :)
Leah says
Hi Guys!
Not sure if you were aware of this or not, but Good Housekeeping mentioned YHL in the “Blogs We Love This Week”!
YoungHouseLove says
Whatttt?????!!!! That’s amazing! On their site or in their mag? Off to google!
xo,
s
Danica Allen says
Thanks so much for this post (and the future posts you are planning). Perfect timing for us as we are planning out a patio for our yard too. I love your attention to detail and willingness to share every aspect of each project. Thanks for a super helpful, fun to read blog!
Liz H. says
Just wanted to let you know…I had a dream about removing liriope last night. I blame your blog. Ha ha…
YoungHouseLove says
Oh my gosh, what a dream! I’m not jealous. Haha. And it’s all my fault.
xo,
s
Leah says
Okay, apparently I don’t know how to reply to a reply, but your honorable mention is on the Good Housekeeping website under House & Home > Home Style Blog > Blogs We Love This Week
Very cool, huh?
Leah says
As I just find the reply button….
:)
YoungHouseLove says
Aw thanks so much for the tip!
xo,
s
Colleen P. says
We haven’t done a patio, but we did do raised beds with castle wall brick on a couple of areas at the front of our house. The levelling part will make you absolutely crazy-but once you’ve got it level, it goes FAST. So don’t despair if it seems as though you’ll never be finished, you really will get it level at some point! LOL!
samanthasue says
we did a 700sqft patio in our backyard, we live in ellensburg, wa. Its a pretty dry climate, but we did run into some MAJOR trouble with the ground being super wet. If its wet, when it freezes it will heave up. Luckily we have our own excavator, and we were able to dig up the wet soil ourselves. But we did run into an extra $1000 cost of filling the hole back up with crushed rock. It would be even more if it wasnt for our friends that have a dump truck to transport the rock for us. It was a year ago this month that we completed the project. We didn’t have any problems over the winter. Im glad we did it the right way the first time, even if it did cost a little more.
Sarah says
We’re SO excited that you’re tackling this project- true DIY style! My husband and I are tossing around the idea of hiring out ($$$) or doing it ourselves. We’re nervous. I just don’t want to screw it up and then have to fork out more dough to fix it. Thank you for posting your project and best of luck!! We’ll be patiently waiting :)