Okay, let’s get some open shelves up in this mother.
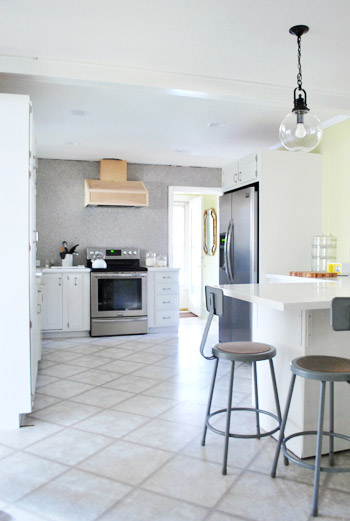
With the hood cover now built, we could finally put the shelves in around it. We were originally going to build true floating shelves (maybe even breaking out Ana White’s instructions) but after looking at some of our inspiration pics again, we decided to open ourselves to the idea of using brackets instead. Note: For anyone wondering how the whole dust/grease situation is with open shelves, check out this post (we’re crazy so we did our research). Apparently the consensus is that if you have a great range hood (check!) and put dishes you use often up there (soon-to-be-checked!) it’s all good. Rarely used items stored inside of cabinets get dusty too, so the key seems to be to have a good hood and to rotate things and use them a lot when they’re out in the open. We’ll definitely tell you how it goes for us.
Besides just liking the look of them, brackets would also make us less concerned about things ripping out of our wall o’ tile (and you already know that stresses us out). Plus, we had heard that Home Depot had some pretty good and affordable options for brackets. Here are the ones I found – actually this is the photo I texted to Sherry to ask which one she liked best since she was at home with Clara and the photoshoot crew.
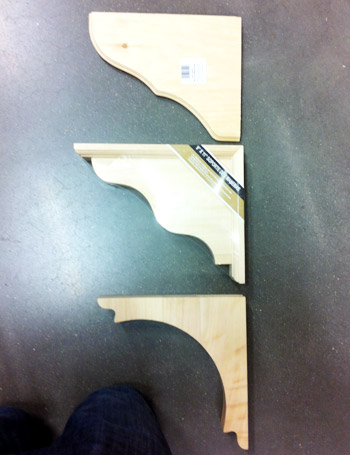
We both agreed the last one was BY FAR our favorite, so I picked up 12 of ’em along with some 12″ framing lumber to act as our shelves. A few of you had said this 12″ framing lumber + brackets system worked well in your kitchens (and we had good luck with them making our office desk) so why not, right?
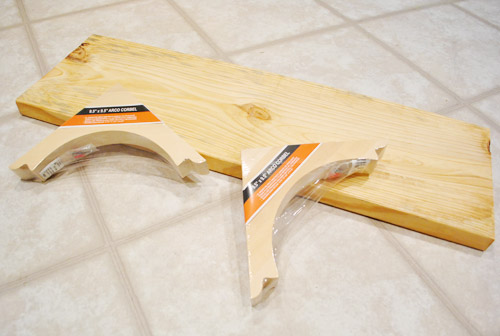
Well, one “why not” would be that they’re not wide enough for our plates. We have 12″ dinner plates and since 12″ in lumber terms is really closer to 11.25″, we realized we’d have some plate overhang-age. Which is never a good look:
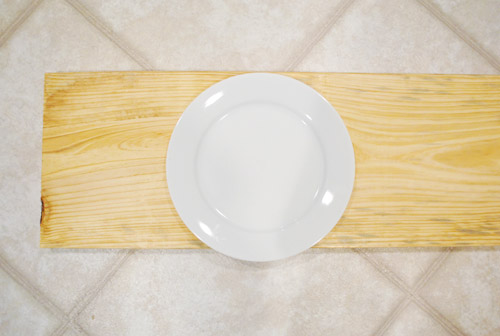
After briefly contemplating getting smaller plates, we devised this solution instead: adding some 1 x 2″ trim around the end (just like we did to finish the top of our homemade console table in the living room).
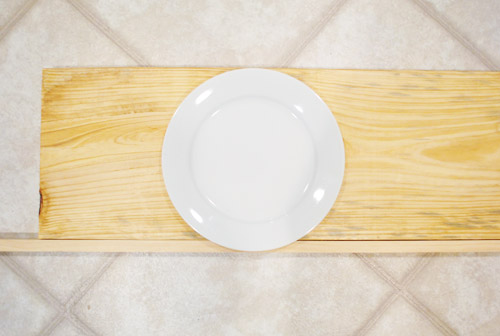
Not only would it solve our shelf depth issue, but it’d also mean I could cover up the rough end of each board with a nice smooth piece of wood. A win-win, dontcha think?
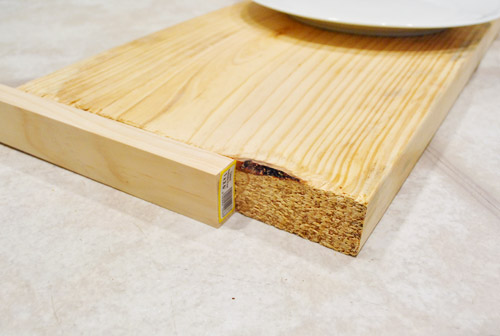
With all of our materials purchased our total came to about $116 (for brackets) + $15 (for the shelf boards) + $10 (for the smaller boards to frame out the larger shelves) = $141. Which isn’t exactly cheap, but we knew we’d essentially get four shelves worth of storage (two big and two smaller ones) which is about the equivalent of three upper cabinets (which usually go for around $300+ total). And thanks to saving money with things like reusing our original cabinets, building our fridge cabinet, our self-installed wall of tile, and our craigslist range hood we were ok with a semi-splurge in the shelving category (plus we already have the paint and primer we’ll be using).
Next we began marking and measuring everything. We used the same weighted-thread-hanging-from-marks-on-ceiling method for indicating where my studs were (which we used here to hang our range hood). Ends up they’re pretty awesomely placed to get even looking brackets – except for the two on the end of the long side (that stud is being used by the hood, remember?). But we figured we’d just use heavy duty anchors on the other two (sunk into tile we knew they’d be nice and strong).
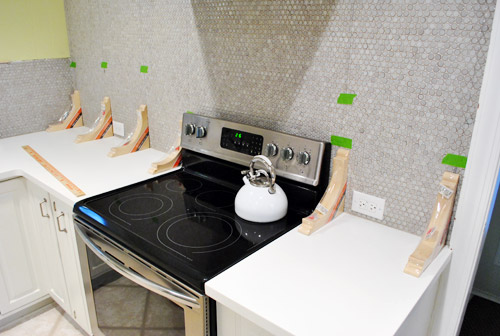
We also used this moment to measure and cut our shelves too. I know it may look short on that one end, but remember we’re gonna trim it with a 1 x 2″ board, so that’s intentional. Oh and see those subtle gray lines in the photo above and below? Those are our hanging pieces of thread to mark the studs. Just didn’t want anyone to wonder if we drew on the tile or anything.
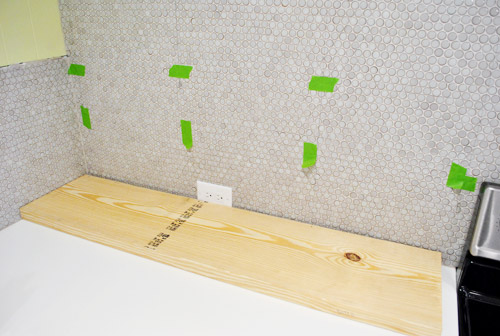
We decided to just trim the exposed sides so each shelf had a slightly different configuration. The long shelf on top would have the wall and hood on both ends, so it only needed trim on the front. But the short shelf on the bottom would be exposed everywhere but the back side (the one on the top right would run into the hood and the one on the bottom left would run into the wall). I know it might seem strange not to just trim them all out in the same way, but we knew from building our console table that once it was all put together and painted it would look great this way. And of course we cut the framing lumber to different sizes to account for the trim, so they’ll all be the same finished length and depth.
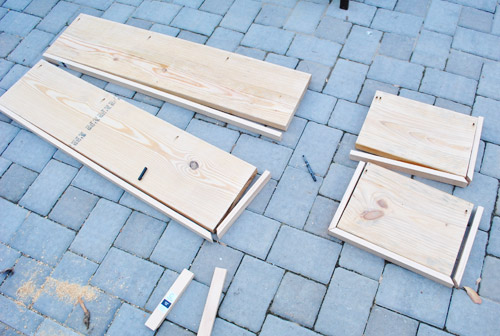
We attached the trim with some wood glue and finish nails. You’ll notice we also have some pre-drilled pocket holes on the top. I was thinking it might be nice to screw the shelves directly into the wall (in addition to screwing them to the brackets).
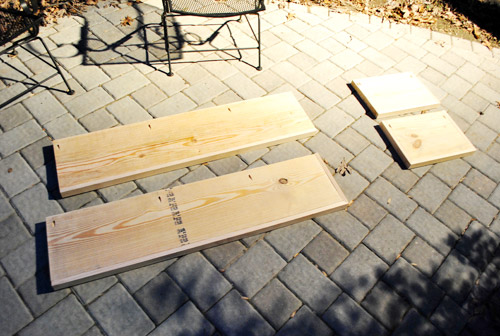
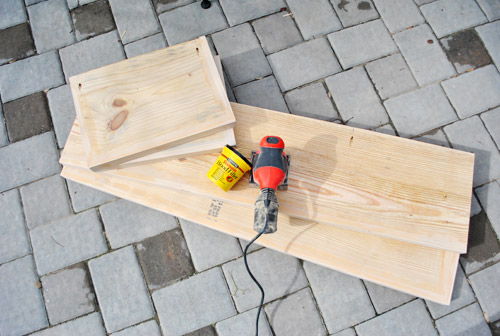
That night I also broke out the wood filler to make the thin seam between the trim and 12″ board completely disappear. It was a small detail, but we thought once primed and painted it would really help make it feel like one solid board. See how even in the photo below (without primer and paint) you can’t tell that some are trimmed out on one side while others are trimmed out on two? We’re actually glad our plates didn’t fit on the boards alone since the trimmed out result is so much more finished looking.
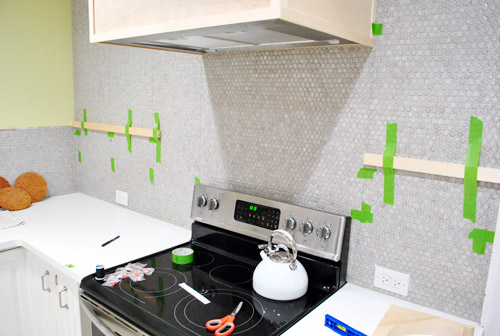
While all that was happening, we also started getting ready to attach the brackets to the wall. We leveled and taped up some 1 x 2″ scraps to act as our placeholder shelves so that we’d know exactly where the top of the bracket needed to sit.
The brackets came with two metal hooks on the back, so I used my favorite paper template method to help figure out where I needed to drill corresponding holes on the wall. The strip of paper is taped to the bracket on the top and bottom, but the tape on the sides is facing out to stick to the wall. And the two holes are punctured right where the notches are.
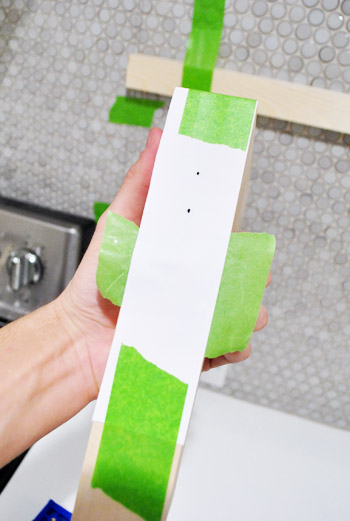
Then I put it in place on the wall, pressed the side pieces of tape against the tile, and carefully peeled the bracket away…
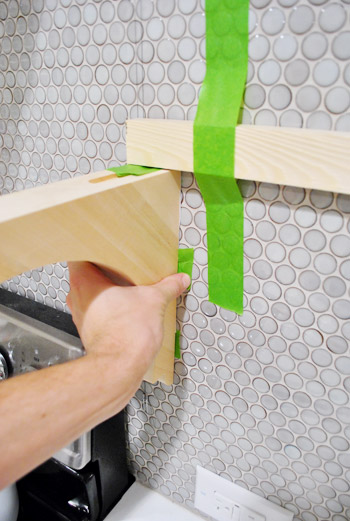
…leaving my paper template in place so that I could mark through the holes.
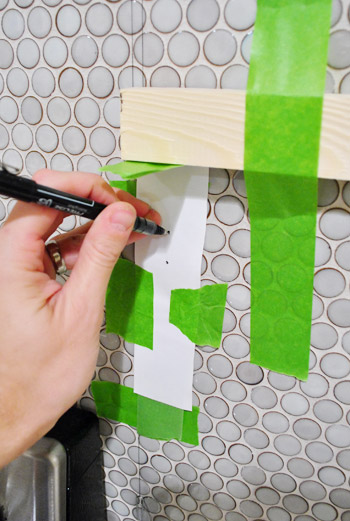
See? Easy right? Now just pretend it wasn’t super tedious to do it 11 more times.
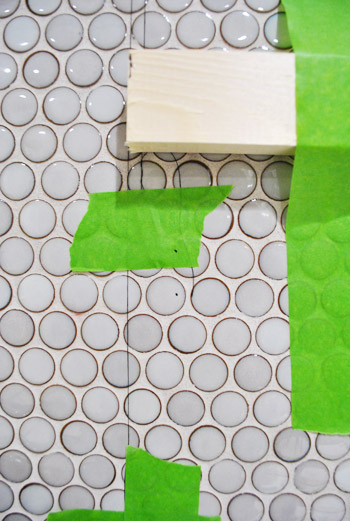
And since I still cringe at the sight of our tile getting drilled into (especially 24 times!) I couldn’t bear to photograph it again, let alone share it here. But here’s some of the final product – a dozen pairs of screws waiting for brackets to be hung on them. That my friends, as subtle as it may look, is the look of progress.
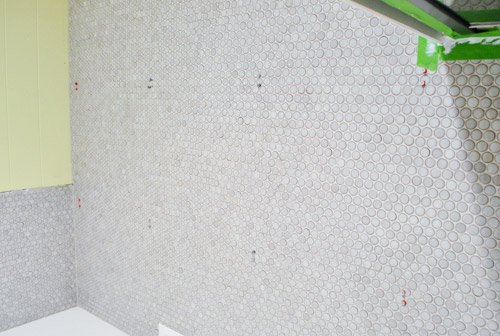
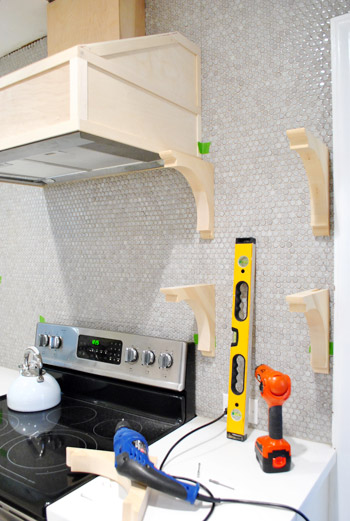
Here’s a sense of how everything will hang. We did a test run of hanging one side to make sure the screws weren’t in or out too far, and to make sure they felt secure. They did! Phew. True to form, Sherry can’t wait to load them up with dishes and plates galore.
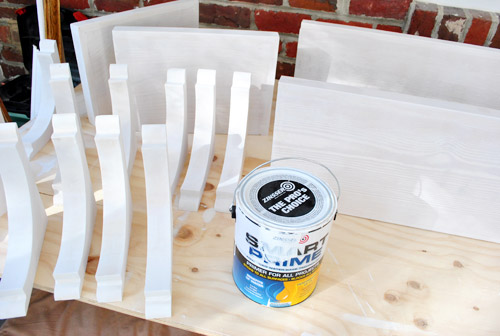
But as excited as we were to just get the darn stuff hung, we knew it would behoove us to do all of our priming/painting beforehand – (that way we wouldn’t have to worry about taping off the wall or getting paint on our grout). So this is where our shelf-hanging tale ends for now. Waiiiiiting for our primer to dry so we can apply two coats of paint (the same color that we used for our cabinets) and then hang it all up once it’s nice and cured. Oh yes, and we’re priming and painting the hood too, so that should look nice and crisp the next time you see it.
Once dried, it should be pretty quick to get everything hung so we should should have “after” pics for you by Wednesday, barring any unforeseen craziness (who are we kidding, it’s week two of three for our in-home book shoots and we live in Crazyville, but it would take a pack of wild boars running through the house for us to slow down on our shelves). What did you guys do this weekend? Any lumber stuff? Priming? Drilling through tile? Prepping 35 more secret projects to shoot for your book while your daughter ran amok and your chihuahua ate various crumbs leftover from the past week of visitors?

Jen says
I just wanna let you know that I am addicted to your blog! Your kitchen is coming out awesome! Much respect for u and ur hubby doing it all by yourselves…it’s not easy especially with young kids!
YoungHouseLove says
Aw thanks Jen!
xo,
s
Rebecca says
That’s exactly how we did shelves in our Family Room. The trim really makes the look! Wish I knew John’s bracket/paper trick. We just always cross our fingers and hope it works (and is level).
This weekend we painted walls then tiled the floor in our Master Bathroom. Took alot longer than planned. I give you guys ALOT of credit for all you do with as much other things as you have going on. Keep it up!!! The kitchen is almost there!!!
YoungHouseLove says
Aw thanks Rebecca! Congrats on all the painting and tiling you got done! Amazing.
xo,
s
Allyn says
I never liked chihuahuas before Burger.
He has converted me.
Can’t wait to see the shelves completed and stocked!
YoungHouseLove says
Chihuahua’s are the best, if I do say so myself.
-Burger
Allyn says
Getting a response from Mr. Burger himself pretty much just made my Monday.
Andrea says
Oh, I just love progress! I can totally see how it’s gonna look and I love it! I think open shelves will really make the kitchen! The penny tile is a great backdrop, and once the shelves are in, plates stacked and accessories added — beautiful! I’m so excited for you! I can’t wait! =)
Carrie says
UGH Such a TEASE!!! I can’t wait to see the shelves in place!
Lilly says
I want to tour ur house like a museum. AAAAAAAAAAAHHHHHHHHHHHHHHH (thats crazy talk for I love love love love love it)
YoungHouseLove says
Haha, thanks Lilly!
xo,
s
Mandy says
Yay, so excited to see the shelves!!! We are currently working on some shelving of our own…for our cat. We just got a new pup who is not exactly a friend to the cat, so we are building him some vertical shelves for the living room. Will be sanding and priming them today while hubs is at work, then we will hang them tonight and probably paint tomorrow (the same as the wall color, so we are going to hang and then paint)
YoungHouseLove says
That’s so cute! I’m sure kitty will love them!
xo,
s
Micha says
Wow! It’s really starting to come together and it looks awesome! Can’t wait to see the end results!
Carrie says
Oh my, the suspense is killing me!! I was so excited to see this post and thought I would get to the end and see the result…. you got me! hahaha…. can’t wait to see it all up and painted, it is going to look amazing!! I love that you opted for open shelves instead of cabinets. :0)
Viv says
WOW! I can’t wait to see how the shelves turn out! Don’t you just love those happy accidents? Those 12″ plates will bring you gorgeous finished shelves! Ok now prepare yourselves for some gushing — you know how you guys joke about how you’re hooked on your must-see shows. Your blog is THAT show that I just can’t wait to come on! Thanks soooo much, guys!
YoungHouseLove says
Aw Viv, you’re sweet. Thanks!
xo,
s
Lianne says
We had similar shelves in our laundry room/pantry but removed a few of them to open up the space for resale – but I’m taking them with me to my next home! My husband and I have spent the last five weeks renovating our home to sell it – Drywall, flooring, painting, backsplashing, trimming, siding, soffit, roof, and new doors. We now live 90 minutes from our first home and have only had the weekends to do the work. Two more weekends and then the for sale sign goes up. I’m really enjoying your posts now that I’ve discovered your blog and have so many great ideas for the next house (which we are also in the process of trying to find!). I also love when Burger appears! We have four dogs and luckily have had an offsite location for them during the renovations!
YoungHouseLove says
Wow- it sounds like you’ve been crazy busy! Good luck with everything and tell your pooches that Burger says hi!
xo,
s
Gina @ Running to the Kitchen says
Every post I’m loving your kitchen more and more! I was wondering what you were going to do with all that tile space around the hood. love this!
Sarah says
We just used the exact same brackets to create some open shelves in our kitchen. They’ve been up two weeks and are literally filled with all my heavy Pfaltzgraff dishes, and they haven’t wiggled a bit. I was really nervous loading them up, but they are very sturdy. Can’t wait to see how yours look against all your lovely tile!
YoungHouseLove says
Wahoooo! That’s awesome to hear! I can’t wait to load ours up!
xo,
s
Amy says
I love this look! – and open shelving was featured in BHG’s email today –
http://www.bhg.com/kitchen/small/add-character-to-a-small-kitchen/?sssdmh=dm17.579670&esrc=nwkbi020612&email=2789287932
YoungHouseLove says
So sweet!
xo,
s
Stacy says
I can’t wait until Wednesday to see how they turn out – It’s like one of those teaser things at the end of a movie :) I am so jealous. My husband told me I could look into redoing our kitchen so it’s more efficient over the weekend but banned me from watching HGTV or any other home improvement show because he said it puts too many ideas into my head – like putting in french doors between our back porch and dining room or just adding on to the back of the house and redoing the floor plan of our home… anyway… I love your kitchen. The transformation is amazing so far!
YoungHouseLove says
Aw thanks Stacy! Can’t wait to see how your kitchen comes out. Send pics!
xo,
s
Heather W says
Spent another weekend watching Dexter season three. Off to the library after work to see if Season 4 is in.. So addicted!!!! So, not getting much down around the house yet! haha.
YoungHouseLove says
Oh mannnnn- crazy stuff is coming up. I love that series.
xo,
s
Betsy says
OH, I love how you are breaking it down, because I tend to get overwhelmed and fear it’s all too complicated. I also love the tiles you chose. Subway tiles are great, but so done already. What a nice change. (I don’t read every day, so maybe this has already been mentioned.)
Incidentally, I think it all looks easy to keep clean.
Carolyn says
Excited to see the shelves! We have a tendency to start house projects on Super Bowl Sunday, and this year was no exception … hoping to get a microwave and a few cabinets hung soon! Something about this time of year just gets me antsy ; )
YoungHouseLove says
Haha, that’s like us and Christmas! We’re always mid-project! So funny. Good luck with your microwave and cabinets!
xo,
s
Monika says
I can’t wait to see your shelves up! Do you know the weight limit for each shelves? I’m sure it will hold quite a bit, but there might be an upper limit, I wonder? On an unrelated note, how are you liking your corian counters? Any issues with scratching, staining, etc? Just curious. Thanks guys and keep up the good work!
YoungHouseLove says
I think I could sit on each shelf, so maybe 120lbs? Haha. Those brackets are strong and going into so many studs makes them strong enough to hold cabinets full of dishes so it’s the same concept with open shelves!
xo,
s
Monika says
I think I would like to request a picture of you sittin on the shelves ;) Just kidding, but it would be hilarious fo sho! Thanks Sherry!
YoungHouseLove says
Haha- I’ll just lay out on them like a centerfold. It will be totally graceful and not awkward at all.
xo,
s
Jenna says
I don’t understand – your top left shelf is going to be 2″ shorter than the bottom one, because the bottom one has an extra 2″ of trim? How will this not look all crazy?? Why not just make them all the same length? It seems easy enough to do!
YoungHouseLove says
Nope, we cut the framing lumber to different sizes to account for the trim! So they’ll all be the same finished length and depth! Hope it helps.
xo,
s
Jenna says
Ohhh, smart! Awesome idea!
Wendy says
It’s looking so great! I can’t wait to see the afters, and the magic that Sherry will work on those shelves when accessorizing!
CourtneyOutLoud says
Loving the kitchen reno – it’s my favorite series to date I think. You guys have bundles of energy — I have had trim in my garage for a year for a mirror project that has yet to materialize. You guys just may get me back on track….
Teresa @ wherelovemeetslife says
oh la la…. sexy curves on some sleek shelves?? :) Can’t wait!!! I am sure you will be glad to see this project come to a close with all the other craziness you are juggling right now!
Kasey M. says
You two make me feel like such a slacker! The shelf progress is fantastic AND you have a house full of photographers AND a baby & pooch to chase AND you are working on secret projects?
I hope you’re getting some babysitting assistance from Clara’s grandparents!
YoungHouseLove says
They’re saving our life with a few hours here and there! Clara’s been so good with the whole crew around though. She thinks it’s fun and knows everyone’s name (and even which car is which). So funny! She’ll go to the window and say “Susan’s car!” and “Marcie’s car!” and “Kip’s car!”
xo,
s
Karla@TheClassyWoman says
I cannot wait to see the reveal!! I love corbels and shelving in the kitchen. So far, everything looks amazing! :)
Julia @ Chris loves Julia says
I am so excited for you! We absolutely love the convenience of our open shelving. It has changed our cooking lives! Which may sound dramatic, but Chris spends so much time cooking, and having things conveniently on hand makes life so much easier for us..errrr him. :)
We spent our weekend putting lots of stuff up in the online classifieds (YAY for dejunking!) and making plans for our family room renovations this month. We bought a sectional last year and our 6′ and 6’4″ bods are just way too tall for the thing. Our butts always hang off when we slouch….which we do when we watch tv. So we put it up for sale and the hunt is on (again)! Also media cabinet plans are in the works!!
YoungHouseLove says
Aw, that’s so good to hear Julia! I can’t wait to love our shelves like you guys love yours!
xo,
s
sarah says
we finished up our mini mud room wall in our entry hall way, and we did the same thing….trimmed out our final piece of mdf (not wood) with a smaller one to get a finished edge and cap. i LOVE it, and it just adds more storage to our little townhouse.
http://carrotcakeandcreamcheeseicing.blogspot.com/2012/02/mini-mudroom-finished.html
YoungHouseLove says
Congrats! It looks awesome!
xo,
s
elaine says
wonderful. love it all. Can’t wait for the primer/paint to dry :)
Jennifer says
I used the same brackets in my kitchen! Mine are under the cabinets. It’s those little details that turned it from a regular white kitchen into something phenomenal…if I do say so myself ;)
YoungHouseLove says
I love it! Sounds like we’re going to be bracket twins with lots of people. Send pics!
xo,
s
Kelly says
Yessssss, this is awesome timing. We have shelves in our kitchen that I wanted to swap out, but I couldn’t find purty brackets. For some reason, I went to a bunch of home decor stores like Pier 1 instead of checking the handy dandy home improvements stores — duh!
We have a shelving system that the previous owner put in. It’s on those metal dowel things that are adjustable, totally looks like wood shop industrial shelves. I want to write a book called “Idiots Things the Previous Home Owner Did.” These shelves would definitely be on the list. They are fugly. Thanks for the post!
This weekend I painted 60 ft of trim that’s waiting to be put in our hallway (yay) and drew up plans for a small bar to relocate our beer tap (because the previous owner decided to install the tap in the counter’s soap dispenser hole, yuck. This probably tops the list of idiot things my previous home owner did.)
Katie @ Lovebird Productions says
You left me on the edge of my seat! haha! I can’t wait to see the new shelves! I have to say I love how documented y’all have been during this process. It helps to understand your perspective and see exactly what is taking place. Y’all are so talented! No declining that compliment either cause you are! :)
katie says
If I can’t wait to see the finished look, I can’t imagine how you guys are feeling! It’s going to be so exciting! :)
Katy @ The Non-Consumer Advocate says
How dorky am I that I’m excited to see the finished project?
Katy
Erin says
Did you use a special tile bit to drill into the tile? How did that go? Any tips? I have ot drill tile soon. It worries me and my tile is not nearly as pretty as yours:)
Can’t wait to see the finished product!
YoungHouseLove says
Oh yes, click over to the hood installing post (linked within this one) for more on that! It was a special bit for tile, and as nerve-wracking as it was, it wasn’t too bad!
xo,
s
Jessica says
How wide are the shelves to the right of your range? I have a similiar set-up in my kitchen and I too will be installing open shelving. I’m in the planning phase right now and I’m debating about whether or not I should use brackets. I’m worried the brackets would appear too close together in one area–the right side of my range since that section is only 17.5″ wide.
YoungHouseLove says
Our brackets are about 15″ apart on the whole wall (both on the short side and the wide side).
xo,
s
Lynn @ SafeBeauty says
Nope did no home repair at all this weekend. Just had a mega family day Saturday where we got the kids to pile into the van and then turned and said to them “Okay today is Family Day whaddaya wanna do?” And then we proceeded to go bowling (where I almost got beat by my 6 year old), bought the Hubs a tv (2 years in the making just to sit down and realize simultaneously “this things too big”), and capped it off with a true Japanese Sushi restaurant experience. Oh and we also tried not to think about the house we are buying that we are sure our realtor is secretly trying to make it 1000 times harder for us to purchase so she can buy it for herself! You wanted to know all that didn’t you? ;o)
My best, Lynn
YoungHouseLove says
Haha- sounds like the best day ever! I would love to have a Family Day one of these days. Sounds awesome.
xo,
s
Wom-mom Ethne says
Will you have to wait to put dishes and such on the painted shelves? Even after the paint dries?
YoungHouseLove says
Yup, but Benjamin Moore Advance paint is the best! Pros paint the inside of people’s cabinets with it so it should be great once it’s all cured.
xo,
s
Shaina says
Love the brackets. Those are really nice, low profile ones. I’m not a fan of the overtly big ones on shelving. Can’t wait to see the final product!
Have you decided if you’re going to tempt fate and screw the shelves into the wall and the brackets?
YoungHouseLove says
We’re leaning towards no now that our brackets are so strong, but we’ll definitely be screwing the shelves into each bracket! More when we get there!
xo,
s
Ellen says
Oh my gosh! The piece of string hanging down in your first drilling pictures makes it look like you cracked the tile! I gasped when I saw it and kept scrolling, finally realizing there were no tragedies. I’m so excited for new updates! These posts literally get me through my mornings at work.
YoungHouseLove says
Oh yes, sorry about that! The string can be really confusing looking- especially since it’s black, but that was the easiest to see!
xo,
s
Rachel says
Can I ask what CFM rating your hood has? We are just about to buy one and we will be having open shelves as well, so I’d be interested to hear how much air movement yours has :-)
YoungHouseLove says
We believe it’s a 400 CFM motor. It didn’t come with the manual (craigslist) but after calling JennAir to double check our mounting ideas they confirmed it’s one of their strong but not suuuuper industrial models. Hope it helps!
xo,
s
Rachel says
Thanks! After doing some research… I’m concerned about finding the balance between good suction (to prevent too much grease collecting on the open shelves) and avoiding the backdraft/CO2 issue… not sure if this was part of your decision-making process?
http://www.greenbuildingadvisor.com/blogs/dept/musings/makeup-air-range-hoods
YoungHouseLove says
Oh yes, check out the convo we had with David a few comments after this one. I think avoiding super heavy duty stuff that’s made to be in a giant restaurant kitchen (like 1200 CFMs) is the key. We also don’t have a working fireplace- it’s all sealed, and don’t have gas appliances or heat – it’s all electrical. Hope it helps!
xo,
s
Rachel says
Haha, great minds think alike? Thanks again for your take!
MamaJ says
From word one in this post, all I could think about while reading was the drilling. The horror!
Looking sharp, kids. Anticipating the finished product. Because, lord knows, my kitchen isn’t progressing at all!
Anne says
Lovely! I seriously can picture it all together now and once you get your floor in those lights are going to look awesome!
No building for us this weekend. We built a new coffee table the weekend before which still needs sanding and staining. The snowstorm kept us from doing that. So instead I used my new sewing machine and made a new duvet cover for our bed.
YoungHouseLove says
That’s awesome! I wish I could make a duvet. Amazing.
xo,
s
Anne says
I found two flat sheets of the same size and sewed them right sides together on three sides. Added ribbon to the four corners to tie the duvet to (after all, a shifting blanket is not fun) and turned it right side out.
The top is open with Velcro. Hopefully that made sense. It’s been a while since I’ve done any sewing and I’m hoping to make another duvet cover later on with a ruffler foot.
YoungHouseLove says
Awesome! I love it. Thanks for the tips!
xo,
s
Ashley M says
How ya gonna leave us hangin like that!?!! we’re in the middle of a small kitchen reno too, painting cabinets, walls, etc. we actually got our floating shelves at ikea. I like the way you guys did yours though – maybe for my next house!
Kim W Rily says
You guys are so smart to check them against your plates FIRST. We packed up our kitchen, had a frickin’ room added on (bumped the wall out 14 feet), got a new island, new cabinets, etc, and our plates did not fit in our new cabinets! Luckily, it was just where the door had trim (mission style doors). So we added a board underneath the dishes to lift them up over the lip of the cabinet doors and it’s fine. *phew*
YoungHouseLove says
Whew- so glad it worked!
xo,
s
David W says
I really love what you are doing and I cannot wait to see how you tackle the floors. I am sure that I am not alone in using you as guinea pigs for what I might try in my own house.. and you are over the top helpful with your honesty and advice and instructions… which I really love and appreciate.
How industrial strength is that range hood?
Have you considered the possibility of a back draft created by such a powerful exhaust (perhaps not such a problem in an older home that is likely more “drafty” than a newer one.)
This was a hot topic over on FineHomebuilding not too long ago and is more common as people add commercial kitchen equipment to their new “green” homes.
Something to consider if you have not already done so.
Here is one of the links from FineHomebuilding that I can find.. links to the Green Building Advisor site and talks about the need for “make up” air to compensate for the air pushed out by the exhaust fan. Hope this helps.
http://www.greenbuildingadvisor.com/blogs/dept/musings/makeup-air-range-hoods
Keep up the great work.
YoungHouseLove says
We actually don’t have a working fireplace (it’s sealed up completely) and only have electrical appliances (no gas heat or gas appliances in our house) so we think our 400CFMs are ok (it’s definitely nothing like a 1200CFM crazy pro hood)! Thanks for the article though- off to check it out!
xo,
s
Megan @ Two Live Colorfully says
Ahh! Getting so close to the finished product! I can’t wait!! And way to go with adding the trim! Crafty!
Jenny says
I agree, those brackets def look the best. It’s coming along so nicely! I still love your bubble tile so much, too!
Stacie says
I’ve been all out of sorts because our house has been “torn apart” for a few weeks while we got the nursery and living room painted. I’m not sure I’d still be functional if I was in your house with all your projects AND and photoshoot going on! You would probably find me in the back of my closet in the fetal position…you guys seem to rock it out under pressure, though!
I finally put the finishing touches on my daughter’s nursery this weekend…http://www.casadecolella.blogspot.com/2012/02/giannas-nursery-tour.html
I’m excited to see your finished shelves!
YoungHouseLove says
So cute! I love that room. What a lucky girl.
xo,
s
Diana says
We just picked out the brackets for the shelves we’re putting up in our kitchen (we’re going with #2). We aren’t so lucky, though… our studs aren’t as nicely spaced, so we’re trying to figure out what the best way is to hang everything up and make sure it will hold the weight of all the jars of beans, rice, and flour I want to put up there!
YoungHouseLove says
Aw man, good luck! Maybe look into heavy duty brackets- especially going into tile they’re so strong!
xo,
s
hannah says
i’m such a dork. i had to check to see if you used anchors too. whew, i saw in the comments your brackets had anchors. now i can relax :)
i uploaded and edited two months worth of photos this weekend… and came up with more craft ideas from darn pinterest- if only i could clone myself or get more hours in the day!