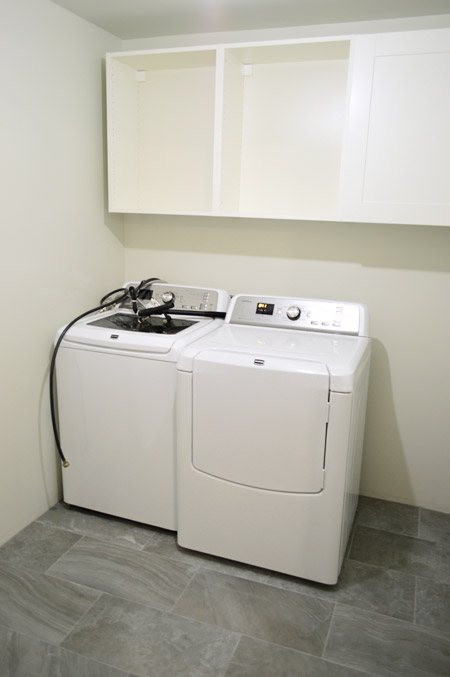
This post was shaping up to be a weird one (well, weirder than our baseline weird). We were simultaneously trying to hang Ikea cabinets in our laundry room and re-hook up the washer & dryer, but as of yesterday morning we were sort of stuck half-way through both projects and this was the best progress shot we thought we’d have for you today:
But thanks to some last minute pieces falling into place over the last 24 hours, we have working appliances that have been completely re-installed (picture Sherry dancing for no less than twenty minutes with an elated baby in her arms laughing at her) and doors on our all of our cabinets (more dancing – also singing). I’ll get into appliance installation details next week (getting the overflow drain and washer pan connected took some effort) but today is all about cabinets.
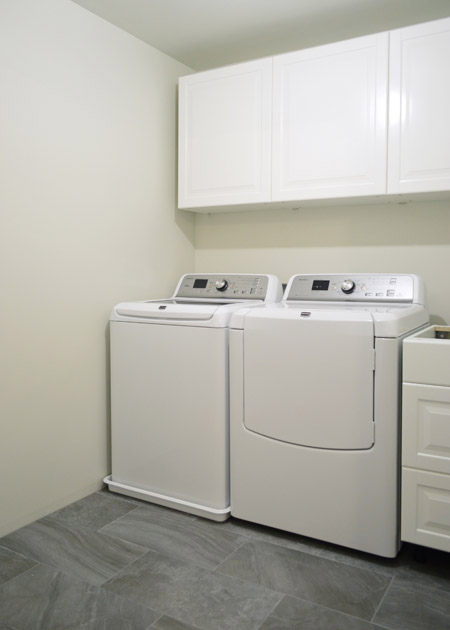
We’ve been wanting to take Ikea cabinets for a spin since we’re heavily considering them for our eventual kitchen remodel. We hear great things about them and pretty consistently see them popping up in high end homes thanks to magazines like Dwell, Domino, and House Beautiful, yet we’ve gone a bunch of other routes in the past. We’ve done the custom cabinet thing in our first house, and the second-hand / work-with-what-you’ve-got thing in our second house (we refinished our existing cabinets and added used ones from the Habitat ReStore). It’s funny that despite all of the Ikea in our life, we’ve never actually dabbled in their cabinetry. So the laundry room felt like a perfect lower-risk test space to learn the process and to help us determine if we want to go this route in the kitchen down the line.
We started by using their online Kitchen Planner to map out the space. We actually used it before to help envision our last kitchen, even though we weren’t purchasing their cabinets. In general it’s a pretty easy (and free!) online tool to play around with – although I did have to insert a dishwasher into my plan, since they don’t have a dryer option. Before long we had a plan and a shopping list that we could print out and bring to the store.
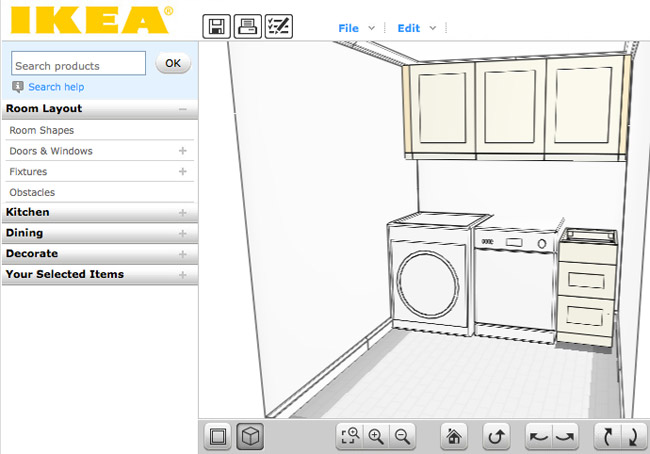
The above shot is the plan after the kitchen expert at Ikea helped us fine-tune things. I’m glad we arrived with an idea of what we wanted (it saved a ton of time!) but I’m also glad we consulted with one of their employees before our purchase (it saved some unnecessary purchases when she went through the list and explained that some things weren’t necessary for this type of installation). She also helped to point out some trim that we might want to add to hide our under cabinet lighting (last minute decision = under cabinet lighting, just to help us see & treat stains more easily).
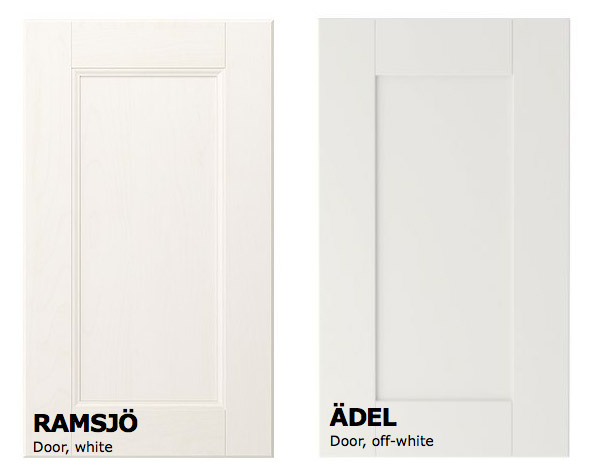
While we were there, we also made a change in our cabinet door decision. Online the Ramsjo looked closest to what we wanted, but in person it had more of a whitewashed wood look (with some pink undertones). The Adel, even though it was labeled “off-white” appeared to be a lot closer to the solid white look we wanted. It wasn’t perfectly white, but we’re used to Ikea stuff being ever so slightly creamy.
Everything was in stock, so about an hour (and 800-some-dollars) later we were packed up and back on the road. Which was a good thing since we were doing this on a Friday afternoon, which is pretty much the last time you should attempt traveling I-95 South near Ikea (we were doing a few other things in the area, so it definitely wouldn’t have been the time we’d pick if we were just hitting Ikea and returning home).
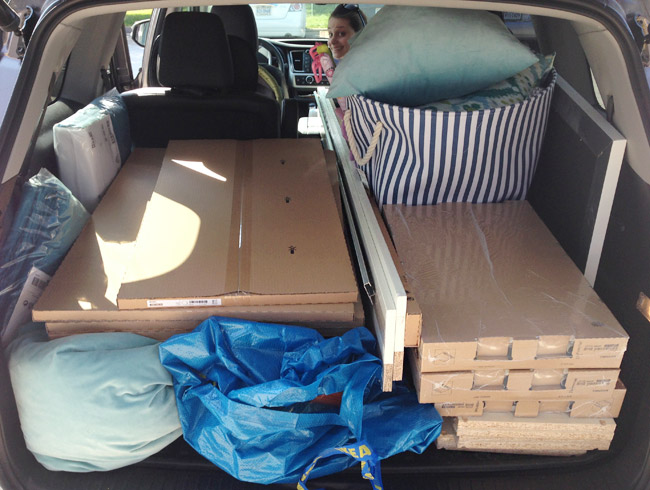
We gritted our teeth through the normal rush hour / summer Friday traffic. And just as we got through it… they closed the highway entirely because a truck spilled acid all over the road. Sooooo yeah. I trip that’s normally two hours took about three times that long.

Once we had them home, it was time to put them together, which we hear is the most dreaded part of an Ikea kitchen. It wasn’t so bad for us since we were only assembling three upper cabinets and one lower one. Plus, we did the three uppers assembly-line-style (not to be confused with Gangnam Style) so it went faster.
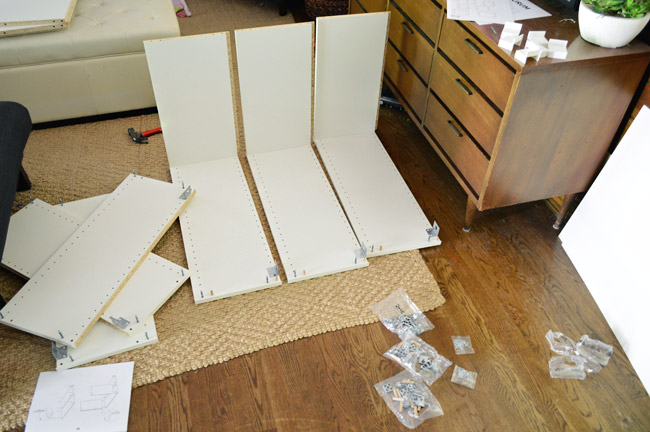
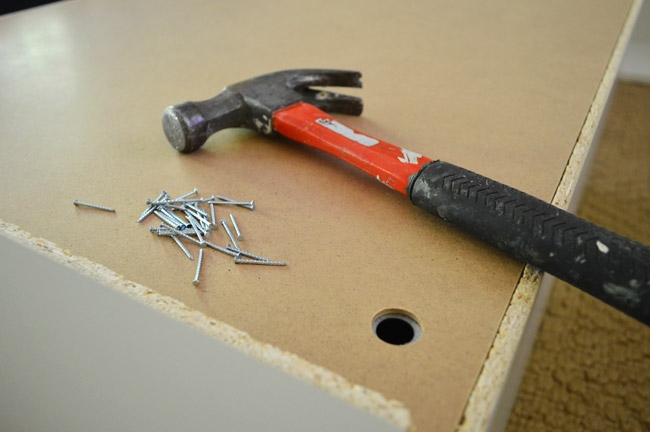
Actually, the most annoying part was nailing the panels on the back of each one, and that wasn’t even that bad (it just took a while since there were around 24 nails for each cabinet).
I have to say, we were both pretty impressed with the hanging system Ikea uses. In all of the Ikea kitchens we’ve seen online and in magazines, we never realized that the uppers aren’t screwed to the wall like traditional cabinets. Instead, they all hang from a metal rail that you install directly into the wall studs, which made hanging them ourselves (and keeping them aligned) a lot easier than other methods we’ve tried in the past.
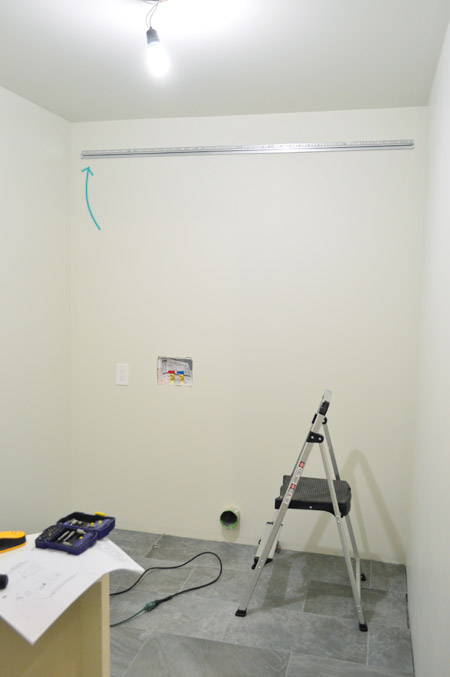
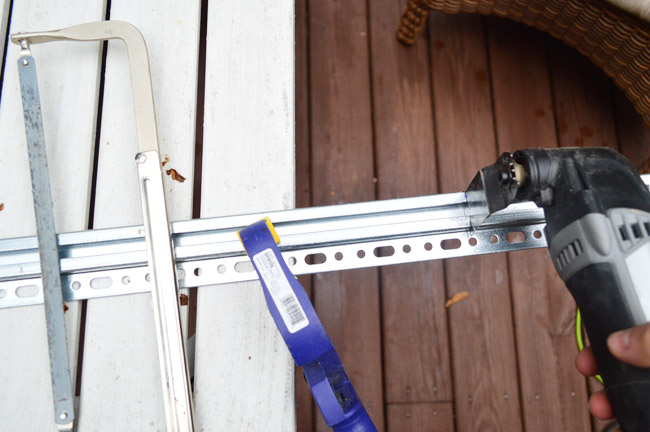
The metal hanging rail comes as one 80″ long piece, but we only needed ours wide enough for the three 24″ cabinets. The instructions suggested a hacksaw, but our Dremel made the job much faster.
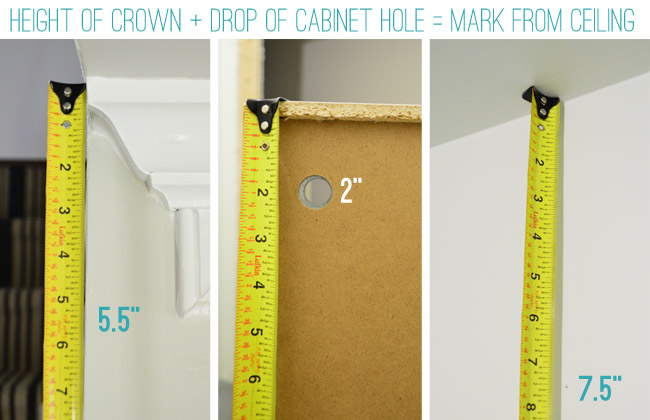
Determining how high to hang the rail took some planning. We’re going to finish off our cabinets with the same crown molding that matches the rest of the house, so we had to account for the height that would add, as well as the fact that the cabinets attach to the rail a few inches down from the top of the cabinet.
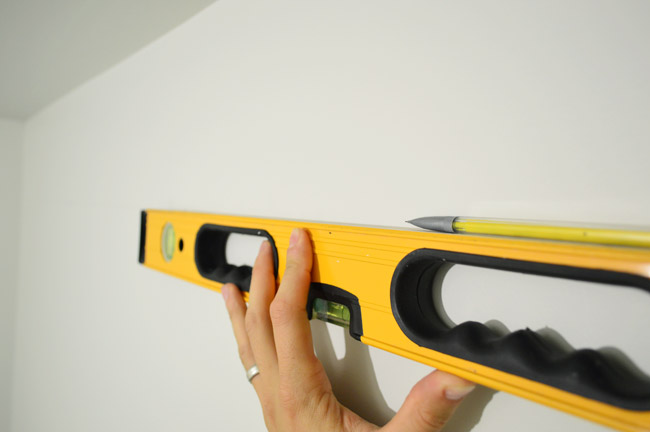
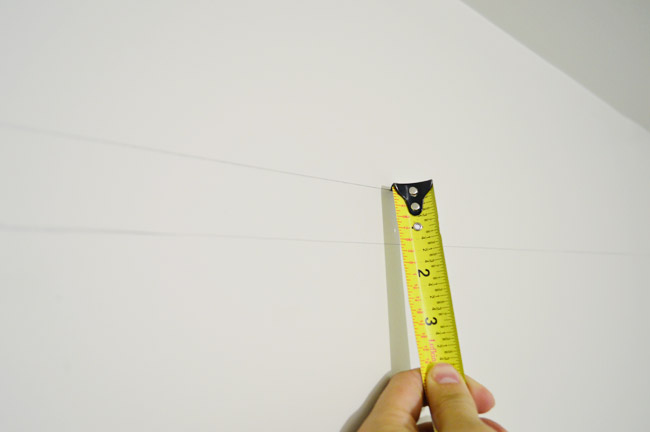
Once I had my mark (which I made in the center of that back wall) I drew a line across the rest of the wall with my level.
But I soon realized that the line I marked wasn’t very helpful since it would be impossible to see behind the solid metal strip that the cabinets hang from. So I noted how much higher I needed to mark the wall to give myself a more visible reference point.
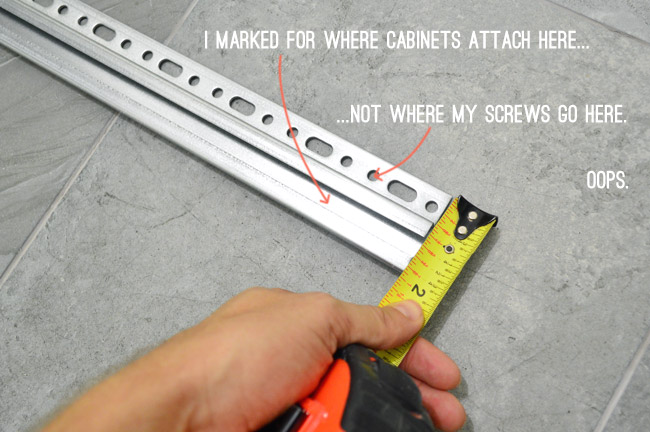
And so went the second line on my wall.
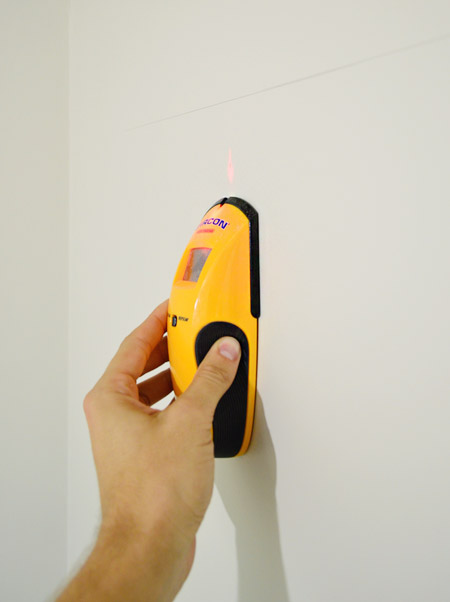
We also marked the studs so we were sure our screws would be going into something solid.
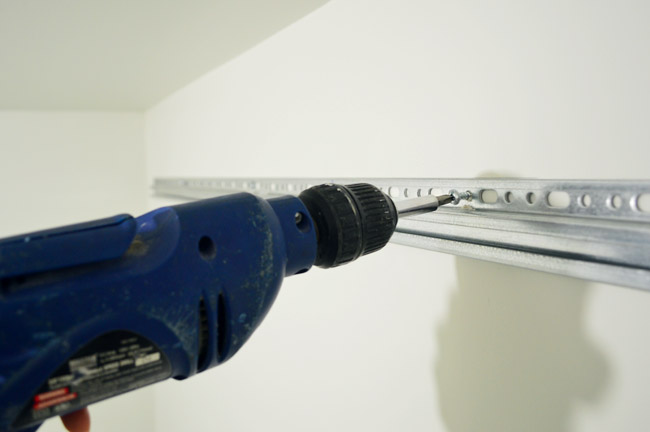
The wall is pretty flat (i.e. it doesn’t bow or dip anywhere) so we could just directly screw the metal rail into each of the studs. But according to the instructions, you might have to shim it if your wall is a little wavy.
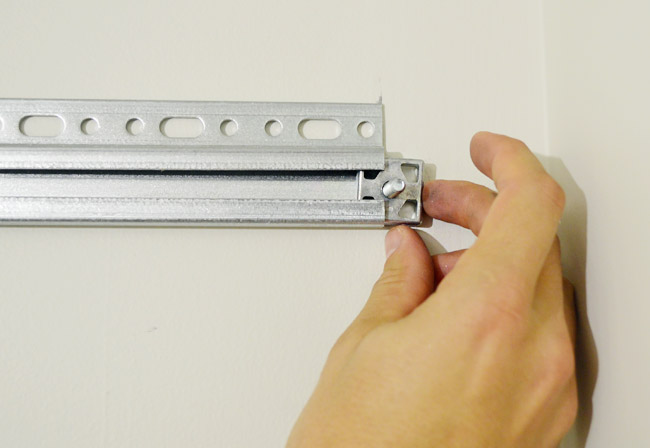
With the rail securely hung on the wall, we slid in the bolts that each cabinet frame would hang from.
The cabinet frames aren’t very heavy (at least without shelves or doors yet) so it was easy enough for one person to hoist them up and place them on the bolts (Sherry did one herself without any sweating or cursing). We secured them one at a time, so the first one to go up was that middle one, then I did the right one and Sherry did the left one.
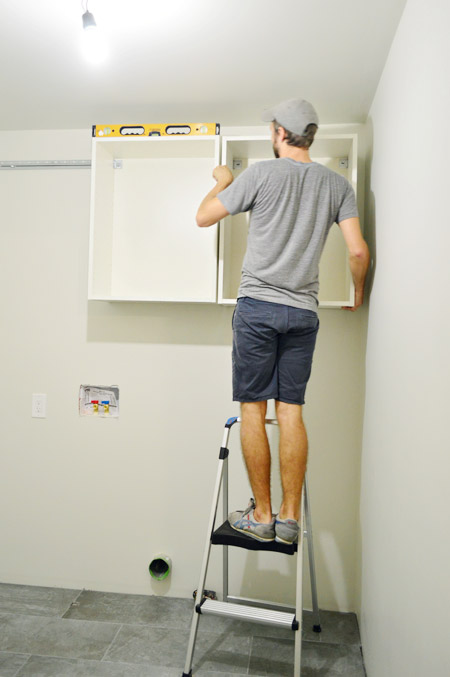
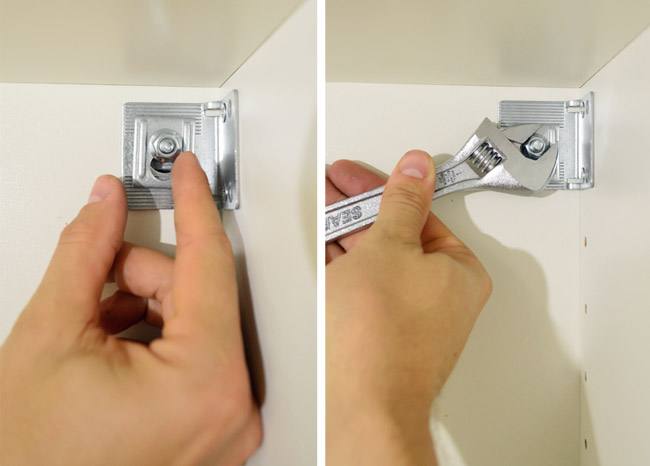
Once they’re resting on those two bolts, you add a metal clip and a nut – then tighten everything with a wrench. The clip allows you to adjust the placement slightly in case you need to level things a little. As you can see above, we rested a level on top to make sure each cabinet was straight as we went.
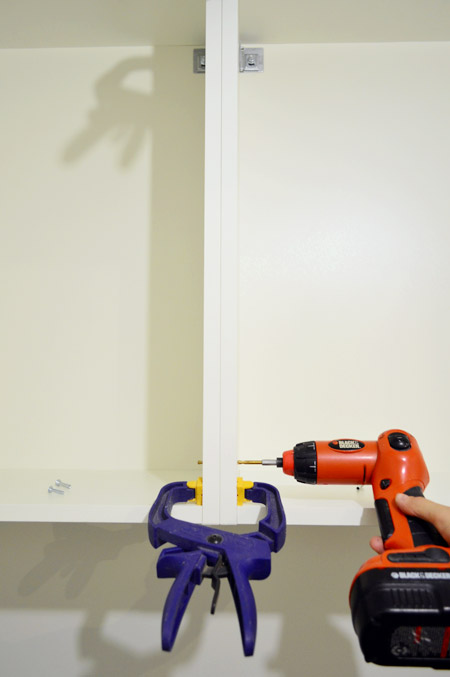
Once all three were up, we clamped them together at the edges so we could bolt all of them together to make one solid unit (this also eliminated any gaps between them). Once clamped, I drilled through one of the peg holes using a 3/16″ bit. NOTE: I realized afterwards that you should do the very bottom and very top hole, not the second one in – since those are used for the door hardware, but it was easy to correct – it just meant doing it twice.
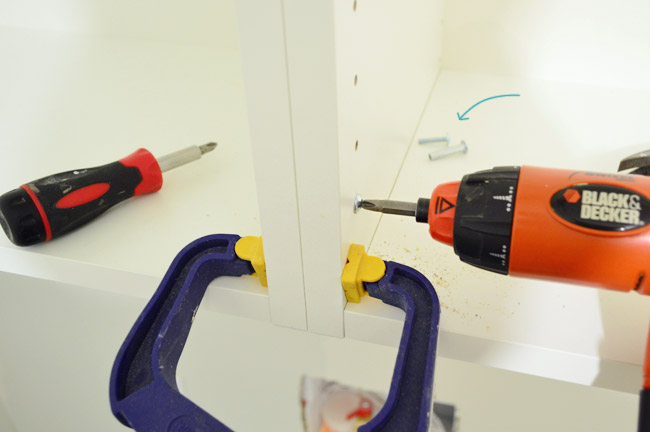
With a hole drilled through both cabinets, I used the supplied screws to make the connection tight.
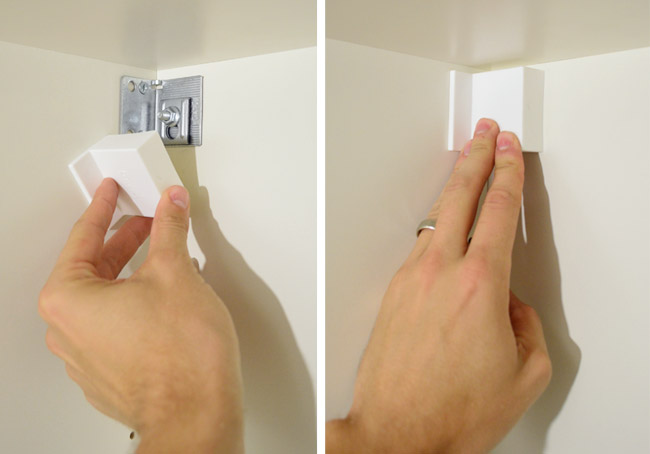
The final step was snapping on the white plastic caps to cover the hanging hardware on the back of the cabinet.
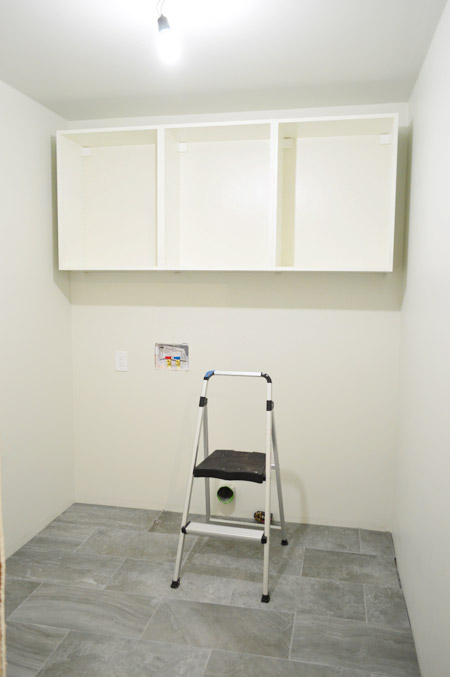
So here are our three uppers sitting pretty on the wall. Definitely an improvement when it comes to storage & function, but not super impressive looking since they still need some wood filler pieces on the sides and some crown on the top. Oh yeah and shelves and doors.
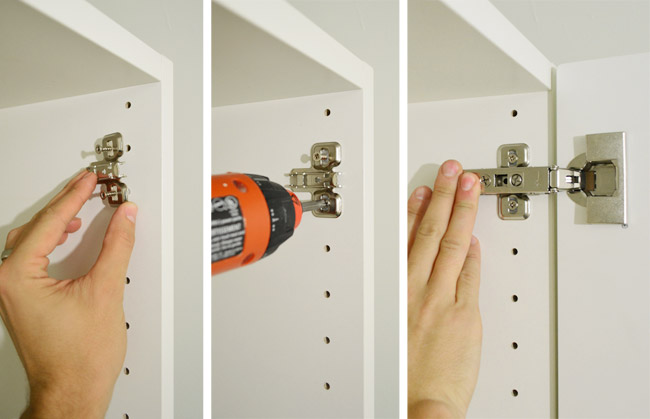
The doors were pretty easy to add, since the hardware that Ikea sells uses pressure to attach everything (there’s no drilling holes or anything). The various screws can help you adjust the placement, but our first one seemed to sit nicely against the frame without touching them at all.
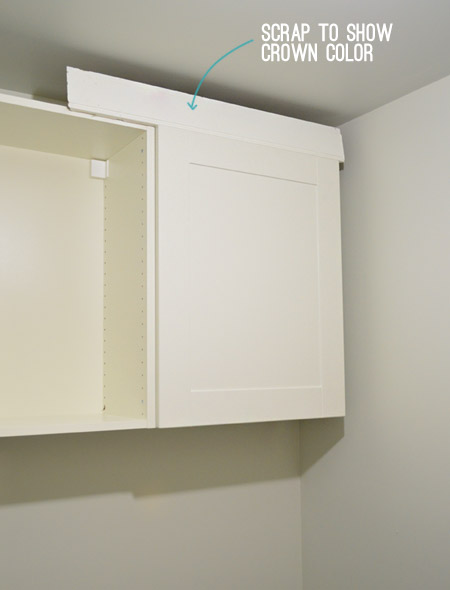
What wasn’t so nice? The color. It’s harder to detect in photos than real life, but the Adel door front was looking a lot more cream than we hoped it would look (it’s a few shades darker than the other slightly cream Ikea furniture we have). It looked especially yellow next to a Simply White scrap piece of baseboard – which is what all of our home’s trim/baseboards/doors are painted.
We didn’t expect it to match perfectly, but after some Googling (which we wish we’d done before our Ikea trip) we realized that Ikea sells a door style that people say matches Simply White almost perfectly (what are the odds, they actually shouted out our house’s exact trim/door color?!). Meanwhile the style we bought is said to match Benjamin Moore’s Paper Mache (which is notably less white). Oops. We sadly overlooked the Lidingo door style since the picture on Ikea’s website makes it look a lot darker/yellower, but here’s an example of how the matching paint swatches look SO DIFFERENT than the photos of the doors online:
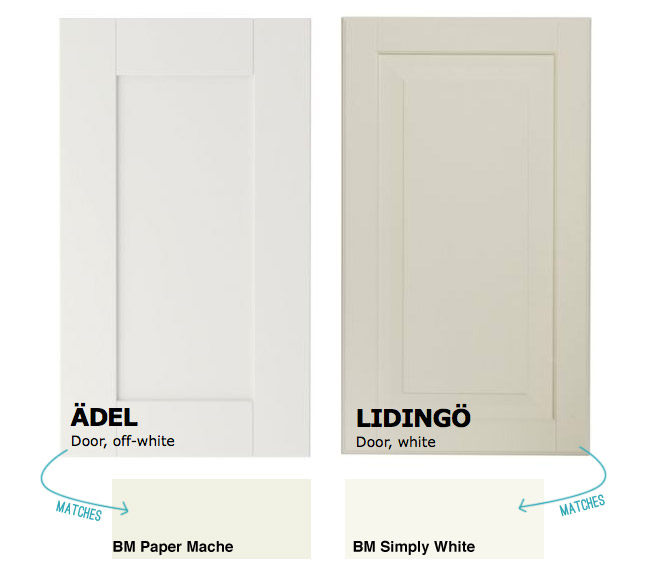
And while the Lidingo door style isn’t as clean-lined as the shaker style that we’re usually most attracted to, it definitely fits the style of our house and looks pretty great in other Ikea kitchens we’ve scoped online (we’ve always liked Dana’s over at HouseTweaking, so learning that she used them was definitely a selling point). But most selling of all was the fact that there was actually a door style that is said to match all of our house’s doors and trim. I know I’ve said what are the odds already, but really, what are the odds?!
So… we halted door installation and started planning a return trip to Ikea. Cue the eye twitch and flashbacks to highway closure traffic. But by some MIRACLE, it turns out my parents were visiting my sister and cousins in Northern Virginia on Tuesday and could swing by Ikea on their way home and get the new Lidingo doors for us. They are such an improvement over the Adels that we couldn’t wait to hang them last night after we got the kids to bed. We even tucked the base cabinet in there for kicks, although it still needs to be secured to the wall to be officially installed (along with needing trim pieces on the sides, hardware, a counter, and a toe kick).
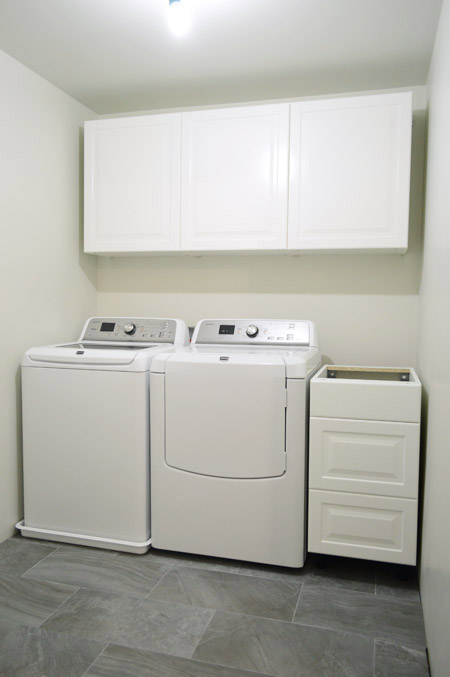
Actually, our to-do list is still pretty long in the cabinet department. But those little details are what makes it all come together, so we’re psyched to dive into them.
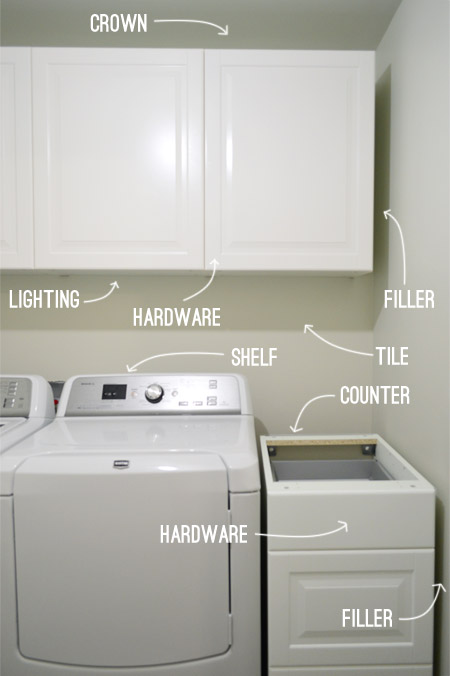
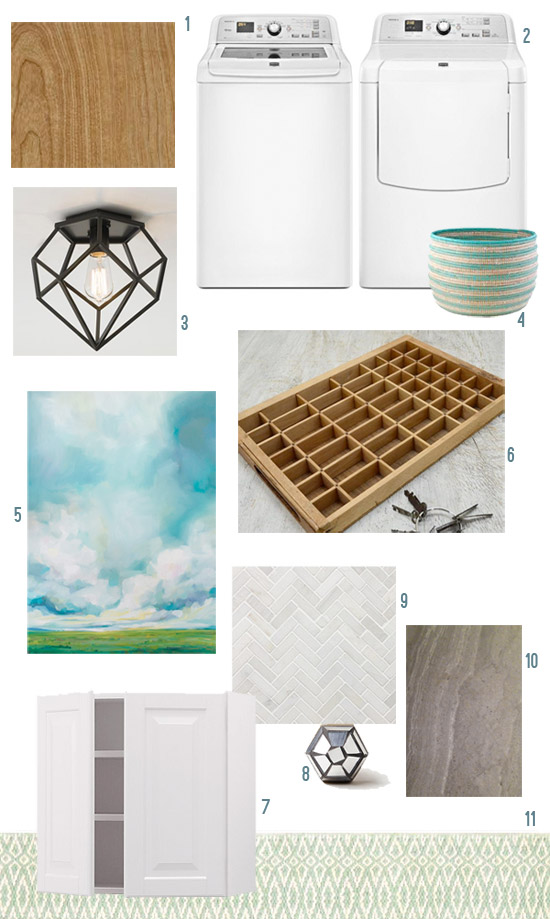
It’s definitely still more of a blank slate in here, so we’re especially excited to bring in some wood tones to break up all the white – in the form of a butcher block counter among a few other items (you can read about those plans here).
We still need to return the doors and drawer fronts in that first color (we only unboxed one), but we’ll be driving through that area again in a few weeks so it’s not too much of a pain to stop in and drop those off (he says while crossing all appendages that no unforeseen traffic issues arise). Also, here’s how I feel about being able to do laundry at home again:


Niki Delehant says
Man, you guys know how to time things perfectly with my renovations. I’m in the midst removing the laminate/thermofoil off my kitchen cabinets and painting the MDF in Benjamin Moore Aura Simply White. I’m doing this because I’ll be adding a tall kitchen cabinet with the Lidi doors as they are the closet to matching the doors I have in the kitchen already. We took down the upper cabinets in our 1987 Colonial and hung Ikea Ekby and Grundtal shelving last weekend. To save on costs so I can splurge on new countertops, we’re keeping the base cabinets. I did a lot of research on matching colors and planning the kitchen renovation. I love the open shelving and how easy it is to grab a plate or pan. Plus all my stainless steel Dualit appliances can come out to play again. Happy Happy Joy Joy.
Niki
Niki
YoungHouseLove says
Good luck Niki!
xo
s
Teresa W says
I keep dreaming of my own Ikea kitchen and having a store only an hour and a half away in Charlotte keeps the dream going. We learned you also avoid Ikea when it is back-to-college weekend. We made that mistake two weeks ago!
Now that I have seen how the cabinets are installed, I am beginning to think this may be the kitchen I will have when we remodel. It actually looks like something we could do ourselves. Another suggestion has been that we assemble the cabinets then have someone else install them, saving some on the cost.
It will still be a few years before we do ours. We have a couple of other projects forst, but I can keep dreaming and adding organizers in the meantime.
Angela says
Looks great! I’ve always loved the look of the IKEA cabinets. Thanks for sharing the install process. Looks like something we could tackle for our next cabinet project.
Rosie S says
Looking great, I do love Ikea, especially their textiles, (and we just bought a loveseat, so fingers crossed on that). Cannot wait to see the laundry all done!
Mags says
I know you’ve told several commenters that you didnt put a sink in because the space would be too small- I’m wondering since you built this room from scratch, why you didn’t just build a bigger room, with space for a sink?
I grew up in a house with a tiny laundry/mud room and when househunting myself, a utility sink in there was a priority, so that we’d have a place to rinse out diapers, shake sand out of towels before sticking them in the washer, and as a general holding spot for anything wet/dirty when the washer was already in use.
When you’re washing out paint brushes and other diy materials, are you using the bathroom or kitchen sink? And in this laundry room- where will you put a drying rack, ironing board, folding space, etc? Do you have a tall closet for upstairs vaccuum, mop, brooms, etc? It just seems like you didnt plan for much more than the machines when planning the room- I bet with a little tweaking it could be so functional!
YoungHouseLove says
We made the room as big as we could (the attic steps kept it from being deeper, and if it was any wider it would have bumped into the future tv room and made it sort of an L-shaped space instead of a rectangle, which we wanted to avoid). This old floor plan hopefully shows you what I mean, and you can also see our double closet in the hall next to our bedroom where we keep the vacuum, broom, mop, etc). For washing brushes & rollers we use the kitchen sink but plan to add a utility sink in the garage. As for a hanging ironing board & drying rack, we’re working on them (more on that here). We’ll get there, I promise!
xo
s
Denise says
When we gutted our kitchen we went with the Adel cabinets from IKEA. We had glass doors, a pull out pantry, and we used drawers instead of bottom cabinets. They look and work like the first day they were installed and so easy to keep clean. I would definitely put IKEA cabinets back into any kitchen remodel I would do in the future.
Kaybee says
I love the room so far! One question – any particular reason why you guys didnt install base molding and quarter round after you installed the floor? Just curious to know if that is in the plans. Impressive work as always!
YoungHouseLove says
Here’s that explanation for ya :)
https://www.younghouselove.com/2014/08/theyre-back/comment-page-3/#comment-4813350
xo
s
Cate says
As an outsider, this laundry room looks like it’s being built fast! Can’t wait to see the finished product.
Two things..
1) Apparently the seams on the cabinet door that you ended up with are easier to clean. A custom cabinet maker in my city says that the perfectly square shaker builds up dust and is highly visible on the white.
2) Did you consider putting braces up between your 2x4s for the cabinet install? Again, the custom cabinet maker does this using 2x1s. I think it’s also done where heavy art is planned to be hung.
Anyway, you’ve inspired us to do (some of) our own work. We just put in an offer to purchase a 2005-built beige-everything townhouse because it was more affordable than the 2014-built shiny white-everything townhouse. Hoping our sweat equity pays off! We are first time parents with a 6-month at home. I have no idea how to get so much done…anyway, have a super nice weekend!
YoungHouseLove says
Thanks so much Cate! So interesting about the dust! Hooray for happy accidents! As for the braces, since the hanging rail just needs to go into studs we’re all set without braces, but it’s a really smart method for custom cabinets (which might need to be hung without a rail system so hitting non-studs and getting it super strong is important).
xo
s
Andrea says
Wait wait wait. Hold the phone, I think you missed a totally deserved self-congratulatory happy dance.
“The wall is pretty flat (i.e. it doesn’t bow or dip anywhere) so we could just directly screw the metal rail into each of the studs. But according to the instructions, you might have to shim it if your wall is a little wavy.”
The wall is pretty flat because of what YOU DID. YOU DID THAT. You win.
YoungHouseLove says
Wooooot! I totally agree. When I read that sentence I was all “mah man!”
xo
s
NJ Basement Waterproofing says
Laundry room looks great so far! Can’t wait to see the finished product!
Kate says
Oh, we have made that Friday trip from NOVA to RVA mistake many a times. Glad you guys survived it!
Also…just throwing it out there…if you guys need a house to work with for the new book we are in Midlothian, just bought a house, and it could use some love. So, you are more than welcome to do whatever you would like. Just sayin’ :)
YoungHouseLove says
Aw, thanks Kate!
xo
s
Annie says
I’m wondering why you got the short cabinets rather than the tall ones? And it seems like you’re not going to build them to the ceiling? Why is that?
It also looks like there’s just one outlet on that wall. What if someone wants to plug in something above the drawers? That’s why code has all those requirements for outlets, they are damn useful things. Or will you be putting a small sink there?
YoungHouseLove says
The cabinet placement is detailed in this post for ya (they’re hung there to account for the crown molding we’ll add for a built-in look). If we did taller cabs they would have hung lower & interfered with the top-loader’s door. There are also 5 outlets in here, which we think will be more than enough! There’s a pair of them on the side wall for things like the iron or a steamer, and another pair on the back wall (slightly behind the appliances so they’re not in the middle of the backsplash but still accessible) as well as the dryer hookup behind the dryer. I anticipate that we’ll use the side wall ones most often since the counter will be pretty small (won’t be ironing or steaming on that anyway).
xo
s
Annie says
I saw that you’re putting crown, but crown isn’t that tall. It’s not going to hit the ceiling from what I can see. You’ll end up wuth that awful shadow line abover the cabinets.
YoungHouseLove says
We’ll have no line and it’ll hit the ceiling – promise. Pics to come! We hung the cabinets accounting for the exact height of the wood crown (that’s in this post for ya – we would have just hung them higher if it wouldn’t have covered ;)
xo
s
Andrew V says
Hey guys! Thanks for this great post….we are looking to do pretty much this exact same thing, with a top-load washer, so it’s very timely.
When I was sizing our cabinets, it seemed that the washer lid was really going to raise the bottom height of the cabinet that went over it. In your “after” pictures, it looks like the clearance is really tight….does the washer lid open fully without hitting that cabinet?
YoungHouseLove says
We’re so happy it doesn’t hit! If the cabinets were any deeper or lower it would have, so we’re really excited about the fit. We think we’ll do a video or share some pics of us using the room since there have been questions about if I can reach the cabinets and if that door hits, etc :)
xo
s
Sarah says
Hi guys! The room is looking amazing! So impressed with your DIY, you guys are better than the pros. I would know because I just had porcelain tile put down in my kitchen by a contractor who came recommended to me by friends and I’m so disappointed! The tiles are not laid evenly and the grout looks terrible. It’s so frustrating! Did that ever happen to you guys when hiring out? I tried not to get involved and to trust them to do their job, but unfortunately I didn’t get good results. I don’t know what to do now!
Anyways now that i got that out, awesome job looking forward to seeing the rest!
YoungHouseLove says
Oh no that stinks! We have never encountered that sort of issue, but hope someone reading might have advice for you? I wonder if you said you weren’t satisfied with the job and asked if he would redo it what he would say? Tile is tricky since it might need to be re-purchased to be redone (can’t always just pop it off and relay it).
xo
s
Emily says
I started checking in on YHL back in December, but haven’t commenter! I just had to share how I am a nerd and every day I am so excited to read another post on your laundry room Reno. I can’t wait for it all to come together!!
YoungHouseLove says
Thanks so much Emily!
xo
s
Shary says
Friday is definitely the worst day to go south on 95, especially in the summer after 12:00 noon. Now with the construction, there are accidents all the time. I live in Dumfries, but thankfully don’t have to get on 95 most of the time. When the new lanes are complete, things should get better.
Suzanne Melton says
I’ve built 28 IKEA wall and base cabinets with Härlig fronts.
We had no paint color to match (we’d torn out everything in the house so we could sheetrock every wall and ceiling) so we took a piece of Härlig to Home Depot and had them custom-match it. We call it “IKEA White.”
Two tips:
1. If you already have a compressor, go to Harbor Freight and buy a pin-nailer. If you don’t already have a compressor, go to Harbor Freight and buy a compressor AND a pin-nailer. Your life will be so much easier…especially if you do decide to build a lot of IKEA cabinets!
You’ll also be able to use the compressor with a spray gun, a flooring nailer, and a texture sprayer. When you decide to add on to the house or build a playhouse in the back yard, you can buy a framing nailer.
2. Get the IKEA soft close drawer and door dampers. We found them well-worth the price.
When you DO get ready to plan your new kitchen, consider drawers for every base cabinet (except under sink).
YoungHouseLove says
LOVE all the tips! Thanks so much!
xo
s
Megan says
We have had Ikea cabinets in our kitchen for 6 years and yes I love it BUT beware that if you let water (or coffee or random wetness…) sit for any length of time – such as a spill that runs down the front and sits on the closed top of the drawers (does that make sense?) it will bubble and crack. This happened on many of our drawers and doors (yes, we were a bit slow on the uptick) especially on our doors under the sink and drawers on our island. It doesn’t take that long for it to bubble… p.s. I think you guys are great – thanks for the constant inspiration not only the DIY stuff but by demonstrating a real zest for life!
YoungHouseLove says
Thanks so much for the tip Megan!
xo
s
Erica Ginnett says
http://www.housebeautiful.com/decorating/house-pictures/palm-beach-design-decorating-0411?src=nl&mag=hbu&list=nl_hbn_dot_non_042811_palm-beach-design&kw=ist#slide-4
Saw this and thought immediately of your staircase! I know you already did them, but this reminded me of the sleek white y’all like! Just something to think about. Or say, “Oh how pretty!”
YoungHouseLove says
No way! I’ve totally had that picture in my inspiration folder!! I love that railing because our porch railing right outside has that same pattern and it would be awesome to have it inside someday!
xo
s
Angela-Rose says
We are in the midst of a full house reno. Our new kitchen (formerly kitchen & office) is IKEA frames but we used a company in CA called Semihandmade (they specialize in building fronts for IKEA frames) for the doors/drawer fronts as we wanted a simple shaker door in solid wood that we could paint. The bases are BM Kendall charcoal and the uppers are BM Chantilly Lace. We do all the work (destruction and construction) ourselves and are very impressed with the strength of the cabinets as well as the ease of installation. The full extension drawers are fantastic! Everybody raves about our new kitchen an nobody believes it’s an IKEA kitchen. I think the key to it looking high end is not to go overboard on the IKEA stuff (don’t use their hardware, appliances, etc. etc.). We also built the foundations for the bases, rather than use the legs sold at IKEA w/a traditional toe kick plate. I’d be happy to share pics with you.
YoungHouseLove says
That sounds amazing! Would love to see pics!
xo
s
Emily @ Life on Food says
I cannot wait to hear your thoughts on the IKEA cabinents after you have used them a bit. I am looking to get some for a few areas in our house. Those color mismatches would have drove me crazy. They look so different than in real life.
Pat S says
Looking good! I feel your pain on I-95. I live in Maryland and was overjoyed when we got two IKEA stores I could get to without venturing down your way. I’m not fond of driving north on I-95 but will do almost anything to avoid going south towards Richmond.
Sara says
Heavens to mergatroid! Just saw this on my blog roll from Remodelista….
“Our friends at Young House Love revamp their laundry room, Ikea cabinets included.”
http://www.remodelista.com/posts/current-obsessions-august-2014-back-to-school
You are so FANCY!!!
Congrats!
YoungHouseLove says
NO way! Thanks for the heads up & the link Sara!
xo
s
Heidi says
Ikea is great and they have beautiful stuff. For a kitchen though I would check some custom places. We used Kitchen Craft. Their from Pennsylvania, but they do travel to install. Our kitchen is 18 foot by 20 foot with a 8 x 4 foot island and the price from them was $16,000. They use real maple that can be refinished and they also give you touch up paint for those inevitable dings. Also its custom, so the sky is the limit! Their address is 89 Broad St. East Earl Pa. 17519. Their phone # is 717-445-7246.
YoungHouseLove says
Thanks for the info!
xo
s
Kristin says
These look awesome and I’ve heard so many wonderful things about IKEA cabinets, but now I’m confused…
It looks to me like the cabinet backing is somewhat flimsy and simply nailed to the cabinet frame. Will having a full cabinet just pull the cabinet off the wall leaving the backing hanging on the strip? Am I missing something?
I hope I am because I’ve wanted to give these a try! It looks great and so easy!
YoungHouseLove says
The rail is screwed into those metal clips you see John tightening in the post, and those attach to the actual frame of the cabinet (the sides) so there’s no weight on those back panels. Hope it helps!
xo
s
Hannah says
We put in a Lidingo kitchen ourselves 3 years ago and we love it! Great quality, totally doable – in spite of our 120 yo wonky floors and walls. If you end up going the Ikea kitchen route, I cannot recommend the Ikeafans site highly enough! The people on there are incredibly helpful and know all the tricks to maximize space and tweak designs beyond what the basic ikea planner wants to let you do. It’s also a great resource for finding hardware substitutes and the right tool for any ikea-related job.
YoungHouseLove says
LOVE that tip! Thanks so much Hannah – and so happy to hear you’re still loving your Lidingo cabs three years later!
xo
s
Deborah says
I totally feel your pain. I live in Springfield and I won’t go near 95 past 3 pm!
I’m interested to see how you like these long-term. We’re just starting to plan a remodel and I’ve been thinking about using Ikea cabinets in the laundry room.
caroline says
random observation – went through your current house tour – wow, you guys are amazing. in the guest room, would you ever consider hanging the mirror above the bed sideways and then add two valences (or some other decorative item) on either side? just an idea – you both always come up with great designs but that one stood out to me when looking through your current house tour :) hope you had a good weekend! C
YoungHouseLove says
Aw thanks Caroline! We definitely would consider that, I think that room will evolve for a while! We’d love to make a nice big headboard so that might change things over it :)
xo
s
guide pare baignoire says
Hey there, very in depth step by step guide, thanks. What I’m wondering or maybe I have missed it somewhere is the type of ceramic tiles on the floor?. It looks like natural stone though to me, beautiful colour.
YoungHouseLove says
Thanks! It’s porcelain tile from The Tile Shop (the name is Blast Anthracite). The striations are so pretty in person – it does look like stone!
xo
s
Elizabeth says
I can’t help but want to see something like this pop out ironing board in your tricked out laundry room. Any chance??
http://www.pinterest.com/pin/381187555932197509/
YoungHouseLove says
That’s so cool! We actually thought about a pop-out/fold down ironing board system, but I like my board to be portable (I’ve been known to carry it around and iron the bottom of curtains, haha!) so we think hanging our current ironing board on the wall will give us the best of both worlds (out of the way but easy to take down and use in the laundry room – or any other space in the house).
xo
s
Erin says
People need to calm down about your decision to not add a sink to this new space. I have lived for 36 years without one in multiple residences and have survived to tell the tale. As for ironing, I would much rather set up my ironing board and basket of clothes/hangers in front of the TV and catch up on my DVR.
Marie says
Looks awesome!! I just bought my ikea cabinets for our kitchen remodel last week!!! So excited!!
Cass says
Thank you so much for the colour match for the Adel cabinets! I just installed an Adel kitchen in my rental property and needed to find a paint match after accidentally drilling a hole for the doorknob in the wrong spot. Whoops…!
YoungHouseLove says
Oh no! Good luck Cass!
xo
s
Jessica Salopek says
This post gave me the peace of mind I needed! We just purchased our entire kitchen from Ikea this past Saturday and was able to take advantage of their 20% off sale. I was so thankful for the attendants. They went over our entire purchase and verified we had everything we needed from pulls, to dampers to cover panels. The Ikea kitchen planner is great but it didn’t add exactly everything we needed. We’re planning to do all of the install ourselves and we also hired Ikea to come in and do the quartz countertop installation once the lower cabinets are in. Delivery for everything was only $60 and we live 45 mins away. This will be my first big project so wish me luck. Y’all always make everything look so easy!
YoungHouseLove says
Ahh! So exciting! I bet it’ll look awesome!
xo
s
timepiece says
Just wanted to tell you guys about a site I found for future reference. A nice compromise between custom cabinets and cheap cabinets: custom doors for IKEA cabinets! Brilliant, right? The company is called Semihandmadedoors. I’m keeping it in mind in case I ever manage to start redoing my kitchen.
YoungHouseLove says
A few others have said such great things about it! Will definitely have to check it out!
xo
s
ashlee says
We are assembling our ikea cabinets right now! Im curious what they gave you to hide the undermount lighting. I asked when we picked ours up if id need anything and they said no. Thanks so much! I love your detailed lengthy posts!!
YoungHouseLove says
They sold a trim piece to us specifically for under cabinet lighting, so we’ll be adding that. Bummer they didn’t mention that to you!
xo
s
Marissa says
Totally off the home improvement topic… But, Oh wow! My boss was in that acid truck traffic. If you saw a very nice guy walking down the road to check things out and talking to everyone along the way. That was her husband. Hahaha
YoungHouseLove says
No way! It’s such a small world!
xo
s
Robynne says
Hey guys! I know you’re considering using IKEA cabinets for your kitchen reno. I came across a wonderful company that can make your kitchen look semi-custom if you all choose to go that route, SemiHandmadeDoors (click on the link!).
I’m not affiliated in anyway, hubby and I are considering using them for our upcoming reno. Sarah Samuel from smittenstudioonline.com used them in her kitchen as well! Good luck :)
YoungHouseLove says
Thanks for the tip!
xo
s