This morning, while Clara was doing this:

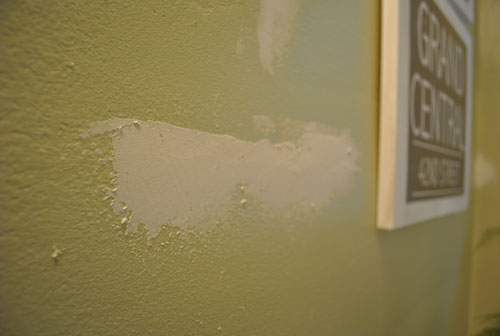
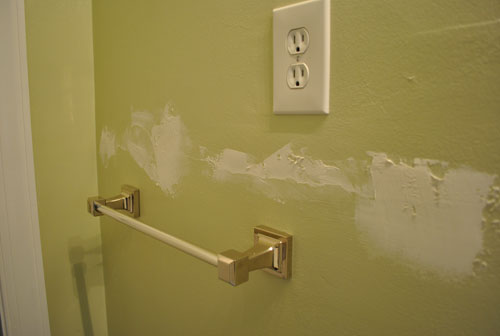
I attempted to tackle this:


A few days ago I slapped some spackle on the walls in the bathroom (we like Dap Crackshot), because as happy as we were with the big bathroom overhaul, you could tell it was definitely our first rodeo when it came to drywalling. And in our hurry to get paint on the walls we were a wee bit less careful with the mudding and taping than we could have been. But thanks to Operation Sell This House we’re making all those never-got-around-to-them tweaks to get things looking as close to perfect as possible. You know, tackling all of those projects that we’ll never get to enjoy ourselves but that we hope will woo someone else into moving right in (story of a seller’s life, right?).
Anyway, so after the spackle was applied to those cracked and uneven areas of the wall a few days back and I was 100% confident it was totally dry (trust me, semi-dry spackle is not what you want to work with) I finally decided to sand things down. Here are the tools you’ll need for this project:
- Dap Crackshot Spackle (as we mentioned)
- 100 grit sandpaper or a sanding block if that’s your thing
- A bra and underwear (or just underwear if you’re male or anti-bra)
- A post baby body (well, this one’s optional)
Did I lose you somewhere along the way? It’s actually quite simple. I learned a long time ago that sanding down spackle is a messy undertaking. So if you’re wearing a ton of clothes they all get caked in chalky dust, which flies everywhere when you remove them. So the fewer clothes the better. In fact, if you’re particularly brave or into nudism you can totally tackle this project on in the buff. It’s not like there are sharp tools that you’re using, and heck, you are in the bathroom (or another private room in your own home).
So all this quick fix entails is smoothing on some spackle with a putty knife (I like one with a bit of flex), giving it a while to dry (ideally a few days), sanding it down with 100 grit sandpaper so it looks as smooth and flat as possible, cleaning up all that dust that flies everywhere (we prefer to vacuum it all up while it’s dry so it doesn’t smear all over the floors and fixtures – which it can do when it’s wet), and then hopping in the shower and tossing your undergarments in the wash.
Next up I have to roll some primer and a bit of paint over that sanded down spackle for a cross-your-fingers-that-it-looks-good result (using the same type of roller that we used to paint the whole room should help match the texture for a less obviously “patched” look that a brush can leave). Can you guys handle the excitement? Here’s hoping it works out.
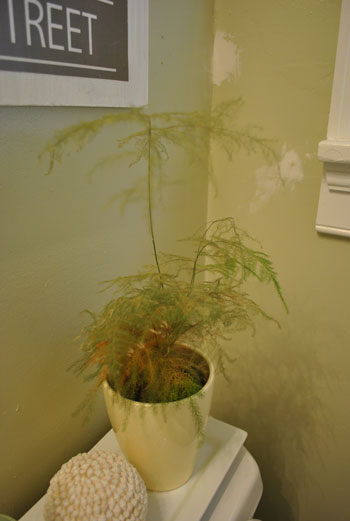
And speaking of works out, here’s an update on that asparagus plant that the dudes at Home Depot swore I couldn’t kill.

Things aren’t looking too promising for him (see what he originally looked like here). Eh, you win some, you lose kill some.

Jenn L @ peas and crayons says
Poor, poor plant. Maybe you didn’t kill him.. Maybe he was really really old…? haha such a longshot but I hope that cheers ya up a little about it! It seems like Chrissy had some good tips for reviving the little fella! good luck =)
YoungHouseLove says
Hahah, yes that’s it! He was just really old and it’s his time. We’ll still try to revive him though… it’s worth a shot right?!
xo,
s
mike @ the lil house that could says
I hate anything drywall. It is the devil!
Jen_nifer says
The problem I’ve had with spot spackling/plastering is that I usually end up making that spot smoother than the rest of the wall. Using a roller to paint leaves those tiny little bubbles, and many coats leave a little more texture. I try to roll over the plaster with each coat, and it helps a little, but depends on the wall.
I am anxious to see what leads to success for you two. Please make sure to do an after for us looking for tips!
YoungHouseLove says
Hey Jen_nifer,
Try water based primer first! Using that between the paint and the spackle seems to cut down on the bubbles. Ours came out looking pretty darn good- a lot better than it did before, that’s for sure!
xo,
s
Whitney Dupuis says
Not that I didn’t absolutely love the post for the home improvement tips, but that baby girl is precious! Sleeping babies are the best, aren’t they?
Sarah B says
Poor fern….I think the problem might be your very cute pot. Unless you’ve somewhere for the excess water to go you are literally drowning the roots. Because the pots with the drainage holes aren’t usually the best looking, I try to always set them inside a larger decorative pot. That way after I water, any water left in the bottom after about 20 min gets tossed. My go-to plant is a christmas cactus – who doesn’t love bright pink blooms in December?
YoungHouseLove says
Hey Sarah B,
It actually has gravel in the bottom of that pot and sits in a pot with drainage (so the water drains out and into the gravel). We’re thinking it might be a lack of sun issue… maybe.
xo,
s
ginger says
I like to use one of those yellow/green sponges, the rougher green side damp (not dripping) works great on drywall. Then just toss it out when finished if it’s wrecked, or save it for another day. (dont’ use for dishes!) ha
Too bad spackle and sanding doesn’t work for sprucing up bodies too, eh? lol I’d be sanding and spackling like crazy if that worked!
Movie Fern reference: How to lose a guy in 10 days? (kate hudson) ?
Margaret says
yall’s bedroom is on the front page of the nest today on the 15 best nesty bedrooms! :)
YoungHouseLove says
Sweet. Thanks for the heads up! Off to check it out.
xo,
s
Mary says
I was just wondering yesterday how your asparagus plant was going! I wanted one for my bedroom, but have never found one. I guess I’ll give up the hunt now.
Danielle says
We just renovated our two bathrooms and took off old towel rings/bars and hardware off the wall, leaving nice size holes where the anchors were (and of course the new ones were totally different sizes for the hardware, so we had to mount the new ones in a different spot). When we spackeled, all the spots are very obvious because of bumps from pulling out the anchors (part of the drywall that flared out sort of and refused to back back into the hole). Anyone have any suggestions on how to avoid this? Even with paint, the spackling is super obvoius and looks awful because of these bumps.
YoungHouseLove says
Sometimes it helps to hammer those bumps a few times before spackling to smash them back in so they’re not little pyramids anymore. Hope it helps!
xo,
s
Juliet says
Don’t be afraid to trim off the dead parts of your plant. It might help it rebound faster.:)
YoungHouseLove says
Will do!
xo,
s
ADogonMyChair says
I think it needs water. :)
Beyaz Show says
I think it needs water. :)
Jennifer says
Perfect timing! I’ve been spackling it up lately and now it’s time to sand. The elderly woman we bought our house from had an insane number of phone jacks throughout the house and I finally got around to removing them and patching the walls. This is a new one for me. It’s a YHL-inspired DIY. :)
Stephanie says
I’m curious to know what brand of vacuum you use? Love it?
YoungHouseLove says
There’s a post all about that linked on our Projects page (see the tab under our header) in the Cleaning section. Hope it helps!
xo,
s
Kristin says
I’m curious to find out if this worked for you? Did you do a follow up post with afters?
We did a bathroom renovation and may need to do this as well. I’m wondering if you thought it worked or if you had any tips for next time.
YoungHouseLove says
Yup, worked pretty well! Picture a flat painted wall and you have the after. One tip would be to wipe down the spackle with a wet sponge (as others recommended here in the comments) to smooth things out. Good luck!
xo,
s
Melanie says
Can you give some tips on touching up spots you missed with the roller? Our 1955 walls are very slightly textured — basically not as smooth as walls today — and we ended up with a few dotted spots on walls where you could see the old color peeking through. I went over them in some spots with a small foam brush and others with a brush. I can now see obvious shiny spots where I touched up. (I did try to feather out the paint.) Any ideas on how to fix this without repainting the whole wall? We used an eggshell finish.
Thanks also for your blog! As a homeowner for just slightly under four weeks, you’ve given me lots of inspiration and motivation for tackling projects around the house.
YoungHouseLove says
My tip would be to use a roller to apply it super thinly and really feather it out. Like a foot extra all around the perimeter of the touch up, so you end up with a 30″ wide or more touch-up spot. It helps to go really thin and wide to keep them less detectable. Good luck!
xo,
s
Melanie says
Thanks! I’ll give it a shot!