Today we’re going to show you how we built the bookshelves in our son’s room. It’s an easy project that we’ve since used to create custom shelving everywhere from our living room to our beach house pantry. But these bedroom shelves were our very first attempt at them and we absolutely loved how they turned out.
This tutorial specifically focuses on building the actual shelves, aka the top portion of these built-ins. You can separately read about how we first built-in the cabinet bases (it’s an Ikea hack!) and later finished them off with crown molding. But since not every bookshelf needs those features, we’re talking just about the shelving today.

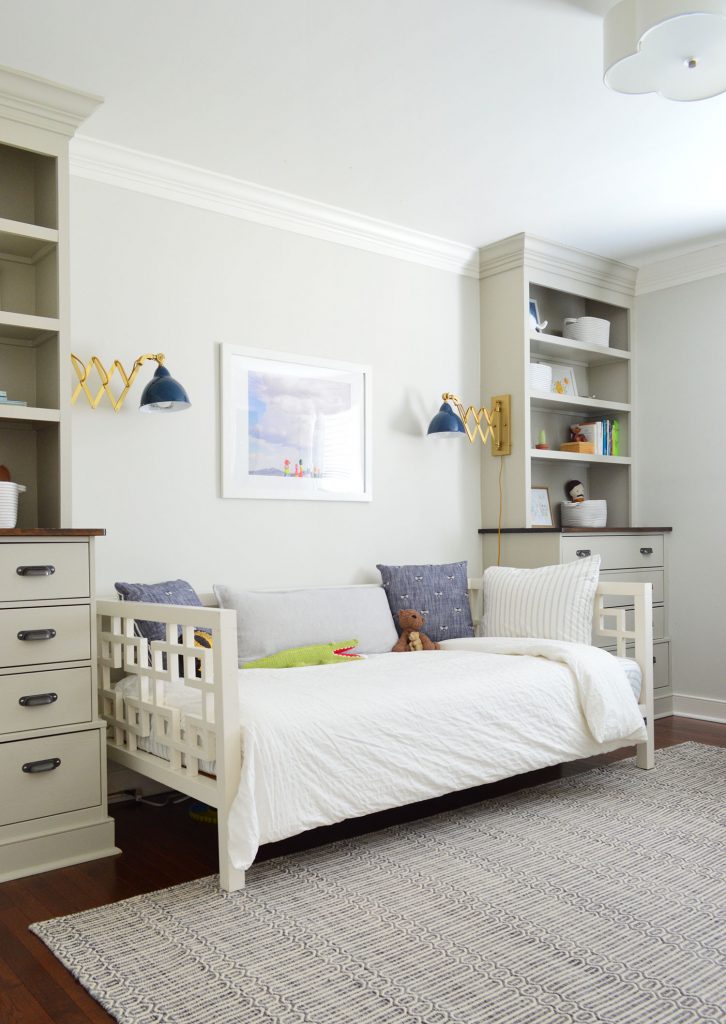
You also can take a tour of the finished room both in it’s initial version as our son’s nursery and then later when we updated it with a big boy bed.
Tools & Materials To Build A Bookshelf
Here are the supplies and tools you’ll need to build your bookshelf. If you don’t have a table saw or circular saw, try renting one from your local home improvement store. Some stores will also cut your wood for you, but this is a project where you’ll really like having one around.
- 1/2″ MDF or plywood for the shelves
- 1×3″ pine (ripped in half) for support pieces
- 1×2″ pine for face pieces
- 1×4″ or 1×6″ pine for top brace
- Measuring tape
- Stud finder
- 24″ level
- Clamps
- Nail gun with finish nails
- Miter saw
- Table saw
- Circular saw
- Power drill/driver
- Wood glue
- Paintable caulk
- Primer & paint
- Painting supplies
The exact amount of wood you’ll need depends on the specs of your bookshelf build. That’s why the first step is so important!
Step 1: Plan Your Build
Start by measuring your space and sketching out your bookshelf on paper. This will help you figure out how material you may need. You can still adjust as you build (like you might change your shelf spacing as you go) but always take time upfront to make a plan. For us, this made sure we bought enough – but not too much! – plywood for our shelving. You can see below how figuring out exactly how to maximize a 4×8′ sheet of plywood was almost like a puzzle.
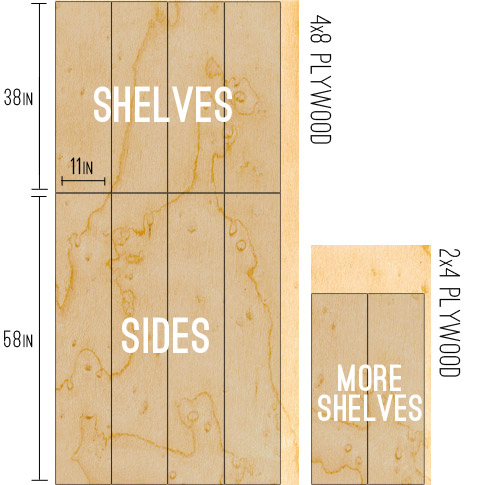
NOTE: We used plywood for this build to better match the subtle wood grain in the base cabinets. However, for a smooth, painted finish we recommend using MDF instead.
Step 2: Cut Your Shelf Pieces
The first building step is to cut your plywood or MDF into the big shelves and side pieces. You can do this with a table saw or circular saw, like you see below. That photo is actually from our pantry shelf project because we got our plywood cut in-store for these bedroom bookshelves. The Home Depot guy ripped my plywood into 11″ strips after seeing my sketch, which was a huge help. He was able to lock his big saw into place to ensure I got equal and even cuts on all of my shelves.

If you are cutting at home, I recommend careful measuring and taking your time. You can also see above that I had clamped two pieces of MDF together so that I could make two cuts at once to ensure the shelves matched.
Step 3: Prime & Paint Your Shelves
We find it easier to paint all of our big pieces BEFORE installing them. It’s typically easier to paint flat surfaces with a roller when you don’t have to worry about edging against walls or cutting in to corners. You will still need to do some touch-ups after building, but this saved us a lot of time.
Just be sure to prime the pieces first, especially if you’re starting with raw plywood or MDF. The color we used was Benjamin Moore Senora Gray.
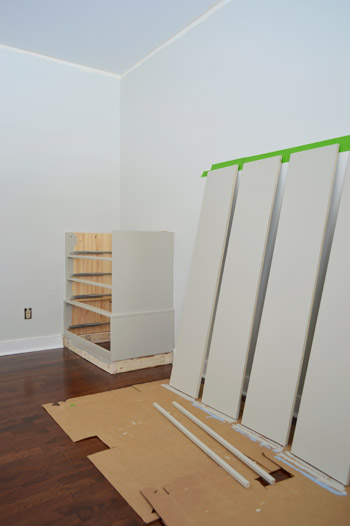
Step 4: Build Your Bookshelf Frame
One our paint was fully dry, we began construction by securing one of the tall side pieces directly into the wall. We used a stud finder to locate studs and attached the piece with countersinking screws that we could putty over later.
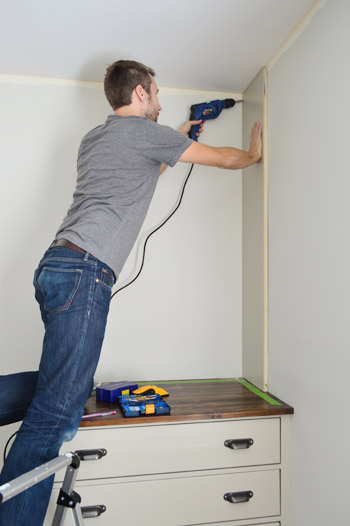
Attaching the next side piece was a bit more involved since I wasn’t screwing directly into a wall. I knew it would become sturdy once I added my shelving, so the challenge was to keep it in place in the meantime.
To do that, I attached a 1×3″ brace piece along the top of the back wall into a couple of studs. This piece wouldn’t be visible in the final bookshelf, but it gave me a place to screw the vertical side piece into. An alternative plan would’ve been to purchase a large piece of MDF or plywood to act as a solid back behind the bookshelf. We opted to just use the wall itself instead, mostly to cut down on cost.
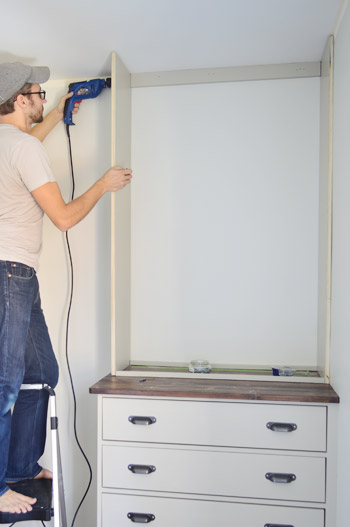
I also add a 1×6″ brace piece across the front of the bookshelves to help keep things square. I hadn’t planned on this piece originally, which is why it’s not painted.
You can also see some pieces at the bottom helping to keep things square down by the base of the bookcase. These were cut to the same length as the eventual shelves just laid there temporarily.
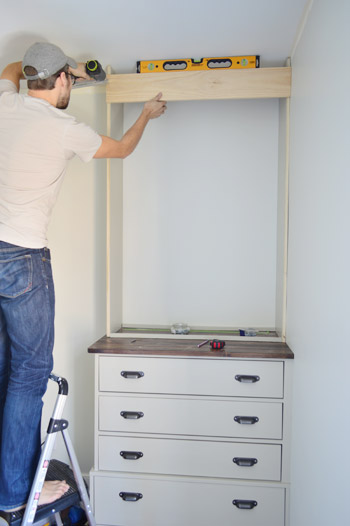
Step 5: Add Your Shelves
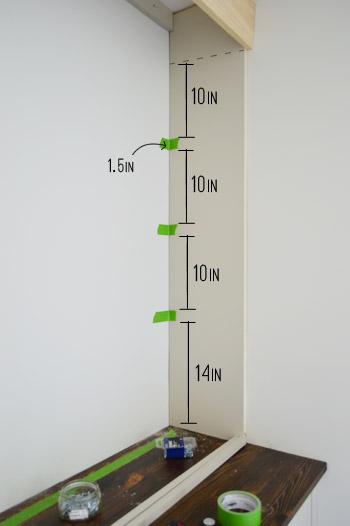
With the sides in place, we turned our attention to the shelves. First we needed to finalize our shelf spacing, so we broke out a ruler and some painter’s tape to help visualize spacing options. Ultimately we ended up with evenly spaced 10″ shelves with a little bit of extra room at the bottom. Just be sure to account for the 1.5″ width of the shelves themselves, as represented by our painter’s tape.
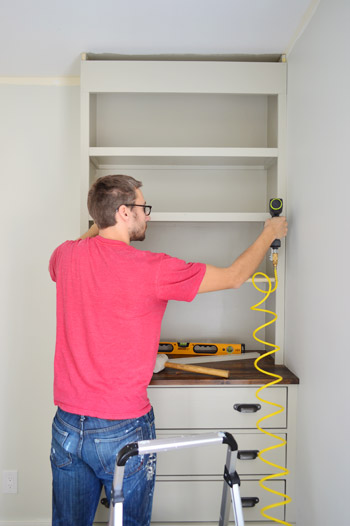
Next it was time to attach the shelf supports. These are thin strips of wood under each shelf on 3 sides. I cut these pieces by ripping a 1 x 3″ along my table saw into .75″ wide pieces. This will make more sense in a moment, but any thicker than that and the supports would be visible below the face pieces added later to the front of each shelf.
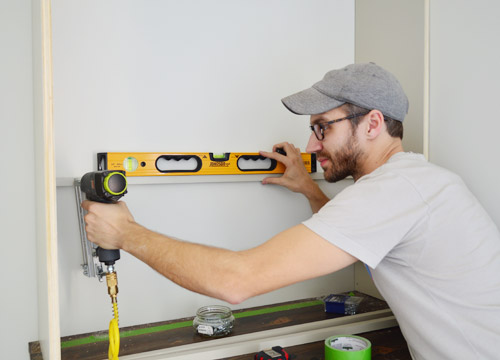
I first nailed the braces into the wall and the sides being sure to keep things level as I went. This was just a speedy way to get everything in the right place. Then I went back and screwed each piece more securely into a stud (along the back) and into the wood (along the sides). This enables the shelves to bear more weight over time.
Once all of the support pieces were screwed in, it was easy to pop the plywood shelf pieces into place. After all, we’d already cut, primed, and painted them!
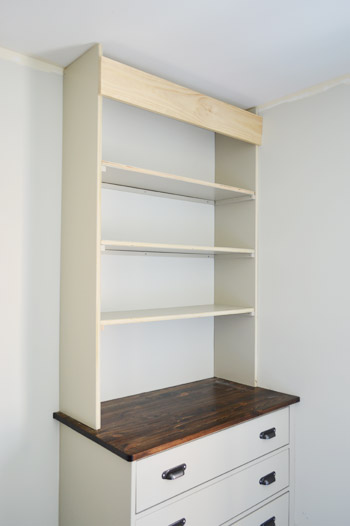
I also nailed each shelf down into the brace piece so they won’t pop out or jiggle or anything.
Step 6: Finish With Face Pieces
The next step is my favorite because it makes the bookshelf look way more finished. We cut and nailed in 1×2″ pine pieces (already primed and painted) to cover all the exposed edges along the front of the shelves. This not only hides the raw edges, but also makes your shelves look thicker than they actually are! This is also why you want those support pieces cut thinner in the previous step.
You can also see before this step I had done some painting – both the back wall and the brace piece at the top. I also had done some caulking, but you can do this as a final step as well.
Step 7: Caulk & Touch-Up Paint
Once everything is constructed, you’ll want to caulk your seams, fill any nail holes, and do any necessary touch-up paint. The caulking will take some time, since you’ll want to caulk any place two surfaces meet: shelf meets wall, wall meets support piece, support piece meets shelf, etc. We did a little bit of this as we went, especially to fill gaps where our wall wasn’t very flat.
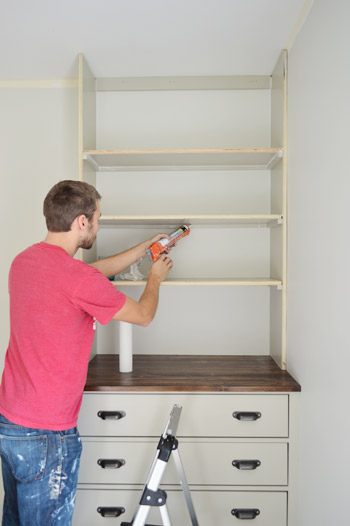
Once your caulk is dry, you’ll need to do touch-up paint over it. This may feel tedious because you already painted, but I promise you this is much faster to do quick touch-ups than be painting from scratch at this point.
Step 8: Add Crown Molding (Optional)
For our bookshelves, we decided to finish off the top with crown molding that integrated with the crown we’d put installing around the whole room. We would be using a “beefy crown” method we’d tried first in our daughter’s room. It’s involved putting a piece of baseboard around the top of the room first, to make the crown look thicker.
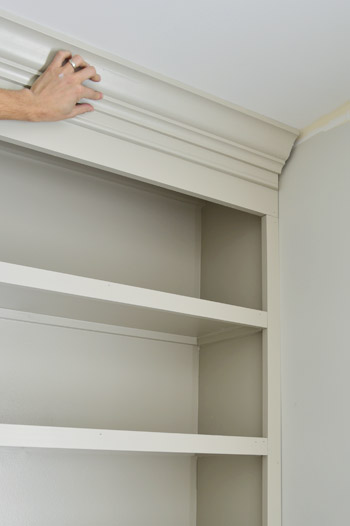
You can read more about the process of installing crown molding in this room.
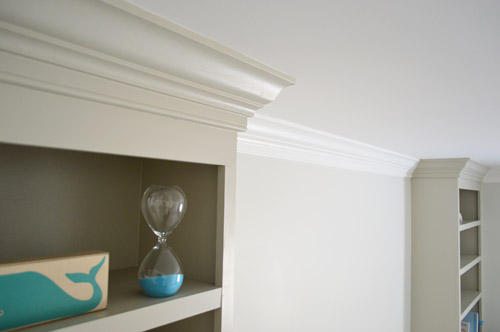
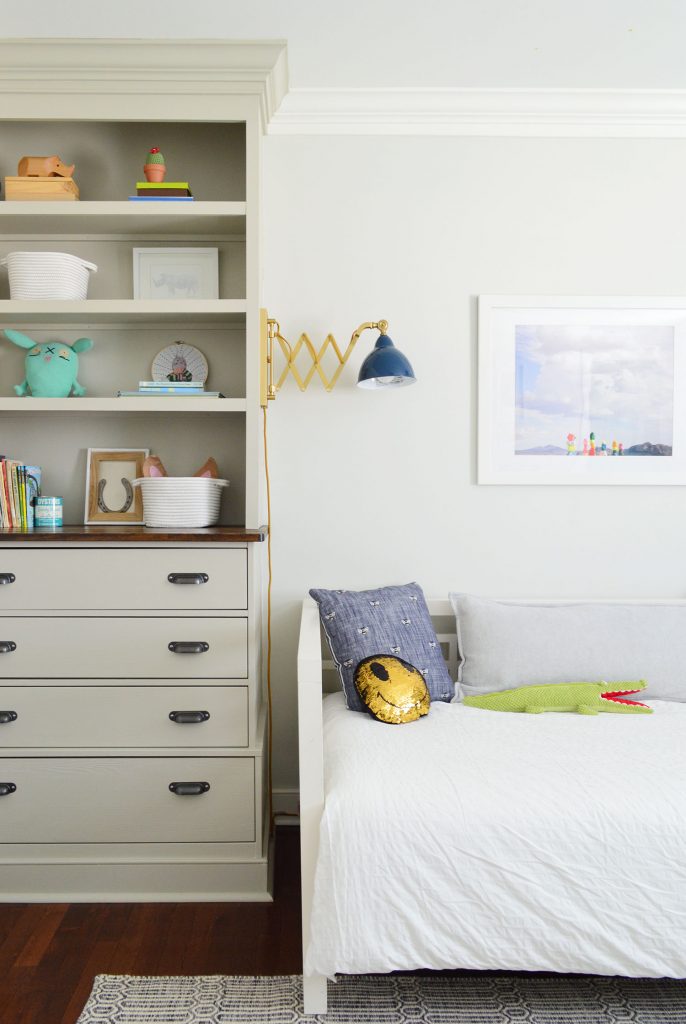
We love how these bookshelves turned out, especially how easy and affordable they were to create – they were about $60 each. And that includes all of the material for the bottoms too! They’ve also been great for both functional storage and cute display items.
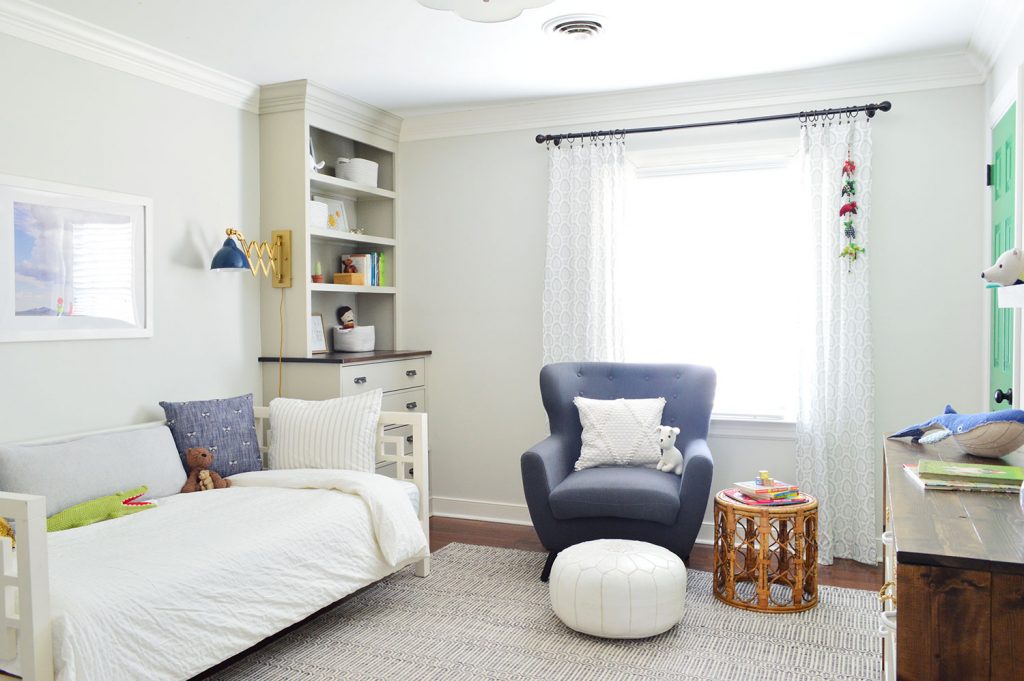
Again, you can read more about how we finished this room in its first iteration as his nursery, and then a few years later as a big boy room.
More DIY Shelving Projects
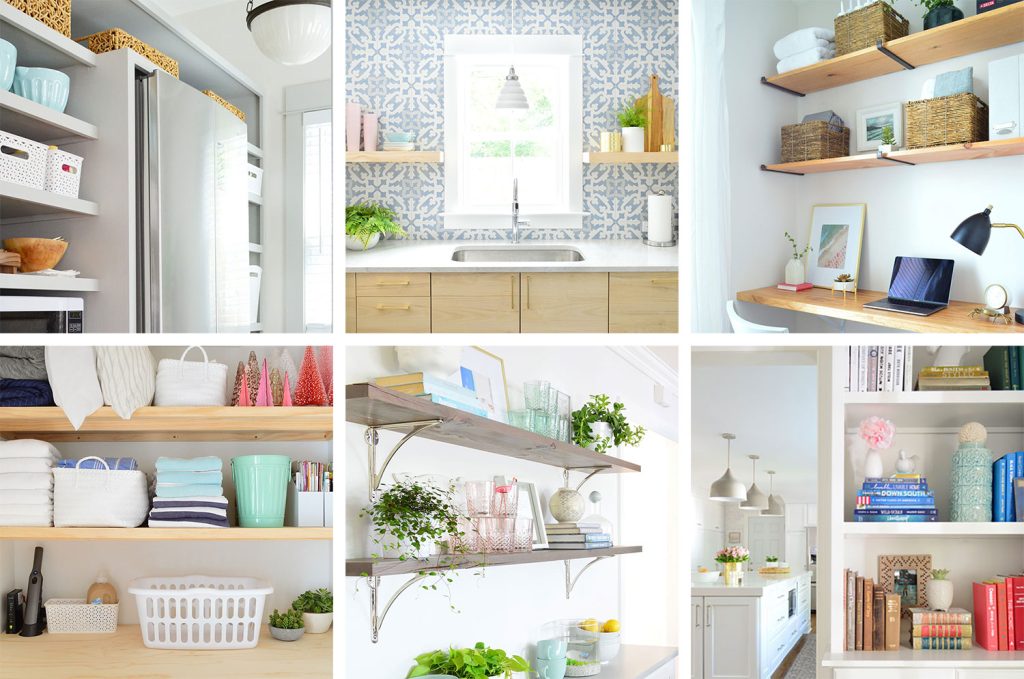
If you’d like more DIY shelving ideas, we wrote a roundup of 15+ shelf projects you can build yourself. You can even see how we used a similar technique shown here to create kitchen pantry shelving!
P.S. And when it comes to the items in our house, we hear “where’d you get that?!” a lot – so here’s a page full of our home’s paint colors & stuff we’ve bought/loved.
*This post contains affiliate links*

Lisa says
OK. Ya’ll are seriously diytastic. Totally ripping this off when I re-do my 7 year old’s room (but in a good way)!
YoungHouseLove says
Wahoo! Send pics!
xo
s
hollyloo says
very impressive!! you never cease to amaze!
Michelle says
AHH! I’m so excited about these built-in posts! They look amazing! The photoshop job definitely didn’t do them justice ;-)
Kelcey says
They turned out so nice! I can’t wait to see the whole set up once it’s decorated.
-Kelcey
hellokelcey.blogspot.com
Sassafras says
John, I am married to a Master Carpenter. He can build anything from scratch. I mean ANYTHING. He’s got nothing on you bud!!! THESE LOOK FANTASTICO-I-MOW-MOW!!! I bet Sherry’s getting hives just waiting. :)
YoungHouseLove says
Oh my gosh, I’m so glad you said this Sassafras, because I tell John he has seriously reached carpenter level and he’s so modest about it and says “no way, I’m still nothing like those pros” and I beg to differ. So I read him your comment out loud. We gotta convince him how good he is!
xo
s
Jeanine says
I love the built ins! I wanted to do this for our daughters room when I was pregnant, but we ended up going a totally different route. But I do still dream of biult-ins. Maybe when she’s older we will conquer that.
Oh, I also love the little part of Sherry’s random thoughts/input. Maybe it’s something you guys could do on future posts? The other one could add a few random thoughts or insights about what the other one is writing about.
YoungHouseLove says
That’s fun! I like that idea!
xo
s
Jennifer says
This might be your most impressive carpentry project to date! They look great!
YoungHouseLove says
Thanks Jennifer!
-John
Stephanie @ Whole Health Dork says
The built-ins look fabulous! Great job! We’re looking to do a built-in for a nook in our living room and this is definte inspiration!
Katherine says
Oh, this makes me wish I had time/talent to do a project like this. I need a coat closet in our entry and have considered buying an Ikea one and making it look built-in like you did with these shelves. It looks really great! I hope you are happy with this room for years!
Janice says
Lookin’ good! REAL good! But what’s with the bare feet?? you’re making me very nervous Mr Petersik!
YoungHouseLove says
Thanks Janet! We definitely have shoes on when we’re sawing and cutting lumber out in the garage, they just get covered in sawdust so we slip them off at the door (hence the barefoot look upstairs when we’re doing lighter duty things like nailing or screwing).
xo
s
Susan in Colorado says
Love it!! In my opinion, you can never have enough storage.. ever ever!! lol Especially pretty storage!
Susan says
I wish I had all those drawers to store things in…organizing baby stuff is so fun…those tiny 3mo clothes they grow out of so fast and those 18mo clothes you think they’ll never be able to fit in! My baby’s stuff is in our closet on one of those six cube wire mesh units. I’m way to busy to organize those all the time, so the clothes just sit piled on top. At least I can close the closet door.
I can’t wait to see it decorated. I know it will be fun and amazing!
YoungHouseLove says
Aw thanks Susan!
xo
s
Yvonne says
Oh my word, those are some awesome built-ins!!!!!! Great job, John!
katalina says
beautiful!
I keep seeing knot-acle or nautical with that beautiful rug and beiges and barnacle references…
(is Barneby gonna be his middle name? ) I see navy blue
and whales and …
I had a hutch over drawers growing up and I looked them. later i did my own sherry-decor in the shelves with books.
YoungHouseLove says
Aw you’re so sweet! I can’t wait to start adding in the fun stuff. We’re not quite sold on Barnaby as a name but we do love it as an in-there nickname :)
xo
s
Jill says
Have you given any thought to painting the wall between the built-ins a different color? Or maybe putting up grass cloth or some other kind of accent there?
I agree that the painting the built-in backs would be kind of busy since it’s all broken up with shelves and stuff on the shelves, and the built-ins aren’t really the star here.
But doing something contrast-y on the wall between them would be less busy (as it’s one big, unbroken swatch), and it’d highlight the crib and the real star of the show who’d be in it.
I had a hard time finding a picture of what I mean, but here’s my best shot:
http://t0.gstatic.com/images?q=tbn:ANd9GcR_pAycKVFZJ0oZVih07HBP6UlFroUQCSWvmjGAg2qZNcR1fXq-xw
(the whole wall between the built-ins isn’t painted, but, like, 90% of it is a different color)
http://cdn.decorpad.com/photos/2008/10/15/072a2df1e069.jpg (pretend the built-ins go to the ceiling, and the colorful medallion thing is an all-over accent wall between them).
http://jmcdesignltd.com/ESW/Images/built-ins-01%5B1%5D.jpg
(pretend that tiny swatch of wall on the right was white like the built-ins – so only the area above the fireplace was yellow)
YoungHouseLove says
Yes! We have thought about making that an accent wall between them somehow (with paint or art or some other interest-drawing thing like wood slats or something. Will keep you posted!
xo
s
Theresa says
Dude when did John get such a beard going on? It’s all I noticed haha. Just kidding, the built ins look great!
YoungHouseLove says
Haha! That’s his scruffy winter look ;)
xo
s
Robin says
Ooo – what about lining the inside of the drawers in green? Adorable!
YoungHouseLove says
Fun!!
xo
s
Ann says
John- Did you think about making the shelves adjustable? I know I move my bookshelves around when I have taller books, trophies, etc.. Also, why did you decide to build it into the wall rather than make the bookshelves with a back and then install them? I have a question about the drawer unit. Did you look at the Ikea Tarva? I need a dresser with legs (floor vent right where I want to put it) and wondered why you did not use that one. The price is so much cheaper I wondered what the difference is quality is.
YoungHouseLove says
Those first two questions are addressed in the post for ya (so sorry I’d cut and paste them for you but I’m in the car :)
As for looking at other ikea bases, we checked them all out but the dimensions and solid wood of the Fjell sold us (we needed a certain depth and width that some others couldn’t meet). Hope it helps!
xo
s
Joy says
Love the built ins.. I wish you could come make me some :)
John @ Our Home from Scratch says
NICE! Those cabinets pop. Well done!
Amanda says
Amazing! What a great post. It almost makes me feel like I could do it too. Just need a garage-like workspace and a saw.
Annegirrl says
Seeing these built-ins makes me so excited to finish our “screen porch becomes breakfast nook/sunroom” conversion so we can set our sights on our basement TV/movie theater room. We hope to put in some base cabinets, small sink, and fridge in an area that currently houses 4 very long, simple shelves. Built-ins like you just created would be perfect for above those cabinets for housing glasses and tchotchkes. Well, OK, it will house all the movie figures we own from Matrix, AvP, and Star Wars. The geek will come out.
YoungHouseLove says
So exciting!
xo
s
Shannon [Our Home Notebook] says
I’m so excited to see it coming together! And hurray for fast builds!
katalina says
Navy Crib?
YoungHouseLove says
That’s fun too!
xo
s
EJ @ Not A House, But A Home says
When I saw the bottoms of the built-ins, I wasn’t sure I liked them. But now seeing them with the tops done… wow!! They look fantastic. Great job! I love the colour and the scale. And I agree that the crib does look very white now, but as soon you add some white mouldings and some fabric, it’ll all tie in together so nicely. *two thumbs up!*
Sayward says
Talk about taking that baby to the market!
YoungHouseLove says
Bahahaha!
xo
s
M says
The cabinets look awesome. My question is how do you decide what goes with what when mixing different wood finishes and paint color furniture and styles. I have a basic wood tall dresser I’m wanting to refinish, it is currently this ugly stain. In my room I have a black armoire like a modern country look. How can I make these work together!
YoungHouseLove says
We just generally hold them up together (stain cans and paint swatches and pieces we have, etc) and just see what we like. There’s also Pinterest or magazines for inspiration (to see how other people are mixing things). Good luck!
xo
s
AmandaT says
I skimmed for answers but didn’t see them, apologies if already answered:
1. Did you use 3/4″ plywood? or 1/2″?
2. Do you screw right into the studs or did you do quick pilot holes first?
I have a great spot for built-ins in my dining room and I’m trying to get everything planned that I can before embarking. I’ve also had good luck with the Home Depot cutting guy being not busy on Sunday evenings if anyone needs a specific time. It’s completely inconvenient for weekend projects but a good bet for people who find the process intimidating.
YoungHouseLove says
It was 3/4″ plywood and I did pilot holes. Hope it helps!
-John
Peggy says
Very impressive! Now the fun part can really begin! My .02 on the crib drawer: paint it a glossy black.
YoungHouseLove says
Ooh that’s fun too!
xo
s
Jeanna says
You guys outdid yourselves this time! I just love them, really can’t wait to see how it all evolves :)
Victoria says
Love these! Wondering what the thought process was when you selected the fjell dressers vs the other wood Ikea dresser options. These are so much more expensive at $299 ea (esp X 2) than Hemnes or Tarva. Was it size or workmanship or other?
YoungHouseLove says
Yes it was dimensions (we wanted something deeper and wider) and that we wanted solid wood, so that sold us in these. We also liked how solid they felt in the store (that really sold us).
xo
s
Sheila F. says
Just WOW! I love them! And the beard suits John. With the flip flops and the working to build a home for the little one he is becoming quite the hippie LOL! Thanks for another great post!
YoungHouseLove says
Haha! My hippie man!
xo
s
Lara says
Those are so beautiful! I love love love everything about them, and am thinking of replicating them on a narrower wall and possibly building in a bench in between. I have a quick question though–how do you get such a smooth finish when you paint things like this? Especially on the long, smooth sections. Do you use a roller or a brush? Multiple coats? Special leveling paint? I seem to always end up with tacky brush strokes when I attempt to paint furniture. I think I must do it wrong…
YoungHouseLove says
We used Advance paint, which is self leveling, so that helps. We just rolled it on with a small foam roller and used a brush to get into tighter spots.
xo
s
Lynn says
I am studying everything I can find about built-ins because I am debating whether to tackle a built-in bench/radiator cover myself or hire contractors. I like what you did here. P.S. It’s so great that you do everything with an eye toward the long-term. It’s nice to put down roots, isn’t it?
Molly says
Great job on the built-ins! The stained wood top is my favorite part.
I had a similar two-tone crib – the Baby Mod Olivia from Wal-Mart (of all places) and I painted the base white and I’m much happier with it. I think if you paint the drawer a color, your eye is definitely going to go to it, so unless you want that drawer to be a focus, white is probably the way to go and let the color come from fun sheets/crib skirt. Maybe even the swing lamps could be bright and fun?
You can see our all-white crib here, if you’re curious:
http://thenestinggame.com/2013/06/04/the-babys-room/
YoungHouseLove says
That’s a great idea too!
xo
s
Liz says
This is such a great project! I want built-ins in my room now :)
Did you paint the ceiling the same color as the walls? I thought you were going with white, but it looks very blue/grey in these pictures.
YoungHouseLove says
It’s just white so I think it just photographs that way (might be the walls reflecting too).
xo
s
Nora says
Beautiful look! I love that you guys have planned out the future use of these wonderful built-ins – room for a twin then double/queen in between the shelves. Great for the little guy toddler stage, then teen then, gulp, college age.
Ok slow down. Great stuff as always.
Elvi says
WOW! It looks really pretty! Just an idea, but when the barnacle grows up, you’d also be able to put a built in desk between the built ins, something like this: http://cabinetpainter.com/Site/Kitchen5_files/IMG_0202.jpg
YoungHouseLove says
Love that too!
xo
s
Cate says
Love them!!! They look amazing! I just need you to come to MS and build some next to my fireplace :). And you can never have too much storage for babies, toddlers, or big kids!
Kristen says
One. Loveeee the built-ins! John, can I hire you as my official furniture builder?
Two. Completely unrelated – when in the blog timeline did you guys decide to have a set posting schedule? I hope that question makes sense.
YoungHouseLove says
Sure I’ll be right over! With regards to the posting schedule, we are nerds for a routine so we pretty much started with one pot a day (usually alternating between us) from the start. They were tiny one paragraph updates for the most part though. With one or two tiny pictures.
-John
MB says
Looking so good and coming along well! The Barnacle will love this room, I’m sure.
Quick question for ya, John. Why didn’t you use your Kreg Jig on this one? Seems like bookcases are the perfect project for it, no? Just wondering…
YoungHouseLove says
I debated it, but I just didn’t want to make and fill a bunch of pocket holes, so because they would have been visible (in some projects they hide more) I went with screws and my trusty nail gun.
-John
Summer says
I soooo enjoy reading everything you post, but this has been my favorite. Way to go, John!!!! Sherry, I am jealous you get to look at these GORGEOUS creations on a daily basis :) I cant wait to see the finished product!
YoungHouseLove says
Aw thanks Summer!
xo
s
Marina Loureiro says
Everytime I visit your blog it makes me feel like fixing everything around the house by myself! hehehe
Kathleen says
Wow!! Those look amazing!! I absolutely love how things are turning out! Can’t wait to see how the rest of the space comes together. Great job!!
Jessie says
Looks great, we are doing something similar right now. How much weight do you expect the shelves to hold? We are ‘weighing’ different shelf brace options and I love how yours looks nice and clean. Just wondering about the max weight load..as we will have books on ours.
YoungHouseLove says
They should be pretty sturdy for a good amount of books since the plywood is 3/4″ (there’s thinner 1/2″ stuff but we went with the thicker type) and the braces are screwed into studs (that’s how you hang kitchen cabinets, and they hold a lot of weight).
-John
Laurel says
THESE LOOK AMAZING!! Really fantastically professional. I LOVE that you combined an IKEA purchase with self made shelves. It looks great. You guys should be so proud of yourselves! I can’t wait to see the crown molding up! The room is going to be great!
M.C. says
Yes! Paint the crib drawer!!!!
Amanda H says
Ok, note to self: do not eat while reading your posts. I almost spit out my food at the thought of Golum Sherry!! Aaaanywho, those built-ins really look fantastic…great job!! I have a feeling that once Barnacles’ room is done we are going to see it all over Pinterest. Looking forward to hearing you guys speak this weekend at the Home & Garden show!!
YoungHouseLove says
Thanks so much Amanda! Excited you’re coming!
xo
s
Sara says
These look SOOOOOOOO awesome! Love the step-by-step guide.
Brandy says
Can I just say BOO to all who have said these look like filing cabinets?? Maybe it’s only been 2 comments & I just so happened to read those 2 and so most people don’t think that at all, but even so… WHO would get online to say that? Sheesh. Have a lil vision, yo. It’s gonna be very cute when all of the shelves get staged & prettified (handsomified?? ;) And so what if you want, like, TEN dressers in there? Babies have a lot of shtuff. WHY did I read a comment about the number of dresser drawers in this room?
Do you, Petersiks. Do you.
Ok, forgive that lil fangurl outburst, lol. Looks GREAT y’all.