Today we’re going to show you how we built the bookshelves in our son’s room. It’s an easy project that we’ve since used to create custom shelving everywhere from our living room to our beach house pantry. But these bedroom shelves were our very first attempt at them and we absolutely loved how they turned out.
This tutorial specifically focuses on building the actual shelves, aka the top portion of these built-ins. You can separately read about how we first built-in the cabinet bases (it’s an Ikea hack!) and later finished them off with crown molding. But since not every bookshelf needs those features, we’re talking just about the shelving today.

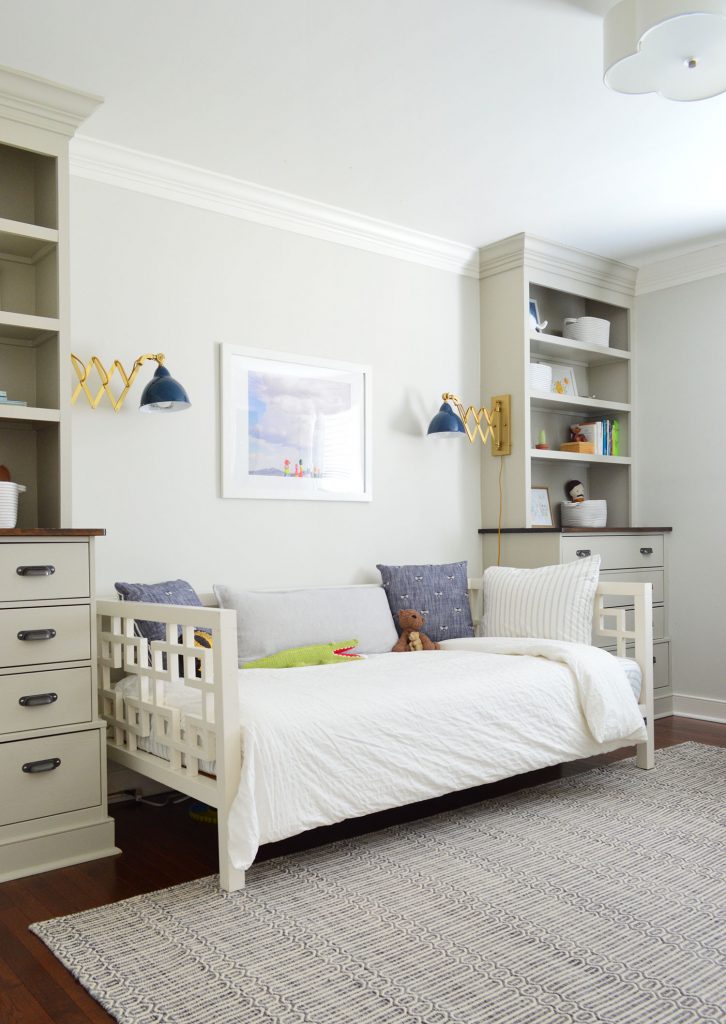
You also can take a tour of the finished room both in it’s initial version as our son’s nursery and then later when we updated it with a big boy bed.
Tools & Materials To Build A Bookshelf
Here are the supplies and tools you’ll need to build your bookshelf. If you don’t have a table saw or circular saw, try renting one from your local home improvement store. Some stores will also cut your wood for you, but this is a project where you’ll really like having one around.
- 1/2″ MDF or plywood for the shelves
- 1×3″ pine (ripped in half) for support pieces
- 1×2″ pine for face pieces
- 1×4″ or 1×6″ pine for top brace
- Measuring tape
- Stud finder
- 24″ level
- Clamps
- Nail gun with finish nails
- Miter saw
- Table saw
- Circular saw
- Power drill/driver
- Wood glue
- Paintable caulk
- Primer & paint
- Painting supplies
The exact amount of wood you’ll need depends on the specs of your bookshelf build. That’s why the first step is so important!
Step 1: Plan Your Build
Start by measuring your space and sketching out your bookshelf on paper. This will help you figure out how material you may need. You can still adjust as you build (like you might change your shelf spacing as you go) but always take time upfront to make a plan. For us, this made sure we bought enough – but not too much! – plywood for our shelving. You can see below how figuring out exactly how to maximize a 4×8′ sheet of plywood was almost like a puzzle.
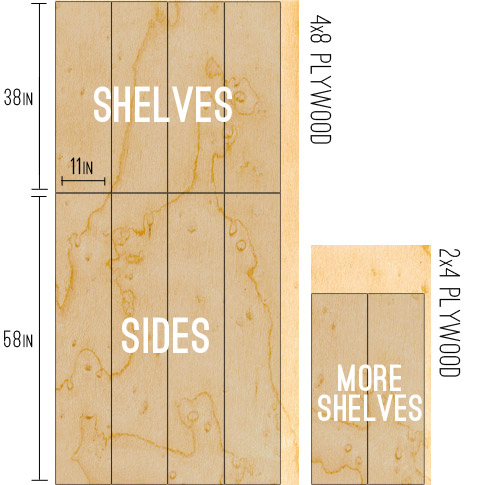
NOTE: We used plywood for this build to better match the subtle wood grain in the base cabinets. However, for a smooth, painted finish we recommend using MDF instead.
Step 2: Cut Your Shelf Pieces
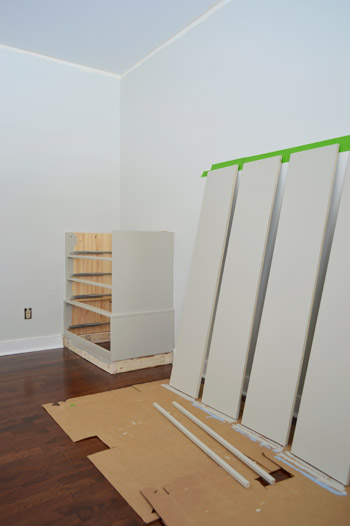
The first building step is to cut your plywood or MDF into the big shelves and side pieces. You can do this with a table saw or circular saw, like you see below. That photo is actually from our pantry shelf project because we got our plywood cut in-store for these bedroom bookshelves. The Home Depot guy ripped my plywood into 11″ strips after seeing my sketch, which was a huge help. He was able to lock his big saw into place to ensure I got equal and even cuts on all of my shelves.

If you are cutting at home, I recommend careful measuring and taking your time. You can also see above that I had clamped two pieces of MDF together so that I could make two cuts at once to ensure the shelves matched.
Step 3: Prime & Paint Your Shelves
We find it easier to paint all of our big pieces BEFORE installing them. It’s typically easier to paint flat surfaces with a roller when you don’t have to worry about edging against walls or cutting in to corners. You will still need to do some touch-ups after building, but this saved us a lot of time.
Just be sure to prime the pieces first, especially if you’re starting with raw plywood or MDF. The color we used was Benjamin Moore Senora Gray.
Step 4: Build Your Bookshelf Frame
One our paint was fully dry, we began construction by securing one of the tall side pieces directly into the wall. We used a stud finder to locate studs and attached the piece with countersinking screws that we could putty over later.
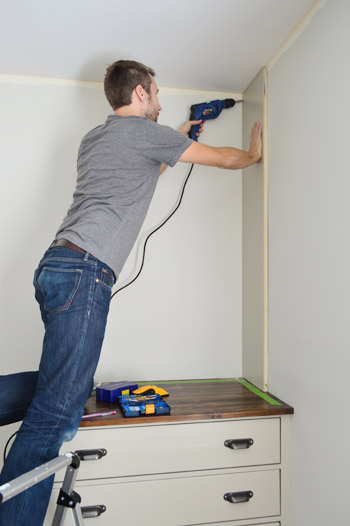
Attaching the next side piece was a bit more involved since I wasn’t screwing directly into a wall. I knew it would become sturdy once I added my shelving, so the challenge was to keep it in place in the meantime.
To do that, I attached a 1×3″ brace piece along the top of the back wall into a couple of studs. This piece wouldn’t be visible in the final bookshelf, but it gave me a place to screw the vertical side piece into. An alternative plan would’ve been to purchase a large piece of MDF or plywood to act as a solid back behind the bookshelf. We opted to just use the wall itself instead, mostly to cut down on cost.
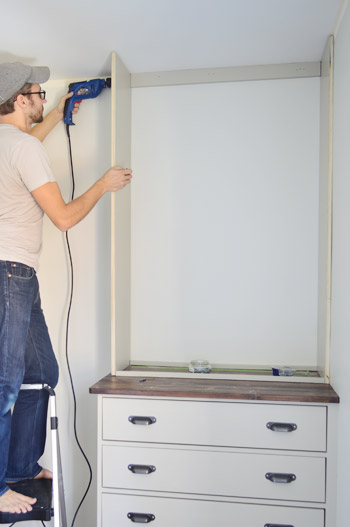
I also add a 1×6″ brace piece across the front of the bookshelves to help keep things square. I hadn’t planned on this piece originally, which is why it’s not painted.
You can also see some pieces at the bottom helping to keep things square down by the base of the bookcase. These were cut to the same length as the eventual shelves just laid there temporarily.
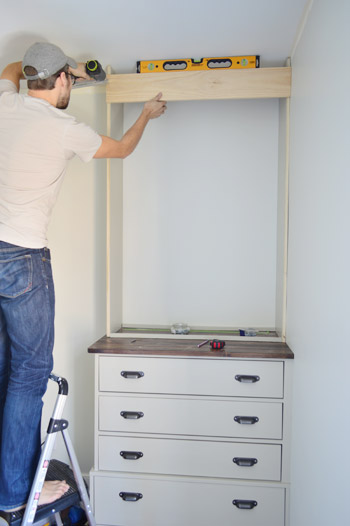
Step 5: Add Your Shelves
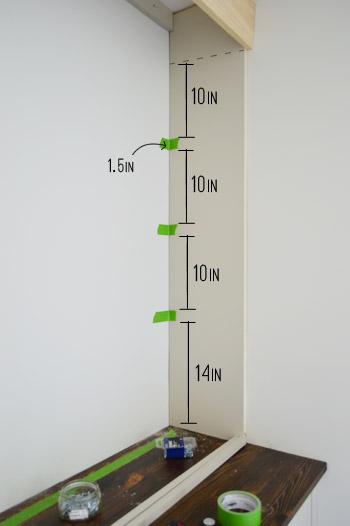
With the sides in place, we turned our attention to the shelves. First we needed to finalize our shelf spacing, so we broke out a ruler and some painter’s tape to help visualize spacing options. Ultimately we ended up with evenly spaced 10″ shelves with a little bit of extra room at the bottom. Just be sure to account for the 1.5″ width of the shelves themselves, as represented by our painter’s tape.
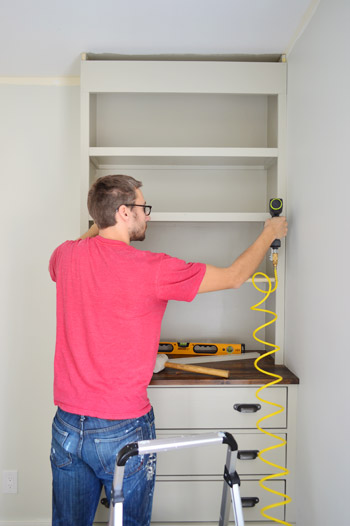
Next it was time to attach the shelf supports. These are thin strips of wood under each shelf on 3 sides. I cut these pieces by ripping a 1 x 3″ along my table saw into .75″ wide pieces. This will make more sense in a moment, but any thicker than that and the supports would be visible below the face pieces added later to the front of each shelf.
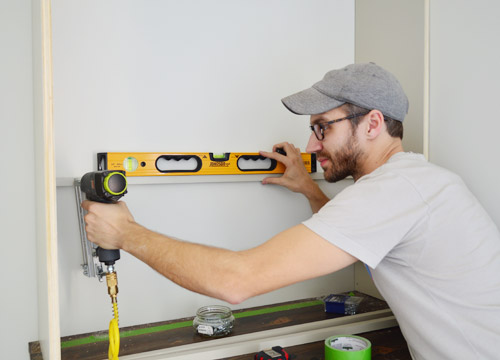
I first nailed the braces into the wall and the sides being sure to keep things level as I went. This was just a speedy way to get everything in the right place. Then I went back and screwed each piece more securely into a stud (along the back) and into the wood (along the sides). This enables the shelves to bear more weight over time.
Once all of the support pieces were screwed in, it was easy to pop the plywood shelf pieces into place. After all, we’d already cut, primed, and painted them!
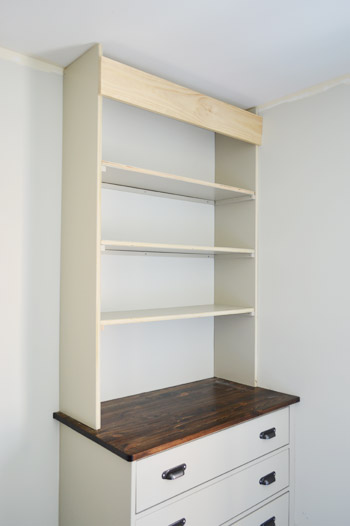
I also nailed each shelf down into the brace piece so they won’t pop out or jiggle or anything.
Step 6: Finish With Face Pieces
The next step is my favorite because it makes the bookshelf look way more finished. We cut and nailed in 1×2″ pine pieces (already primed and painted) to cover all the exposed edges along the front of the shelves. This not only hides the raw edges, but also makes your shelves look thicker than they actually are! This is also why you want those support pieces cut thinner in the previous step.
You can also see before this step I had done some painting – both the back wall and the brace piece at the top. I also had done some caulking, but you can do this as a final step as well.
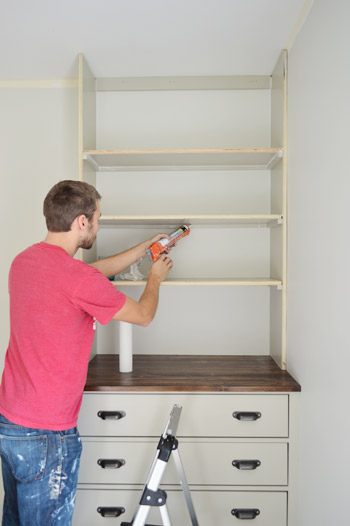
Step 7: Caulk & Touch-Up Paint
Once everything is constructed, you’ll want to caulk your seams, fill any nail holes, and do any necessary touch-up paint. The caulking will take some time, since you’ll want to caulk any place two surfaces meet: shelf meets wall, wall meets support piece, support piece meets shelf, etc. We did a little bit of this as we went, especially to fill gaps where our wall wasn’t very flat.
Once your caulk is dry, you’ll need to do touch-up paint over it. This may feel tedious because you already painted, but I promise you this is much faster to do quick touch-ups than be painting from scratch at this point.
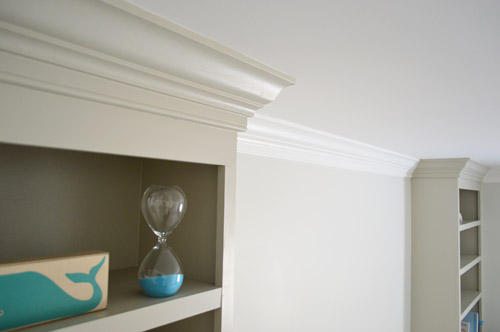
Step 8: Add Crown Molding (Optional)
For our bookshelves, we decided to finish off the top with crown molding that integrated with the crown we’d put installing around the whole room. We would be using a “beefy crown” method we’d tried first in our daughter’s room. It’s involved putting a piece of baseboard around the top of the room first, to make the crown look thicker.
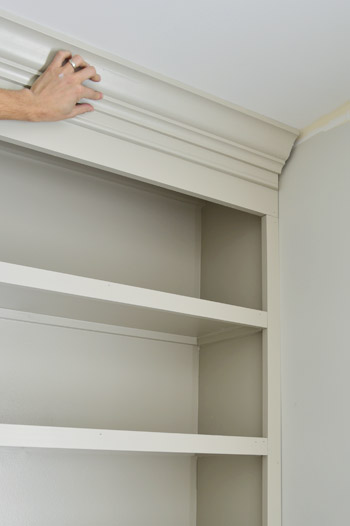
You can read more about the process of installing crown molding in this room.
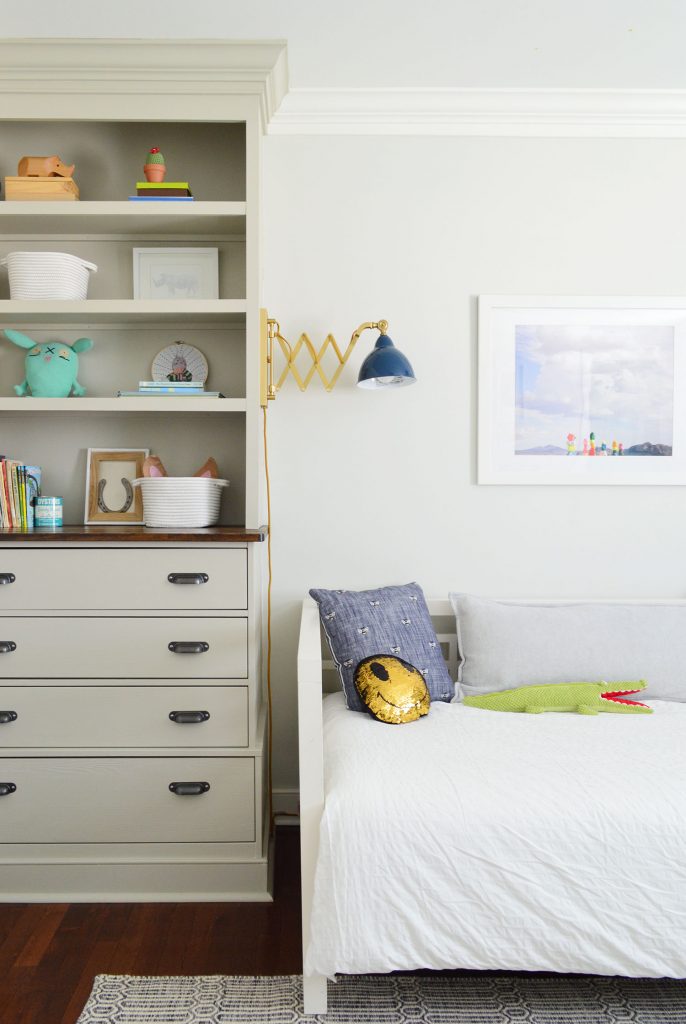
We love how these bookshelves turned out, especially how easy and affordable they were to create – they were about $60 each. And that includes all of the material for the bottoms too! They’ve also been great for both functional storage and cute display items.
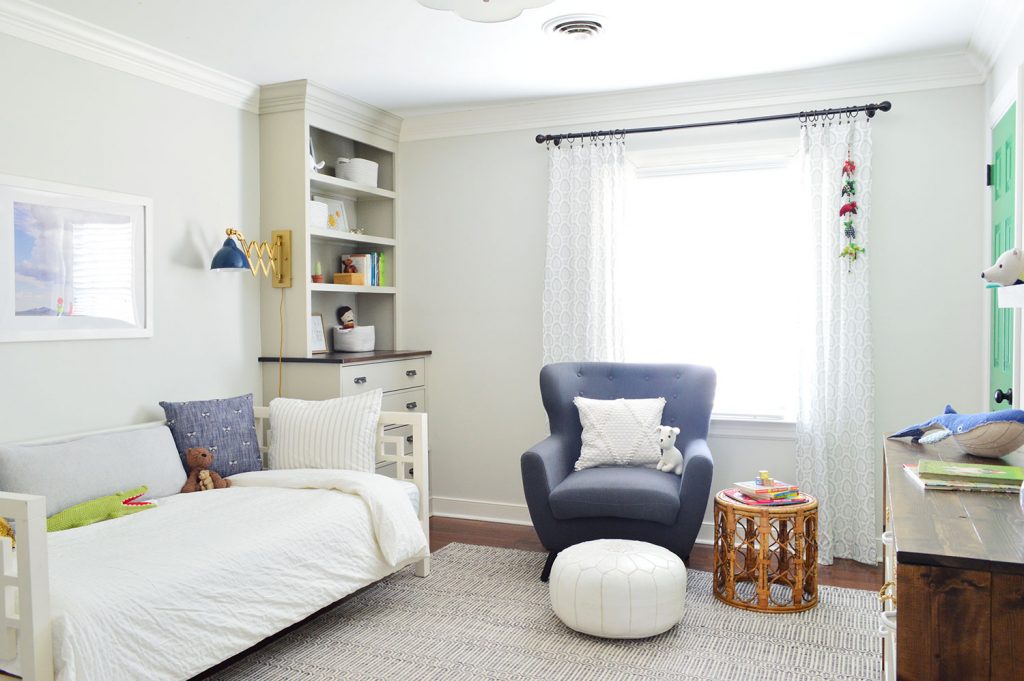
Again, you can read more about how we finished this room in its first iteration as his nursery, and then a few years later as a big boy room.
More DIY Shelving Projects
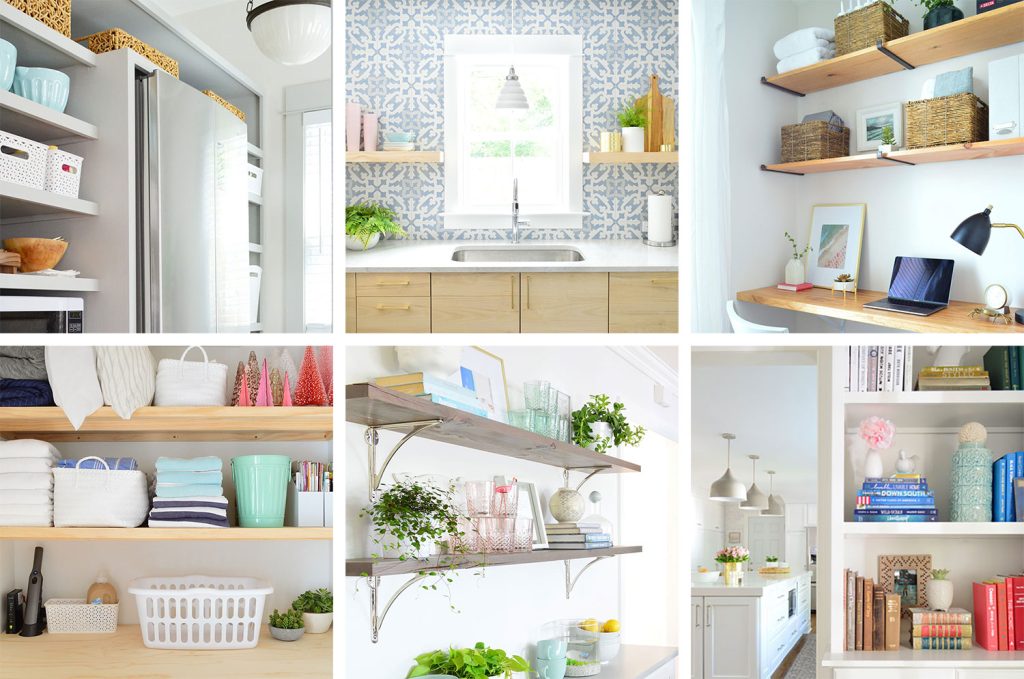
If you’d like more DIY shelving ideas, we wrote a roundup of 15+ shelf projects you can build yourself. You can even see how we used a similar technique shown here to create kitchen pantry shelving!
P.S. And when it comes to the items in our house, we hear “where’d you get that?!” a lot – so here’s a page full of our home’s paint colors & stuff we’ve bought/loved.
*This post contains affiliate links*

Kathy says
I totally agree with Sherry – something has to be done with the crib drawer – we just ended up taking ours completely out. Couldn’t even tell one was supposed to be there.
YoungHouseLove says
Love that tip! I worried it would be obvious so that’s nice to hear!
xo
s
mp says
Beautiful!!!
Megan says
The fact that I love the built-ins goes without saying!! Can’t wait to see the finished product! I actually have a random question–any reason you guys haven’t invested in an old truck for hauling things? You seem to be prime candidates, yet I see you prefer to rent vs buy one. Since you two are budget conscious, I figure you have your reasons! Any idea how much you’ve spent in rental trucks over time? Is it still way less than a cheap old truck?
YoungHouseLove says
Yeah we have done the math and buying and insuring a truck just doesn’t make sense for us yet (we rent around 5 times a year for $19 for a total of less than $100 a year. We’d love to eventually sell our Altima and get something slightly bigger with a hitch so we can buy a trailer though!
xo
s
Sarah says
Love these built-ins! What a lucky little guy. I may steal this look (hope that’s ok) for my family room. :-)
YoungHouseLove says
We’d love that! Send pics!
xo
s
Hillary says
I have been reading your blog since the beginning, and am proud to admit I use “young house love did it this way” in my daily conversations…. so coming from someone who knows you as well as any internet stalker can…. the last line of this post is by far the funniest I have read. How do you guys turn the simple “building bookcases” into, “just laughed and spit my coffee on the computer!” Keep on doing what you’re doing! Love it!
YoungHouseLove says
Thanks Hillary!
-John
Jennifer I says
WOW WOW WOW. I love them. I like them the lighter color, too. So impressed. SO much work.
YoungHouseLove says
Thanks Jennifer!
-John
Janet Belbeck says
Love the built-ins!! The colour is fabulous. Can’t wait to see the finished nursery.
Anne says
I’ve been following your blog for about three years and I have to say I’m most excited to see how this room turns out. Maybe it’s because I have two little boys of my own. I love the built-ins so far and gosh…what a cost saving adventure. $60 each! Way to go.
Anita says
So, your post shows painted crown molding, but Sherry’s quote in there says something about white crown. What color will the crown molding actually be?
p.s. These look AMAZING. I wish my husband or I was even remotely handy!
YoungHouseLove says
Sorry to confuse you! The crown on the built-ins will be the same color as the bookcases, but the crown around the room will be white (like the white trim and baseboards that are already there).
xo
s
Erin Port says
Shucks! I wish I had read this before our family room shelf install. WE installed them before painting them and now we are left cutting around. Did you use enamal paint or latex? The rest of our woodwork is enamel but so fumey we will have to wait til spring when kiddos aren’t home and we can have lots of air flow in the room! Curious – love your blog – so inspiring! Blessings!
YoungHouseLove says
We use Kilz Premium primer (water based and no-VOC) followed by Advance paint by Ben Moore (it’s alkyd and made to mimic oil but is low-VOC instead).
xo
s
annie t says
at a loss for words….
AMAZING!!!!
YoungHouseLove says
Thanks so much Annie!
-John
Kelly says
Those look great! What an awesome project! Following your blog makes me feel so inspired and empowered. I like to think of myself as a pretty smart gal (she said modestly), but you guys are constantly making me realize that I haven’t even been seeing possibilities all around me in my home. Wait, you mean I can, seriously, make my OWN built-ins? That’s ALLOWED?! You mean home builders don’t have some sort of magical special built-in maker? ANYONE can do it? Never. Crossed. My. Mind. I’ll blame my toddlers for rendering my brain to mush. And I’m figuring out how to use our table saw pronto.
YoungHouseLove says
You’re so sweet! Happy building, Kelly!
xo
s
Stephanie B. says
Holy cow! They look so good! (Not that I had any doubts.) Solid work, John!
Sam says
Things are shaping up and looking good! I can’t wait to see how green will fully be incorporated into the room!
Ash says
Wow! LOVE this post – amazing built ins …. thinking the crib would be beautiful painted gray – #justsayin’! We had a green crib for our little one – the green alma bloom crib – and used these green and black tree / squirrel etc decals from Boodalee so am looking fwd to seeing this colour scheme come together. http://www.whatisblik.com/shop/explore/boodalee-trees
YoungHouseLove says
Sounds so pretty!
xo
s
Marilu Luna says
John, excellent job. You truly are one helluva carpenter. Maybe its my eyes, but in the pic it looks like the bottom of the left bookcase has a straight edge, while the one on the right has a more decorative one. Maybe its the angle of the picture. In any event, job well done! Can’t wait to see the completed room!!!
YoungHouseLove says
Yes, that’s just the angle. Straight on they both step in a little (they both have the same interior edge). That’s just how the dressers were originally made, but we like that extra detail!
xo
s
Erin says
I had my doubts after seeing the photoshop rendering, but these are turning out great!
rachelle says
dang, those are looking SO fine! I have to admit I could NOT see where y’all were going with those- I trusted you, I was hanging on for the ride, but I just could not envision what the outcome was going to look like (even from the fancy Photoshop renderings). But these look TRULY sweet and awesome and custom. Please don’t keep us in the dark too long before you show us them decorated with Sherry’s style. CONGRATS on the bookcases!! – oh yes and the baby! :>
YoungHouseLove says
Aw thanks Rochelle, you’re so sweet!
xo
s
Christa says
You’re a bold one Mr John for not wearing shoes will working around power tools, wood, etc. Other than that I LOVE YOUR BLOG!
YoungHouseLove says
Thanks Christa! We definitely have shoes on when we’re sawing and cutting lumber out in the garage, they just get covered in sawdust so we slip them off at the door (hence the barefoot look upstairs when we’re doing lighter duty things like nailing or screwing).
xo
s
Libby says
We just watched ThisOld House do crown moldings in a less fussy way that allows the house movement not interfere with the look. Looks really shape too.
YoungHouseLove says
Sounds cool!
xo
s
JenWoodhousecom says
Love what you guys have done here! It looks soooo good! And it’s gonna be so much fun to fill those suckers up! Is it weird that I’m just as excited as you are to style those shelves?
YoungHouseLove says
WAHOOO! We need to start “CLUB BOOKCASE: For anyone as ridiculously excited to fill these shelves as we are.”
xo
s
Jessica Moroney says
Soo right about the crib drawer. Please re stain it to match the built in stained shelf. That would totally match it in, and keep it very classic for re-sale purposes for the future.
I love the built ins! You have very lucky kids! :)
YoungHouseLove says
Thanks Jessica! That’s definitely a possibility!
xo
s
Krissy says
I’m a little confused… You mention that the molding is going to match the built-ins, but then you say that the crib will match the white molding… What color is the molding going to be?
Also, they look wonderful!
YoungHouseLove says
Sorry, I’ve been confusing people all day with that passing comment! The crown around the rest of the room will be white, just like the baseboard and trim around the rest of the room. So the crown on the bookcases will stay painted, but the rest of the room’s crown (and baseboard and trim) = white :)
xo
s
Kristen | Popcorn on the Stove says
These look so great!
Rachel says
I was looking at 2014 decorating trends and came across this pic. As soon as I saw the green lamp in the bottom picture, I immediately found myself thinking of your nursery. Time for me to turn off the computer, me thinks!
;-) Love your work!
Rachel
http://www.farrow-ball.com/decorating-trends-2014/content/fcp-content
YoungHouseLove says
AHHHH! I love that picture!
xo
s
Mrs. A says
I adore these shelves! Perfect for a growing baby, little kid and older boy!
And, the extra drawers are definitely not too much storage, even for a little one. We have extra drawers in both our 6 year old son’s room and our 1 year old daughter’s room and find them very helpful in storing clothes to grow into. I buy next season clothes in bigger sizes on sale (I especially look out for funny shirts and Star Wars gear for my son). These and hand-me-downs from friends are stashed in the bottom drawers according to size.
So, when I’m dressing my little girl in the morning and her little shirt pulls up over her adorable belly, or when I notice my son has grown an inch overnight and has high-waters, I can grab them new clothes from the bottom drawer. I then put the too-small clothing in the basket in the closet for donate/hand-me-down/consignment).
It’s fun to be able to have cute clothes to put them in and know that they’ll always have something that fits! :)
YoungHouseLove says
Love that tip!
xo
s
Mrs. A says
Oh, I forgot – I’m so looking forward to what you make/do for a crib mobile or crib decoration. I still love the wire and flower construction you made for Clara’s room!
Your room plan seems both rustic and hip. I envision something with newsprint and gears . . . .
YoungHouseLove says
Aw thanks Mrs A!
xo
s
ajira says
They look amazing! Well done, you! Can’t wait to see how you finish it. I love me some built-ins.
lisa says
amazing…you guys pulled it off once again! (p.s. is there anything as too much storage? me thinks, not!)
Isabel says
This room is looking so good already! BTW I remember a lot of comments about adding in a piece to fill the gap on the insides of the dresser, but seems like after the crown is added that small gap will look even more purposeful and balanced with the bookshelves.
John’s carpentry skills seem well on the way to ensuring you guys might never have to buy another stick of furniture again if you so choose! :D
YoungHouseLove says
Yes, I think now that those two inside edges of the bookcases step in, it hopefully looks nice and balanced :)
xo
s
Alyssa says
This is SO great!! Extremely impressive. :)
Leigh says
Those look great!!! Awesome job. I can’t wait to see them decorated!
I don’t know how clothes, books, toys have worked for you so far, but my 2.5 year old has way more toys than anything. I have been much better about clearing out his clothes and shoes than I have the toys. Now if only I was as choosy with my clothes and shoes. :)
YoungHouseLove says
Yeah, that’s true here too!
xo
s
Sarah says
Ceramic animal plus light. Thought of you immediately, Sherry!
http://www.shadesoflight.com/dolomite-owl-lamp.html
This room is going to be amazing. Love reading about your home design adventures.
YoungHouseLove says
LOVE!
xo
s
Allison says
Love it! Saving this picture to show our carpenter…who I will have to hire…because neither of us is that skilled! Question about the shelves: how do you decide what a “normal” depth and height would be? Our current kitchen is “custom”, which just means that the last guy who lived here stuck a bunch of stuff up, and I swear nothing fits!! They’re too shallow, or else there is so much space that it’s all wasted…drives me crazy!
Also, Sherry, are you feeling any better??
YoungHouseLove says
Too shallow drives us crazy too (the shelves in our last house’s dining room weren’t deep enough for most books) but thankfully there are some nicely sized built-ins in the corner of our living room here, so we referenced them a lot as we went! That’s how we got the depth (they fit nice large books) and also used their spacing to help us decide how many shelves to add, and how far apart to place them.
And thanks for asking how I’m feeling! I’m afraid I’m sick all day again (it seems to go back to just being mornings and then flair up again) but this little guy’s worth it. Trying to keep my eye on the prize ;)
xo
s
Susan Valle says
Awesome job … I love them. Looks so expensive and gives great character to the room.
Britt says
Long time blog lurker here :) Beautiful work on the built-ins!! As for the crib drawer, maybe ditch it entirely? You now have plenty of storage space and a more airy crib might help balance the heavier book-ins. Can’t wait to see the finished space!
YoungHouseLove says
It’s funny, a few others said that and I worried pulling it out would look like it was obviously missing (there are drawer slides, etc) but someone with the same crib said she removed hers and you can hardly tell so I might play around with that!
xo
s
Natasha says
Looks awesome!! Makes me want to build something :)
Jo says
These are fab! They totally look restoration. :) Wish you would’ve kept the dark gray of the photoshop rendering, though. The beige looks clashy with the white crib. Even with color accents, that’s gonna be hard to temper. Oooh, maybe we have a green crib looming on the horizon!
Julie says
Definitely watch out for crib climbing once the Barnacle gets older! When I was about 2 1/2 I used to climb out of my crib and onto the rocking chair that was right next to it, then stand on the ARM of the chair and poke my head through the blinds to look out the window. If only I was that good of a gymnast now! lol
And I love the look of the built-ins. Like someone else said, you can’t have too much storage space.
angie says
Oh my goodness. It looks FANTASTIC!
Steph Nelson says
I’d be dying to get on styling the shelves too! I think painting that wood piece on the crib green is a great idea as well. Great job as usual!
Vicky says
You guys rock!!
Been following you for 4 yrs now, you just keep getting better!
YoungHouseLove says
Thanks Vicky!
xo
s
jenny says
YEEEEESSSSSSSSSS! I’ve been wanting to build built ins for our loungeroom for ages, but we’re so not as handy as you guys. This looks totally doable though! It’s all in the pre-planning :)
They look awesome, well done :)
Sarah says
Ooh, these look brilliant! …And what a spot of luck that you’ve posted all about the process! My husband and I are planning built-in bookcases (with cupboards and the bottom) for our living room, and I was trying to persuade him tat this was the easiest way.. Bookmarking this post to show him when he gets home tonight! :)
Jessica says
This is awesome! I love them. And I love how nurseries look with the little nook for the crib :) Impressive!
sarah m. dorsey says
Wow!! Those look amazing!!
Amanda T says
I love the direction the nursery is going! I had a question about your angel care monitor you used with Clara…do you plan to use it for this baby? What was your experience with it? I’m due in a few weeks with my first and am debating getting one, I know there was a recall recently but I feel if you attach the wires the proper way (according tot the instructions) there shouldn’t be a risk. I’d love to hear your thoughts on it.
YoungHouseLove says
We loved ours and plan to use one again with our son (they sent out free adapters to solve the wire issue in old ones, and new sets come with those as well). I believe they also sell video AngelCare monitors, so we might upgrade to that (just since our house has two levels so if he’s napping upstairs and we’re downstairs that might be helpful).
xo
s
Gretchen says
Impressive work! And all done with bare feet!
Sherry says
Would it be too dorky to say I am so proud of you? What a great job! These look beautiful, and can’t wait to see more evolve.
Jeff says
They look fantastic! Are you going to be adding the lights like in your photoshop mockup?
YoungHouseLove says
We’re thinking that we might do them along the wall behind the crib instead of drilling through the bookcases. That way they can be like those sconces people add over their beds for reading (especially when there’s a bed between these built-ins down the road).
xo
s