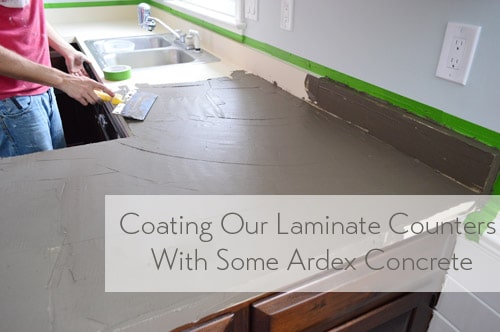
So we did it. We concrete’d our kitchen’s laminate counters. Sherry shared this quick peek at our first coat in Friday’s post, and we’re back with the final results, the details of how we got there, and an in-action video to hopefully help explain the process.
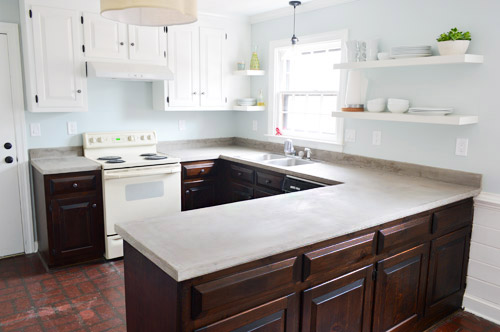
We’re really happy with how they turned out. Pictures don’t do it justice, but the whole room feels a lot more updated and less laminate-y. It’s giving off kind of a stark/cold vibe in these photos, but after we add some colorful window treatments, stuff on the shelves/counters, and remedy that bad faux brick flooring (and that almond stove) we think it’ll feel like a whole new room.
I’m not going to sugar coat it, though. It was a lot of work. And a lot of dust.
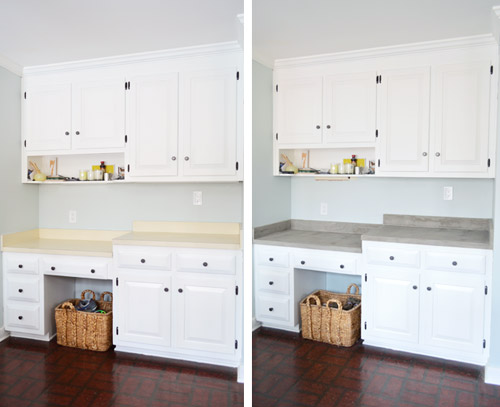
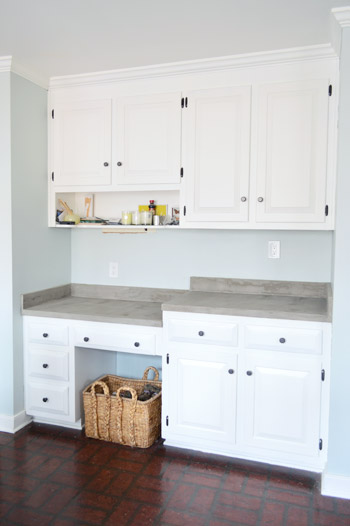
Here’s a reminder of what the counters looked like before. We had creamy-yellow laminate (with the occasional burn mark or scratch). In addition to the main kitchen area, we also gave the concrete treatment to the nearby nook by the eat-in part of the kitchen. We haven’t sealed the counters yet (we haven’t been able to track down either of the two products that our research points to using), so the color will probably get a bit deeper after that step.
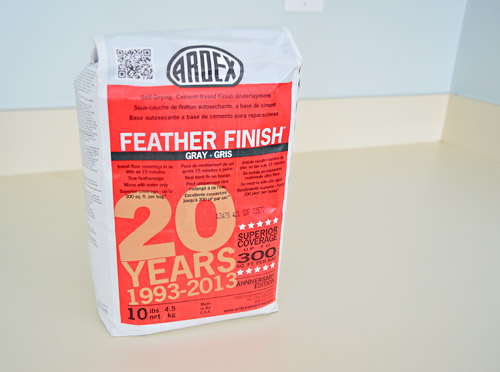
We did this using Ardex Feather Finish, which we’ve been really interested in trying since seeing a few other attempts like these from Kara Paslay, Little Green Notebook, Sarah’s Big Idea, and A Beautiful Mess. Somewhere between all of their pretty pictures and the low price tag for Ardex ($19 per bag) I had assumed this would be a quick and easy task. Oh silly me…
Maybe it was because we’re first timers, or maybe it was because our work area was especially large (we were dealing with 45 square feet of counters thanks to the U-shaped area in the cooking zone and the nook area by the table), but it turned out to be a tiring and messy job that spanned across five days. It wasn’t very complicated or difficult, just more labor and time intensive than we realized we were getting ourselves into. So let’s dive into the process. Forgive our photos for not being chronological. We took a bunch throughout our four rounds of applying/sanding the Ardex and I’m just using the ones that are most helpful. Let’s begin with supplies!
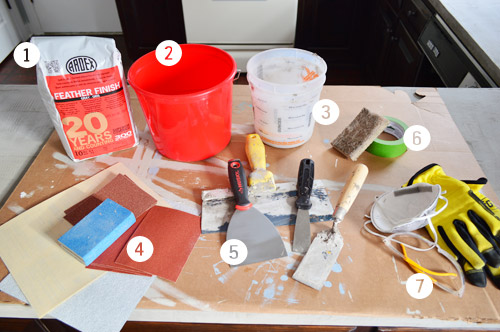
- Ardex Feather Finish, obviously. It’s not easy to come by, but you can hunt for a local distributor on their site or just follow this affiliate link to get it on Amazon. We ended up using 2.5 bags, though I think we applied it a bit thicker than necessary.
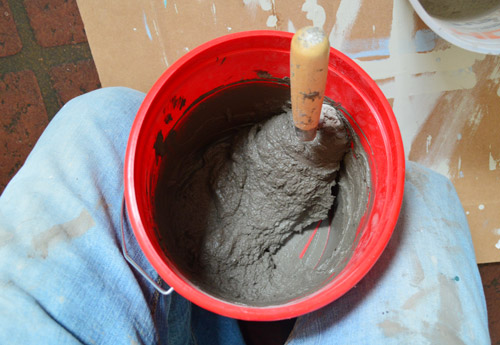
- Mixing buckets: We used one of these small red buckets for mixing our Ardex (it mixes with water). We made pretty small batches, so this was a great size.
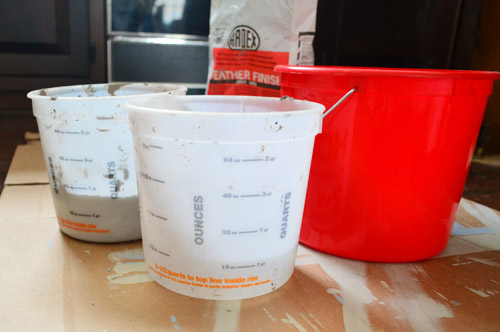
- Measuring buckets: We used these (one for water, one for Ardex powder) to make sure we were mixing the right ratio in our red bucket.
- Sandpaper: A variety of grits – both high and low, as well as a sanding block for easy gripping. We used mostly 60, 120, and 220 grit.
- Spreading tools: We used the flat trowel (on right) for mixing in the bucket, then used the other three for spreading. The big 10″ drywall knife was good for big flat areas, the 4″ putty knife was great for backsplash and edges, while the small guy helped us get into tight spots, like around the sink.
- Stuff for keeping walls clean: We kept a sponge and paper towels on hand to clean up any drips or splatters on the wall. We also taped off some areas too (more on that later).
- Protective gear: During the sanding process the glasses and dust mask helped keep stuff out of our faces (Sherry preferred our heavy duty respirator) while the gloves were great for keeping our fingers from getting crazy raw.
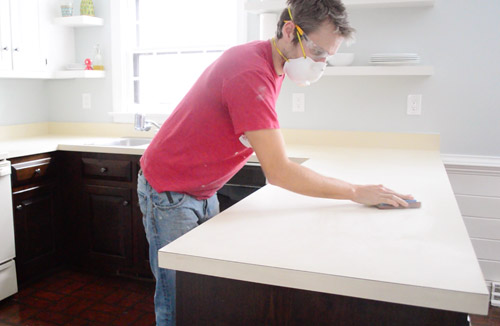
Speaking of sanding… the first step was to rough up the existing counters with some high grit sandpaper. This was before we realized our fingers would be taking a beating from all of the sandpaper gripping. We wised up and added gloves and used nice big sanding blocks wrapped in high grit paper about ten minutes into it. It went much easier after that.
The Ardex bag suggests a mixture of 2-parts powder to 1-part water, but we found that balance to be a little bit on the thick side – making it hard to spread and what we believe led to our first layer being, well, on the thick side too. So we erred on the side of a bit more water from that point on.
Like grout or thinset, the goal seems to be a toothpaste-like consistency. Thick enough that it doesn’t run or drip off your blade, but thin enough to spread easily. If you’re mixing larger batches it suggests a paddle mixer, but we did just fine by hand (Sherry took a turn mixing things too and didn’t have any issues doing it by hand). Since it starts to harden within about 15-20 minutes, we never wanted to mix up too much at once anyway.
Spreading it on the flat surfaces was kinda fun, in a weird way. It was like icing a giant cake and using a big 10″ blade made it pretty fast to get the big areas covered. The backsplash was another story, but we’ll get to that in a second.
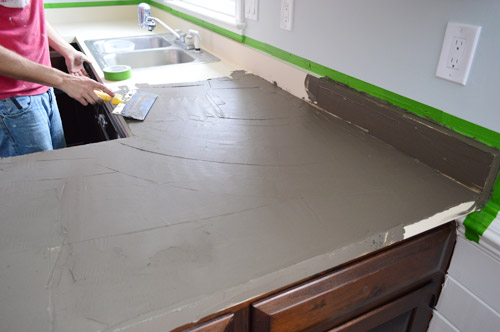
Here’s a quick video Sherry took of me applying the third coat, since we thought it’d helpful for you to see the stuff in action. I’m not claiming my technique to be great or anything, but we did find we got a bit better each round (Sherry also thought we got better at sanding/smoothing each layer as we went). Which is good news because your first couple of layers will get covered up anyways – so they’re kind of like low-risk practice rounds.
When it came to doing the sides, we switched to a smaller putty knife. We usually did these after we had applied most of our mixture to the top, that way what was left in the bucket had set a bit more and was less likely to slide off the vertical surface.
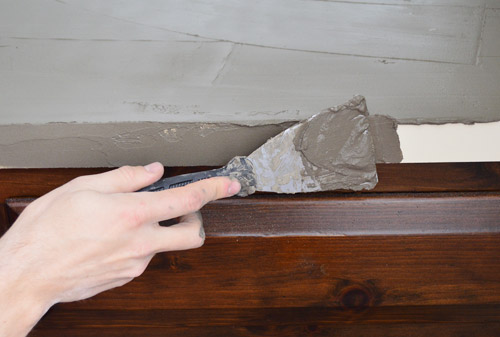
At first we found the edges to be challenging since it was easy for stuff to build up there. What we realized a couple of rounds in was that after about 20 minutes the Ardex had hardened to an almost clay-like consistency, and Sherry or I could come back and smooth the edges with a damp finger. My favorite part was sneaking up behind Sherry all Ghost-style to smooth them from behind her back. Who says there’s no romance in DIY?
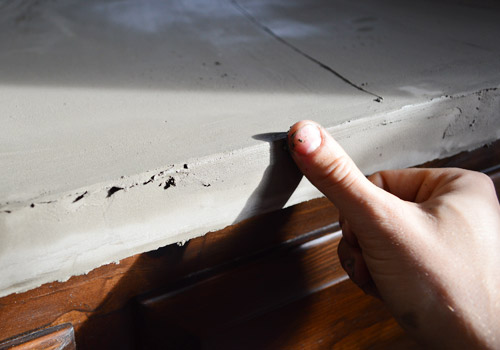
Here’s our first round after it dried. You can see Sherry taped off the wall to protect it when I lamented how much was getting on them as I went. In hindsight we’re still unsure whether that ended up being a smart decision. It certainly made us less paranoid about being messy as we went, but removal was a bit of a pain and not perfect since we were essentially concrete-ing the tape to the wall in a few spots.
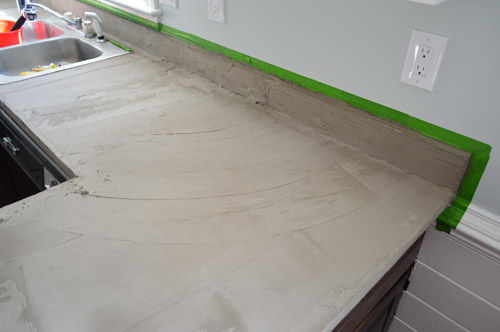
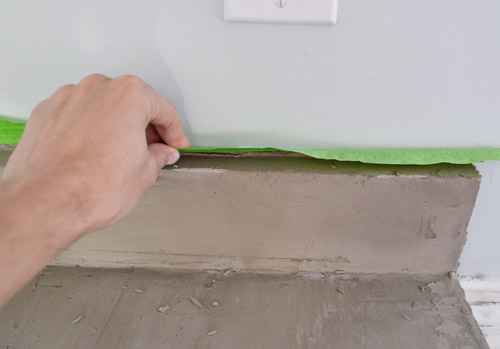
We decided to ditch the tape after our second round of counter smoothing, so we slowly worked our way around the room peeling it off (we feared that too much concrete build-up would trap the tape in place forever). One thing that we found during this process was that pulling it down from the top (rather than ripping it to the side like we do after painting) did a better job of getting a clean edge and not just tearing the tape. But we did have to chisel it free in a few areas… so I’m not sure if it was a time saver in the end.
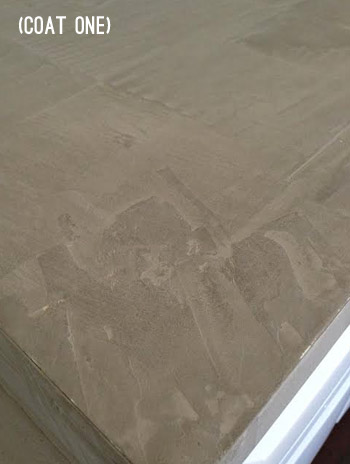
Things looked pretty rough after our first round (well, after every round actually). But that’s where the fun mess begins: the sanding step. Here’s where you smooth out any rough spots or ridges so that the next layer can go on evenly and ultimately get you to a flat, smooth finish.
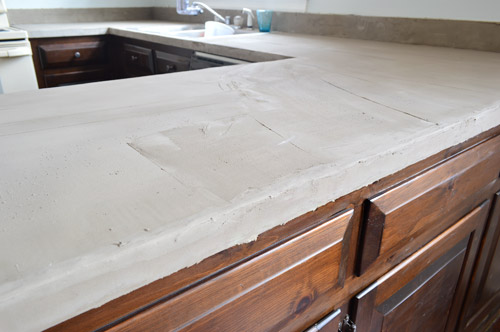
After letting the surface dry overnight, first Sherry would go across the top with a putty knife and scrape off any obvious ridges that were left by the drywall knife during the Ardex application. Even though it had hardened, it wasn’t tough to do. Blobs and ridges just popped right off as she scraped back and forth over them.
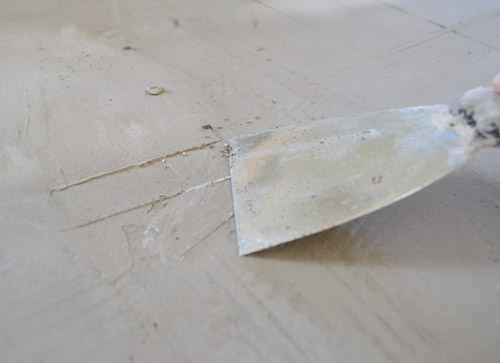
The most satisfying thing was cleaning off the bottom edge. Sherry realized we could just run our smaller putty knife along those and sheer off any irregularities, which left us with an awesomely crisp line on the bottom. Best part of this project by far. Could’ve done it all day.
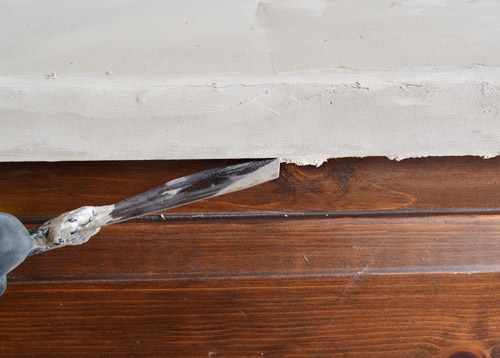
That step was quickly followed by our least favorite part: sanding, sanding, and more sanding. We chose to do it all by hand, since we feared that our power sander would just sand everything down to the laminate again (or leave rough ridges or marks as it traveled around the counter). Plus, with all of the tight spots like the backsplash and around the sink, we figured it would be easier to maneuver by hand.
We used a sanding block (for easy grip) wrapped in fresh sandpaper each time. For sanding every layer except for the last one we used a really rough 60-grit paper to make smoothing ridges and rough spots easy, but after the last coat of Ardex (we did four coats) was all smoothed on and dry, we switched to 220-grit paper to make sure we didn’t leave big/rough scratches in that top coat of concrete.
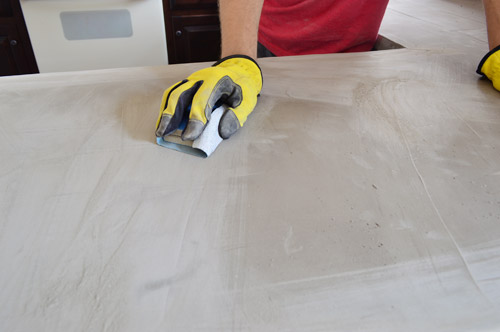
Sherry also realized that it was helpful for us to pause while sanding each section to vacuum off the excess dust as we went (thanks shop vac!). This was especially helpful because sometimes the dust would disguise an area that needed a bit more sanding. Plus, it just helped for sanity reasons, since we felt like we were keeping the mess more contained that way.
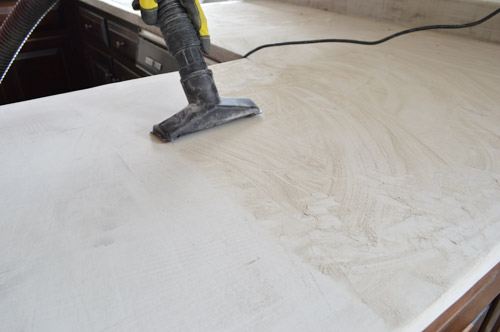
Speaking of which, the mess was the biggest surprise to us. Despite reading other people’s experiences with it (and obviously, we knew sanding was involved), I don’t think either of us had mentally prepared for the fact that there’d be a fine gray build-up of powder EVERYWHERE. And since the kitchen is such a central and highly traffic area of our house, keeping it clean ended up being a big time suck (after each round we would sweep, then vacuum, and then mop the floors to be sure nobody tracked anything throughout the house when they passed through over the five days that we worked on it).
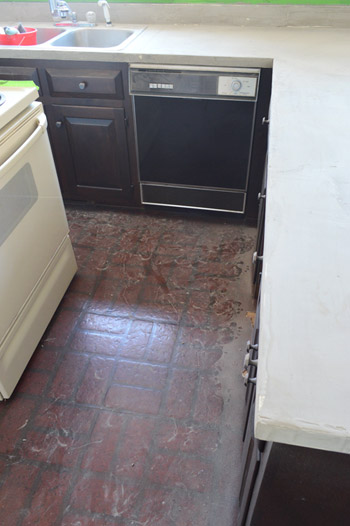
After our first coat, we noticed the laminate was peeking through in a few spots after our initial sanding step – mostly on edges where it’s really easy to scrape everything off if you’re not careful. But that’s one reason you do multiple coats, so we weren’t too panicked.
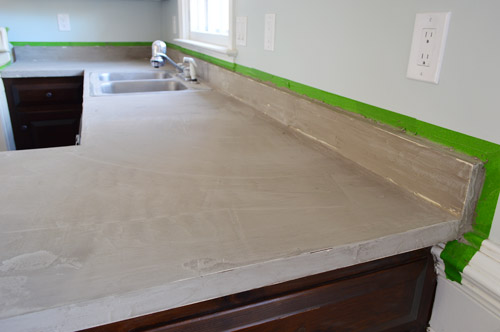
Here you can see a second coat beginning to get applied over the first. Note the difference in color between the wet Ardex vs. the lighter stuff (that’s how it dries). We actually think once we seal it, it’ll get closer to the wet color though, so that should be interesting to see.
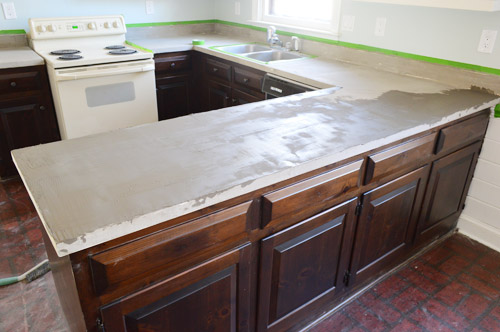
Here’s a shot of our final counters (well, pre-sealing). You can see it’s still not perfect, which everyone notes is one of the charms of this Ardex technique. You get that sort of imperfect, industrial look, but it definitely feels more solid & stone-like (as opposed to plastic-y like laminate).
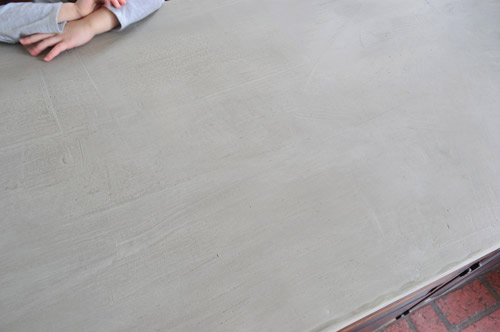
I’ll admit that I had to come around to the idea of appreciating the flaws of the finish. Sherry was immediately charmed by it, but the perfectionist in me resented the fact that this type of project doesn’t yield perfectly uniform results. I think once we seal it I’ll appreciate it even more (that will darken it a little and remove the chalky finish in favor of a more polished look) so I’m really looking forward to that.
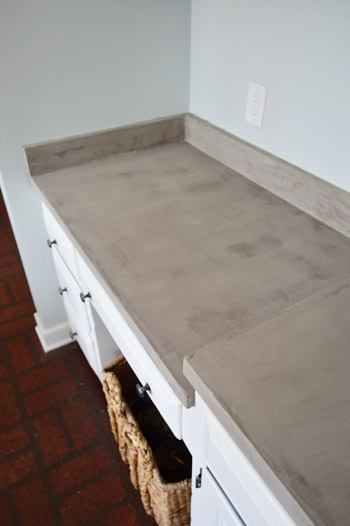
By far the hardest area to get smooth was the backsplash, just because it was a small area that was difficult to reach and seemingly made up entirely of edges and corners. So both applying the Ardex and sanding it was challenging and required a bit of body contorting on my part (lucky Sherry was too pregnant to reach it in most areas thanks to her belly being in the way, which had me slightly envious by the end of this process).
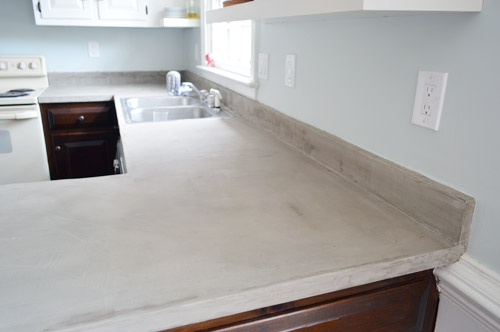
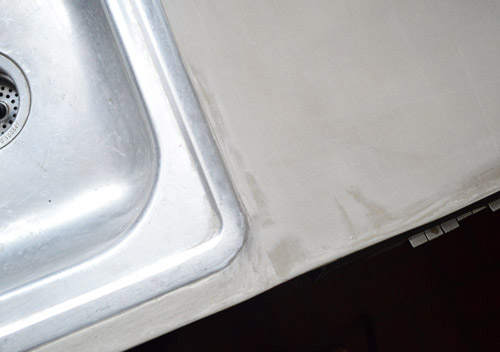
Another tough spot was around the sink. If this were our “forever” counter, I would’ve gone through the trouble of removing the sink, but we’ve got some old copper pipes that are pretty much corroded together down there (which would mean bringing in a plumber to switch this out). So we opted to save that for Phase 2 of our kitchen update and just taped / sanded around it. The results were actually better than I expected.
Challenges and flaws aside, we’re happy with the overall improvement to the space. It feels good to rid the kitchen of another old yellowed surface and make the room feel a bit more updated. Just cover the floor with your hand and squint – ok?
And although the time that we spent on this update was longer than we envisioned (probably around 15 hours spread across five days, including prep and clean-up) the cost was still pretty fantastic. The three bags of Ardex (again, we only needed 2.5 to do four coats) cost $57 in total – and we probably spent another $20 in buckets and sandpaper. So for 45 square feet of countertops, we paid just $1.71 per square foot to update it – which is pretty hard to beat.

That doesn’t include the sealer though, which is next on our list. We’ve read a ton of sealer reviews since it seems that the wrong sealer can cause more scratches, stains, and even issues like bubbling down the line – so we want to get it right. The two most highly recommended products seem to be Ardex Clear Concrete Guard High Performance Sealer and GST International Satin Seal Water Based Acrylic Sealer. Does anyone out there have a preference between the two? We can’t find either of them locally so we’re going to have to order one of them online and wait for it to come, but we’ll definitely share what we end up going with, how it goes on, and what it does to change this finish – as well as updating you guys on how these counters end up wearing for us over time.
Update: You can check out what we used to seal them here, and read an update on how they’re holding up here.
Psst – Wanna know where we got something in our house or what paint colors we used? Just click on this button:


Kim says
Interesting project. Really feeling the white on gray look. But the “working” part of the kitchen with the wood-tone cabinets looks very disjointed after this update. How do you feel about it?
YoungHouseLove says
I think once we seal the counters and they darken up a little (and we get stuff on them, and the shelves, as well as window treatments in – etc), it’ll be a nice balance of warm and cool with those wood bases. We’ll have to see where we end up, though!
xo
s
Alexandra says
They look great! I’ve been thinking of doing this to our laminate counters for a while but wanted to wait to see what y’all thought. I’m glad I did because we have a drop-in sink (and a drop-in range), and I was scared I’d have to take them out to do the Ardex finish. Are y’all pleased with the results around the edges of the sink? Any other tips for that part of the process? Thank you!!
YoungHouseLove says
We worried it would look terrible around the sink so although it’s not perfect, it definitely came out a lot better than we expected. I would just tape it off and try to sand it well and get it as smooth as you can with your finger after 20 mins like we did on the counter edges.
xo
s
Audrey says
love love love it!!!
I will need to show this to my daughters and maybe see about doing this ourselves.
A quick question… could you tint the concrete with color?
YoungHouseLove says
Yes, if you click the link to Sarah’s Big Idea in the post where we mention others who have tried this, she tinted it dark. So pretty!
xo
s
Meredith says
I’m totally just using the comments here to take advantage of your HUGE readership, but I hope you don’t mind. :) Goodwill of Wisconsin is running an upcycling contest; it’s a contest for cool things made out of Goodwill finds. My mom makes purses/totebags out of team sweatshirts that she finds and has entered her Badgers purse made from a sweatshirt. If you have a minute to do a good deed for the day, she’d really appreciate your vote! (No registration, just a click.) http://www.amazinggoodwill.com/ultimate-upcycling-contest/ THANK YOU!!!
AT says
I’ve been looking at this look for a while as an update to my green marbled laminate counter tops until I can replace them. Yours look really great!
What do you think about using the counters as a food prep surface once the sealer is on there?
Are the sealers food safe and what sort of effect would using these counters as a food prep surface have on them do you think?
YoungHouseLove says
One of the two sealers we’re debating (the Ardex one) says it’s safe for occasional food contact or something sort of half-enthusiastic (haha) but we use cutting boards for everything from apples to meat, etc – so since we’re not rolling dough out on the counters or anything I think we should be ok. They do sell super food-friendly ones but the reviews on them are a bit shaky, so I think sticking to our cutting board method will be the better choice in the name of them holding up. Will keep you posted though!
xo
s
Amy says
I can’t imagine putting a material on my counter top that is not considered 100% safe for food! I use cutting boards too, but there is always going to be inadvertent food-touching no matter how careful you are. (And who would want to HAVE TO be careful about this in the kitchen?) Especially with babies and kids in the house – I would be scared to have something like a piece of cheese touch the counter. Sorry, but you lost me on this project!
April P says
I absolutely love this and am so happy you guys did this! I think your kitchen looks gorgeous!
Do you think this could be a 1 person job? Say… if my husband was out of town for a few days and i wanted to tackle on my own?
YoungHouseLove says
I definitely think one person can do it, just prepare to be sort and sweaty. Haha! We sort of switched off making batches and sanding and tag teamed things (I would do the nook and John would do the U-shaped area) but if you have a smaller kitchen or just take it slow and steady one person can definitely do it!
xo
s
Brittany says
I think it looks fantastic! What color paint is on the walls in the kitchen? I’m really diggin’ it.
YoungHouseLove says
Thanks Brittany! It’s Nelson Blue by Ben Moore.
xo
s
Nicole B says
I am happy to see you did this! I think it looks great! I have a sideboard that is our entertainment center that I am planning on trying this on. Thanks for sharing!
YoungHouseLove says
Good luck Nicole!
xo
s
Laura says
Do you think you can do this on a counter top with rounded edges?
YoungHouseLove says
Someone else asked that and I think you should be able to. Maybe just let it set up a bit, smooth it on, wait 20 mins, and smooth it again with a wet finger. Anyone else try a rounded edge counter with Ardex?
xo
s
Lisa says
Please update us when you figure out what sealer you are using. We built a very thick concrete counter top for our outdoor pizza oven and we need to seal it, but haven’t been able to find a sealer for exterior use that is food safe. Can’t wait to see your update and hear your review!
YoungHouseLove says
Will do!
xo
s
Darcey says
The counters look great! I have two questions-
I remember you mentioning somewhere in the archives probably that concrete countertops were too heavy for the structure of the house you were in at that time- is that different now? Or is this process that much lighter?
Also, what made you both decide to keep the short backsplash up? I know you’ve taken it off in a bathroom before without replacing it. Is a full backsplash more of a phase 2 type of update?
Thanks for showing us all the details… this is so tempting for our hunter green laminate counters that have been mocking me since our move last summer.
YoungHouseLove says
Yes, this process is much lighter! The previous one was to build a wood form and fill it with concrete (solid concrete, a few inches thick, to create solid counters after removing the old ones) and this only skim coats the existing laminate counters and builds them up about 1/2 of a centimeter. As for the backsplash, this kitchen was so oddly constructed (wish we could have popped them off first). The backsplash was actually installed behind the counters in here (instead of on top, which would have allowed us to pop them off) but if we tried to remove them in this case we’d be left with a big 1.5″ gap behind them all around the room.
xo
s
Isabelle says
I really like it! Especially the nook area with the white upper and lower cabinets. With the rope-ish basket you have under the desk area, you can get a good idea of how the table and chandelier fit in with the more “industrial” counters. I really like the industrial-rustic texture mix you’ve got going on :-)
YoungHouseLove says
Thanks Isabelle!
xo
s
Suzy says
It looks amazing! Our family just started renovating our kitchen/installing hardwood floors and I just want to say kudos to you guys for constantly updating your house! I would not be able to take the stress of it all the time! As a reader I appreciate all the hard work you do just to keep us entertained.
Courtney says
My husband and I have concrete countertops and we love them! I’ll admit I wasn’t totally in love with them when we bought our house but now I am! The ‘flaws’ really grew on me, gives them some character :) They are extremely easy to clean up and since they are aolid concrete you can plop down a hot pan if need be. However, we still put a oven mitt or trivet underneath the majority of the time just in case it would hurt the sealer. We actually need to re-seal ours this year. The ones you mentioned above, are they just for the concrete spread over laminate or are they safe to use on the solid concrete as well? We do not have any local retailers who sell a sealant for concrete countertops so we would be ordering online, too. Ours have slight blue undertone but are mostly grey. Do you think the sealers may change the color any or remain the same since they have been sealed before. Obviously I’m not much of a DIYer! That’s why I follow you guys for ideas :)
You guys did a great job! What a difference the new countertops make!
YoungHouseLove says
So glad to hear that you love yours! They sound awesome! As for these sealers, I think they’re good for solid concrete as well. Maybe check the reviews just to be sure, but they seem good for that material whether it’s solid or a skim coat. Good luck Courtney!
xo
s
Kaesey says
Oh, my goodness. You may have just solved my ugly laminate counter problem! =)
Sharon says
Congrats on doing the $100 job I paid $4k to a professional for! You can scroll down for a photo here: http://www.allowmenyc.com/category/decorate/ Couple of tips: Never cut on the concrete. It scratches easily, moisture gets into the scratches and makes them very noticeable. Ditto if you’re mixing something in a bowl and pressing down, like making guacamole. Put a dishtowel under the base. Lastly, be sure to wipe up anything sticky. I once lifted a couple of square inches off my surface because sugar water dried under the bottom of a glass and when I lifted it, that was it. I had my counters touched up at about the 10-year mark (after the sugar incident) and have really learned how to care for them. Good luck!
YoungHouseLove says
Thanks so much for the tips Sharon!
xo
s
Jessica says
Looking awesome! I just picked up some black appliance epoxy spray this weekend, for refreshing our black fridge. Thanks for the inspiration!
YoungHouseLove says
So glad! Congrats Jessica!
xo
s
krista says
I’m intrigued! I’m never sure if I like concrete countertops or not, so now I feel like I’m on a little kitchen adventure, waiting to see how everything comes together in your space. :)
Lauren F says
Love love love the concrete! But I might be biased because I’m a civil engineer :) One of my professors did a cast-in-place concrete counter top for his kitchen – it’s one of those things I’m looking forward to for my future house. So excited to see how the kitchen is shaping up!
Morgan says
Great work you two! This post couldn’t have come at a better time – I’ve been researching the same process/products and just prepped our countertops this week for the Ardex Feather Finish. You did such a good job outlining your experience. I’m currently doing the same thing as you – Phase 1 projects that don’t break the bank so it’s great to see how much the countertops helped modernize your room!
Can’t wait to see the sealed/finished product as I am debating over products to purchase for that step too!
Samantha @ Fabulous Fabris says
Wow! This looks great! I wasn’t sure how this would look, as I’ve never heard of using concrete like that before, but it definitely looks better than the laminate. I can’t wait to see how it looks once you’ve changed up the floors.
Amanda Bolan says
Looks great! Make sure you get the sealant on before you do any cooking/prepping on it. We did our master bathroom in concrete and had to order sealant, in the meantime I put make up on and it NEVER came off the counter. My husband had to do another layer of concrete and seal it to hide the stain. Just hoping to save you some sanity by my mistake!
YoungHouseLove says
Thanks Amanda!
xo
s
Tandra@Little Houses Big Dogs says
Looks great you guys! We have something similar in the works but we’re not using ardex. I just wasn’t sure how it will work for our specific situation (how we live/kind of countertops we have, etc.) Also I know it requires sealant and even though we don’t prepare or eat on the countertops, do you know if it’s food grade safe? (I couldn’t find much information or wasn’t looking in the right place?) Thanks you two, it looks beautiful as always!
YoungHouseLove says
One of the two says sealers we’re debating (the Ardex brand one) says it’s safe for occasional food contact or something sort of half-enthusiastic (haha) but we use cutting boards for everything from apples to meat, etc – so since we’re not rolling dough out on the counters or anything I think we should be ok. They do sell super food-friendly ones but the reviews on them are a bit shaky, so I think sticking to our cutting board method will be the better choice in the name of them holding up. Will keep you posted though!
xo
s
Kristen says
I love the counters with the white lowers but think it looks a little funky with the stained lowers. Any chance you’ll give in and paint those white? I think that would look phenomenal
YoungHouseLove says
I think once we seal the counters and they darken up a little (and we get stuff on them, and the shelves, as well as window treatments in – etc), it’ll be a nice balance of warm and cool with those wood bases. We’ll have to see where we end up, though!
xo
s
keisha says
Oh my word… the effort! Great job, you guys.
Kelsie says
Is there a reason you guys didn’t try using the power sander before ruling it out because it might cause issues? That just seems like a crazy amount of sanding by hand to do without trying the easier route first!
YoungHouseLove says
The other tutorials we read (like Kara’s and Jenny’s that we linked to) sanded by hand, so we followed suit. Kara uses Adrex a ton (I think she’s even a distributor/partner to the brand), so we figured whatever she did would be the best way for us to get good results.
xo
s
Ashley M says
I’ve been curious about this method. Is the sealer safe for food?
YoungHouseLove says
One of the two sealers we’re debating (the Ardex brand one) says it’s safe for occasional food contact or something sort of half-enthusiastic (haha) but we use cutting boards for everything from apples to meat, etc – so since we’re not rolling dough out on the counters or anything I think we should be ok. They do sell super food-friendly ones but the reviews on them are a bit shaky, so I think sticking to our cutting board method will be the better choice in the name of them holding up. Will keep you posted though!
xo
s
Dana@chocolateandsunshine says
Beautiful “after” photo. Love this outcome. I know a couple others who did this project and were very happy with the results. What a project!! I love the mix of industrial with modern and cottage. Your kitchen will look great, as always!
Annie T says
Your counters looks great! I refinished my butcher block countertops once and it almost killed me, so I think this is a little out of my league.
You should have a Petersik DIY Scale where you rate the difficulty of a project. (Put it together in your spare time!) It would factor in time, technique and mess – and somehow account for possible unexpected difficulties! I so appreciate it when you guys put it out there that a project is messy (this one) or arduous (blue trim) because pictures make everything look easy.
I can’t wait to see what happens when you switch out the floor!
xo
Annie
YoungHouseLove says
Haha, thanks Annie!
xo
s
Jennifer says
Love love your concrete redo and overall blog! We have black concrete countertops as well..a labor of love by my fiance. Just a little note…ANY citric juice, orange, lemon, etc…etches them badly…we found out the hard way when my stepson didn’t have the top on all the way when making smoothies. OUCH!!!! we have a wonderful little island butcher block on casters for food prep but wish the counters were more functional…Ours were sealed too…but little white spots show through…Just alittle caution so yours can stay beautiful!
YoungHouseLove says
Thanks for the tip Jennifer!
xo
s
keisha says
And oh my gosh… I apparently need to keep up better. I didn’t know you had a collection at Target now. That’s awesome – congrats!
YoungHouseLove says
Thanks so much Keisha!
xo
s
Lis says
OT here, but I’m a faithful reader and I feel like I missed something big here… when did you get a line at Target?!! I just saw it on the sidebar. How come I didn’t know of this before when I visit every day? haha Congrats on it! I browsed it and loved it! (Your countertops look pretty nice too.) :D
YoungHouseLove says
So sorry Lis! We posted about that last Monday. Here’s the link for ya: https://www.younghouselove.com/2014/03/hook-line-and-bullseye/
xo
s
Lis says
Aw, thanks. I went back looking for it. Of course you shared on the day I had doc appointments with my kids. In love with the octopus hook. Congrats again!
YoungHouseLove says
Thanks Lis!
xo
s
Karen says
I really want to try this technique to create a stone slab look for the horizontal surface of our ugly fireplace hearth — it (obviously) doesn’t have laminate now, but I was thinking if I took a piece of plywood or cement board, cut it to fit, and then used Ardex to cover the top and sides for the look of a cement/stone slab. Do you guys think this would work? What would you recommend using as the ‘countertop’ surface? Can’t figure out if it’s a genius idea or a ridiculous one.
YoungHouseLove says
That sounds like it could work! I’d check out the link in this post that we shared to Sarah’s Big Idea (she created a base for her Ardex since she didn’t have an existing counter).
xo
s
Kristin Friesen says
Have you thought about staining it before you seal it? That could hide some of the flaws, or make them look more uniform.
YoungHouseLove says
We did consider that but I think we prefer the raw/industrial color of the concrete (it’ll deepen when we seal it and we think it’ll look more polished that way too). Will keep you posted!
xo
s
Betsy says
Thank you for the step by step. I have been patiently waiting for you to finish, before embarking on the Ardex adventure. I do have one question for you. Do you think I will have any issues with applying to a rounded laminate back splash? Instead of a 90 degree angle at the top, mine is a rounded edge. I’m guessing if i let the mixture set a little longer, this will help with adhesion? Thanks for any advice you can shed on the subject!
I think they look fantastic! Can’t wait to see how they look sealed.
YoungHouseLove says
Yes, I would let it set a little and then go back 20 mins later with a wet finger to try to smooth it like we did our edges. Hope it helps!
xo
s
sarah says
My husband and I start this project this weekend, we are trying to find a sealer that will work….
lauren says
I’ll be so interested to see how they turn out once sealed! We’ve thought about doing this to our laminate counters too.
Lisa says
Love it! We made our own zinc countertops but the sealant isn’t holding up like we had hoped for. This might be what we try while we save up for real concrete countertops.
Also, this is a local (for me) blog where they acid etched a concrete floor. I wonder if you could do something like this for a countertop to “warm” up the concrete…
http://www.sopocottage.com/2014/03/tough-wearing-concrete-floor.html
YoungHouseLove says
Woah, that’s cool!
xo
s
Laurel @ SoPo Cottage says
Thanks so much for sharing our acid etch project Lisa. And thanks for linking me to these cool countertops! That might be a great project for an upcoming project!! What a great job – love them!
traci says
I really love these counters! It really brings things together and even makes the faux-brick floor look better. I’m eager to see how you feel about them in a few months. If I had known about this stuff a few years ago, I probably would have given it a try too! I put in cheap Lagan beech counter tops from IKEA in my kitchen as a phase 1 change from bad/old laminate since we couldn’t afford something more. We sealed them with pure tung oil from http://www.realmilkpaint.com/oil.html (it’s all natural and super safe and great for sealing any wood project). I ended up loving them so much that I have no desire to “upgrade” them-they’re already the perfect upgrade for us! I think sometimes the less expensive route can turn into the best route. In my research, stone counter tops had just as many drawbacks as all of the others. I don’t think there is a perfect counter top.
YoungHouseLove says
That sounds awesome Traci!
xo
s
Barb says
Wow! I am in! Great job, John!!!
Was wondering…is John for hire?
I sure would love to have this done to my laminate counters!!!
And my question is: will this be guaranteed to stand the test of time? Wiping down, banging things, dropping things, just wear and tear?
B.
YoungHouseLove says
I’ll just put John in a UPS box and send him over ;)
As for how they’ll hold up, with sealer they should be good, but we’ll keep you posted either way. If any cracks or flaking or staining or scratching occurs, we’ll definitely let you guys know!
xo
s
Jen says
I’m so glad you guys did this because I’ve had it pinned on my kitchen board for awhile now and was nervous to attempt it. Curious about one thing–my laminate counter has a rounded edge that I loathe (squared edges seem much more contemporary to me). What do you think about creating a new edge (thin molding strips?) before concrete-coating it?
YoungHouseLove says
Never even thought about that but I bet it could work! If you click through to Sarah’s Big Idea (we linked to her in the post as someone we saw try this technique) she built her counter bases for the Ardex from scratch, so maybe her method could work for you!
xo
s
Allison says
We pour our own concrete counters and used a generic concrete sealer from home depot. I regret that a lot! We have experienced two main problems. First, water soaks through if left to puddle up, and does eventually damage the finish. But that’s not all that noticeable. The main problem is the discoloration that citrus juice causes. It took me a while to realize what was causes the white stains, but it’s from lemon juice. I cut a lot of lemon (not directly on the counter), but any juice that gets on the counter will bleach it out!
http://mattandallisonkelly.blogspot.com/2011/10/concrete-countertops-part-5-reveal.html
If I had to do it again, I would use the Cheng line of products. I heard wonderful things about this sealer!
http://store.concreteexchange.com/CHENG-Concrete-Online-Store_5/Concrete-Sealers-Waxes-Care-Products/CHENG-Concrete-Countertop-Sealer
YoungHouseLove says
Thanks for the tip Allison!
xo
s
Stacy says
I just finished doing this to our countertops last week. We LOVE it. I’m still finding cement dust around the house, but I think it was worth it. I used Cheng Concrete Countertop Sealer because it says it’s food safe, and it left our counters still feeling concrete-y. It was super messy, though. You spread it on with water versus painting it on, so water gets everywhere–and where it hit the walls it left shiny spots I needed to sand and repaint. But I think it was worth it to have a food-safe finish.
YoungHouseLove says
Thanks for the tip Stacy!
xo
s
Jen says
We’ve had concrete countertops for a few years and though I loved them at first, they can stain so easily! (We poured our countertops in a mold, so it was a different experience than yours). We’ve been told by several companies that it is necessary to re-apply the sealer once a month in order to maintain good results and minimize stains. It isn’t too time intensive to apply the sealer, but still, you know, maintenance! You might want to look into Cheng Concrete in Berkeley, CA. They’ve done some really beautiful things with concrete (I’ve seen a variety of their projects in person) and have their own line of care products. Anyhow, keep up the good work! Even though I have been frustrated with our concrete countertops at times, I’m glad that we gave it a try.
YoungHouseLove says
Thanks for the tips Jen!
xo
s
Casey says
Hi! I’m wondering about the food-safe nature of this product. You guys always seem to do very green projects with low/no-VOC, so I’m sure you did some research here as well.
YoungHouseLove says
One of the two sealers we’re debating (the Ardex brand one) says it’s safe for occasional food contact or something sort of half-enthusiastic (haha) but we use cutting boards for everything from apples to meat, etc – so since we’re not rolling dough out on the counters or anything I think we should be ok. They do sell super food-friendly ones but the reviews on them are a bit shaky, so I think sticking to our cutting board method will be the better choice in the name of them holding up. Will keep you posted though!
xo
s
Tania // run to radiance says
YAY!!! Love concrete counters!! We built our own with custom molds we made- you can see them here:
http://www.runtoradiance.com/2012/10/29/building-concrete-countertops-a-kitchen-update/
I love, love, love them!!!
YoungHouseLove says
So glad you love yours Tania! That’s awesome!
xo
s
Beth says
Your projects are saving our downstairs bathroom! First we painted over our grout to lighten it up (everyone who comes over comments on how much brighter it is without the nasty dark grout!) and I just ordered the Ardex feather finish on Amazon. Our house is 110 years old and estimates for a new countertop have been around $600. The vanity goes the whole length of the bathroom and with six kids, we need to keep it that way! ;) So excited to give this a try. Our bathroom is a blue-grey color so I think this will look great!
YoungHouseLove says
Good luck Beth!
xo
s
Sarah says
You guys are so amazing, this is such a fantastic idea! The first house that my hubs and I rented had concrete counters. They were actually framed out, and poured the concrete several inches thick. The idea of covering a sub-par laminate counters is so brilliant. I imagine they’d weigh a lot less, but give you that chic, industrial look. The one thing about those countertops we had, the varnishy finish scratched really really easily.
YoungHouseLove says
Thanks for the tip Sarah!
xo
s
Marianne in Mo. says
Lookin good! I want my island marble and the perimeter in quartz, but the kitchen is only 7 yrs. old, so have to wait a couple years. We too have laminate, and some places are showing a bit of wear. I look forward to seeing the long haul of how this ardex holds up. Happy Birthday, late!
Laura G. says
I have done this twice now – once for a kitchen counter and once for a bathroom counter with integrated sinks! I am really happy with both. If you are looking for a perfect glass-smooth finish – probably not the material for you. If you are doing a countertop, I recommend a tool called a pointing bar used for brick mortar for the inside corners (where the main countertop meets the vertical part). I found this to give a better transition from vertical to horizontal. I have left the bathroom counter the original concrete color and used a black concrete stain on the kitchen counter. The bathroom counter has been in place for over a year with good results and the sinks are exposed to water every day without an issue. You do need to seal every year and if you leave it its original color, you can see when the sealant needs to be reapplied by the concrete getting darker. The kitchen counters were just finished over Christmas and are doing well so far!
YoungHouseLove says
Love those tips! Thanks Laura!
xo
s