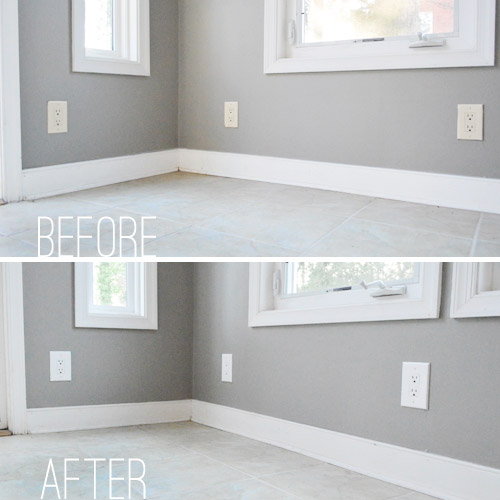
While our sunroom mojo was still running on high from accomplishing our most daring painting task to date, I quickly followed up with two small electrical updates to the room. The first is seemingly minor, but to us makes a world of difference in making a room feel new: updating outlets. It’s something that was especially helpful in a room like our sunroom where the off-white outlets just look dirty against the white trim.
A basic new outlet and cover plate can run you as little as $2-3 so it’s not a pricey update – even for an outlet-riddled room like ours (there were nine in here). And the task of replacing them is pretty straightforward too. Maybe a bit tedious, but certainly not backbreaking. So I actually put together a little graphic tutorial for easy reference if anyone else wanted to update some outlets in their home. I’m not a trained as electrician in Perth, so I can’t say this is an expert how-to or that it’ll work for every home out there, but so far it has served us quite well.

Switching out all 9 outlets – plus two switches – took me a little over an hour. But it made the room feel a couple decades newer to our eyes (we’ve heard of folks who spray paint their outlet covers but you can’t spray the actual outlets so in our world it was worth the $25 that we spent to update all of the covers and the outlets themselves in one long-lasting fell swoop). Oh and for anyone looking to sell, this is one of those things that’s pretty straightforward and inexpensive but is actually good for resale (it makes the whole room feel updated and even more crisp when it’s combined with fresh paint on the walls).
Now on to my less successful electrical project in the room: adding a light to the ceiling fan.
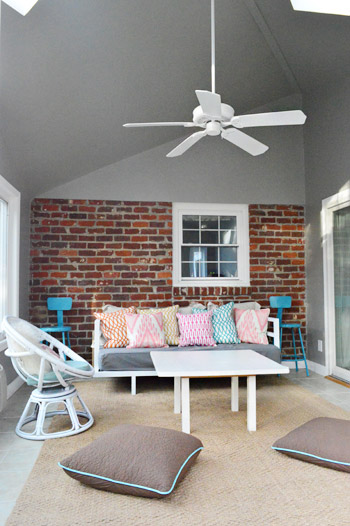
This room has no lights in it. So just as it’s sun-filled during the day, it’s pitch dark at night. So when my mom enlightened me that they sell kits to add lights to existing ceiling fans we immediately had our game plan in mind (which included this vintage-ish Ceiling Fan Light Kit found at Home Depot).
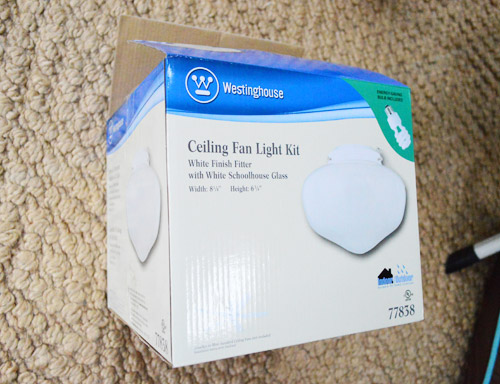
I was pretty stoked about the price of the add-on light fixture ($20) and the schoolhouse style was pretty decent too. So in my excitement I kinda sorta might’ve skipped over the directions and started taking the fan apart to see how it connected (after turning the power off to the room). It was quickly apparent that this colorful mess of wires didn’t match up with the simple black and white wires that the light kit came with.
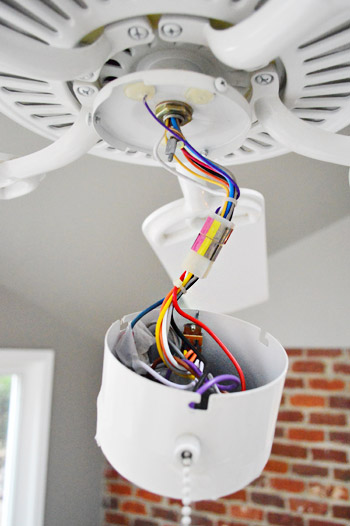
Convinced I had purchased the wrong kind of light kit, I returned it to the store and brought a picture of my wire situation to show the lighting lady at the store in hopes that she could point me in the direction of a kit that worked for my fan.
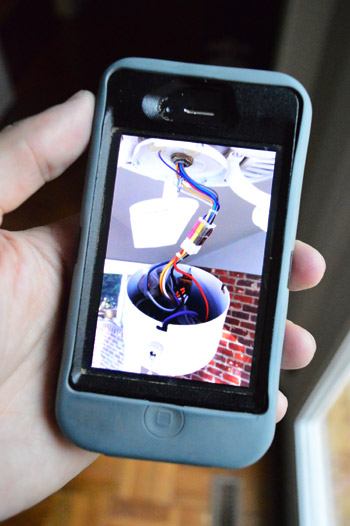
Well, after a short discussion (that uncomfortably involved the word “nipple” a lot) she informed that I did in fact have the right kit, I just wasn’t following instructions correctly (oops). Apparently I was supposed to pop out the small cover on the bottom of the fan (see below)…
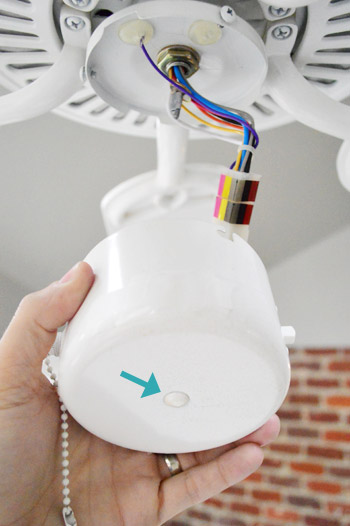
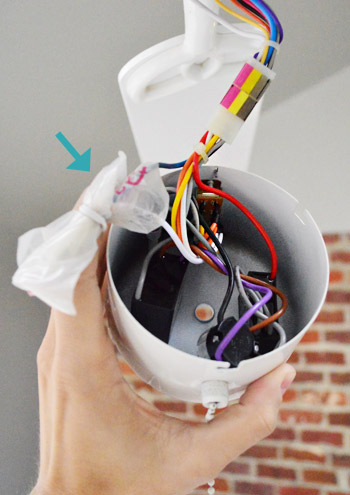
…and connect the black and white wires on the kit to the two corresponding wires in the fan. I just had missed them because they were wrapped up in a plastic bag which, had I looked more closely, was labeled “for light.” Duh.
With renewed confidence I started piecing the light and fan together. I started by screwing the light fixture’s, um, nipple into the fan cover…
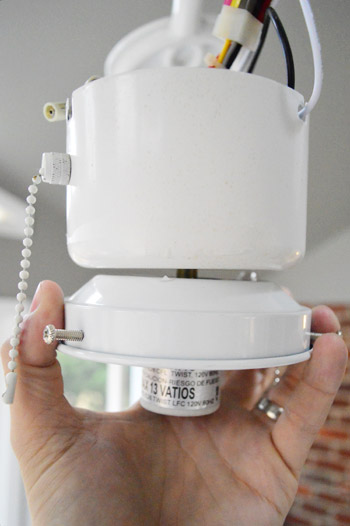
…and securing it in place with a nut.
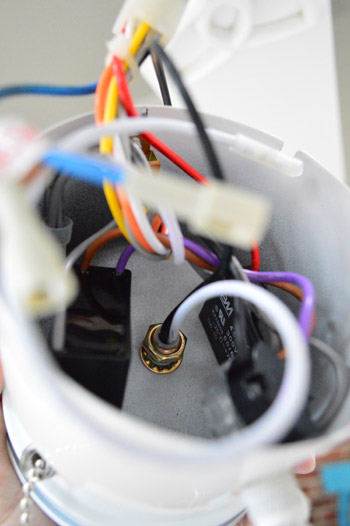
Then – in what promised to be the easiest electrical connection I’d ever done – I simply plugged the wires from the light into the ones on the fan (blue into black was correct according to the instruction I had finally cracked open).
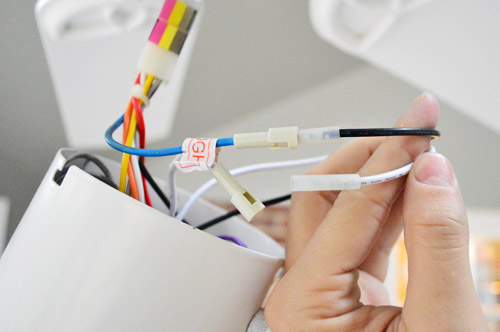
Certain I had done things right this time, I twisted the fan cover back into place and flipped the power back on.
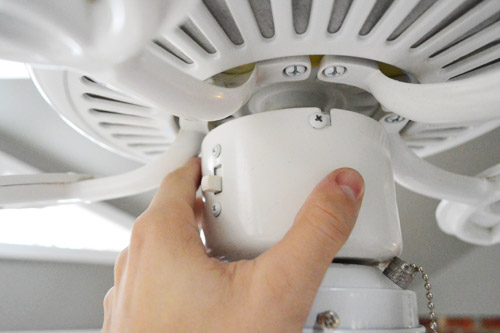
And nothing happened. The fan would turn on, but not the light. I pulled the chain a few times to make sure it had switched on. I flipped the switch at the wall back and forth. I disconnected and reconnected the wires a couple of times.
Nothing.
After some Googling I found a few other things to try. First was buying another kit from the store, just in case the one I had gotten was a bum one. Nope, still didn’t work. Then I saw somewhere that I should try hardwiring it by exposing the wires (i.e. cutting off the provided plugs) but that didn’t make it any better.
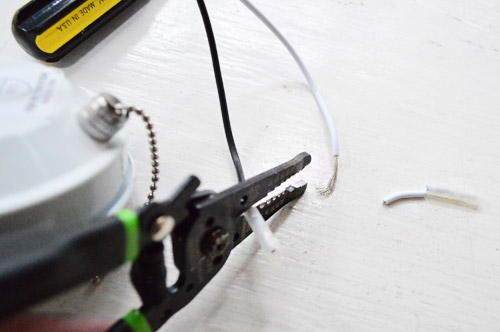
So after all those attempts (and a couple of extra trips to the home improvement store) I’ve determined that the issue is not with my light or with my fan – it’s at my ceiling. I must be one of the lucky homeowners where the original fan installer opted not to connect the wires for the light up there, figuring they weren’t going to be used since he was just installing a fan without a light kit.
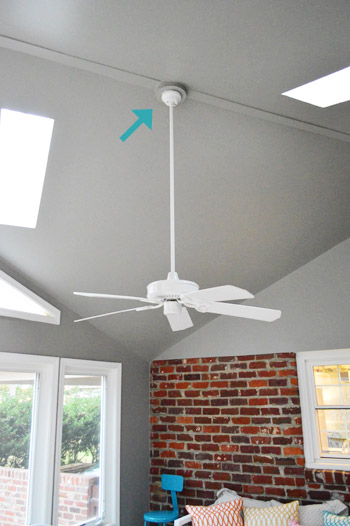
So this is where Sherry and I officially called the project a bust. Sure I could buy a taller ladder or rent a scaffold to help me access the wiring that’s 12 feet up in the air, but that seemed a bit extreme for what we assumed would be a quick and easy (and inexpensive) project. So for now, here’s our solution:
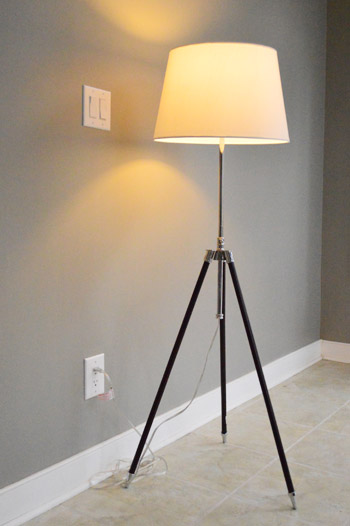
Yup, it’s a floor lamp stolen from the bedroom (since we noticed that we never turn it on in there thanks to an overhead light along with two bedside lamps). Not quite as elegant of a fix as true overhead light would have been – and who knows if we’ll properly wire things down the line – but for now it works.
What sort of electrical adventures have you guys been up to lately? Did anything go super easily (cough-outlets-cough)? Or did something turn out so hot (cough-stupidfan-cough)?

Jane in STL says
Nice. We have been doing this over the last few years. Baby steps here. I hope you add Step #11 to the tutorial-donate old stuff to the Habitat ReStore. We have taken all of our yucky outlets, heat registers, ceiling fan blades and light kits, etc.
YoungHouseLove says
Oh yes, we do that too! Just toss them all into a bag and give them to someone who might actually be looking for cream outlets!
xo
s
Shary says
We’ve moved several (too many) times and each house we replace all the outlets with white ones. Every single time we have to do this. I kept thinking I was the only one who wanted white outlets since we were unfortunate to ALWAYS move in behind someone who didn’t bother to change them. Thanks for confirming I was doing the right thing. Now we’re temporarily living in a rental and all the outlets and plates are painted the same color as the walls, which are the same color as the trim. Driving me just a little crazy. But it’s temporary. I can live with it. I hope!
Marlena says
In a “dude get on that already” attempt to clean grout, my husband cracked our bathroom tile, which apparently doesn’t exist anymore. So we called in a friendly fix-it guy, who discovered that the previous home owners didn’t put Durock up, so the tile was a disaster waiting to happen (mold, etc.) So we hired him to rip out the tile and re-tile what now looks like a great shower, but it was a simple DIY that escalated (for the better, later), but not-so-great on the checkbook.
YoungHouseLove says
Eeks, so glad you found out before it collapsed on you or got all moldy! I bet in the end it’ll be awesome and well worth it!
xo
s
Melissa says
hmm defiantly a great idea to just change the outlets oppose to painting them. We did that and now they are scratching off and look crappier than before-time for new outlets lol!
I think the fact that the light kit was still only $20 bucks, I would just borrow a 12 ft ladder and re wire it. We replace the ceiling fans in out sun-room (12 ft ceilings too) and it was defiantly worth the effort.
Fatima says
Hey there, I’m an avid reader, but never a commenter (commentator?) on your blog. I must say, this post is probably one of the must useful ones to me yet! I have a hard time getting the hubby to do little fixes like this around our home, but now that I’ve got step-by-step picture directions, this will be an EASY thing for me to do! I’m also thinking of taking on the ceiling light switcheroo in our bedroom! Thanks so much!
YoungHouseLove says
Glad to help!
-John
Robin @ our semi organic life says
This photo tutorial actually really helped! It seems easy now. Question – what would one do with the old outlets? Toss them in the regular trash?
YoungHouseLove says
We save them in a big plastic bag and donate them to Goodwill if they’re still functional (maybe someone else is looking for cream ones, ya know?).
xo
s
Shirley says
Oh, yay! We have these awful bisque outlets as well that we are dying to change. My husband likes to make a fuss so I will have to print this out for him. He is pretty handy though. Just installed a chandelier in our dining room, and in past he installed and took down a large crystal chandelier in a double height entryway.
Desiree C. says
Nipples, nuts, and lubricants…home improvement makes for such awkward conversations sometimes. Especially when it’s with a stranger…or your dad. Yes, I totally said “lube” to my dad on Saturday in regards to our garage door.
It was awkward.
YoungHouseLove says
Hahah!
xo
s
Joy says
Hello YHL. I am so glad you did ths tutorial on updating electrical outlets. For a whole year now since we moved in to our new house, some our outlets need to be replaced. And the hubby normally would do this type of a job. But with all the projects we do during the weekends, this task gets “outranked” by the other big stuff.
So now I’m thinking to myself – this is something I can do! Thank you! :)
Steph says
This is on the list of “things I need to do but am probably far too lazy for.”
Also, I can’t see any pictures on your site. Actually haven’t been able to all week. :( Even tried clearing my cookies (sounds weird) and nothing.
YoungHouseLove says
So sorry, we didn’t change anything on our end but have heard that sometimes if you have an update on a virus protector (like McAffe or Norton) it can block pics for a while and then they miraculously pop back up. Wish it was something we could fix on our end!
xo
s
Steph says
It’s probably work being jerks and blocking something new. I guess I’ll just have to wait until I get home to view your posts and pics! (And find some other distraction at work. :) )
YoungHouseLove says
Aw man, I hope they come back!
xo
s
karen little says
P.S. I also meant to say that we paint the return air vents the same color as the wall as it makes those large pieces of metal (grates) blend lots better. We have one over our guest foyer closet so it looks loads better than if we’d left it to match our white trim. Enjoy getting your sunroom fixed-up!
Nicole says
Thank you!!! This was perfectly timed. We worked our bathroom and laundry room this weekend & updating all of the outlets are next on the list to finally “finish” the rooms.
YoungHouseLove says
Good luck Nicole!
xo
s
joni says
loving all those pillows especially the ikat-ish ones! i might have missed something – did you ever mention where they are from? or are they from the book project where you paint the pillows?
YoungHouseLove says
Those are all from random places like HomeGoods and Bed Bath & Beyond (love the clearance bins!).
xo
s
Alli says
My husband replaced all the outlets and light switches in our house when we moved in. Amazing how a small thing like that can make a house feel so much newer! Paint helped too, I swear they matched the paint to the ugly beigy-yellow light switches, so that definitely had to go!
Our biggest disaster had to do with a ceiling fan too! We replaced a dated looking ceiling fan with a large 4′ diameter fan that looked better and had better air movement. We found out the bolts to attach it to the ceiling were not long enough and quite inadequate. How did we find out? When it came crashing down to the floor a day later! Thankfully we were able to box it up and bring it back to Lowe’s and they gave us a new one. We also hit up the hardware aisle for longer screws!! It’s still up there to this day thankfully. :)
YoungHouseLove says
Oh no! That’s so scary!
xo
s
Gabriella @ Our Life In Action says
I am master at the outlet switch-a-roo but the fan is way too intimidating for me.
My hubby installed our little man’s fan/light combo…it was super cute, with space ships that flew in a circle and the earth was the light….after all his work he realized the he accidentally reversed the wires so when you click on the fan switch (on the wall) the light goes on and vice versa. I thought there would be cursing but he just dropped his head and started to undo the screws…:-( What a pain!
Great job -can’t wait to see what you do with the brick.
Amber {noted home} says
Ohhh that’s a bummer. At least it’s a very nice floor lamp! I’m filing away the new outlet info though. I’m going to have to do that someday soon.
Allison says
Thank you so much for the tutorial. My new house has all cream colored outlets so this will be super handy. I’ve printed it out and saved it for when we decide to tackle the outlets. A million thanks :)
Starr @ The Kiefer Cottage says
Switching outlets is a challenge in our house because the wiring is so tight. There’s almost no give, so it’s easy to break a sweat holding onto the wiring for dear life one centimeter from the wall. But we have to do it since there have been multiple melted outlets, random breaker outages, and other electrical mishaps. This house is one big sparky mess.
YoungHouseLove says
Woah, that sounds hard Starr! Good luck!
xo
s
Sassy says
I was mostly just looking at the pictures and thinking “they did put a light bulb in, right?” (It’s early here).
I’m with the folks who don’t like ceiling lights on their fans. They are emergency lights as far as I am concerned. It is just uncomfortable lighting especially coming from up that high…on the other hand, my husband loves them. I tend to use uplights behind plants and furniture to try to light up a room like yours (especially with all those outlets).
Love reading about your adventures.
sjaustin says
The ceiling fan lights in my dining room kept blowing bulbs, so I disconnected the light kit and took it to Lowe’s to get a replacement. I couldn’t find any that would fit, and the guy who was trying to help me told me that because of its age I might not be able to find a replacement at all. I ended up getting rid of the ceiling fan and replacing it with a semi-flush fixture. Installing that was a lot of fun, because it was one where the glass went on before attaching the fixture to the box. So I had to hold the heavy glass with one hand and do the connections with the other.
Your outlet tutorial is great! Almost all of mine are old and dirty looking. Over time that off-white seems to get yellower and yellower.
Jessie says
You guys should get a Circuit Alert! They sell them in hardware stores or on amazon. It looks like a little pen, and you hold up to any sort of outlet, wire, or whatever, and it beeps if there is voltage coming through/near whatever you’re holding it against. You could use it to tell if you have any live wires (so you could just hold it up to those black and white wires to see if there is a current running through it). It could save a lot of headaches in the future :)
YoungHouseLove says
Oh yes we have one and even used it but we weren’t clear on why the wires weren’t getting power (was a mysterious wall switch the wrong direction, was the pull chain not pulled so the light would switch on, etc). So many variables, so we didn’t know the problem was at the ceiling for a while!
xo
s
heather says
So much wiring. So so much wiring. We aren’t done yet. We still need to wire up the downstairs bedroom and livingroom. We are so waiting for the point we can finally get that drywall up. As pain in the butt drywall is to install, it will be nice to be at that point!
http://tinyurl.com/cgtbubg
YoungHouseLove says
It’s going to be amazing Heather!
xo
s
Carole says
We’ve had our own ceiling fan drama over here too. Went to install a ceiling fan and the color of the wires from the ceiling didn’t match what was listed in the fan directions. We played around with different options and gave up at the point that the only way the light can be on is if the fan is on high. lol We’ll get back to fixing it once our necks recover from the first experience.
Katie @ Suburban Fervor says
I tried a similar outlet switcharoo in this blog post:
http://suburbanfervor.com/2012/09/13/lemme-upgrade-you-part-2/
Except, my lightswitch inexplicably started turning on the fan and the light and the fan switch does nada. AND my outlets are super old and have the wires sticking out of the back (larger fire hazard). AND there are 6 wires instead of 5. So I’m pretty much lost.
I FEEL YOUR ELECTRICAL PAIN (especially that time I electrocuted myself)…
…Here’s a hot tip. If you have a lightswitch and an outlet in the same electrical box it does not mean that they are powered by the same circuit.
YoungHouseLove says
Oh yes, boy have we learned that! Old houses can be quirky!
xo
s
Amanda B says
New white outlets and switches are the icing on the cake for a re-done room. I always save that update for last, as a “reward” for all the hard work of painting, decorating, etc. :)
Darlene says
Thanks, John. PERFECT timing, now I don’t have to make that call to Dad for the refresher course and I can pretend I totally remembered how from the last time he showed me.
Does it work just as simply for the light switches?
YoungHouseLove says
Yup, same deal with light switches too (just be sure the powers off and transfer things over the same way they were wired on the old switch).
-John
Jennifer says
The new outlets you can buy with built-in childproofing are awesome, and reason enough to switch existing outlets whether the existing ones are the right color or not.
YoungHouseLove says
Those sound really cool!
xo
s
Lil says
We (my husband) recently installed a chandelier I had rewired…convinced I had rewired it incorrectly when it didn’t work, he uninstalled it…resulting in a trip (by me) to the lamp shop for help where the guy determined (in about 2 seconds) that the bulbs weren’t screwed in all the way. *sigh*
YoungHouseLove says
Argh! At least it ended up being an easy fix. Whew!
xo
s
Olivia says
Shoot, that would have been such an awesome solution! I had no idea you could potentially add a light to a ceiling fan – good to know that it’s theoretically possible…
Stephanie says
Mu husband (the sweet nerd that he is) has been working on installing wireless outlets and switches in our new house. So far we can control our fireplace, a few lamps, and our garage door opener with our phone or a computer! At first I thought it was kind of silly, but I’m a “Oh crap, did I shut the fireplace off? And is the garage door closed?” worry wart type of person, so it’s actually really calming to know I can just go on my phone and check.
It didn’t go so smoothly… the man who built our house wired things totally weird and we pretty much have to turn off power to our entire house when he’s working because our box is so unorganized (the left half of our upstairs is on the same switch as the right half of our basement…) So we definitely spent a fair share of time with wires sticking out of walls and many a trip to Home Depot/Menards to consult. In the end though, totally worth it and totally cool!
YoungHouseLove says
That’s so high tech! John would love that!
xo
s
Laurie says
Have to say … this may be one of my favorite posts ever, because it so perfectly reflects the reality of fixing things up: some tasks are perfectly straightforward, others end up ridiculously maze-like. You never know which will be which. And that never seems to be acknowledged in most books/DIY sites, which is hard on the ego when you can’t seem to figure out WHY your “simple task” went astray. Thank you for sharing the set backs along with the inspirations.
YoungHouseLove says
Aw, you’re welcome Laurie! We love to keep it real about DIY. It’s not always fast and painless. Hah!
xo
s
Danie O'Shaughnessy says
I had no idea they called it a nipple! That is awkward!! Although I didn’t know there was such a thing as a “boob light” until I read your blog. At the hardware store the other week, I overheard people talking about male and female parts in the electrical section, so I think the conclusion is electritians have too much time on their hands.
Suzanne says
I don’t like a light on a fan unless it has a dedicated switch so I can control the fan and light independently. The lamp probably a better way to go in the long run.
Those “mystery switches” aren’t half-hots on your plug-ins? So that when the lamp is plugged in, it’s controlled by the switch? (but it’s probably only half the plug-in, either the top of the bottom). You’d probably have to test every.single.combination to figure it out. John will have to get his math on. ;)
YoungHouseLove says
Oddly enough we tried every single outlet to see if any of the mystery switches fed them power and no dice!
xo
s
Gretchen@Boxy Colonial says
DH is going to excited about the outlet tutorial…I don’t think he had any idea it was so easy! We’re having sunroom lighting woes, too. In our case, there IS a light, and it worked when we moved in, then mysteriously and suddenly stopped working. We’ve reached the limits of our willingness to poke around with it, so all that’s left is procrastinating about calling an electrician (as we’re short on extra floor lamps around here!)
Shelley @ Green Eggs and Hamlet says
Is it weird that I have been hoping that some day you guys would tackle the project of adding a light kit to a ceiling fan so that I could follow your trusty instructions? We want to do this exact thing in our house – we have a sunroom with a ceiling fan but no light. I am nervous that ours would be the same situation you encountered – the fan isn’t wired to accommodate the light. Oh well, I’ll give it a try and hope for the best!
YoungHouseLove says
Good luck Shelley! Maybe yours will be all hooked up and ready!
xo
s
Christina @ Homemade Ocean says
What a bummer about the fan….We just moved ours thanks to one of your tutorials. Now if we could just get the shoulder strength to paint the ceiling….shudder.
Lexy @ This Crazy Cass Life says
The floor lamp y’all moved in to the sunroom is the perfect mix of industrial and simple I’m looking for to put in the nursery. Do you happen to remember where it is from?
YoungHouseLove says
It’s from either TJ Maxx or HomeGoods. Hope it helps!
xo
s
Jess says
We have to replace all the ones in our 1960’s ranch too, feel your pain. The cool thing about that problem is my expensive but awesome sauce solution: vintage metal cover plates. Ebay and Etsy are great sources for this unusual obsession (trust, you will become obsessed).
My nice husband installed the gorgeous plates I found (and sprayed ,etallic gunmetal) along with black outlets and switches in my deep plum craft room. Note to the potential vintage plate lover: to get them to sit flush on the wall AND the outlet/switch unit you may have to space it out or cut off some of those metal support tabs in the corners. So don’t just switch out all your units and screw them into the wall thinking you’re good to go!
Poor husband, took him an hour and a half to do 6. But it looks so damn good. I love how solid and substantial they feel, which I never thought about until turning off the light in there for the first time after he put them on.
YoungHouseLove says
Sounds like they’re amazing! Such a cool update!
xo
s
Connie says
I also have replaced all my beige-y outlets, switches, & face plates with sparkly new white ones. When it came time to replace a two-way switch (light can be turned on in 2 locations, ie: top of stairs, bottom of stairs) AND a 3-way, I chickened out! I’ve heard these can be tricky, plus they are quite a bit more expensive than regular switches. I took off the face plates, taped them off and spray painted them with white spray paint for plastic. They got new white faceplates and over a year later, they still are still looking good & lighting up our lives!
YoungHouseLove says
So glad they’re holding up!
xo
s
Megan @ Rappsody in Rooms says
Oh man, you guys crack me up! That is a bummer about the light fixture. Best laid plans and all, right?! I didn’t know switching out electrical outlets was that easy though. That might be something I give a try. I have white switch plates around cream outlets. Not my best look.
Cassie says
I love the look of your new outlets!! I hate old outlets, plus they always scare me haha. I want to switch to the child safe ones that snap sideways when you pull out a plug.
I wanted to ask you, do you know if/when your book will go on sale on Nook again?
YoungHouseLove says
Hmm, we’re not sure how that works. We just heard that day it was on sale and popped an update on the blog, so we’ll do that again if it happens again!
xo
s
Mallory says
When we moved into our house we updated all of the electrical wiring, (1927 home = knob and tube wiring). All the new outlets and covers made a huge difference!
We also just completed a big electrical project in our basement renovation project. We’ve been using a single table lamp that was left by the owners for more than 2 years now, and my fiance, (with the help our an electrician friend), just wired in 10 new boxes that will eventually house recessed LED lights. 10 lights, (and high-efficiency ones to boot), are a lot better than 1 table lamp!
I can’t wait to finally get rid of that ugly table lamp, (although it’s sort of a running joke now and has been with us so long I may have to find a way to incorporate it somehow)!
Liz says
When we bought our house a year and a half ago, the previous owner had the entire house — walls, ceilings, doors — painted a semi-gloss off white. The painters sprayed the outlets too. The owner was supposed to fix that but instead of replacing all the outlets, she just had them “cleaned” out. We’re slowly replacing all of them as we update each room. It is tedious. The best was when one was so firmly stuck to the wall, the entire outlet cover came off, leaving exposed wires. So much fun.
Jeff H. says
Replacing the outlets was one of the first things we did in our house. Once I got the hang of it, it didn’t take long and makes such a difference!
Most of ours though were connected via the “quick” release holes. I know some people disagree but once I found the right screwdriver to release the old wire these took a lot less time than connecting the wires via the screws.
rhonda says
Have you checked out tamper resistant receptacles?
YoungHouseLove says
Those sound cool! We haven’t tried them yet though!
xo
s
Corinne says
OMG I cannot thank you enough for this post! All of the outlets in my house are that weird almond color that was so popular in the early and mid 90s. I desperately want to change the outlets to white, so this is perfect to see! I like easy, cheap, but good-for-resale projects.
Elizabeth says
A few years ago you guys wrote a post about quick updates around the house that make a difference visually (i.e. changing out old yellowed electrical plates, painting trim, etc). Well, three years ago I moved into a condo (still here, but I just rent), and I changed out every electrical cover (plugs and light switches) and it made a HUGE difference in the way the room looked. An instant update! We needed like 20 of them and they were under $1 each. It made the room look so much better for barely any money.
YoungHouseLove says
That’s awesome!!
xo
s
Brittany says
We actually don’t have any overhead lighting in our living room and only one overhead source in our dining room (they’re one big room) so we use a lot of lamps. Currently there’s 2 in the dining room & 4 lamps + 2 wall sconces in the living room. I kind of like the atmosphere it gives. And lamps are much more helpful when I’m curled up reading on the couch :)
YoungHouseLove says
Sounds cozy!
xo
s
Erin says
Fans are a dreaded topic in my house. It seems like there’s always a problem with them and they never work the first time! We just put up a brand new ceiling fan two weeks ago, which ended up being a huge headache. Doesn’t it seem like you can follow the direction word-for-word, and you’ll still have to get up and mess with the wiring at least one or two more times?! They’re just so difficult to work with!
Margy says
Bummer…