Remember this old post about all the fun projects we were daydreaming about taking on with some bonus cash from BHG’s 48-Hour Challenge? Well 20,000+ votes later (!) we didn’t win the 5K (congrats Nicole!), but the good news is that plenty of those projects are still on the agenda. In fact, two of them are already completed! Remember we spruced up our patio a few weeks ago with a DIY firepit and some cheap-o lounge chairs? One down, four to go.
Well, better make that three because we’re back to share the second project that we tackled on the sly. We hinted at wanting to “introduce some layered, textural interest in the half bath” but then decided not to delve into details and surprise you guys instead. Well… surprise!
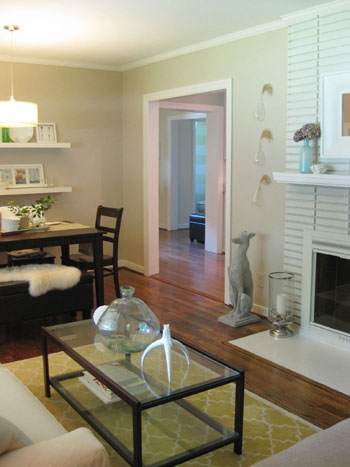
See that cream on cream texture that’s visible all the way from the front door? Let’s get closer shall we?
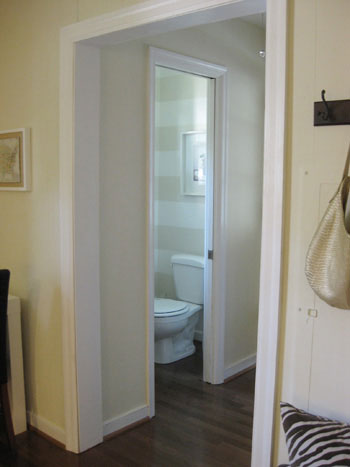
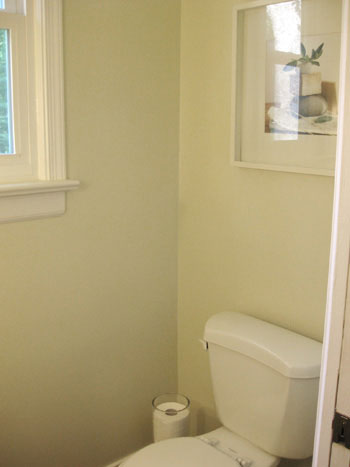
Yup, we painted cream on cream horizontal stripes in the half bathroom! It used to be the same tone as the hallways and the adjoining den (Wishes by Glidden) but we decided to amp it up in that jewel box of a bathroom with some lighter stripes to make the room feel a little more expansive (horizontal stripes have a way of creating that effect) and a heckova lot more interesting. Jenn’s Design Star makeover from last summer was actually our inspiration- it just took us twelve months to make it happen. Here’s the bathroom before our little paint intervention:
The entire project took just 4 hours one evening, and the steps were really simple:
Step 1: Divide & Conquer- Measure the full length of your wall and divide that number by twice the number of stripes that you want to have minus one (ex: our ceiling is 98″ tall and we wanted six horizontal stripes so we divided 98 by 11 (6 x 2 = 12 – 1 = 11) to get the thickness of each stripe. Ours came out to about 8.9 inches.
Step 2: Make Your Mark- Use a ruler to mark off every 8.9 inches starting from the floor and working up to the ceiling (we made two small pencil marks on each wall, one on each side).
Step 3: Tape It Off- Grab some blue painter’s tape and connect your pencil markings to create taped off stripes (once the tape is in place rub it a few times so you know that it’s flush with the wall for cleaner lines). The main thing to remember is that the tape should go outside the marks for the stripes you’ll be painting but inside the marks in the negative space that you won’t be painting. This might sound confusing, but just ask yourself if you’re taping off the stripe or the negative space as you go, and make sure the taped stripes are the right distance apart (ours were 8.9 inches) while the tape for the negative spaces is closer (once you remove the tape both areas will be the same width).
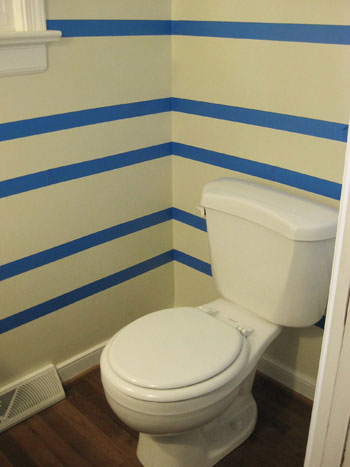
Step 4: Roll With It- Grab a good roller and some slightly lighter or darker paint (subtle is key for this look, so just going a shade or two away from the wall color makes for a soft layered look). Then apply two even and thin coats of latex paint between the tape that’s further apart to create your stripes. You’ll also need to use an angled brush to cut in near the base molding and the ceiling.
Step 5: Take It Off, Baby- This is a very very very important step. It’s crucial that you remove every strip of tape as soon as you’re done with your second coat of paint while the paint is still wet (assuming the coverage is good enough that you don’t need a third coat). Waiting to remove the tape until after the paint has fully dried will cause peeling and uneven lines that are less than crisp (which will make you want to cry after all that taping). In short: as soon as your roller is down, start pulling that tape off the wall for a clean stripe that looks seamless and sleek.
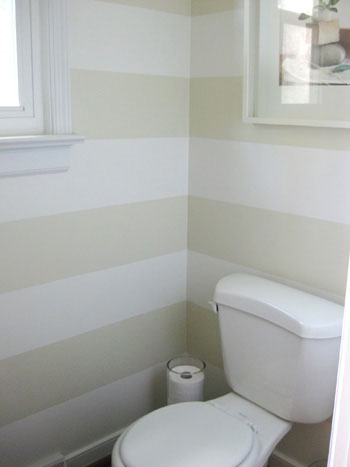
There you have it. Horizontal wall stripes. Easy eh? Oh and we used a quart of Valspar’s Honeymilk for the stripes because we actually had a $10-off coupon to Lowe’s. And thanks to that $10 off coupon, this entire project came in at just… (drumroll please)… $2.48. Gotta love that bang-for-your-buck upgrade!
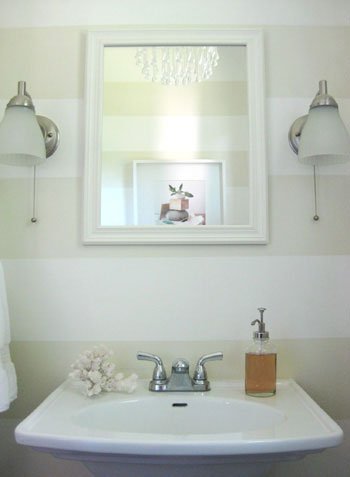
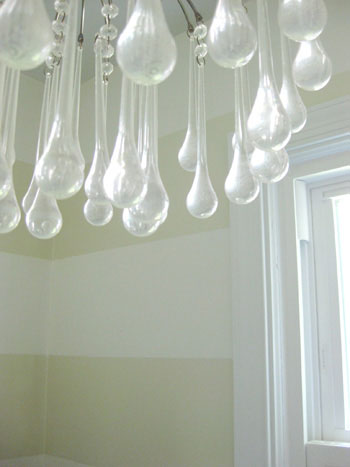
We really like how our crystal tear-drop chandelier (a cheap-o Urban Outfitter’s score from a while back) looks even more dreamy with the soft stripes around it.
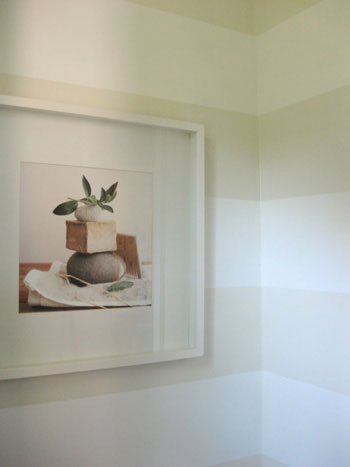
And our $9.99 art somehow feels even more spa-like with the tone on tone stripes:
We also feel particularly lucky that our stripes ended up framing our wall sconces perfectly (of course this is something you can ensure by starting your stripes in that area and working up or down to tape off the rest of them so nothing cuts through your lighting at a funny spot).
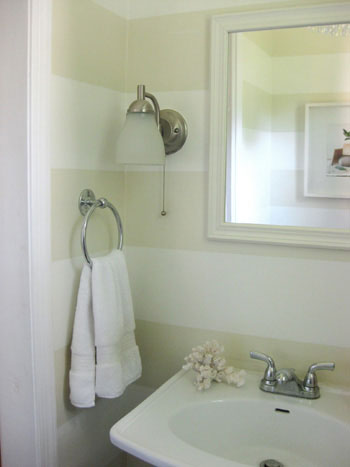
So there it is. Our under $3 bathroom makeover. We’ve always had a soft spot for stripes (take our blog’s background for example, or our recently striped porch) and I guess we just had to bring ’em into our tiny half bath to fully embrace the linear love.
What do you guys think? Did any of you take on any cheap-o projects this weekend? Any striping stories of your own? Do tell.

Elizabeth says
Hey guys,
I have a couple of questions. I would like to do vertical stripes in my bed room. Should I follow the same steps on this post?
I will be doing black and white stripes on one of my walls. Similar to the master bedroom in this post
http://alkemie.blogspot.com/2008/07/study-in-black-white-one-designers-home.html
YoungHouseLove says
Hey Elizabeth,
Yup, the steps above should work exactly the same way for vertical stripes. Hope it helps! Love that inspiration pic!
xo,
s
Sue says
I painted vertical stripes in my dining room last year. Instead of using blue painters tape to tape off the stripes, I used a product called Frog Tape. It’s green . . appropriately. The paint guy at Home Depot recommended it to me, and it was the best painting decision I ever made. It was a bit more expensive than blue painters tape, but it completely prevented any bleeding on my bumpy plaster walls. Well worth the cost.
Love your blog!
YoungHouseLove says
Great tip! Thanks so much for sharing. We’ll definitely have to give frog tape a try.
xo,
s
jamie says
I just finished copying your half-bath and I love it! Thanks again for the inspiration and step-by-step directions!
http://thesouthernroyalty.blogspot.com/2010/02/half-bath-beauty.html
jamie says
(notice the YHL artwork on the wall in the background!)
Heather says
I love, love this idea – but I wanted to throw out a word of caution… Our walls are slightly textured, and the medium hold blue painters tape didn’t hold up. Instead of clean lines, I ended up with messy lines. It’s obvious it bled through where the texture was a little bit higher/bumpier. I honestly think this only works if you have non-textured walls. Thanks so much for all the tips, I just wanted to share my experience!
YoungHouseLove says
Hey Heather,
We’ve heard that a bead of paintable caulk along the tape (after you put it up but before you paint) can keep things from bleeding. Just wait for the caulk to dry and paint away. Hope it helps!
xo,
s
Sarah says
My home is super small at 906sqft, which means my bedrooms are super small! My question is, we have a lot of furniture in our bedroom due to a recent addition of our little boy and I’m looking for a way to make the room look larger with paint. We just purchased a new duvet cover and I would like to paint our walls based on the colors in the duvet. It is mostly a soft green color with a large white block in the middle which is outlined in an espresso brown. Should I just paint one wall a dark color (like the wall our bed sits on) or try the stripes?
YoungHouseLove says
You can’t go wrong either way so it comes down to personal preference. If you like subtle tone on tone spaces go for soft stripes and if you like a bold focal point go for the accent wall. Hope it helps!
xo,
s
Shannon says
I have a question about measuring the wall from top to bottom – did you include the floor and ceiling moulding when measuring the total wall length (i.e. literally measure from the floor to the ceiling)? If so, when measuring for the individual stripes, did you begin measuring from the actual floor?
Your small bathroom with the stripes is lovely – I hope it looks as nice in ours!
YoungHouseLove says
Nope, we just measured the wall area so we didn’t include baseboards, trim, molding, etc. Just the paintable area. You could include the trim if you wanted to though- it’s totally a personal preference thing. Hope it helps!
xo,
s
Erin says
Beautiful bathroom, I am inspired to do my powder room like this. One question for you, did you move your sink before you painted or did you use the special roller brush that you mentioned you used to get behind the toilet? Thanks much!
YoungHouseLove says
Hey Erin,
Nope, we didn’t remove the toilet or the sink, we just used the short handled brush (it’s not a roller, just a simple cheap-o brush from Sherwin William’s that we talked about here). Hope it helps!
xo,
s
reagan says
Hi Sherry,
I recently picked up two lighting scones (the same ones you have in this bathroom) at the Goodwill for $3.00 a piece last week. However, they didn’t come with any hardware pieces for attaching them to the wall. Do you have any ideas or suggestions for what I may be able to use to attach them to our wall? Also, how did you hid the plug-in cords?
Thank you.
Reagan (Lexington, KY)
YoungHouseLove says
Sadly, we have no idea what specific parts you need (since every light fixture calls for different things). And in our case we didn’t hide the plug in cords, we purchased hardwired sconces so they never plugged in- but there may be a way to convert yours if they’re plug ins and you’d prefer them to be hardwired. We would definitely recommend bringing them to a hardware store or a specialty lighting shop to see what they recommend. And congrats on finding such a deal!
xo,
s
Beth Mast says
Hi
I love the look of your bathroom. What did you do to make sure the stripes were straight. Did you use a level?
Thank you,
Beth
YoungHouseLove says
Using a level would definitely work but we just used a ruler as we mentioned and measured between each stripe at the same increments to keep things even. Hope it helps!
xo,
s
Amber says
A bit of a delayed question on this one… but I’ve got one for you! A few people mentioned that after they finish the tape job, they paint over the tape with the original color to “seal” the lines. Once that is dry, then they paint with the second color, and since it is sealed there are no drips through the tape. If I do that though, I would obviously have to wait until that “sealing” paint of the original color is dry before I use the second color… but you say to peel the painter’s tape off as soon as you’re done painting to avoid peeling. Well, is that sealing layer going to peel? Sorry if that’s hard to understand, but I’m dying to paint stripes in my new house and would really like to know your thoughts on that. Thanks!
YoungHouseLove says
Nope, if you decide to go that route it should be great since others have used that method with success. We’re crossing our fingers for you! We just prefer not to let the paint sit on the tape for too long to keep it from peeling off less cleanly, but if you try that alternate approach you’d obviously have to wait for things to dry. And we’d love to hear how it goes! There’s definitely more than one way to skin a cat (gross expression but so true). Good luck!
xo,
s
Christina says
So I LOVED your striped bathroom that I had my hubby copy it in our half bath as well and it turned out GREAT! I LOVE LOVE LOVE it! The only thing I am struggling with now (warning…this sounds really stupid) is finding a extra tp holder that isn’t ugly since we have a pedistal sink like yall do. Any suggestions? Where did you get yours?
YoungHouseLove says
We actually got both of our tp holders (in our half bath and full bath) from Target. They’re affordable and they have a surprising variety. Hope it helps!
xo,
s
Lisa says
Just completed this project last night (taping urgh!) and it looks fantastic. I can confirm that the painting-over-the-tape-with-the-original-wall-color thing works and creates perfect, crisp lines. For tape-purchase planning, I used close to two rolls of 1 1/2″ blue tape to stripe my half-bath. Also, if anyone needs a color match for the Valspar Honeymilk paint but only has a Home Depot in town, Glidden Swiss Coffee is the pretty much the same color.
YoungHouseLove says
Great tips Lisa! So glad it worked out so well for ya!
xo,
s
Saz says
I *love* your website and this is a great tutorial! I have a very small bathroom that I’m trying to spruce up – and I am so inspired! I may stop by the paint store on my way home from work! Thanks much!
Rita says
Love it! Did you use the same finish for each paint or did you go with a semi-gloss for your strips?
YoungHouseLove says
We used the same finish (semi-gloss since it’s a bathroom) but we could have switched that up for fun too. Hope it helps!
xo,
s
Ashley says
I love love love your entire house, but these stripped walls have been my all time favorite since you did them. I am planning to do the same thing in my first floor full bath, however they are an awful shade of blue right now so I need to paint on the base color as well. How long after painting the walls do I have to wait before we can tape and paint the delicious stripes??
YoungHouseLove says
We would give it three to five days, just to be sure. Good luck!
xo,
s
andela says
Thank you so much for sharing your life with us, and always know that you will have our blessing. I have a question related to the shower .
Why did you decide to go with a curtain ??
Did you ever considered a shower door instead ?
We are planing to redo our bathroom this summer and I am not so sure if I would like to keep the door , as I am working extra hard now to keep it clean. lol
Thank you again .
YoungHouseLove says
Hey Andela
We actually did consider hanging a seamless glass shower door instead of a curtain to allow the space to feel even bigger and more open, but with a little one on the way we thought something softer and less shatter-prone might be a smarter choice for our growing family. Plus it was easy on the budget!
xo,
s
Tande says
Hi! I love this project and am in the middle of attempting this in our half bath. Do you have any advice on how to create those perfect lines? With an uneven ceiling and an uneven floor, this is proving to be quite the project! My tape keeps bowing in the middle to boot!
Help!
YoungHouseLove says
Just follow the steps in this tutorial above. The use of a level will really help you get the tape placed in the correct spot (no bowing at all) or you can use a ruler to make a bunch of subtle pencil marks that you can follow around the room so the tape is sure to be super straight. Good luck!
xo,
s
katy says
Hi! I love this idea and I want to paint tonal stripes in our new apartment. We have a long narrow entrance hallway that was painted by the building super, a warm buttery neutral color.
I have in mind to go a shade or two lighter, but I can’t get the name or info on the original paint color. I’m wondering if I take a photo of the original color on the wall, how accurate that’ll show up, and in which light to take the photo? the natural light or the hallway light?
Do you know of a safe nice light neutral option that goes great with any color I could look for?
Thanks! love your blog! I’m getting married next week and am more excited about decorating our first home together than anything!
YoungHouseLove says
Hey Katy,
Here’s what you can do- visit the paint store and grab as many swatches in a similar color to the wall as possible. Then bring them home and hold them all up against your wall- you’re sure to find at least one that’s extremely similar- and it’ll be a closer match than trying to take a photo of the wall and match it to that. Hope it helps!
xo,
s
Katy says
Thank you! This makes so much more obvious sense! Who has the best paint prices that you have found? I live in NYC, so my first thoughts are Home Depot and Benjamin Moore. Other than that I just stroll pass expensive hardware stores that may have a small paint display.
Thanks again!
YoungHouseLove says
We love Behr (from Home Depot) because it’s great quality paint for a good price. Benjamin Moore’s great too, but a bit more pricey. Hope it helps!
xo,
s
Leigh Anne says
How long do you wait before you apply the second coat? I’m a beginner painter and recently took on the project of painting our office desk. Maybe wall stripes could be next…
YoungHouseLove says
Waiting a few hours should be good. You want each coat to thoroughy dry so it has a nice fully cured result at the end.
xo,
s
rachelle says
love your make over!! Where’d you pick up that cute soap dispenser?
YoungHouseLove says
Target! Plus it’s recycled glass. Love it.
xo,
s
Angela says
Weird question for you. Do you have a trash can in both bathrooms? If so, what do you use? Thanks!
YoungHouseLove says
A while back at Target we picked up two chic little clear actylic cylinder trash cans. They almost look like stout cylindrical vases but they’re not breakable like glass. Love them!
xo,
s
Angela says
Thanks! Now an even weirder question. What do you do about a toilet brush? Why is it that necessities have to be such eyesores?
YoungHouseLove says
We have a small white one in one of those cases that can stand on the floor. We keep it tucked behind our white toilet on the far side so it’s virtually invisible unless you know it’s there (the fact that they’re both white helps it blend). Oh and we only own one even though we have two bathrooms so we don’t have to store two. Hope it helps!
xo,
s
Shanna says
Do you think it would be too much if I did the same horizontal stripes in my half bath that also has 4ft beadboard? I wasn’t sure if it would be too crazy having vertical beadboard and then horizontal painted stripes. The beadboard is white and I would do the stripes in a subtle beige and creamy white.
YoungHouseLove says
We would probably just stripe the wall above the beadboard and keep the beadboard one of the two colors (maybe the lighter one so it feels “built-in.” Hope it helps!
xo,
s
Heather S says
Love the stripes (and the stripe-making tutorial!) I’ve been dying to try it in my half-bath.
One question… our half-bath is currently blue, so I’ll need to repaint before striping (I’ll probably do colors similiar to yours, since the rest of my house is in various shades of khaki.) Well, the previous owners got paint on the ceiling too. Should I paint the ceiling the khaki or creamy-white in the stripes, or just plain white like the rest of the ceilings? And if I went with one of the stripe colors, would you start your stripes at the top with the same color or the opposite? I have no crown molding.
p.s. I’m working on a plywood “counter” right now! Love your ideas and stealing every one of them. I’m hooked on the Bower’s blog too… you creative girls. : )
YoungHouseLove says
We would paint the ceiling the lighter color of the stripes so it feels cohesive and airy. As for starting your stripes at the top, we would start with with opposite color (the darker one) for that true striped effect and some nice contrast. Hope it helps!
xo,
s
Janelle Clayton says
I love every room in your house! My husband and I got married last February and purchased our first home in June of the same year. I wish I would of visited your site before I started decorating! I would of coppied a lot of what you did. I was going to try to do what you did in your bathroom to ours. One question:
We have vertical stripped wainscot up now do you think it would look weird having vertical wainscot and horizontal stripes? Thanks!
YoungHouseLove says
If you paint the wainscot the color of the lighter stripe (a super soft off-white or cream tone) and then continue the horizontal stripes on the wall above it, everything should look lovely and seamless. Hope it helps!
xo,
s
Chantel says
I did this in one of my bathrooms, and it turned out great! Measuring and drawing the lines was the hardest part, but after I got out a really long level and used it and light pencil marks, I got everything spot on. Everyone who sees it absolutely LOVES it. I tell them that if *I* can do it, anyone can do it. Thanks for this! I’d love to see how to do a diamond pattern on an accent wall. :)
Kendra Thompson says
I saw this a couple yrs ago in a magazine and did it on an accent wall in my living room vertically in dark purple with toast colored walls all around it. It looks very classy! It was also very easy and inexpensive. A great way to dress up a wall. I am a handywoman in Denver and my customers found your blog and want this in a small room. Very nice!
Laura B. says
So this is my first every YHL inspired project. I’m about to attempt to paint my powder room. It’s medium sized for a powder room, but has no natural light/windows. Do you think it will work in a small space like that? Right now it’s asparagas green, so I’m not worried about trying something different, I’m just worried that it will over-power the space. Any suggestions??
Thanks for all that you guys do!!!
YoungHouseLove says
As long as you keep the colors pretty light and keep the contrast to a minimum (nothing too bold, like black and white stripes) it should turn out really well! Good luck with everything!
xo,
s
Meagan says
What is the width of each stripe? I don’t want too many stripes because I’m afraid it will get too busy. Also I have to two shelves in my bathroom that are approx. 13 inches apart and I was going to have my stripes width be 8 or 9 inches. I cannot figure out a way to get each shelf centered on a stripe…any suggestions?? I am so particular I dont think I will like it otherwise.
YoungHouseLove says
Hey Meagan,
The width of our stripes is listed in Step 1 (11 inches). As for how to get your shelves centered, if they’re 13″ apart we’re thinking your stripes would have to be 13″ apart so the shelf could rest in the middle of each stripe. So just divide the height of your wall by 13 to see how many stripes you should have at 13″ apart. Hope it helps and good luck!
xo,
s
mona says
Hello,
I really LOVE this site, and hope you keep posting more “how to’s”. I want to try to copy this bathroom, as its sooo different and refreshing. Can you tell me what colors you used for the stripes? Thank you.
YoungHouseLove says
We used Wishes by Glidden and Valspar’s Honeymilk for the stripes. Hope it helps!
xo,
s
Theresa says
I was browsing to find out how to do the horizontal stripe in my bathroom and found your lovely bathroom. The rooom I want to do is very small with only a toilet and tub and connected to the dressing area where the sinks are. I bought a turquoise fabric shower curtain with two wide chocolate and off-white horizontal stripes that I want to duplicate on the wall. My husband thinks I am crazy so I guess I will have to do the work myself.
YoungHouseLove says
Sounds like fun! Good luck with everything!
xo,
s
Meghan says
I LOVE this project and your blog! You guys are everything I want to be and more! HA! I am in the process of changing out our dining room (doesn’t get much use with a 4 year old, 18 month old, and a 6 month old!) into “Mommy’s Playroom” a.k.a. craft room/sewing room/reading room. I am wanting to do some horizontal stripes and when I did a search for pictures of other rooms, yours came up! Needless to say, I pretty much forgot about my kids all afternoon and caught up on everything I have been missing out on since the inception of your blog!!! Anyway, I need a little direction. The room that I am painting has beautiful baseboards, a chair rail and beautiful crown molding. I would like to do the same colors as you, but what should I do about the wall below the chair rail and what about the chair rail? I really don’t want to paint the chair rail, so should I do the darker color on the lower half of the wall and then strictly do the stripes on the top half? Any guidance would be greatly appreciated! Keep up the great work! Thanks!
YoungHouseLove says
Yes! The darker color on the bottom and the stripes above the chair rail will look so pretty! Good luck!
xo,
s
Ashley says
I actually have the same chandelier from urban outfitters. I would love to use it again in our new house. How did you hide the cord, since it is not hardwired? Thanks!
Cory Christie says
So I’m giving these stipes a go this weekend in my living room/dining room. Bold I know. We currently have white walls do we have to prime first?
YoungHouseLove says
Nope, no need to prime- although we do recommend using Frog Tape (it’s a bit more but you’ll get a super clean edge) or taping the stripes off and then painting over the tape edges with the wall color (not the stripe color) and letting that dry and then painting the stripe color so there will be less of a chance of bleeding. Good luck!
xo,
s
Morgan says
Love your website…everything you do is breathtaking and adorable!
So I’m madly in love with the Wishes color by Glidden. Problem being, they have since discontinued the color in the new line of paint. I can’t seem to find anything that’s comparable to that specific color. I don’t know how often you’re in there, but if you happen to see a color that’s similar… please let me know!
I am going to check this weekend to see if the Honeymilk still exists in Valspar.
Love everything!
-Morgan
YoungHouseLove says
Oh yeah they just changed the name so now it’s called Eloquent Ivory- same exact color!
xo,
s
Ginny says
Would this work well in a REALLY small bathroom (like, used to be a closet)? I feel like the stripes might be overwhelming in a very small space
YoungHouseLove says
Our bathroom is tiny! You can touch all the walls while standing in one spot. As long as you use light colors that aren’t too high contrast it just creates a nice texture without making anything feel closed in.
xo,
s
Paige says
I’ve been wanting to tackle this project ever since I saw your post…and finally my walls are all taped and I’m ready to paint!! I painted my half-bath pure white, and it’s just a bit overwhelming. So I got some light blue for the stripes to hopefully get the same effect. Just stopped by YHL one last time to check if I missed any details so I don’t mess it up. Crossing my fingers that it looks as sharp as yours does!! Thanks!!
YoungHouseLove says
Good luck, Paige! You’ll do great!
-John
Kara says
I absolutely LOVE this bathroom. The colors are superb. I have been looking for a very subtle tan and your choice is perfection. The only problem is, I went to Lowe’s today in search for Valspar’s Honeymilk and they didn’t have the color on file. Is it discontinued? If you see a similar color (or if the name just changed) let me know. I brought a bunch of swatches home and am trying to hold them up to your picture to find a match, however, that is turning out to be harder than I thought. Thanks! Keep up the great DIYing and Inspiring!
YoungHouseLove says
We’re not sure if it’s discontinued, but you should be able to ask them to look up the formula for it on the computer at the paint desk so they can make some for you even if it is. Hope it helps!
xo,
s
Brianna says
I love your blog, your love/family story, how you turned it into a business, JUST EVERYTHING! God bless you guys! OK, now to my question about your striped walls…How did you paint around the sink, mirror and toilet? Did you remove anything, use a smaller brush, etc.? Thanks!
YoungHouseLove says
I used a short handled brush to get into those tight spots like the area behind the toilet and under the sink, but we only removed the mirror (since that was super easy) so everything else stayed. Good luck!
xo,
s
Sascha says
Hi there! I love what you have done with the half bath, it looks fantastic! I am hoping to try and do this in my bedroom (I am 16 by the way – don’t worry, I’ve painted many walls before!) and was wondering if it would work. My room is fairly square shaped, and I am thinking of doing it as a feature wall, the one which my bed head rests against. The only thing is, I’ve read somewhere that horizontal lines don’t look good with high walls? Ours are higher than normal but they are not huge or anything. Also, the walls are beige. Would you suggest having the lighter or darker tone at the bottom of the wall, and what about for at the top? I’m not sure which way to work it. Finally, about how wide were your stripes?
Thank you so much! I love reading about all your different design ideas!
YoungHouseLove says
Oh yeah, it should look awesome! We have the lighter color at the stripes nearest the ceiling and the floor (since it looks good with the lighter ceiling color and the lighter baseboard color) and our stripes are 8.5″ apart. Definitely measure your wall the way we mentioned in the post though, just because that size stripe won’t work out perfectly in every space. Good luck!
xo,
s
Sascha says
Thank you for such a quick reply! I will definitely put light at the top and bottom then:) Thanks also for the stripe width! I will have a fiddle with the wall measurements, and probably have about 11 stripes. Thank you again! xx
YoungHouseLove says
Sure thing! Good luck!
xo,
s
Brianna says
Thank you so much for quick reply! I will give it a try!
Diana Yarborough says
Love your website and this project is great. I was thinking about trying this in our half bath which has a pale green color right now. Do you have any suggestions on a lighter color for the stripe – a paler green or a cream? Also, I noticed you started your lighter stripe at the baseboard, and I was thinking of leaving the darker color at the baseboard to avoid painting next to the baseboard. Was there a reason why you chose to start at the bottom?
Thanks!
YoungHouseLove says
Hey Diana,
It was all pretty arbitrary to us, so we just opted to start at the baseboard, but you could easily avoid painting next to the baseboard as you mentioned. And when it comes to a pale green or cream, they both sound lovely. We wouldn’t recommend a specific swatch (since they look different in every house thanks to varied lighting conditions) but you could just slide one or two shades lighter on the paint swatch with your bathroom color on it for something that should coordinate perfectly. Hope it helps!
Christine says
Hi! I love reading your blog and you all have been my inspiration on so many of my latest home improvements!
I am getting ready to paint horizontal stripes in my half bath under the stairs. I am not planning on painting the sloped wall with the stripes…however, when I used the formula in your post, the width of my stripes doesn’t match up on the shorter wall….the taller of the walls is 92.5 inches and the shorter wall is 72.5. How can figure out how to make the stripes match up on both walls…or is that even important? The way I marked it on the large wall each stripe is 8.4 inches, but that means that when the stripe wraps around to the shorter wall, it wont’t be the same width…does that make sense? Is there some sort of simple math formula to figure this out. Any ideas would be greatly appreciated! Thanks!!
YoungHouseLove says
Hey Christine,
You definitely want the stripes to match up, but if you’re dividing the height of the wall in the formula, each wall’s stripes won’t match up since the walls are different heights (which you’ve experienced). We’d recommend using one wall’s stripes (perhaps the tallest wall’s) and carrying them over onto the other walls so they all match up. Just pick the one you like the best and carry it around for the most cohesive look! Good luck!
xo,
s
Ann Hagedorn says
Hello,
I just found your website and LOVe it! I now have you in my Google reader and love your daily posts! I want to do my half bathroom with stripes like you did (in your old house). Did you use white and the honeymilk color as the two colors? I want the light airy look and the colors you used were perfect.
Thanks in advance,
Ann
YoungHouseLove says
Hey Ann,
We used Wishes by Glidden & Honeymilk. Hope it helps!
xo,
s
ap says
Excellent and totally inspiring. My husband and I are going to use stripes to paint our laundry room this weekend. I’m a new DIYer so thanks for all the tips! I will be sure to link back to your great article from my blog!
thanks,
ap
Selina says
My powder room has chair rail, and I wanted to do stripes similar to this. Do you think I can work around the chair rail, or should I just remove it?
Thanks!
YoungHouseLove says
It could probably work either way. If you keep it we’d recommend making it where one color meets another instead of placing it in the middle of a stripe. Hope it helps!
xo,
s
The iHubby (Jason) says
My wife and I are about a month or so away from getting our first home and we are pretty much addicted to your site. I have been going through all your posts and the ideas are flowing through both our heads.
Keep up the awesome work! As the modern day prophet Charlie Sheen says: WINNING!