Strike up the band! Fire the cannons! Attempt to twerk! Okay maybe not that last one, but whatever the appropriate celebratory action is, bust it out because our once very wallpapered house is officially wallpaper-less!
And since we thought one last wallpaper removal post might be boring on its own, we saved that info and bulked it up with some other bathroom progress for you guys – namely…
- how we puttied, prepped, and primed the damaged walls
- how we primed & painted all of the cream trim and old wood quarter-round
- what paint plans we’ve landed on for this freshly de-wallpapered space (hint: we’re going to try to balance out the bold floor tiles with some up-high interest)
But let’s soak up the whole “wallpaper free” thing for a second. Considering that we’ve spent over 45 hours of our lives removing it in five different rooms over the course of the last six months we’re relieved. Very, very relieved. In fact, it was actually one of Sherry’s “before the baby comes” goals – so to hit it with a few months to spare means that we can dive into some more fun bathroom stuff before baby. But more on that in a second.
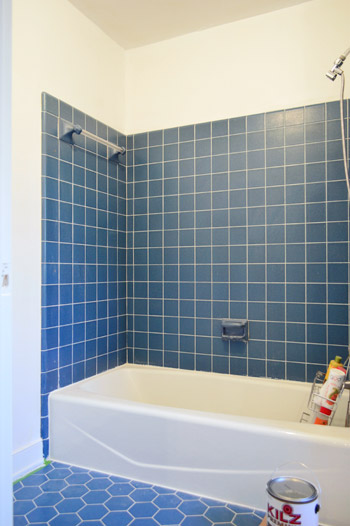
First we’ll just remind you what this room looked like every time we walked into it for the last half of a year. The walls are just primed in the picture above, but it’s already a vaaaast improvement.
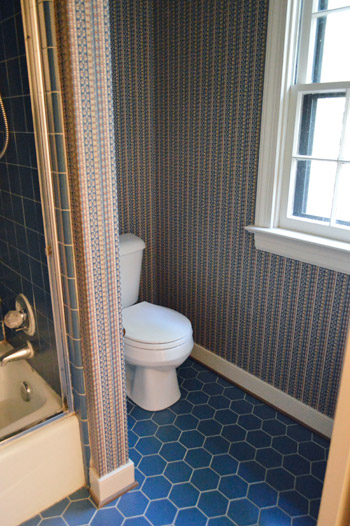
Although it was just completed last week, the peeling process actually started a little while ago. One morning Sherry was showering and I heard her yell “hey, come take a picture!” Intrigued, I hurried into the bathroom… only to find that she had stripped off several panels of wallpaper whilst showering.
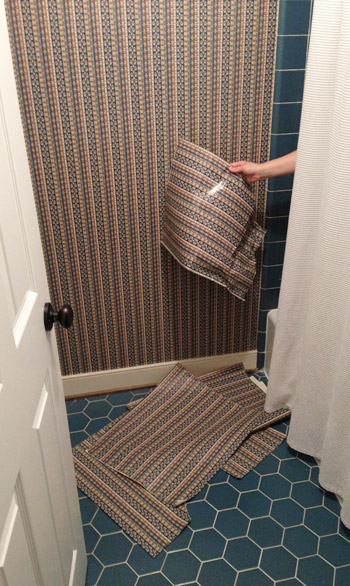
A bunch of corners in there were curled up from the effect of the shower steam over the years, so it took virtually zero effort (and apparently zero clothes) to get most of the shower free of wallpaper.
Since the shower steam had worked so well for that area, we figured a little extra help from my sister’s clothes steamer would do the trick everywhere else (it had been slightly faster than the other methods we tried when we used it in the foyer). Especially if I added a new step beforehand that we heard could really help loosen things up: spraying it down with fabric softener before steaming it (I used a spray bottle with 50% warm water and 50% Seventh Generation fabric softener in it). Because it’s such a small room, I decided to tackle it early one morning on a whim, assuming it’d be so speedy that I didn’t even bother to put my contacts in or hide my bedhead under a hat.
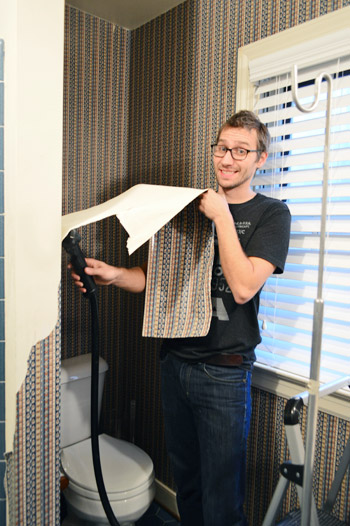
Fast forward several hours later and I had made little progress and my demeanor was quite different. John was not amused.
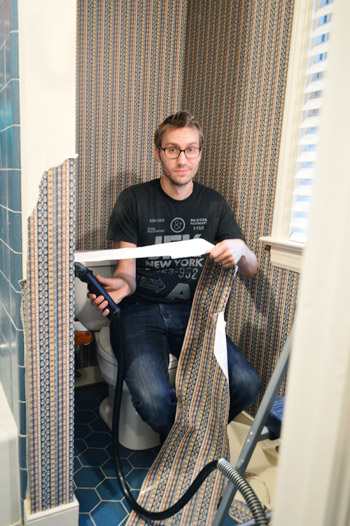
Okay, so there wasn’t really several hours between those two photos, but the project did end up taking me an entire day (meanwhile Sherry was doing this). Despite using the steamer, most walls came off in small strips and flakes rather than the big sheets that we were able to get in the foyer. But by sunset, the paper was all gone.
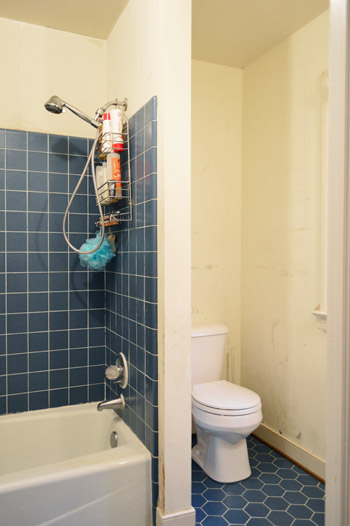
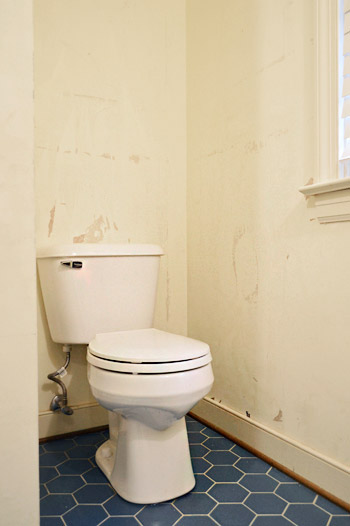
The bad news is that the walls were in rougher shape than any other room that we had de-papered. We started to wonder if they used a special treatment or glue in here, knowing that years of showering might be too powerful for a normal adhesive. Either way, it left us with a look that I lovingly call “gas station bathroom.”
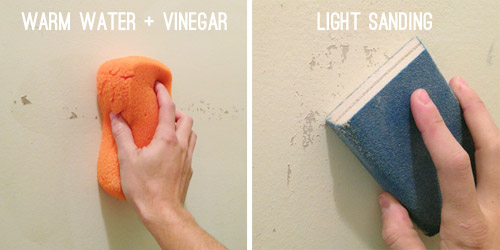
So unlike those other rooms, we had to do some pretty in-depth prepping. First we removed the last vestiges of wallpaper glue with a light scrubbing of warm water & vinegar (that’s usually our last “prep step” before painting). But this time we moved on to sanding all of the walls with a sanding block to help file down any rough spots.
There were still lots of dimples and low points, so we also decided to fill things in with a coating of spackle. You can see that my coverage was super thin (I was scraping it nice and firmly against the wall) but it did the trick for filling in those slightly recessed peeled-looking spots.
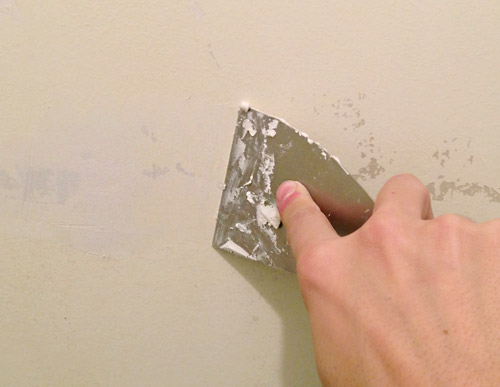
This was not a fast process, as you can see from this shot of all the spackle spots. The same smooth outcome probably could’ve been accomplished with a full-wall skim coat, but that would have taken longer and resulted in a ton of sanding dust, so we opted just to go with some small pats of spackle wherever we needed them.
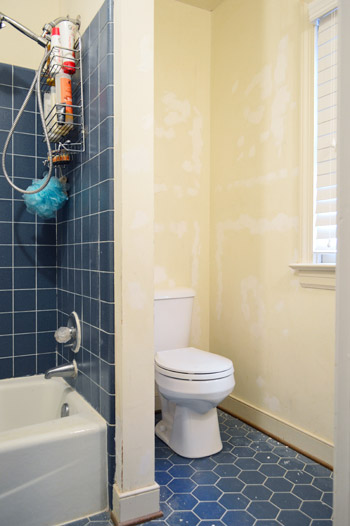
The spacke job still did require sanding, which is always a fun messy task. I can’t imagine how much dustier the bathroom would have been with a full skim coat going on.
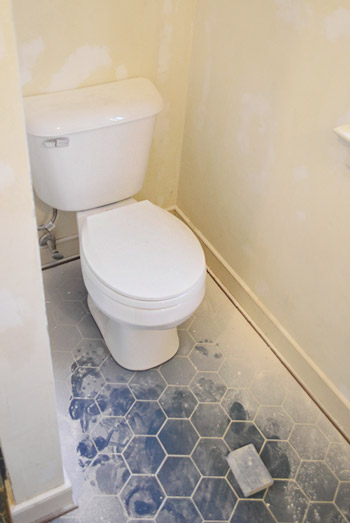
Once all the sanding dust was brushed off the walls and swept/wiped up, you can see how the spackle helped level out any areas where the wallpaper had torn off a bit too much of the drywall.
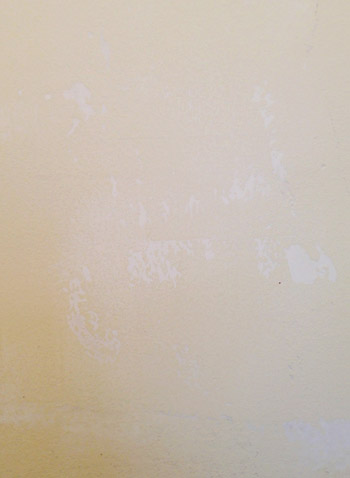
Next up was primer. See how yellow the walls were on the left, compared to the fresher look of primer on that wall on the right? It was possibly my favorite priming project ever, since it evened out the spotty wall and made the whole room so much brighter.
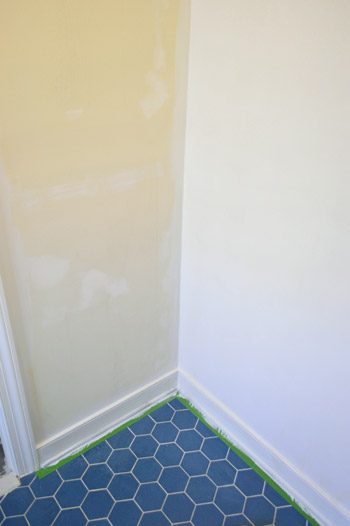
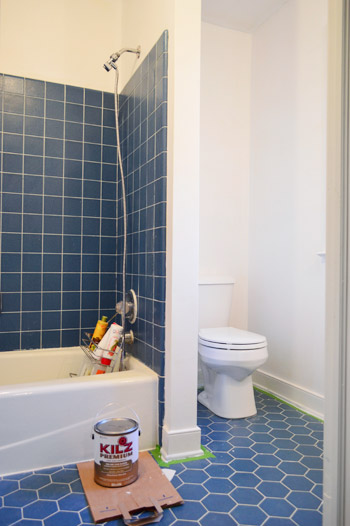
You’ll notice that the floor is taped off too. That’s because Sherry decided to seize the day and paint all of the cream trim white while we were at it. Not only had the trim been cream, the quarter-round was actually wood, so it was definitely one of those time-sucking tasks (the window panes are always a pain) but it was well worth it in the end just to have it done. Sherry used two coats of primer (Kilz no-VOC stuff) and two coats of Simply White (the same semi-gloss trim paint that we’ve used everywhere else). It was sort of a triple “ahh” because the trim is now a crisp white color, there’s no more wooden quarter-round, and ding dong the wallpaper is dead.
But before I get into the fun what-we’re-going-to-do-next stuff, here’s a quick wallpaper removal recap since a bunch of you have asked for a summary of what worked best, and what we’d never try again:
- In the powder room Sherry tried boiling hot water applied with a spray bottle, and just peeling things by hand (respraying and peeling the underlayer as needed) which was definitely not a fast process, but it worked.
- In the foyer we took my sister’s steamer for a spin, and mentioned that it seemed to be very slightly faster than our first method, although lifting up the steamer for those high spots was more physically demanding.
- In the kitchen Sherry tried warm water + soap (Dr Bronner’s) sprayed on the wall, followed by a wet cloth that she used to soak the underlayer and then peeled that off, which was probably tied with bullet #1 for ease/speed/effectiveness.
- And in the dining room Sherry dry-peeled, meaning that she didn’t spray the top layer at all, and only applied water (with a large damp sponge) to remove the underlayer, which was, like every other bullet, not a fast process, but it worked.
- Finally, in the en-suite bathroom we circled back to the steamer because we thought it had been slightly faster than our other methods (although it was no silver bullet, maybe about 5% faster). We also added a spritz of warm water + Seventh Generation fabric softener beforehand (a 50/50 combo applied with a spray bottle). Ironically this time it was slower than any other method and left the walls a mess, although we also tried the three other methods outlined here at various points out of curiosity, and none of them worked well in there. So we can only conclude that this bathroom’s paper was adhered by some evil ninja-esque glue that was too legit to quit.
In summary, the way that wallpaper is adhered along with how well your walls are prepped beforehand seems to have a lot to do with how easy (or how impossible) it is to remove the wallpaper. Nothing we tried was super fast and amazing, but most methods actually worked over the course of 8-ish hours if you kept at them. So hopefully taking those five techniques for a spin and outlining them as we went was somewhat helpful for others who are staring at a bunch of wallpapered walls and wondering what to try next.
____________________________
Now that the boring-but-it-had-to-be-done prep work is out of the way, we’re really excited about a paint treatment that we’re planning to try in here. After wracking our brains about the best way to work with the existing blue tile for now, while drawing the eye up and making the room feel taller and less squat (which tends to be the issue when all the focus is on the floors) we decided to bring some more blue back into the room. Just in a smaller (and lighter) dose than the wallpaper… and in a nice high place.
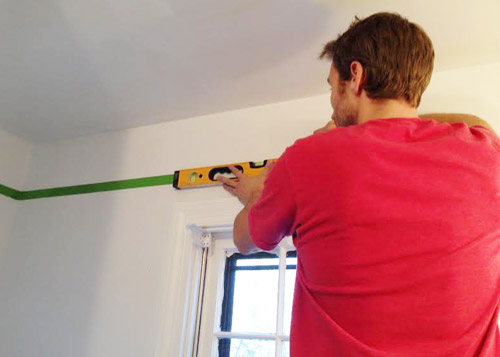
Heather’s amazing bathroom (more on that here) will give you a nice idea where we’re headed. Yup, we want to make a simple wood border around the top part of the wall and carry a soft-but-complementary blue color up that part of the wall and onto the ceiling. This room also has a similar effect while having a blue floor like ours, so it might help you picture how some softer blue up top can balance out a somewhat demanding floor like ours.
So next up, we’re going to paint those primed walls and add some wood trim around the top of the room along with an accent color up there. Hopefully when the tall white shower curtain is rehung and we add some art we’ll completely forget the old room that we started with.
Are any of you guys diving into a bathroom update or planning any wood-border-plus-paint projects? Have you been de-wallpapering, spackling, priming, trim-painting, or sanding? Feel free to toss out tips for anyone else who’s battling those beasts.
Psst- Sherry’s over on Young House Life chatting about her maternity clothing M.O.

Sarah A. says
I tried to leave a comment earlier but I was having trouble with the website- hopefully this isn’t a duplicate. The bathroom looks amazing! What a difference! We are having a nightmare wallpaper removal problem and I would love your advice. Our walls are 1970s swirl texture (ugh!) and have wallpaper over it in a bedroom. We removed it with a steamer, but the glue is stubbornly stuck in every little ridge of the texture. We have scrubbed for hours using many methods, and I don’t think we will ever get it all. Any advice on a primer that will actually stick? I have been reading about Zinsser Gardz but would love your advice! I want to skim coat to smooth walls- which everyone is telling me is crazy. So we will see. Thanks! Love the blog!
YoungHouseLove says
Oh yes, someone else said something awesome about Gardz, so I would give that a try!
xo
s
Urban Wife says
It looks great, guys! I can’t wait to see how you finish out the bathroom.
Question: The warm water + vinegar sponging method didn’t work for me. It basically took off more drywall than glue, so now I’m at a loss on what to do other than spackle those pockmarked spots once I’ve removed the glue. Any tips or ideas? Thanks!!
YoungHouseLove says
Oh no! That stinks! As for the pockmarked walls, I would try doing what we outlined in this post with spackle and a spackle knife, just skimming over it and sanding and then priming and hopefully that will smooth things out. Worked well in there for us!
xo
s
Melanie says
OMG. I actually said “ACK” outloud in my office when you showed the before picture of the bathroom…and I stand by that statement! Haha. I think painting the ceiling is a great idea. I can’t wait to see the final result! We have some unfortunate tan tile in one of our bathrooms and after scratching out heads for months we decided to paint the top half black (we have a black dining room, so we know what we’re doing). We haven’t done it yet, but I think it’s going to really glam up a gross room. We have painters doing our upstairs this week, so that bathroom will be finished today in our effort to ready the second floor for our new baby. I picked “lipstick” by Behr. It’s a super intense red/coral/pink. My husband is very nervous. Haha.
YoungHouseLove says
Sounds awesome!
xo
s
Kim H says
We had hideous paper in our upstairs bath and kitchen with the opposite of what you had: easy in the bathroom, then hard to peel, scrap, curse off. Since all our walls are textured, eventually it was easier to just paint over the bits we couldn’t get off. We had wanted bead board and just covered over the bottom wallpaper, feeling sorry if any new owners down the line who decide to remove it.
Kim H says
…in the kitchen, that is, where it was hard to remove.
YoungHouseLove says
So glad that worked!
xo
s
Priscila says
I bought your book and i am very anxious waiting for delivering. I am from Brazil and must delay some days yet! :D
YoungHouseLove says
Aw thanks Priscila!
xo
s
Brigitte says
Nothing like those nesting hormones to light a fire in you. With my first, I was painting and decorating and with my second I was madly moving into a new house (although not having room to take a deep breath makes going up and down stairs a workout).
I have to say, that old wallpaper in the bathroom would have had my eyes permanently crossed and bugging out. You two are strong people to have put up with it for so long. To think someone did that on purpose…yikes!
It’s no wonder stenciling has gotten so popular – wall pattern without leaving someone with the job of tearing it down someday.
Stacey says
I’m sitting in study hall at school reading this, and could not stifle my laughter after reading about Sherry peeling wallpaper while in the shower!! :-D Thanks for the laugh and I’m excited to see what your bathroom will look like!
mary says
You never tried a scoring tool on the wallpaper? I thought that made it a bit easier, and it’s cheap and quick.
YoungHouseLove says
Never tried it! We heard it ripped the paper apart so much that it took longer to peel off. But we do hear it’s awesome for penetrating painted over paper.
xo
s
Rachel K says
This is such a huge improvement already! Congrats on finally being wallpaper free! Are any of your walls plaster? Oh man did we have a tough time removing wallpaper from the plaster walls in our entryway. There were also years of old paint layers underneath. We used some kind of solution in hot water applied with sponges and special wallpaper scrapers. Some of that paper had to be ripped off with the paint underneath since it was glued on too strongly. Oh the nightmares, lol!
YoungHouseLove says
Our first house had a bunch of plaster walls, our second house was half plaster and half drywall, and this one is all drywall. I did some wallpaper removal in that first house though, and I remember some peeling right off (it was SO OLD) and other areas, like a border in the bedroom, being so stubborn!
xo
s
xo
s
Laura & the Shell says
We are working on a walk in closet in my kids’ room and holy moly wall paper can be a nightmare! The story we’ve uncovered is that someone applied wall paper directly over the plaster walls. THEN someone scraped off about 50% of that paper and painted. And then painted again. And again. So basically the edges of the remaining wall paper were practically cemented to the plaster, but the rest was bubbling up and bridle and dry. Our house was built in 1910, so there is no telling how old this stuff is. Oh, and along with the wall paper, chunks of plaster have come off as well. We REALLY should have covered the whole mess with drywall. Lesson learned!
YoungHouseLove says
Oof, that sounds like THE WORST THING EVER.
xo
s
Olivia (Lively Liv) says
LOVE the idea! Most rooms out here in good ol’ San Francisco have trim like that–my room & apartment included. I actually thought about just painting above the trim and into the ceiling, but my landlord wasn’t crazy about that idea ;) #renterproblems
I’ll guess I’ll settle for living vicariously through your paint job!
-Olivia
YoungHouseLove says
Aw you’re so sweet Liv! I love feeling like we’re doing an exotic San Fran thing, haha!
xo
s
Lesley | Artsy Forager says
Oh gosh, I have been there with the wallpaper! Yay for houses decorated in the wallpaper lovin’ 80s.. My most hated renovation chore after removing popcorn ceilings. I’m actually loving that blue tile, it adds a nice graphic touch– is it in decent enough shape to keep for the long run? Or will your big master bath reno mean it has to go?
Can’t wait to see what you do! Love watching you guys transform this home!
YoungHouseLove says
I wish we had more of it! Since we’re eventually planning to expand our bathroom into the sink nook area off of the bedroom (which used to be carpeted) so there’s just one big bathroom instead of two small and choppy spaces, we’ll need to redo the floors so they match in both areas down the line.
xo
s
Lissa says
It looks so much better without that wallpaper!
Questions: After you spackle the walls, what type/number sandpaper do you use for sanding the walls? My bathroom walls look like they had the chicken pox in their previous life and I need to spackle over a ton of spots but was not sure what kind of sandpaper to use after I spackle. Thanks for any help you can give me!!
YoungHouseLove says
I typically use a rough sanding block at 150 and then another smoother one at 250 to make it nice and even at the end.
xo
s
Meagan S says
Are you planning to put bead board on the walls like the inspiration photo? I love bead board in the bathroom!
YoungHouseLove says
I think we’ll start with just a rail (like some places have picture rails around the room at the top) and see how it looks!
xo
s
Brent says
That little toilet nook is just BEGGING for some chunky, built-in floating shelves in a warm stain. I rent in an 85 year old building, and while I love my tankless toilet, the tile situation up in here is HEINOUS. I’m talking mint/kelly green tiles, with two accent tiles that have swans on them. Swans. Oh, and those awful built-in ceramic soap and toothbrush holders nobody has ever used in the history of ever. Clearly, I’m living vicariously through you guys for my bathroom renovation thrills. Thankfully, I don’t have to look at any groovy wallpaper.
I can’t wait to see how this unfolds!
YoungHouseLove says
Love that idea! Not the swans, the shelves. Haha! Although the swans do sound… interesting.
xo
s
Eileen says
You know it was a rough project when John starts referring to himself in the third person…”John was not amused”
Love Sherry starting the project while in the shower, how in the world did you reach all the way up to the ceiling???
YoungHouseLove says
Oh I’m a little acrobat in there. I was standing on the tub edge and getting some nice stretching in.
xo
s
Katie says
Girl, with your preggo belly? I’m super jealous of your coordination. When I was pregnant that all went out the window, laptop cords were my nemesis!
YoungHouseLove says
Haha!
xo
s
Jodi T. says
Best one yet!!!! This is exactly what my bathroom’s wallpaper / walls looks like… I have quit and restarted a dozen times only to get overwhelmed with the condition of the drywall… I tend to think the reason the wallpaper pulls pieces of drywall off is because the wallpaper was glued directly to the dry-wall instead of priming or painting it first… Does this seem about right, or was super duper glue used since it’s the bathroom? At any rate, thanks for this. It’s inspired me to give it another go!
YoungHouseLove says
Yes, it could totally be due to unprepped walls (not primed, etc) or due to crazy strong glue (if it’s in a steamy bathroom it could be that since it would probably fall off unprepped walls a lot sooner than being pried off 30 years later if it wasn’t held with extra strong “bathroom grade” glue).
xo
s
Darcy says
WOW! This was one funny little post…from your arm out of the shower, to the “Intrigued, I hurried into the bathroom”, to lovingly referring to your gas station bathroom, I LOL’d several times! BTW…never good in a cube farm! So, I got some ‘splainin to do!!
Anyways…Great job, I am super impressed that you are 100% wallpaper free, with a few months to spare! That is just too amazing for words! I can’t wait to see what you guys do next, and what blue you pick for this bathroom!
YoungHouseLove says
Thanks Darcy!
-John
Koen @ TownHouseHome says
Wallpaper removal, always such a fun task ;)
It was one of the first things we did when starting in our own house. What we found to be working best was using a very watered down version of actual wallpaper glue, and soak the paper in it until it doesn’t suck it up any more. By then large sheets came of, and the smaller ones easily came off with a putty knife. You can check out the full story on http://www.townhousehome.com/wallpaper-removal-little-howto/ if you want to.
We still have a huge load of wallpaper to go through downstairs, with a layer of paint on it, so I’ll need another method by then… To be continued as they say :)
YoungHouseLove says
Haha, go get ’em Koen!
xo
s
Diane says
Two heads ARE better than one!
Cacey says
This is awesome. I hate projects with wallpaper but you guys make it look so easy.
Sarah @ The Simple Home says
I am totally obsessed with that bathroom that you showed at the end. Cant wait to see what it looks like in the end! Getting rid of wallpaper must be pretty tiring the first time you did it, none the less now. Oof. Good luck painting!
Sarah
http://www.thesimplehomeblog.blogspot.com
Lori Anderson says
We’ve been living the same wallpaper nightmare, just 3,000 miles away from you. The wallpaper in our bathroom peeled off pretty much like yours. And the wall underneath it has seen better days. We’ve primed the walls, and primed/painted the ceiling. We’re just waiting to see how our taxes might shake out (owning a home for the first time) to see how we want to proceed with renovations. We’ve got a not-so-lovely pink tub in that bathroom that needs to go. :)
YoungHouseLove says
Sounds like you’ve made tons of progress! Good luck Lori!
xo
s
Ellen says
Just de-papered my laundry room last weekend (only one more space to go, yay!). I wet down one wall with DIF gel, while I used water and fabric softener on the others and then covered both with plastic sheeting, which I left on overnight. That was too long, as they dried out, but after re-wetting with very hot water and just waiting a few minutes, I was able to pull down almost entire sheets in one pull. This paper was installed by me many years ago, and I did use sizing before hand, so that may explain why it was so easy also. I would definitely recommend the plastic technique but maybe only for a few hours, not overnight. There wasn’t really a difference between the dif and the fabric softener.
YoungHouseLove says
Holy cow, that’s awesome!
xo
s
Ali says
Congrats on no more wallpaper! I just spent the better part of a weekend getting wallpaper off our dining room that just stopped mid-wall in our open space into the living room (what the heck?). The wallpaper put up a good fight and the wall ain’t looking too good. Oh well. I gave up on this project and am hiring a painter to fix it and do the whole space. He also said that he was going to do a coat of oil primer over the wall to seal in any remaining wallpaper residue or whatever that might be there. Have you heard of that?
YoungHouseLove says
That sounds smart! Never heard of it, but I bet it works to block bleed-through!
xo
s
Emily @ Life on Food says
I am jealous of you being done with the wall paper. i down to 50% of the last room but I cannot seem to find the time to just finish. Maybe this weekend? Soap and hot water have done the trick for the most part so I shouldn’t complain compared to some of the stories I have heard.
YoungHouseLove says
Good luck Emily! Home stretch, baby!
xo
s
stephanie says
OMG, this whole post reminds me of the time I spent endless hours taking down paper in our guest bath … wrestling with a steamer, sweating and losing fingernails while plaster rained down upon me. It was several days worth of work, followed by plaster repair, wall repair, and a dramatic change in wall color (from striped blue & yellow wallpaper to Martha Stewart’s “Seal” paint) and ceiling (same striped wallpaper on the ceiling, replaced with pale robin egg’s blue paint) … then fab accessories. The first time my mother in law came to visit (and stayed in the guest room), she came downstairs beaming … clasped her hands together, and said, “You got a new shower curtain!!!”
It remains my favorite story of my many reno projects! :)
YoungHouseLove says
THAT’S HILARIOUS!
xo
s
ajsteinke says
after two years of living with a 1950s bath…i tore down the wallpaper (post shower in my towel) only to find another older layer underneath…DIF to the rescue, thats good stuff.
next up I am going to give painting the tile a shot. to be honest I was hoping you guys would try it first. i got some good information on what products will hold up in a shower…now i can’t wait. add one new ikea vanity and I hope to be loving a bright new bath.
YoungHouseLove says
Ooh tell us what you’ve learned if you tackle it first! We are considering it for just the blue bathroom tile in here (that way the hexy floor can be the star).
xo
s
Hannah H. says
Sherry – we painted our wall tile and it is holding up about a year later. Obviously there were several steps involved so it was time-consuming, but it toned down the tile we hated enough to be able to live with it until we can do a full reno.
YoungHouseLove says
That’s awesome to hear!
xo
s
Pamela says
Not to discourage you from taking a tile-painting plunge (so I don’t have to), but it seems like just busy work. Once you hang your extra long white shower curtain those walls won’t be visible except when you are in the shower. Kind of like not painting the insides of your kitchen cabinets.
YoungHouseLove says
That’s true except we shower every day, so we see them all the time – haha! Thankfully we don’t hang out in the cabinets ;)
xo
s
Kristin says
I’m sorry it took so long the second time around with the steamer, but I’m actually pretty glad someone else ran into the same situation as us!! I used a steamer in our new nursery since it worked so well for you guys and it took FOREVER to remove. Granted the room was gigantic and I was battling 3 different types of wall paper and 2 (sometimes 3!) different layers, but it was HELL. I agree, I think it has everything to do with the type of glue and wall paper the owners used. The first layer was a much thicker type of paper and was super easy to remove, but the second layer was a thinner type of wallpaper and it was also covered in glue from the wall paper that covered it, which made the whole steaming process really messy and frustrating. I also tried DIF and a vinegar solution in combination with the steamer, which helped, but I found the steamer and a very flat spackle knife worked the best (I stopped counting the hours it took to remove once the tally got too high. I still have another room I want to do so I need to keep my husband’s spirits high!). In the end, we still had to spackle and sand the walls, but it was totally worth it!! Our nursery is nearly complete and completely wallpaper free :) :)
YoungHouseLove says
Gah, that sounds horrific! So glad you got it done!
xo
s
Krysta - KrystaSteen.com says
Oh, I feel your pain! We are working on removing wallpaper in several rooms. I use warm water with Shaklee’s Basic H2 and it works amazingly well!!
Katrina says
Wow, what an improvement already! We don’t have wallpaper in our new house, but the previous owners painted FLAT builder grade paint in the bathroom, even above the tiled shower. It’s all starting to crack and peel. I’m trying to figure out how to tackle it ASAP. Any ideas on how to repair cracking walls that have water damage? (Thankfully our house is only 5 years old and the damage appears to only be on the surface of the walls…)
YoungHouseLove says
Anyone have tips for Katrina? We haven’t tackled that. Maybe try youtube and search for a how-to video?
xo
s
Jamie says
Not a pro – just have home ownership experience (and avid HGTV watcher if that counts for anything). You need 3 things to prevent mold/water damage: 1) a properly functioning (and used) ventilation/fan, 2) caulking everywhere the wall makes contact with the tile/plastic wall liner stuff 3) moisture/mold resistant wallboard, not regular drywall. I would probably start by sanding all the paint off that’s chipping off and repainting and caulking, as well as checking to see that your fan is properly ventilating the room.
Katie says
Just wondering — is the wood border/blue paint plan a long-term plan or part of a “phase one” plan? I know you’re planning to knock down walls and build out the bathroom, but I wasn’t sure if this is something that would carry over after you do all of that or it’s a “just for now” fix? Of course you might not even know yet, but if you do, would love to know. Thanks!
YoungHouseLove says
I think it’ll be nice a budget friendly addition (we did hallway wainscoating at our last house for around $37, so we hope this is $25 or less) so if we love it and want to keep/extend it when we renovate later we can, but if we come up with some other plan down the line we won’t feel bad switching gears either.
xo
s
Molly says
I’ve got a wallpaper issue that I’m stuck on:
I’ve got 2 rooms in my house where the wallpaper was not completely stripped (just scraped, not steamed) and then painted over. There is still a thin layer of paper on the walls under the paint, but I’m not sure how to remove it. I’m not sure steam will penetrate the paint. Ever encountered anything like that?
YoungHouseLove says
It sounds like folks who have had it painted over recommend using one of those wallpaper scoring tools and then spraying it down or steaming it so that it can penetrate once you score it. Good luck!
xo
s
Alisa says
I skipped the whole “fix the walls” step when I removed the paper from my daughter’s room, we had carpet coming the next day so the painting had to be done. I will go back and fix the walls this summer – paint doesn’t coverup everything ????. Also, I’m not sure how you feel about the tile blue floor…, but I love them. I guess the down side is it pretty much locks you into using that color- which, obviously, must have been the previous owners favorite color!
YoungHouseLove says
Oh yeah, blue was definitely their color! The funny thing is that we’re really charmed by the blue hex floor, although we wish the shower was white tile in there.
xo
s
Alexis says
All of your wallpaper posts hit too close to home. I just bought a house and de-wallpapering is my life. I just finished phase I of wallpaper removal. The final phase is the entire kitchen (eeek). Anyway, the fabric softener trick worked for us. Except we just used Downy.
YoungHouseLove says
Oh man, good luck Alexis!
xo
s
Corien says
haha, so funny, ‘intrigued, I hurried into the bathroom…’
I love multitasking – cleaning the shower while showering. Best way to avoid chlorine stains :)
Jamie says
Hi John (or Sherry if you’re on comment duty!) – Question: How did you remove the wallpaper behind the toilet, spackle, and paint? Or did you just get as far behind as you can so that it’s not visible? I have de-wallpapered a bathroom in my house with the exception of behind the toilet. The perfectionist in me is dying, while my practical wife says we leave it since you can’t see it unless you go looking for it.
Jamie
YoungHouseLove says
In the other bathroom I just did as far as I could see/reach and then just left a small square that’s still hiding behind the tank (no one can see it unless we remove the toilet) but in the case of the upstairs bathroom John actually removed the toilet tank and was able to get it all!
xo
s
Tania @ Run To Radiance says
YAY! Wallpaper-free party! :) I’m impressed with how quick you all were- it only has taken us 1 1/2 years to be wallpaper free…and it feels so goooood!
I actually blogged about it this week too!
http://www.runtoradiance.com/2014/01/09/removing-40-year-old-wallpaper/
YoungHouseLove says
Congrats Tania!
xo
s
Tracie @cleverlyinspired says
Got on the site:) No problems:) Can’t wait to see what you do:)
xo
Trac
YoungHouseLove says
Thanks Tracie!
xo
s
Maura says
Wow, you saved the best for last! What a difference! Can you breathe in there now? I feel like I’m breathing better from here. :)
I LOLed at ‘Gas Station Bathroom’. We have names like that for some of the spaces in our house – most notably, ‘Abandoned Asylum Hallway’. The hall in our finished basement is dingy, poorly lit, and the wainscoting and trim is painted a very unfortunate, peeling, burgundy. It’s on the list!
Susan (Between Naps on the Porch) says
Okay, you know you’re a serious DIYer when you are DIYing in the shower in the buff! :) lol I love that shot of the hand and all the wallpaper on the floor. Multi-tasking at its best! Also, love the name “gas station bathroom.” Too funny!
Sarah L says
Have you ever done a skim coat? It seems that the previous owners in our house did a very poor job smoothing the walls before they painted. Now we have lots of raised spots (they appear to be patches that were never sanded). Would a smooth coat be something worth considering? Or would it be easier just to sand down all the raised spots before we decide to paint? There are also a few divots, but not many.
YoungHouseLove says
I think we did some skim coating in our first house but I’m not sure we had the blog at that time. It’s pretty straightforward though, with the right tools. Maybe check youtube.com for a tutorial?
xo
s
Ally says
Funny you should ask, because I’ve gotta crow a little. I just finished a two month process of peeling 3-5 layers of wallpaper(under paint), priming, spackling, skim coating, sanding, cleaning, priming and painting my girls room! So excited to get all the materials out and their beds back in. It looks like a new room!
YoungHouseLove says
Wahooo! Crow on, Ally! It feeeels goooooood, eh?
xo
s
Laurie says
OK, Sherry officially wins DIY. She’s even doing it while attending to her hygiene!
Agree about the method of wallpaper application really impacting the removal the most. I took some kitchen wallpaper down that was put up very well. I used the little thing that perforates the paper, followed with a damp sponge and then scraped it off with a good putty knife. It went really fast but really messy because that wallpaper paste is still around so it gets on your arms and the surfaces the paper falls on and everything needs a wipedown after.
KBella says
““hey, come take a picture!” Intrigued, I hurried into the bathroom…”
I’ll bet you were intrigued. ;)
Congrats on going wallpaperless! Can’t wait to see the finished bathroom!
sarina says
I did a terrible, terrible thing in my last house’s kitchen. It had horrid wallpaper.. so I painted over it. Not just with regular paint, but with a textured paint.. think plaster you put on with a spackling tool to create a somewhat rustic finish. I did it in a terra cotta color and it had a kind of cool italian cucina vibe. I hung herbs from the beam in the ceiling etc. When I sold the house, I overheard the painters the new owner brought in lamenting the fact that not only did they have to remove the plaster/paint BUT apparently there were not one, not two.. but three layers of wallpaper below. HAHA!
Nat says
We are in full bathroom remodel mode! I’m just impressed you were able to squeeze in that tiny little toilet space! We had to move ours out before removing our lovely mauve seashell wallpaper.
On a related note we are very excited to install our new toilet once the drywall is repaired (the toilet paper holder was cemented to the wall.. who does that?!), primed and painted. The new one cuts our water usage per flush in half! :)
Linda says
Oh, my gosh – you know you’re really ‘maturing’ when a new toilet becomes not only exciting, but a hot topic of conversation with neighbors. I just got a Kohler comfort height and it’s amazing how much less water it uses, how quiet it is, how much that extra inch of height helps, and just all around how wonderful it is! LOL!!!
I’m also in love with the Kohler quiet close seat. I laughed and laughed when I was ordering it, but now I wondered how I lived without it!
YoungHouseLove says
Haha, that’s awesome Linda!
xo
s
Melissa says
Question about the quarter-round — did you guys need to caulk at all before you painted it?
My husband and I just moved into a house eerily similar to yours (same amount of crazy blue trim, which let me just say I cannot wait to tackle and am so glad I have your guides to follow :) ) We also have wood quarter round, and in some places its cracking away from the baseboards. I’m wondering if caulking is a good idea to make it looks more seamless.
YoungHouseLove says
I did use a bit of caulk, but I like to use it after I prime (that way I can see what areas look dark after the white primer goes on, so they stick out more than when there’s brown wood). Then I just caulk any holes, smooth it, and apply my paint to seal it all in.
xo
s
Lindsey says
Hi Guys,
You may be aware, but there “New Testosterone Booster” ad under the “you may also like” feature that doesn’t look like something you would normally have that says “sponsored” on it seems like I have seen it other places too. ?
Maybe its Google tracking me? but I don’t know why it would think that would be an appropriate ad for me:)lol
I am so glad you are done with the wallpaper.
YoungHouseLove says
Thanks so much for the heads up Lindsey! Will try to block that for ya right now!
xo
s
Amy P says
Sherry, do you use a mask when you are sanding the drywall, (if so, do you use a certain kind of mask)? We had a flood last summer so we still have a lot of drywall work to do in our basement. I’m 11 weeks pregnant so I’m nervous about having all of the dust in the house. Even if I don’t help sand, it’s amazing how much dust floats upstairs, so I will probably use a plastic drop cloth to section off the basement when we do it. But I would like to help my husband so I’m trying to decide if it’s okay to wear a mask or if I should just stay away.
YoungHouseLove says
I don’t usually sand spackle when I’m prego just because it’s so dusty and I give John that sweet look and say “your turn?” but if I had to I’d wear a respirator (one with filters, not just a paper mask). Maybe check with your doctor to see what he or she thinks? It really does get dust all over you (your eyes, hair, etc) and then after you remove the mask to shower you might inhale some stuff then, so if at all possible I’d try to help out with other tasks.
xo
s