Strike up the band! Fire the cannons! Attempt to twerk! Okay maybe not that last one, but whatever the appropriate celebratory action is, bust it out because our once very wallpapered house is officially wallpaper-less!
And since we thought one last wallpaper removal post might be boring on its own, we saved that info and bulked it up with some other bathroom progress for you guys – namely…
- how we puttied, prepped, and primed the damaged walls
- how we primed & painted all of the cream trim and old wood quarter-round
- what paint plans we’ve landed on for this freshly de-wallpapered space (hint: we’re going to try to balance out the bold floor tiles with some up-high interest)
But let’s soak up the whole “wallpaper free” thing for a second. Considering that we’ve spent over 45 hours of our lives removing it in five different rooms over the course of the last six months we’re relieved. Very, very relieved. In fact, it was actually one of Sherry’s “before the baby comes” goals – so to hit it with a few months to spare means that we can dive into some more fun bathroom stuff before baby. But more on that in a second.
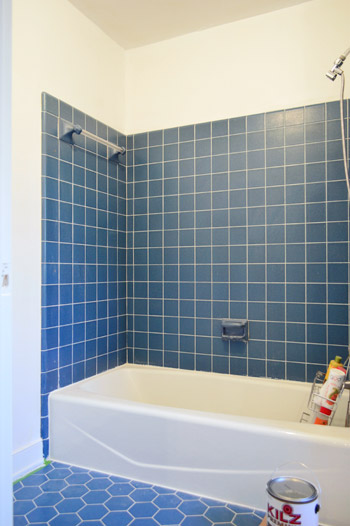
First we’ll just remind you what this room looked like every time we walked into it for the last half of a year. The walls are just primed in the picture above, but it’s already a vaaaast improvement.
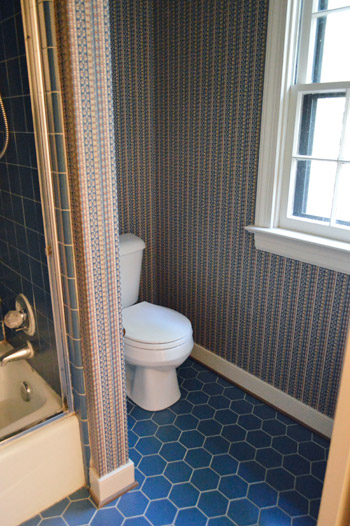
Although it was just completed last week, the peeling process actually started a little while ago. One morning Sherry was showering and I heard her yell “hey, come take a picture!” Intrigued, I hurried into the bathroom… only to find that she had stripped off several panels of wallpaper whilst showering.
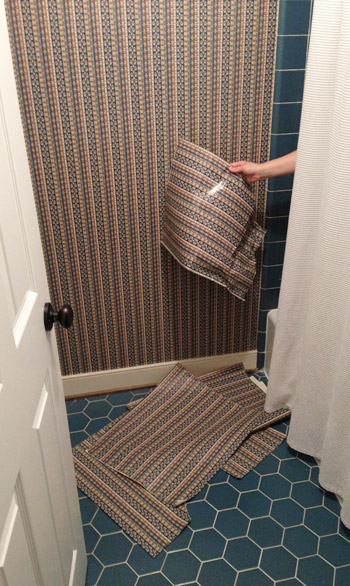
A bunch of corners in there were curled up from the effect of the shower steam over the years, so it took virtually zero effort (and apparently zero clothes) to get most of the shower free of wallpaper.
Since the shower steam had worked so well for that area, we figured a little extra help from my sister’s clothes steamer would do the trick everywhere else (it had been slightly faster than the other methods we tried when we used it in the foyer). Especially if I added a new step beforehand that we heard could really help loosen things up: spraying it down with fabric softener before steaming it (I used a spray bottle with 50% warm water and 50% Seventh Generation fabric softener in it). Because it’s such a small room, I decided to tackle it early one morning on a whim, assuming it’d be so speedy that I didn’t even bother to put my contacts in or hide my bedhead under a hat.
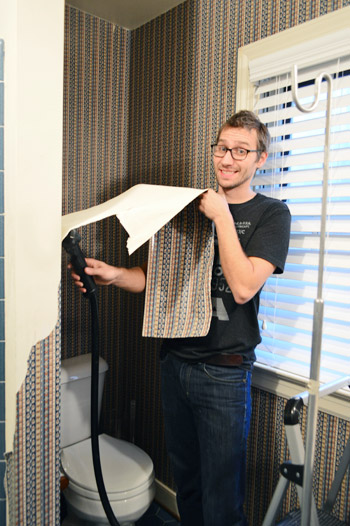
Fast forward several hours later and I had made little progress and my demeanor was quite different. John was not amused.
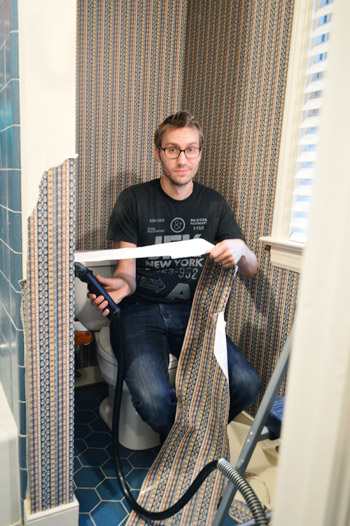
Okay, so there wasn’t really several hours between those two photos, but the project did end up taking me an entire day (meanwhile Sherry was doing this). Despite using the steamer, most walls came off in small strips and flakes rather than the big sheets that we were able to get in the foyer. But by sunset, the paper was all gone.
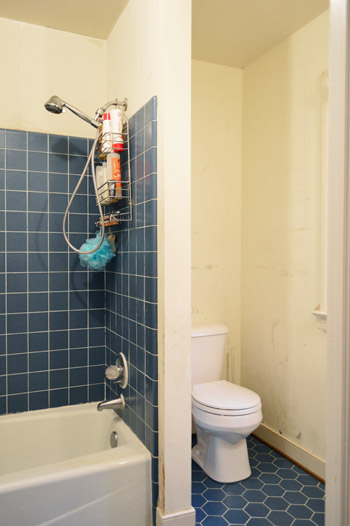
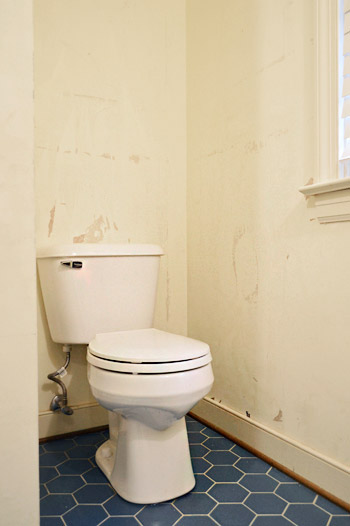
The bad news is that the walls were in rougher shape than any other room that we had de-papered. We started to wonder if they used a special treatment or glue in here, knowing that years of showering might be too powerful for a normal adhesive. Either way, it left us with a look that I lovingly call “gas station bathroom.”
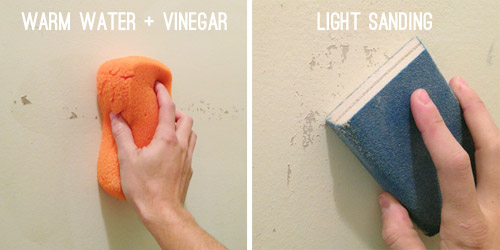
So unlike those other rooms, we had to do some pretty in-depth prepping. First we removed the last vestiges of wallpaper glue with a light scrubbing of warm water & vinegar (that’s usually our last “prep step” before painting). But this time we moved on to sanding all of the walls with a sanding block to help file down any rough spots.
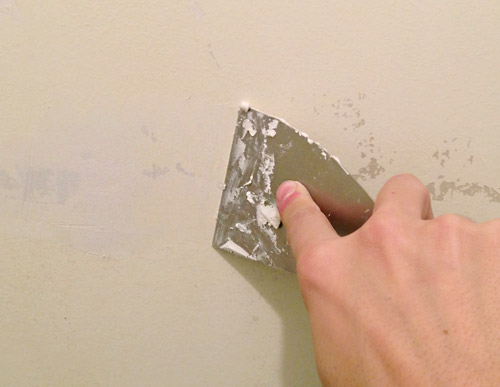
There were still lots of dimples and low points, so we also decided to fill things in with a coating of spackle. You can see that my coverage was super thin (I was scraping it nice and firmly against the wall) but it did the trick for filling in those slightly recessed peeled-looking spots.
This was not a fast process, as you can see from this shot of all the spackle spots. The same smooth outcome probably could’ve been accomplished with a full-wall skim coat, but that would have taken longer and resulted in a ton of sanding dust, so we opted just to go with some small pats of spackle wherever we needed them.
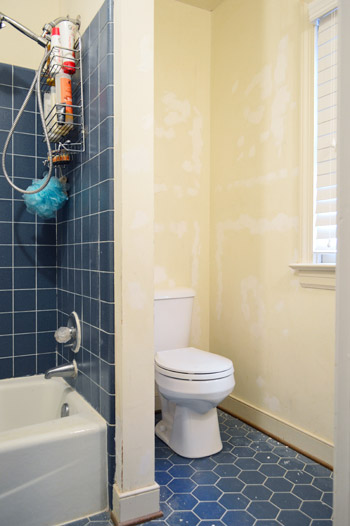
The spacke job still did require sanding, which is always a fun messy task. I can’t imagine how much dustier the bathroom would have been with a full skim coat going on.
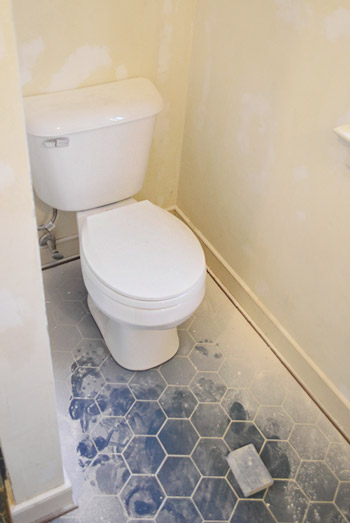
Once all the sanding dust was brushed off the walls and swept/wiped up, you can see how the spackle helped level out any areas where the wallpaper had torn off a bit too much of the drywall.
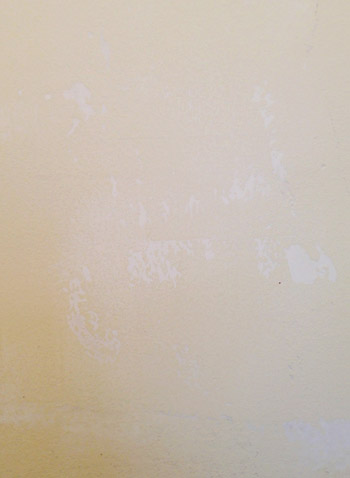
Next up was primer. See how yellow the walls were on the left, compared to the fresher look of primer on that wall on the right? It was possibly my favorite priming project ever, since it evened out the spotty wall and made the whole room so much brighter.
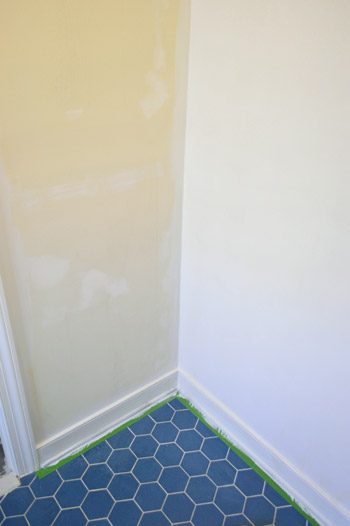
You’ll notice that the floor is taped off too. That’s because Sherry decided to seize the day and paint all of the cream trim white while we were at it. Not only had the trim been cream, the quarter-round was actually wood, so it was definitely one of those time-sucking tasks (the window panes are always a pain) but it was well worth it in the end just to have it done. Sherry used two coats of primer (Kilz no-VOC stuff) and two coats of Simply White (the same semi-gloss trim paint that we’ve used everywhere else). It was sort of a triple “ahh” because the trim is now a crisp white color, there’s no more wooden quarter-round, and ding dong the wallpaper is dead.
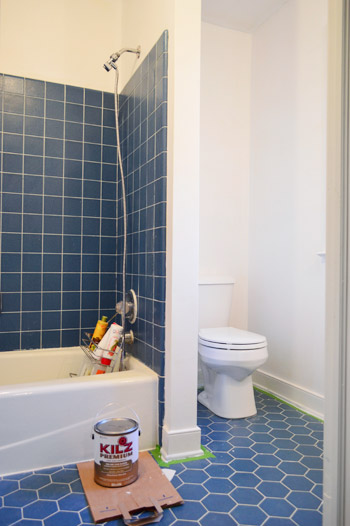
But before I get into the fun what-we’re-going-to-do-next stuff, here’s a quick wallpaper removal recap since a bunch of you have asked for a summary of what worked best, and what we’d never try again:
- In the powder room Sherry tried boiling hot water applied with a spray bottle, and just peeling things by hand (respraying and peeling the underlayer as needed) which was definitely not a fast process, but it worked.
- In the foyer we took my sister’s steamer for a spin, and mentioned that it seemed to be very slightly faster than our first method, although lifting up the steamer for those high spots was more physically demanding.
- In the kitchen Sherry tried warm water + soap (Dr Bronner’s) sprayed on the wall, followed by a wet cloth that she used to soak the underlayer and then peeled that off, which was probably tied with bullet #1 for ease/speed/effectiveness.
- And in the dining room Sherry dry-peeled, meaning that she didn’t spray the top layer at all, and only applied water (with a large damp sponge) to remove the underlayer, which was, like every other bullet, not a fast process, but it worked.
- Finally, in the en-suite bathroom we circled back to the steamer because we thought it had been slightly faster than our other methods (although it was no silver bullet, maybe about 5% faster). We also added a spritz of warm water + Seventh Generation fabric softener beforehand (a 50/50 combo applied with a spray bottle). Ironically this time it was slower than any other method and left the walls a mess, although we also tried the three other methods outlined here at various points out of curiosity, and none of them worked well in there. So we can only conclude that this bathroom’s paper was adhered by some evil ninja-esque glue that was too legit to quit.
In summary, the way that wallpaper is adhered along with how well your walls are prepped beforehand seems to have a lot to do with how easy (or how impossible) it is to remove the wallpaper. Nothing we tried was super fast and amazing, but most methods actually worked over the course of 8-ish hours if you kept at them. So hopefully taking those five techniques for a spin and outlining them as we went was somewhat helpful for others who are staring at a bunch of wallpapered walls and wondering what to try next.
____________________________
Now that the boring-but-it-had-to-be-done prep work is out of the way, we’re really excited about a paint treatment that we’re planning to try in here. After wracking our brains about the best way to work with the existing blue tile for now, while drawing the eye up and making the room feel taller and less squat (which tends to be the issue when all the focus is on the floors) we decided to bring some more blue back into the room. Just in a smaller (and lighter) dose than the wallpaper… and in a nice high place.
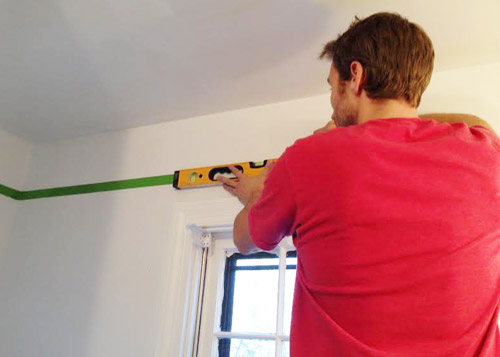
Heather’s amazing bathroom (more on that here) will give you a nice idea where we’re headed. Yup, we want to make a simple wood border around the top part of the wall and carry a soft-but-complementary blue color up that part of the wall and onto the ceiling. This room also has a similar effect while having a blue floor like ours, so it might help you picture how some softer blue up top can balance out a somewhat demanding floor like ours.
So next up, we’re going to paint those primed walls and add some wood trim around the top of the room along with an accent color up there. Hopefully when the tall white shower curtain is rehung and we add some art we’ll completely forget the old room that we started with.
Are any of you guys diving into a bathroom update or planning any wood-border-plus-paint projects? Have you been de-wallpapering, spackling, priming, trim-painting, or sanding? Feel free to toss out tips for anyone else who’s battling those beasts.
Psst- Sherry’s over on Young House Life chatting about her maternity clothing M.O.

Paulette says
John, I avidly read your (and Sherry’s) blogs posts and find them so informative. I also find them HYSTERICAL! (“…adhered by some evil ninja-esque glue that was too legit to quit.”) You guys make my day and I must say you give me courage to try a few DIY projects myself. Please keep blogging!
YoungHouseLove says
Thanks Paulette!
-John
Rachel says
Did you all take the toilet apart or paint around it? Is there some technique to painting around if you did it that way? I’m trying to figure out how to tackle my upstairs bathroom and completely taking the toilet apart would be very annoying.
YoungHouseLove says
John actually took the wallpaper off behind it because the tank happened to be off this time, but in the half bathroom downstairs the tank stayed on and I just peeled what I could reach and painted what I could reach (thankfully you can’t see behind it anyway so it seems to work).
xo
s
Audrey says
I’ve been a reader forever it seems like, at least 3 years. Anyway, why oh why does your blog now show up as “SUSPENDED” as opposed to Young House Love in my blogger reading list? It also shows up that way in my sidebar :/ I’ve tried re-entering it several times, like hoping it would reset or something but no, that didn’t work. So weird. What’s up with that?
Audrey @ neverendingdecorating.blogspot.com
YoungHouseLove says
I wish I knew! Randomly it does that for some people, and the only thing we know that fixes it is unsubscribing and resubscribing. So sorry that isn’t working for you though! Wish it was somethigng we could fix on our end, but it’s so random and occurs so sporatically just for a few people. Boo!
xo
s
Britt Bower says
I too have “demanding” tile (1950’s pink and teal combo!) and RetroRenovation.com and SaveThePinkBathrooms.com have helped me immensely with figuring out how to decorate around them. I’ve come to love my pink and teal tile…I hope you will come to love your blue tile! Can’t wait to see it!
YoungHouseLove says
We actually like the blue hex tile on the floor, although we wish the shower tile was white. I think we can make it work though!
xo
s
Jen says
I don’t know if this stuff was ever used in North America, but both of our homes in NL had this crazy textured wallpaper that actually had tiny slivers of wood in it, under the paper top layer. We rented a scoring tool and steamer… It still came off in tiny bits. We got dozens of splinters under our fingernails – awful stuff! Worse still, the previous owners had been heavy smokers, so the walls were streaming with yellow after the steamer went over them. Worst. DIY. Job. Ever.
YoungHouseLove says
Yikes, that sounds awful Jen!
xo
s
Jennifer says
I redid my tiny half bath last summer. The walls had 3 layers of wallpaper with a coat of paint on top. Yeah. Fun. After trying very unsuccessfully for about 3 hours to peel it, I gave up. I ended up having my remodeler redo the drywall completely. It was much faster and cheaper than if I had tried to pay him to peel it. Just a thought in case anyone else has to deal with that nightmare.
YoungHouseLove says
Smart!
xo
s
tina says
We have a bathroom I started working on removing wallpaper from, right before Christmas. I thought of you guys as I was using my water/vinegar solution. :) Sadly it was 3 layers thick and while the first layer came off easily… Well, long story short, we’re going to be putting beadboard up instead. (If you want to see the multiple uglies we found/dealt with, http://milesclan.wordpress.com/2013/12/21/the-downstairs-bathroom-before-during/)
YoungHouseLove says
So sorry it’s being so tricky, but the beadboard sounds awesome!
xo
s
SarahN says
I’m a HUGE fan of the colour blue, so I actually like your blue tiles! Alas, everyone is different.
I’m glad to know Sherry’s normal – I sometimes end up on a cleaning mission when I’m showering… Keeping it real, love it
YoungHouseLove says
Aw, thanks Sarah! We like that blue hex tile too, we just wish the blue shower tile was white. But I think we can hopefully make it work!
xo
s
bekah says
Haha gas station bathroom. Very much like ours…only ours is actually worse. WAY worse. I’d send you a link but oh, the horror!
Nice work on de-papering! We are still de-paneling, which is awful in its own way. In other news though – I have now found 5 different patterns of paneling in a tiny 2 bedroom home. The mind boggles.
Laura says
It looks great! We have a similar bathroom; when we moved into the house we had such a long to do list that we “patched” the bathroom by getting it professionally spray painted (white). This included the tub, which had beautiful (and permanent) brown/orange stains all over the inside!
When we got it done, the company said it would last about 7 years. However it started chipping after about 1 year and now 3 years later its chipped all over and looks horrible. A major bathroom renovation is in our near future.
Just curious — how does the inside of your bathtub look? How were you able to get it to look so clean?
YoungHouseLove says
Oh no, that stinks! Did they warranty their work for more than a year? I would try to get them to fix it if they said 7 years and it was only a year after it chipped! As for our bathtub, it’s pretty clean looking although it didn’t have any reglazing done that I could tell, so we think it’s original and not painted.
xo
s
Heidi P. says
I’ve been saving up my comments for one big one! (more efficient hopefully :). Here goes!
First of all, merry Christmas and happy New Year!! You guys are awesome! And I loved what you did for the children’s hospital family room. It choked me up.
Second, I was absolutely amazed at the difference some new grout made on your entry!! Which, by the looks of 700+ comments, everybody else was too! Night and day. My jaw literally dropped.
Third, a rug question, since you just bought one. It seems like most wool rugs use the natural cream color of the wool instead of being white. Is it just me, or does the cream color bother you guys at all? For instance, I wanted to buy that big black and “white” tribal rug from Ikea that I’ve seen on so many blogs. And in pictures, it always looks white, but in person it was cream, and I was so sad! I didn’t like it! Any thoughts on that? or explanation that could help me get over it?
Last, I’m also getting ready to paint every wall in the house! And my walls are dinged up all over the place too. But mostly from a little boy that lives here. Lots of prep work ahead! But one big project for getting ready to repaint is almost done! I asked you guys a while ago about putting a board down a wall to separate two connected rooms. And while my parents were here for Christmas, my dad and I tackled it! We devised a faux beam for the ceiling, and then on either end, a board with cove molding to run down the walls. I haven’t filled nail holes or anything yet, but it looks pretty cool all the same! Thanks for the
motivation and inspiration!
YoungHouseLove says
I think John’s more sensitive to undertones like cream vs. white and personally I’m just a little more loose about them. Maybe it’s because our first house had a lot of things that were white and cream layered together and it was nice and airy and breezy, so I don’t mind it? As for the board down the wall, I’m so glad it worked!!
xo,
s
Skooks says
I used that same exact inspiration photo for our tiny half bath which basically started as a beige box. There’s no natural light in the room at all so we found that a brighter blue actually worked better for us and we painted the boring mirror on the wall a rich red for some contrast. Looking forward to seeing how you translate the inspiration pic to your space. :)
YoungHouseLove says
That sounds awesome Skooks!
xo
s
Alexandra says
Oh lordy, wallpaper! We are slowly updating a 1968 traditional. One of the bathrooms had wallpaper everywhere! By everywhere, I mean even the ceiling was wallpapered! 2 scoring tools, 2 steamers, 5 people, and 4 hours got that wall paper down. That was just one room. I swear, I hope I never see another wallpapered room for as long as I live :)
Annie says
Looks great! The blue tiles are amazing btw. I hope they will be sticking around!
Pam says
Wow that’s a lot of prep work! It looks so much better without the wallpaper. Our next big home project is going to be the guest bathroom. We were going to do something similar with a tall wood trim and then we wre going to add faux board and batten. I was thinking a bright turquoise blue for the upper part of the wall since the tile and most of the wall will be white. Never thought of painting the ceiling though. Do you think a bright color on the ceiling would be too much?
YoungHouseLove says
I think something really bright or dark could be overwhelming on the ceiling, but something in the range of the picture that we shared as our inspiration would probably look great!
xo
s
Caren says
I’m new to the blog, so apologies if you’ve answered this before. What made you choose Simply White for the trim in your new house? Were you unhappy with the Decorators White you’d recommended in the past? I’m currently looking at white trim shades and completely overwhelmed with all the slight variations. Btw – your bathroom transformation looks amazing!
YoungHouseLove says
We loved Decorators White in our last house but every house has different lighting and here it was reading a little yellow, but Simply White looked more pure, so we went with that. In another house Simply White could be too peachy or too blue depending on the light, so I just like to bring home swatches and see what you like best in the space.
xo
s
Jen says
So does this mean that the days are numbered for the blue trim in the office and dining room??
YoungHouseLove says
Oh man I hope so!
xo
s
Jess @ Crunchy Hot Mama says
HAHAHAHA! Love the arm shot ;) That’s totally something I would do and my hubby would just shake his head.
Random ? for ya’ll. I’m thinking it’s a southern thing to have walls textured. We have 2 rooms with wallpaper that I want gone but don’t want to texture and paint over (I did that to 3 rooms in my parents house, and it was not fun for me). But when we went to our relatives in Missouri, they didn’t have texture on any of their walls…is this a southern vs. northern thing?
I would LURVE to just de-wallpaper and paint, but don’t know if people down here (Texas) would be expecting texture.
YoungHouseLove says
I totally think textured walls are a regional thing. We’ve never had them in any of our three houses in Richmond.
xo
s
Geen says
I am so glad you posted about your last bathroom.We moved into a house 6 months ago and the bathroom is the wallpaper my daughter decided to peal first. The first layer came off easy. The rest was horrible. Glue, no longer hidden junction boxes and pitted walls- as I read about all your other rooms I would wonder why/how I got such a dreadful space. Did they not prime? added extra glue? They must have hired the same interior design firm to do their bathroom :)
lois says
My method was similar to yours, except I just turned on the hottest water in the shower, closed the door and came back 20 minutes later! The wallpaper practically came off by itself!
Another time I made a big mistake! I put new wallpaper over shiny vinyl paper, thinking it would work because the vinyl was in such good shape. The next morning ALL the paper was on the floor…glue didn’t stick! Vinyl had to be removed and then re-papered again!
YoungHouseLove says
Oh no!
xo
s
Jolene says
All I can say is “May you never have to remove wallpaper again for the rest of your life!”
It looks wonderful!!!
YoungHouseLove says
Haha, thanks!
xo
s
Mary DePalma says
Gas station bathroom lol! I recently removed wallpaper from my 15×15 kitchen it was pretty awful so I feel your pain, can’t imagine removing multiple rooms of the stuff. A trick I tried which worked very well was that kept a pot of hot water simmering on my stove (since I was already in the kitchen), you could also use a crock pot on low if you have one and I kept my spray bottle of fabric softener in the water while I was scraping the wall to keep it hot. I found that there was a big difference in how well it worked hot versus just warm. My paper came off easily it was the adhesive left behind that was the problem. So my method was basically working in patches of about 3×3 feet spraying with fabric softener water then running a scraper down the wall. This was of course followed by a final scrubbing with vinegar and water using a textured sponge. Wallpaper removal apparently also doubles as a fitting punishment for rebellious teens. I had a fridge delivered to my home in the midst of my wallpaper removal hell and the guy delivering it could empathize with me. He told me that in high school he got a few days of out of school suspension. During his suspension at home his parents set him to the task of wallpaper removal. Smart parents if you ask me.
YoungHouseLove says
No way! That’s pretty inventive! As my mom says… “It builds character.” Love the crock pot tip too!
xo
s
Sharon says
First post ever! Yay!
My boyfriend and I purchased our first home in April and he decided to demo the entire living room (seriously, like, down to the studs, ripping all of the old insulation out, view of the attic etc.)because the wallpaper removal was going to “cause the walls to be uneven”. I got new hardwood flooring out of it though!
Kudos to you two for leaving your walls up! :)
YoungHouseLove says
Ooh, new hardwood floors sound awesome! As does demo (I love demo). Best of luck with your place!
xo
s
Kristy says
There has got to be some sort of super strength bathroom wallpaper glue people use, because I removed a small bathroom worth of wallpaper around the time you all were removing the wallpaper downstairs and I was almost in tears wondering why it was so hard for me when I was following the same procedure. It took me two whole days to remove that paper and it was only below the chair rail. I still have nightmares about it.
YoungHouseLove says
That sounds terrible!
xo
s
Cynthia says
LOVE THIS POST! Have been waiting for the conclusion of the what-wallpaper-removal-method-works-best-experiment! You guys had me on the pins and needles. Kudos to Sherry for seizing the moment (and to John for seizing his camera!!)
Now I’m looking forward to reading about those old built-ins! Just putting a bug in your ear. (Why do people say that? Gross!)
Thanks for being a good non-subscription-based blog!
AMK says
Thanks for giving us a breakdown of the different ways you tried taking down wallpaper! We have some “lovely” wallpaper in our kitchen and guest room and I can’t wait to tackle it! Thanks for the tips! :)
YoungHouseLove says
Good luck AMK!
xo
s
thelady says
now that the wallpaper is gone I kind of like the blue tile
YoungHouseLove says
We like the blue hex on the floor too! Just wish that shower tile was white, but I think we can figure out how to make it work.
xo
s
Jill says
What an improvement with just primer vs wallpaper! Have you ever considered reglazing your tile tub surround? If you reglazed it white, then you’re only dealing with the blue floor. Which could (almost) look like a deliberate design decision to add a ‘pop’ of color into the space. I wouldn’t recommend it for a long term solution, but it could be a great facelift for a year or two. I have a friend who did it to a bath that needed a pick-me-up and I was shocked at how good it looked.
YoungHouseLove says
Love that idea! We had reglazing done on our first house’s tub and it was great.
xo
s
Leslie R. says
We’ve had a bathroom with similar tile (and wallpaper). We eventually gutted the bathroom and got rid of the tile. However, seeing the blue hex tile on the floor, I’m really liking it. I think it could really look good as long as it isn’t full of cracks. I’m sort of changing to the the, “why does it need to be removed’ way of thinking. It seems like too much good stuff is being tossed when it has plenty of life left in it. I can’t wait to see which way you roll on this one. I vote for “Keep the tile”.
YoungHouseLove says
Oh yes, we like the floor tile, we just eventually want to extend the small footprint of this bathroom to include the separate sink nook off of the master so it’s one big room, which means the tile needs to be the same throughout the room, so unless we can find the same tile to extend it we’ll have to redo it all so it matches. Should be worth it to have a bigger room instead of two choppy ones, I hope!
xo
s
Donna says
We have a house full of painted wallpaper. It is really stuck! Due to the weight of the paint…it comes off pretty easy but where the glue remained I had to try a few thing…vinegar and warm water worked ok….but Citra Solve mixed with warm water worked the best. We had very little wall repair. I got the Citra Solve at a health food store…the concentrated version. Worked great. I have more rooms waiting. The citra solve works really good to remove labels off glass jars…so i guess that is why it really worked well to remove that stubborn wallpaper paste.
YoungHouseLove says
Sounds awesome!
xo
s
Penelope says
Hi ,
I want to refresh the 60’s look of my bathroom with a small budget like you are doing in this bathroom. You know refresh it with some paint and some art on the wall. I am even willing to paint the floor tile. However I have this challenge to find a good color to go with the bath and the sink which are a kind of dark brownish salmon color. Still have a lot of research to do!
YoungHouseLove says
Hmm, maybe bring home a bunch of paint swatches and hold them up to the salmon to see what looks good and go from there? Good luck!
xo
s
A Secure Life says
Wow – what on earth were the previous owners thinking when they put up/left up that busy wallpaper with the blue tile?? It looks so much better already!! You guys should be so proud – as always! And, I am currently working to get down our wallpaper in the hallway so the reminder about the warm water/vinegar solution was great timing. Thanks!
Mary says
I’ve always heard that having walls without texture will show every imperfection. Maybe this isn’t true? Looks like you guys are doing something right!
YoungHouseLove says
I think it’s a regional thing! Here in Richmond we have never owned a house with a single textured wall!
xo
s
Hillary says
When my husband stripped the wallpaper in our 60 year old bathroom (the wallpaper was there from the beginning) we found the best method was to spray it down first with an ammonia/water mixture
Sarah Jean Baker says
My MIL and FIL just had the painters prime and paint over their wallpaper; have you heard of this at all? They say it looks great and you can’t even tell. I’m hoping to tackle our master bath over spring break (there’s wallpaper throughout!), so I’m already doing the research.
YoungHouseLove says
I’ve only heard horror stories of people trying to remove wallpaper that has been painted over, but I hope it looks great!
xo
s
Nora says
Hi, Great change. Is it just me or does your bathtub look like it changed color too? Did you re-coat it or is that an optical illusion?
Bye for now,
Nora
YoungHouseLove says
Same old color! Maybe it’s just the lighting? We updated the bulbs for our favorite ones with nice white light!
xo
s
Alison says
Not that I would wish the horrors of wall paper removal on anyone but I’m kind of gleeful that this room was a challenge. The wallpaper in our tiny guest bathroom was a NIGHTMARE to remove. It came off in like 1/2 inch segments and took probably a collective 30 hours to remove from a teeny tiny bathroom. Every time I’ve seen wallpaper just glide off in giant strips it makes me irrationally angry.
YoungHouseLove says
Haha, now we can relate!
xo
s
Willow says
We moved into a Victorian styled house 2 years ago. The previous owners were very committed to the style. We had wallpaper in every. Single. Room (and it’s a fairly large house). My favorite was a troupe l’oeil tassel border that filled the entire lower level. I started a blog based on the work we have had to do (& are still doing) to de-tassel and update the house! We finally bought a steamer because it was definitely the best fit, especially when we found some areas with 4 levels of wallpaper! Fun stuff.
YoungHouseLove says
Oh man, sounds like a giant job!
xo
s
Jillian says
Can I ask what brand of paint you’ll use when you get to that part? I know you love Benjamin Moore. I just purchased a gallon of Moonshine and Simply White because I love the look you had in your old hallway but I almost had a heart attack when the woman at the cash register told me the price of the two gallons. It was a little disheartening because I like the Benjamin Moore colors you use but want to paint our entire house (we just bought it) and couldn’t afford to do it at that price per gallon. Is there a brand you like at a more reasonable price? Hoping I can just ask them to color match the Ben Moore swatches. Sorry if you’ve already addressed this somewhere on your site – I tried searching for it but there’s so much paint info!
Thank you!! Love your site! I’ve been perusing it for years!
YoungHouseLove says
It all depends on the type of paint you get. You can get their Ultra-Spec line, which we’ve used in our house and really liked, for $35 a gallon. That’s comparable to Home Depot paint and it’s no-VOC and what a lot of builders use when they do homes with folks who want the quality of BM. So if you go for Aura it can be $60, but nearly half that for their Ultra-Spec stuff! We’ve been using a lot of BM paint just for the coverage/quality, so we’ll probably do that (although we have also gotten quarts of cheaper paint like Olympic when we were stenciling the floor in the bathroom nook for example). We did notice that color matching BM paint wasn’t perfect (it was about a shade lighter than the walls which were really BM paint mixed by BM and not Home Depot) but it still worked out and looked ok!
xo
s
megan says
My husband and I recently purchase a home and we have TONS of work to do. We actually had a contractor come in a “untexturize” the ceilings… we have a dust disaster! Before we can paint, we need to wipe down all of the walls and floors. What is your recommendation for doing this? I have not had much luck just trying to brush off the walls with a broom!
Thanks for your advice!
YoungHouseLove says
I would dry brush it all if you can and then follow that with a damp washcloth (from top to bottom). You might have to repeat that a few times.
xo
s
Lindsay says
Your wallpaper posts have been so helpful. Thank you for sharing them. My husband and I are running into the same problems that y’all did in your master bath. However, I’m thinking we’ll have to do a full skim coat on the walls. There’s a lot of raw drywall after we’ve removed the wallpaper. Any tips on skim coating?
YoungHouseLove says
I would check out youtube.com and see if there’s a video tutorial over there. It’s so nice to see things like that being done on video if you can.
xo
s
Deena Pattillo says
I saw where you painted your trim 2x’s w/ Kilz and then 2x’s with Simple White. Our whole home is trimmed in cream and all the doors were also painted cream. Book cases around the fireplace,rails going up the staircase, and cabinets in the wet bar area are also cream. We have lived in the home for 14 years now and we have been doing improvements by removing wall paper and painting. Lately, I have seen chips of the cream paint and underneath it is this dark brown, probably varnished wood. When you painted the trim, did you do any sanding before using Kilz and then paint. I wonder if paint will still chip off after I paint every thing white. Do you have any suggestions on the best way to paint the trim, chipping rails and doors? Or what you did is sufficient. Thanks for any help. I watch your website all the time. Love it.
YoungHouseLove says
Paint is only as strong as the foundation, so since yours is chipping you definitely want to sand it to get a smooth and strong foundation before painting. In our case, nothing would come off and it was chalky and matte (not a glossy sealed surface, which I would have roughed up with sandpaper). Hope it helps!
xo
s
Laura G. says
Are the walls and trim painted the same color? Love seeing the progress of your home!
YoungHouseLove says
Yes, they’re both Simply White (semi-gloss on the trim and eggshell on the walls).
xo
s
AnnMarie says
Sherry, do you have any tips for painting the quarter round? I find that no matter how close I put that darn tape….a little bit tends to get through the crack and onto the floor.
Thanks!
YoungHouseLove says
My tip is if it gets on the floor a little, you can usually drag a flat-head screwdriver along that seam and it’ll pop off the tile. Hope it helps!
xo
s
Maria says
I have peeled my fair share of TERRIBLE wallpaper. I feel your pain, Petersiks! My parents bought a 1970’s home that was custom built by a Greek couple. Let me just tell you, they love their flocked wallpaper…
Stacy M says
I’ve tried most of these methods, but what I found matters most is the tool used to scrape. It is made by Zinsser and called a Multi-Purpose Scraper Tool. 4″ blade. Way better than a putty knife or drywall tool! Almost makes wallpaper removal a joy. Well, not really, but you get my drift! Spraying a water-vinegar solution or steaming can make tough jobs faster. It didn’t matter as much once I discovered the Zinsser tool of magic!
YoungHouseLove says
Thanks for the tip Stacy!
xo
s
Caleb says
Wallpaper removal can be a painful process, especially if it is throughout your home. But in this case, I believe you made the right decision in removing the wallpaper.