As exciting as it is to have both that section of wall and the contractor gone, there’s still a lot of work ahead of us before our opening is finished. Unless this is your idea of beautiful dining room:
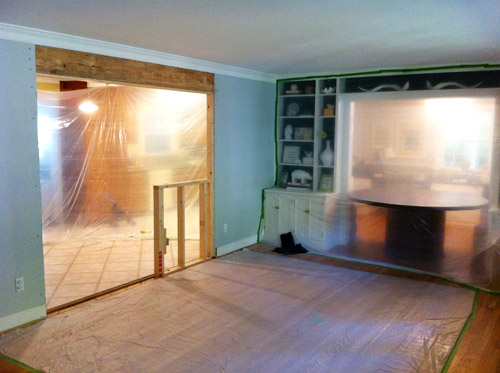
Oh and speaking of the contractor, locals have been asking for Steve’s info – and now that we’ve worked with him and were extremely happy with his result, we’ll share (we only like passing along people’s info after we work with them, to be sure they’re someone we’d recommend). He’s a licensed Class A contractor as opposed to a handyman (so he doesn’t hang doors or build furniture or do odd little jobs), but if you have any big structural work (like knocking down walls, building additions, etc) he’s your guy. His email address is [email protected].
But back to our next steps with the opening. We left the protective plastic up because drywall installation was next up, which can be kinda dusty itself (especially the sanding part). We don’t consider ourselves to be drywall installation experts by any means (it was my least favorite part of our bathroom renovation two years ago) but this particular job seemed straightforward and small enough that it’d be silly to hire out. We just needed a span of it across the top of the doorway on the dining room side (to cover the exposed header on that side) and a few sections around the half-wall.
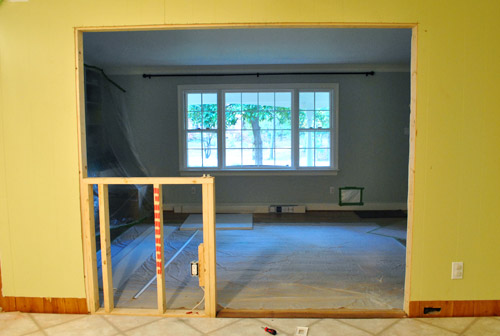
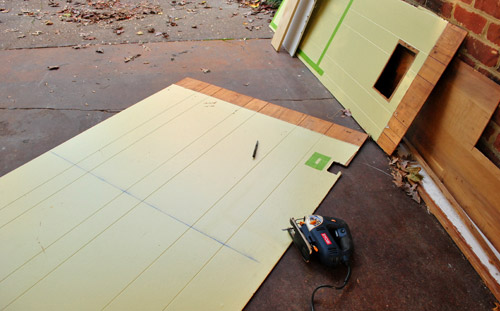
And actually, the kitchen side of the half-wall will be paneling instead – which is why we had the contractor leave all of the scraps from his demolition. So I simply measured, marked, and cut using my little jigsaw. It was super quick and easy.
So easy that I went ahead and set the cabinet against it before proceeding further (Steve actually suggested doing this before drywalling the back so I could see my studs which would allow me to drill into them more easily/accurately). Note: there will be a 12″ counter overhang behind the peninsula with stools tucked under it, so you won’t see very much of the half-wall from this direction at all when we’re done. And we’ll be topping the half-wall with a chunky wooden ledge to add even more function and balance.
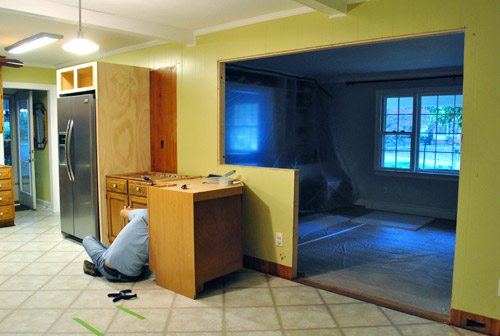
Already looking more finished, right?…. right?
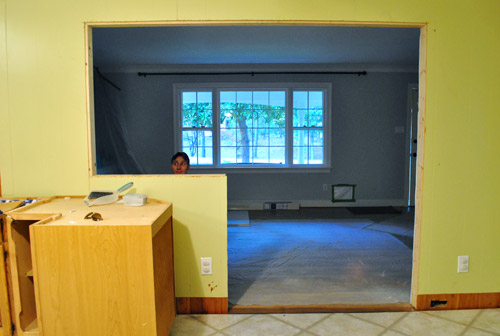
Okay, not really.
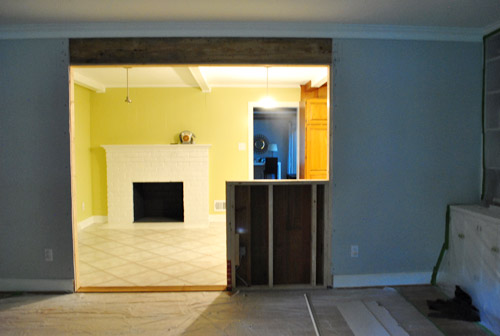
But I was kind of avoiding my next task: getting the drywall pieces home. Obviously I can’t fit a 4ft by 8ft slab of drywall into our Altima. And renting the truck at Lowe’s or Home Depot is always an option, but spending $19 to transport $14 worth of drywall seemed silly. So I took another suggestion from Steve The Contractor: cutting the drywall to size before bringing it home. Which is how I found myself setting up shop in the Lowe’s parking lot. Have I no shame? Nope. Especially to save a buck (or 19).

Basically I brought my tools with me (measuring tape, pen & blue chalk line to mark, razor blade to cut, yard stick as straight edge, towel to try to keep the car clean-ish), bought my drywall, and spent about 45 minutes carefully measuring, slicing, and snapping my pieces to size outside. The drywall in the dining room is actually two panels thick for some reason, so I had to cut two of each size to keep it flush for a hopefully seamless result.
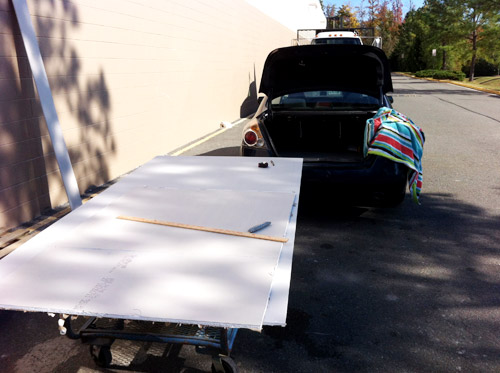
I managed to get my half wall pieces (plus a few scraps) in the trunk…
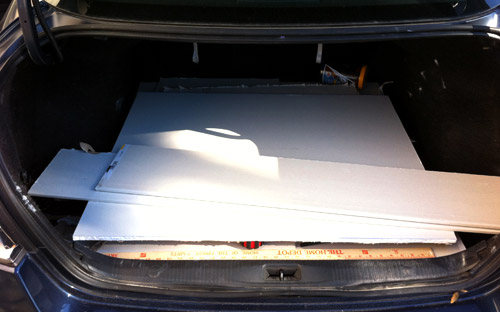
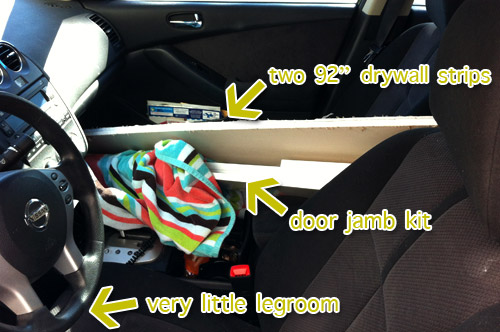
…and the long pieces for covering the new doorway header barely slid through the middle of the car (along with the door jamb kit, but that’s for my next phase of the project). Booyah!
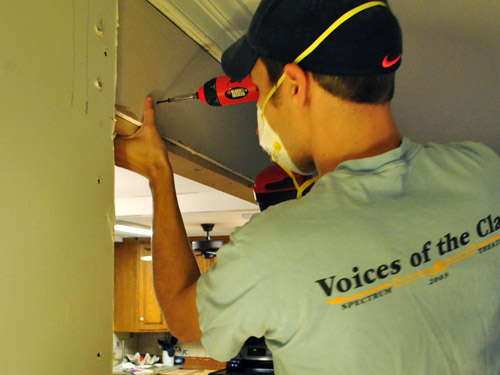
Even though it was a bit awkward working in a public parking lot, it was nice to come home and jump right to screwing the drywall into place since it was already cut to size. Sherry helped me by holding one edge up and then I’d screw a few “holding” screws so she could hop down and take flattering photos like this:
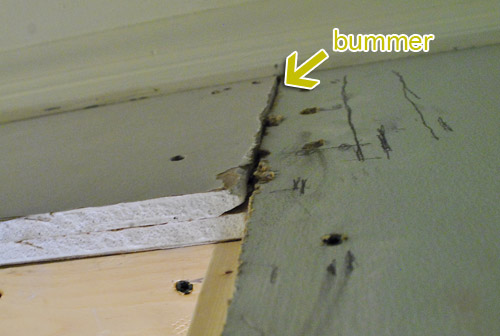
But this is where my wow-this-is-going-better-than-I-expected luck ran out. Despite my best measuring efforts (we even took photos of a tape measure next to the existing drywall and the drywall in the store to pick the right depth), my new doubled-up drywall was a smidge thicker than the existing doubled-up drywall. And a smidge is not acceptable when it comes to drywall. This would have looked all sorts of awkward even with mud and tape and some sanding (it would still read as a slope when the light hit it).
So I ditched one panel and relied on a technique that I used while hanging hardibacker and drywall in the bathroom that we gutted: shims. I added some wood shims to get my new drywall flush with the rest of the wall. Only I didn’t have that many shims and furring strips, so I also had get resourceful and dip into our stockpile of paint stir sticks to help us out. We learned that a few of them screwed together were actually just as dense as a furring strip or two. And since the wood + steel header is beyond solid, everything held nice and firmly. You can see them poking out there a bit on the bottom (don’t worry, that’ll all get covered by trim).
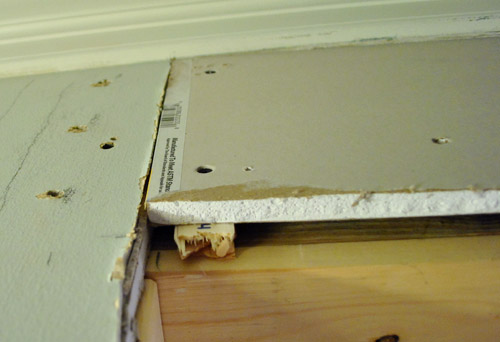
I basically repeated that process for the big panel on the half wall (being sure to get things as flush as humanly possible before drilling). I know what you’re thinking. Yes we’ve accrued quite a stash of stir sticks over the years (probably because they give us one when they hand over our paint and we usually paint right away when we get home so the paint is still stirred from the store’s mixing job).
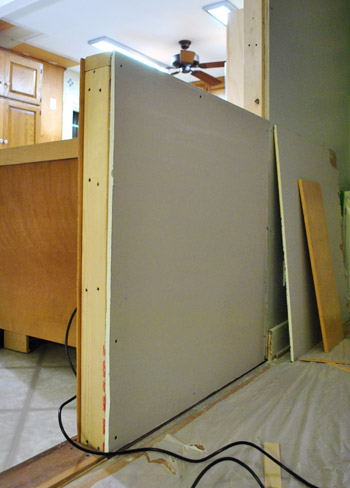
Fortunately for that little end cap I didn’t need to match any existing drywall thickness (since it’s a new plane) – so a single piece of drywall just went on straight into the wood frame. Then we used some metal drywalling corner strips to make the edges a bit sharper. Although they’re typically not meant for where paneling and drywall meet, we’re no strangers to “improvising” along the way, and you’ll see how it all turned out a bit later (spoiler alert: looks good).
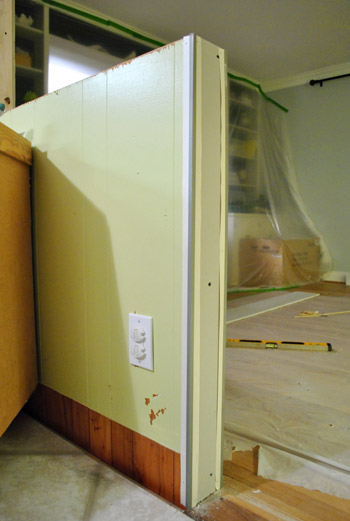
So that completed the hang drywall part (with only one minor hiccup, thankfully). Next up was the drywall mudding part. I left that to Sherry because she has more finesse than I do when it comes to that stuff (at least I tell her that to get out of doing it – the same way she’s better at cutting in).
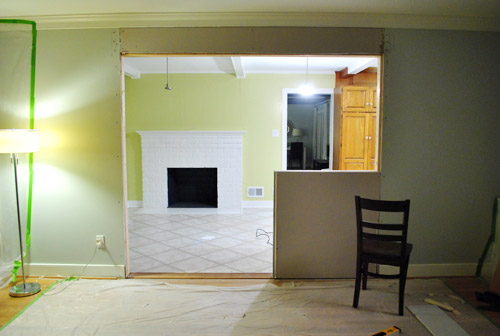
So Sherry broke out her spackle knives (the girl has a nice assortment) and started the fun process of taping, slapping up some drywall mud, smoothing it, letting it dry, sanding it, and then repeating that process. Although she didn’t tape this crack since it was especially tight (not even much of a crack thanks to a super tight fit).
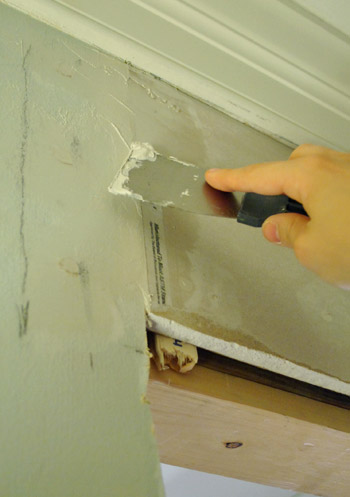
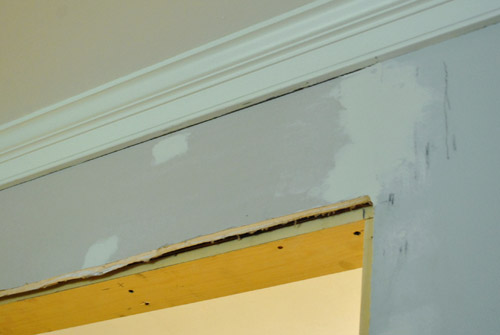
She ended up doing three rounds in most spots, since she wanted things to be as smooth and seamless as possible (she decided to caulk that crack up near the crown molding instead of trying to get mud in there with a putty knife, so that’s why it’s untouched in this photo):
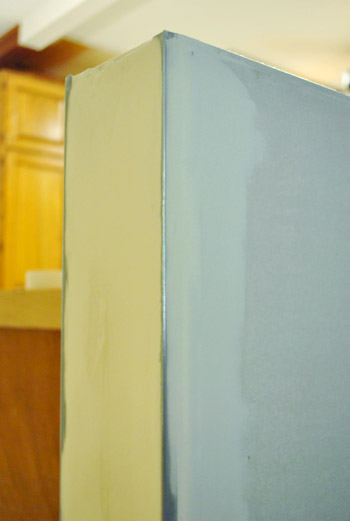
As for the corner things we used around the half-wall, they actually came out really well (admittedly better than I hoped, since I always worry that something catastrophic might happen to leave the walls looking weird and lumpy). Of course I realize as I write this that I didn’t take a photo from the other side so I’ll have to work one of those into a future post. But the corner piece and drywall mud seem to work just fine with the wood paneling – and once it’s all primed and painted it’ll effectively be “sealed” in there for a nice durable and straight-looking end result.
So… it’s definitely looking more finished than it did this morning… but nowhere near totally finished.
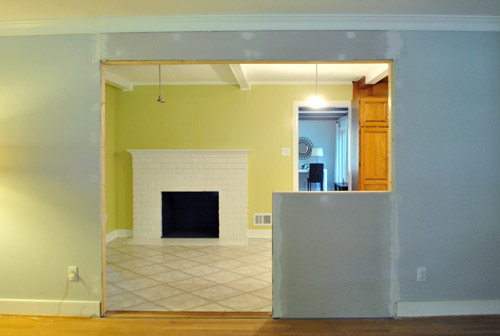
I’m the first to admit that the entire opening still looks kind of crazytown because:
- there’s not any trim to unify it with the other doorways nearby
- the baseboards aren’t complete on either side (they just end at the half-wall)
- there’s no wooden ledge above the half-wall to add some extra function and balance (we’ll tackle that along with the trim/baseboards next)
- there’s not a big peninsula with stools and a giant slab of counter behind the half-wall to make sense of it
- there are lots of things we have to prime/paint, so it’s looking extra rough
So the whole thing is sort of out-of-context right now. But it’ll get there – slowly but surely. Oh and we mentioned this in a past post (this one), but for anyone tuning in now, here’s why we opted for a half-wall instead of a full opening with a peninsula floating between each room:
- we didn’t want the peninsula to look like an afterthought (like it was placed in the middle of a doorway without much planning)
- we thought the half-wall would ground the peninsula, so it would feel solid and supported (instead of more like it’s floating between two rooms)
- we already have four base cabinets in the dining room thanks to the existing built-ins (so we don’t need additional cabinetry/storage)
- because of those existing built-ins, we thought an open bookcase, cabinet, or other form of built-in located less than three feet from the giant wall of existing built-ins would be a bit much
- our threshold would be a lot more seamless (if the half-wall weren’t there, there’d be an awkward strip of cork flooring between the peninsula cabinet and the dining room floor)
Next up? The door jamb, that ledge on top of the half-wall, and trim. Then comes primer and paint. And THEN it’ll start looking finished – especially once we begin to assemble the peninsula behind it. Of course there’s still the whole half-countertop-less kitchen going on (more on that here) but at this point we like to think of that as a minor detail.
Psst- Sherry got in on an interesting discussion about what’s in and what’s out over on Centsational Girl today. It’s definitely one of those fascinating everyone-has-a-different-take reads.

Reenie says
Moving right along…. :)
haha ~ love that John set up shop in the parking lot.
Kelley says
What kind of trim are you putting on the half wall? Since you’re putting a top, have you thought about putting chunky trim vertically on all three sides to make it look like a table leg? Obviously not on the entire wide parts of the half wall, but just enough to make the end portion look like a faux leg?
It’s looking good so far. Can’t wait to see the finished product!
YoungHouseLove says
We’re not sure what we’ll do with the trim but we hope to make a decision soon and share pics asap!
xo,
s
Heidi P. says
Haha! I never knew he was saying “shot caller”! Thanks for that :).
As for the kitchen:
Wow. Wow. Wow. It’s coming together so fast! I’m totally impressed.
And I love that you set up shop outside Lowes. I can so see myself doing that and then all the while wondering if it’s okay to do that and feeling, like you said, awkward. But I’d still be doing it! Haha.
andrea says
I think that John deserves a truck!
It totally amazes me what the two of you can get done in the course of one day.
K says
This is my favorite blog title ever.
Christie says
Thanks for your reply, but I’m still wondering about all the details for mudding. Do you apply mud to the entire drywall surface and then sand for smoothness, or just mud the seams?
Thanks!
YoungHouseLove says
Just mud the seams that you tape or any small nail holes or dings. Then sand them to smooth things out and repeat that step (mudding and sanding) a few times to get the smoothest result!
xo,
s
Sarah F says
I love that you cut up the drywall before you took it home. Clever and a little odd, two of my favorite things.
Looking great, guys!
[email protected] says
i’m loving how you are keeping us updated every single step of the way! it’s awesome. you guys are so inspirational, i just wish i had the balls!
janie says
Why don’t you guys have roof racks? When I think of all the things I avoided before we bought ours, and how easy everything is now that we have them, and for $30 or so. It seems like a no-brainer.
And, why did you need to put drywall on the end of the half wall? Isn’t it going to be trimmed?
YoungHouseLove says
We hear roof racks are awesome. Might need to ask Santa for one! As for the half-wall, we debated it a ton and decided we want it just to be trimless like a normal half-wall. We looked at lots of photos before making the call. More details soon!
xo,
s
Anne says
thank you thank you for that blog title — I am singing that song and I LOVE IT!!!
Ariel says
What are your thoughts on the tile flooring? Is it going to change in the kitchen to flow better into the dining room?
YoungHouseLove says
Oh yeah the vinyl is gone! We got cork flooring (and blogged about it a while ago). Can’t install it until the peninsula is in so everything’s on the same level.
xo,
s
Ariel says
Can’t wait to see that cork flooring! Great choice!
Allyn says
Josh toally sang this song to me when he was renting an Impala a few weeks ago.
I married a keeper.
AC says
we have TOTALLY cut drywall in the middle of a HD parking lot on MORE than 1 occassion to get pieces to fit into our little Jetta! Throw your pride aside and makes the job at home so much easier. Also, we’ve definitely also used paint sticks to match new drywall to crazy old walls. I have NO IDEA how they wind up so different but those paint sticks are the perfect dimension most of the time. I would have opted for a little fiberglass mess to use on that hairline seam just to keep things from cracking as the new header shrinks a little in time, but fingers crossed for the best- really not a big deal there.
Rasonda says
HAHA!!! Just heard that song the other day.. ahhh the memories. Anyways, thanks for the laugh and things are coming a long well!
Missy says
Ah, that half wall makes a lot of sense now that I see it centers the fireplace. You guys think of everything. Looking good! :)
Missy says
I love how you can see the mirror in the living room while standing in the dining room. The opening is awesome.
Sunny says
Okay so you have totally motivated me to tackle the dry wall issue that I have been ignoring. Thanks A LOT!! Just kidding actually you gave me the courage to tackle it myself!! Can’t wait for the updates! Looks great! I read the post at Centsational Girl and it is a great read.
heather says
We (my husband) just did the mudding on our pre-renovation kitchen update. Our walls were hooorrriibbblllyy taped and mudded the first time around (as in, they mudded the joints, didn’t sand a damn thing and painted over it). So Andy fixed what he could with sandpaper and joint compound. I’ll be heading in there with my handy dandy caulking gun tomorrow night to get everything else sealed up. It won’t be that dramatic when it’s painted, simply because we’re keeping everything else. What will be dramatic is when we pull that whole wall down between the kitchen/common room and then open up the rest of the house to the new addition.
http://www.likeacupoftea.com/kitchen-updates-stenciling
Emily says
You guys always make it look so easy and accessible. I am now thinking about tackling a drywall project I was pretty sure I would hire out. Thanks!
Christina says
Am I the only one who giggled at the many mentions of a “crack”? Perhaps I just never grew out of junior high school humor.
This sentence especially “cracked” me up: “Although she didn’t tape this crack since it was especially tight (not even much of a crack thanks to a super tight fit).” :)
YoungHouseLove says
Hahaha.
xo,
s
Kim says
I can’t tell you how many paint sticks we have used as shims. Best DYI tool ever. And the price is right.
Carly G. says
Thanks so much for sharing the progress! It seems like a WHOLE lot of work to keep up with the reno and still please us readers! You guys ROCK!! :)
Cara says
Nice progress. Looks great! Are you planning on replacing the wood paneling in the kitchen in the future?
YoungHouseLove says
Nope, we actually like painted paneling! We had it in our first house’s den and it’s so cozy. The subtle vertical grooves just add soft texture that we happen to like! We’re weirdos. Haha.
xo,
s
Chris says
I adore that you set up shop in the parking lot and that you used paint mixers to space!! That is great.
Ashley@AttemptsAtDomestication says
So exciting! I love that it’s coming around. The half wall is looking a little odd to me right now but I trust it will all make sense once you get that peninsula in!
Also, I LOVED what you had to say on Censational Girl and that you make you guys just go with what you like! It makes your house unique and fabulous! :)
Lindsay says
Hi guys! We went with the metal corner tape as well and it’s rusting :( Through the paint!! Not sure why…I wish we had bought the plastic though. Maybe we accidentally sanded the metal when we sanded down the plaster around it before painting?? Anyway, it’s probably just user error :)
YoungHouseLove says
Aw man! I would use oil-based primer to block the rust and then just repaint!
xo,
s
Lindsay says
Thanks for the tip!! I’m purchasing this on my way home today (who me? reading blogs at work??) :)
Shannon says
I got the church giggles at work with this post title. Probably the best one I have ever seen. I am very familiar with mudding this week as well. We are renovating our dining room which has plaster walls, ugh!
Katie says
I love it! It’s going to look so great when it’s done. I hate doing drywall. We hung new drywall for our master bathroom remodel and I never want to do it again. Mudding walls isn’t so bad, but mudding and sanding the ceiling is a pain in the rear!
Gabbi says
woohooo…looking good guys!!
Gaidig says
I’m looking forward to seeing how you did the corner transition between the wood paneling and the drywall. The way I’m now understanding it, I fear there may be cracking issues when the wood expands and contracts, so I’ll definitely keep my eye out.
YoungHouseLove says
I think the primer and paint will seal it in nicely, but I’ll keep ya posted and share pics as we go!
xo,
s
Sarah says
I love John’s “Voices of the Class” t-shirt! I had several friends who were involved w/ Spectrum Theater. Wahoowa!
April S. says
OMG…this is the best title EVER!!!! lol I’m at work and I just LOL!!!!! :)
E.Lefebvre says
I’m just curious… why didn’t you go for a smaller opening (i.e., why not just do a full wall where the half-wall is)? I think it will come together really well, but I found myself thinking that as I looked at your pictures. I’m excited to see what happens next!
YoungHouseLove says
We wanted a wider opening to mimic the large picture window in the dining room (the placement of the doorway lines up with it) so it all let’s in maximum light and looks like it has always been there thanks to the window-balance.
xo,
s
Lindsay@Tell'er All About It says
Lookin’ good! Drywalling is a P-A-I-N, but it looks great! $herdog, I’m like you – I do the mudding and hubs does the drywalling. Maybe it’s women’s hands or something? Haha!
So random question – is that cabinet amongst the “new” cabinetry you have purchased (the corner one the backs to the half wall?)? Did I miss you buying cabinetry? Or was that a leftover piece from another place in the kitchen…?
Thanks!
Lindsay
YoungHouseLove says
Oh here’s that post for ya (Clara and Burger stole the show): https://www.younghouselove.com/2011/10/cabinets-costumes/
We found a few cabs at the ReStore for cheap!
xo,
s
Lindsay@Tell'er All About It says
You’re RIGHT! They DID steal the show….sheesh…Time change brain…
Lauren says
Wait. I can finally really picture it and holy toledo it’s gonna be awesome!
Melissa Evans says
Looks great! What an adventure! When I make trips to Ikea….my car looks much the same…I’ve fit a billy bookshelf, queen sized bed frame and a bunch of other small “must need items” in my car…..it always reminds me of a carnival/clown car…..people are amazed at how much my Kia spectra can hold. lol :)
Lisa says
Love it, love it, love it! And since the plastic is down, we need to see that video of Burger and Clara running round and round thru the new opening!
Not related to the opening, but you’ve mentioned boxing in the hood. I’m surprised you aren’t using an exposed hood, since that is a more contemporary design, whereas the boxed in hoods are usually more traditional looking. Do you have a design in mind that you can give us a sneak peak at? Or several that you like (so you don’t spoil the later reveal)?
YoungHouseLove says
We had a stainless exposed hood in our first house so we thought we’d try something different this time. And since the wall will have modern floating shelves and tile to the ceiling we feel like a wood hood (painted white like the cabs/shelves) might be a nice balance. Not sure of design yet but might have pinned a few on Pinterest. Haha.
xo,
s
Catie says
I always thought the lyrics were “shock collar.” Hahahah – I’m clearly no $herdog! Gosh. 26 and so much to learn.
Looks great so far!
YoungHouseLove says
Bwahaha. You’re the second person to admit that! Must be a common misconception. Haha.
xo,
s
Robin @ Our Semi Organic Life says
So wait you used the original paneling on the kitchen side of the half wall? That is genius. I was thinking “how’d you prime & paint new matching paneling… durh”.
YoungHouseLove says
Yup! You know we love a shortcut. Haha.
xo,
s
Ann says
When I read, “Even though it was a bit awkward working in a public parking lot”. I thought, omg, I wonder if anyone was wondering what you were doing. A little side business going on. lol. I’m doing a snoopy laugh (search youtube for that) just thinking about it. Anyway, it was a GREAT idea to open the wall. Excellent idea!
Melody says
I should be embarrassed to admit this, but that Lil Troy song is one of my all time faves. So gangsta!
Natalie says
Oooh it looks better already!
Thanks for giving us the step-by-step process and for including pics! It will be very useful if/when the husband and I attempt anything like this in the future.
Well done on everything thus far! :)
Tiffany P says
FYI- Best post title ever!
kaylan says
even though it isn’t finished it’s looking fabulous already. i can’t believe how nicely it frames the fireplace/living room doorway in the kitchen. it’s looks so intentional, like it’s been there all along. and random aside – i love that you have lounge chairs in the office and kitchen. makes those spaces so cozy.
Aron says
It is all coming together. I love that you can look through the dining room and into the living room, through the kitchen. Ties all the paint colors etc together. How exciting!
judi says
sorry if someone already asked this and i can’t find it, but why didn’t the contractor just cut around and leave part of the wall for the half wall instead of removing the whole thing and installing something new? (thereby making it essential that you have a new wall to dry wall that was really already there to begin with…)
YoungHouseLove says
To have full access to install the header and add support underneath the opening on both sides the whole wall had to come out. Rebuilding things like half-walls after that important structural stuff is taken care of is standard since its usually the only way to reinforce things safely first.
xo,
s
Claudia says
My friend (Nancy) and I talk about your blog just about every day. Our husbands look at us funny when we refer to you by your first names. Hehe. You kitchen is looking fabulous. Great job! I just had to comment today because that title made me giggle. Took me way back. Goooo Houston (born and raised)!
Alissa says
I’ve never done renovations, but are you installing the cabinets and fridge-sleeve before you change the flooring? Are you going to put the new flooring over the old instead of tearing it up? Or do you take those pieces out again?
YoungHouseLove says
Since you want all the cabinets to sit at the same level, installing the new peninsula now and adding flooring around everything after its installed is the best way for a seamless result. The toe kicks and quarter round around the bottom of the cabinets will never let anyone know whether the floor runs under or was added afterwards!
xo,
s
Alissa says
Ah, that makes sense. I was thinking you were going to have to take everything out, tear up the flooring, and put it all back. But your way sounds much simpler.
Big Mike says
Your fridge is on sale at lowes for $899 till 11/28, while outside of their 30 day return policy you might be able to get a price adjustment.
YoungHouseLove says
Thanks! I actually called them and that’s not our fridge! Ours is the counter depth one so it’s slightly different than that one. Oh well, it was worth a shot!
xo,
s
Wom-mom Ethne says
Did Sherry laugh hysterically at the thought of you cutting drywall in the parking lot?
YoungHouseLove says
Haha. Totally. Then I cheered him on like a hero for saving money on a truck rental. Haha.
xo,
s