The last few weeks have been deliciously random and so productive for us! I think we should bounce around from room to room all the time like this… at least until we dive into a big renovation that demands all of our attention. So far this week we’ve painted raindrops & a pink door in Clara’s room, had some fun with Shannon’s design dilemma, finally finished our big sunroom floor project, and we’re actually starting to work on something in the kitchen for Monday (ahhh! that room needs more help than I did in Calculus class).
And this week’s little crafty project didn’t bomb, which is a huge relief because there were definitely a few moments of doubt. I decided to tackle something I’ve been meaning to do for, oh, about two years: displaying our vacation keepsakes in a charming and easy-to-see way. So here’s where I ended up…
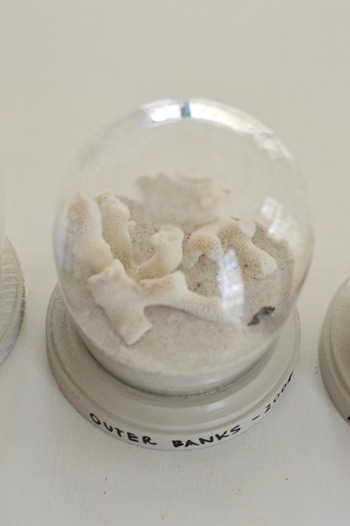
It’s sort of like a vacation-memory-jar-meets-snowglobe-or-cloche, and it was actually really easy and only ran me $2.79 to make each one.
But let’s grab a ride in the Delorean and go back in time for a second. Once upon a time (back in 2008) I made six vacation time capsules here… but I haven’t been displaying them for the last few years because I just don’t love them anymore. Which is sad because I love the keepsakes – I just didn’t like the containers as much anymore.
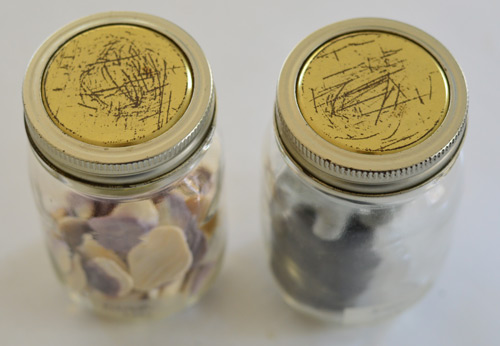
I certainly think canning jars are crazy charming (and they’re probably more “in” now than ever) but I didn’t like that when you looked down at them on surfaces like console tables or desks or dressers, almost all that you saw was the lid instead of whatever was inside (see above).
And I also didn’t love that when you lowered your gaze to stare at them head-on (or placed them in high places like up on a bookcase) the glass was wavy, so it blurred the items inside. Here’s a comparison of how the canning jars obscured the contents compared to a regular stemless wine glass. See how much clearer the objects in the glass on the right are?
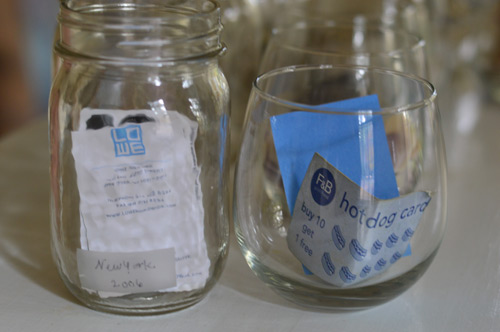
I also thought the scotch tape labels that I had added so many years ago were hard to read, especially depending on what’s behind it (you can see one in the picture above). So I wanted to come up with a way to accomplish three things:
- more clearly label the contents of each jar
- display our keepsakes behind non-wavy glass
- make them visible from above and the side instead of just from the side if at all possible
At first it felt like a tall order, but I was inspired after coming across this project, which made me realize that there might be a way to use inexpensive stemless wine glasses or vases from the craft store along with little slices of wood and some type of adhesive or caulk to connect them. It definitely could have bombed (uh… sand everywhere) but I had a few lucky breaks along the way.
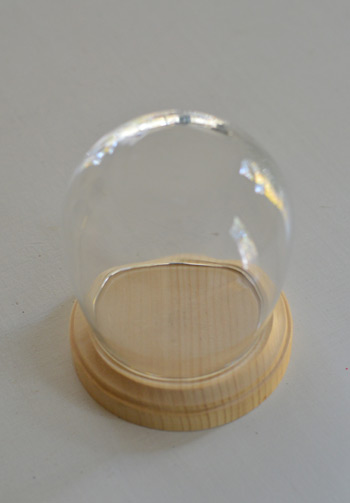
For one, I couldn’t find any tree branches of the right thickness to slice in our yard or at a local firewood spot (they were all triangular or too narrow, and free of bark) and I couldn’t even locate any pre-made wood slices in the craft store (other than some too-large birch ones for $15 a pop online). But when I walked around JoAnn I did notice these little 4 x 4″ round wood plaques for 79 cents each (in their wooden box/birdhouse/plaque area). They also sold stemless wine glasses (in their party/glassware area) for $1.99.
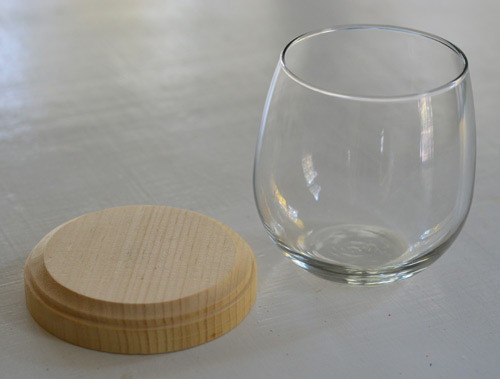
It was nice to find both potential items at the same store because I could flip the glass over on top of the wood plaque to see how they’d work together. It kind of felt like a miracle when they lined up so well.
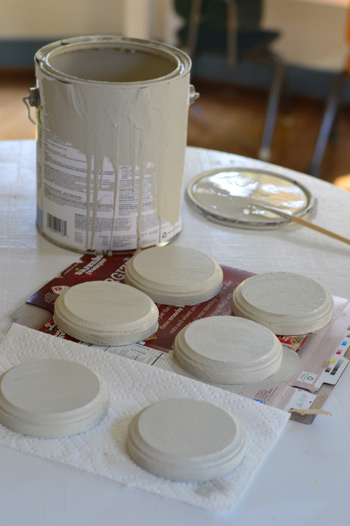
So as soon as I got home, I jumped right into painting the wood plaques. I debated everything from a bold color to white or charcoal or even a whitewash or a stain, but in the end I liked the idea of a timeless neutral taupe-y color the best so the items in each jar could be the focus – and I already had leftover Revere Pewter from the bathroom project upstairs. Two coats did the trick without any bleed-through from the wood (which is nice because I didn’t use primer, so it was sort of a gamble).
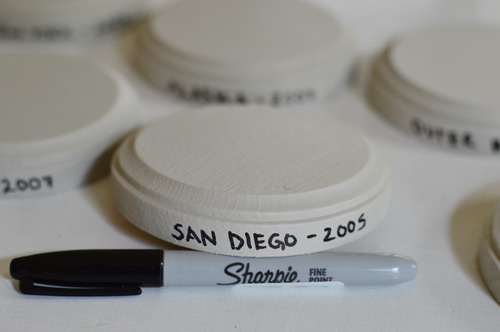
After they dried I used a sharpie to write each of the places we’d been on the side of each one, along with the year that we traveled there. It’s so much clearer and easier to read than tape on a wavy glass jar!
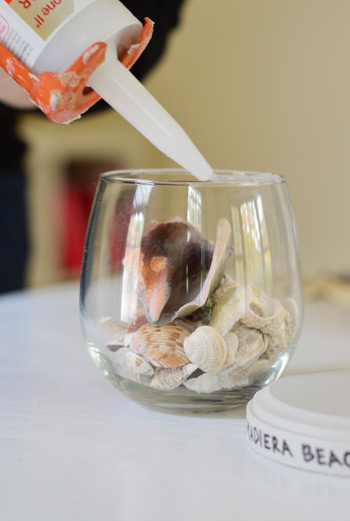
Next I decided that clear silicone caulk would be a good way to seal the glass to the wood. Here’s why: some types of adhesives/glues are thinner/runnier and I worried the seal wouldn’t be as tight as it would with a more thick/dense line of something to stick them together. The other reason that I went with clear caulk is that it can easily be sliced with an exacto knife and peeled back to free up the contents of these jars. So I don’t have to Hulk-smash them like an old school piggy bank to access things (which definitely could have been the case with crazy glue). Instead, I can just score and peel the silicone caulk to open these up again whenever I’d like. But in the meantime they’ll be nice and secure – even with things like sand floating around inside.
I just ran a thin line of it around the top of the glass like this (I used GE Premium Waterproof Silicone II Caulk in the clear color). Tip: try not to make the opening in your caulk tube too wide or caulk will pour out a lot faster/thicker and you’ll end up with a drippy ol’ mess (this is universally true for practically every caulking project, so it’s a good skill to master).
Update: I’m a paranoid prego, so I wore a ventilator and worked the caulk gun like Darth Vader (since caulk can get fumey sometimes), but I later learned that this type of caulk is on the green list. Hurrah!
After getting a thin ring of caulk around the top of the glass, I pressed the wood round onto the cup while it was still in the upright position (didn’t want things to spill all over the floor, which I was certain would happen if I flipped it over before joining it to the wooden plaque).
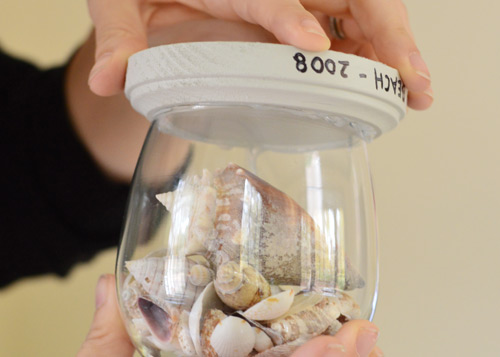
Once they were joined, I could easily turn it over without anything spilling. So I placed it on the table and made sure the glass dome was centered. Then I pressed the glass down with one hand (to keep it centered, since it can slide around a little before things start to set) and used the other hand to wipe the edge down with a paper towel to remove any extra caulk that was oozing out.
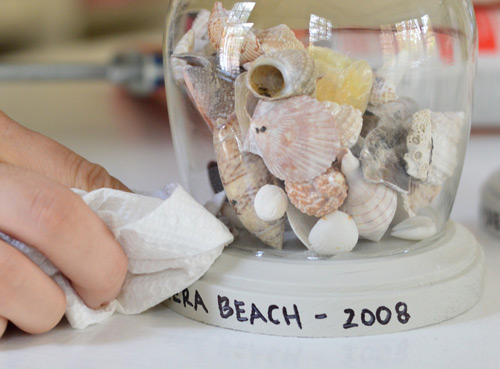
It only took them three hours to dry, and they were sealed up and pretty dang seamless looking. Here’s the sand, all nice and contained (you can sort of make out the clear shiny line around the base, which is the caulk doing its job). I shook that thing like a snow globe and there wasn’t a sand explosion or anything. So glad.
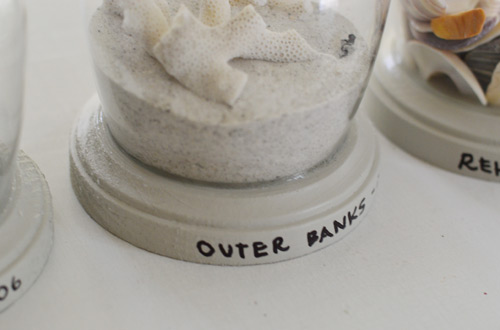
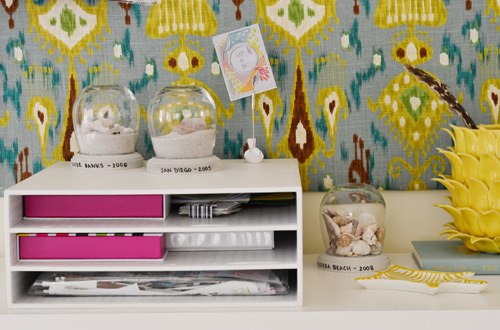
Right now they’re chilling on various surfaces in the office and living room, but my dream is for them to eventually end up all together in our bedroom (we’d love to add a wall of built-in cabinetry in there to make our bed feel like it’s tucked into a nook – and I can just picture them all lined up on one of the shelves). Sigh. Can’t you see it?
I’d love to keep making more over time as we travel to new places, so the paranoid collector in me is tempted to buy at least ten more wood plaques and glasses just to keep around for future vacations so they all match. Is that crazy? What do you think?
Is anyone else out there displaying vacation keepsakes? How do you do it? In shadow boxes? Scrapbooks? With framed photos? I read somewhere once that “experiential purchases” bring you the most happiness. So instead of buying a new car, if you spend money on an amazing vacation, the effects can last longer and you won’t take the purchase for granted like you might if you upgraded something that you’d use everyday and would soon become accustomed to (I found an article here about it, although I’m not sure this is the same one). Certainly makes me want to make the most of our little vacations and memorialize them when we’re back home – even though they’re usually just road trips as opposed to exotic foreign locales. Maybe someday I’ll have a vacation jar for Morocco or Australia. A girl can dream…
Psst- Wanna know where we got something in our house or what paint color we used? Just click on this button:


Candace says
Love this idea- so fun.
Totally unrelated: is it a big home blogger secret that all child-proofing items are hid before pictures? Or did you find you didn’t need to clad every surface in foam and plastic? OR did you find secret-awesome items that are super out-of-sight and not ugly?
YoungHouseLove says
When Clara started walking I hid every breakable object on every surface that was even remotely within her reach but slowly over time I realized she just sort of plays with her stuff and if she sees something new (like a ceramic animal of mine on a table, haha) she usually pokes it with one finger (she just doesn’t seem to be a grabber or a thrower, she might pet something or put a doll right next to it “so they can talk” though, haha!). I’m sure every kid is different and this next one could have me putting all breakables on the highest shelves for ten years (I’m sure I’ll be doing that just in case for a while anyway) so I’ll have to report back on how that goes!
xo
s
Emily Marion says
AHHHHH! I needed this! My husband & I just came back from Europe and this is a perfect idea! I usually just frame a picture, but I’m feeling a little “picture framed to death” right now. I’m so glad I saved Metro and museum tickets! Forget Halloween party prep…I’m headed to Joann’s!
Britiney says
I like to buy Christmas tree ornaments from special places we go. I get one for my tree and one for each of the kids for when they have their own trees. We love looking at them and remembering our trips as we decorate the tree every year!
DawnSC says
I’m not much for storing things like this because our house is fairly small, but maybe I should start because I love these! :) We usually do postcards and (of course) photos, and, over the past few years, I’ve started getting an ornament for our Christmas tree each place we go. I’ve had to get creative for places with no actual ornaments, but those are often the most fun!
Katherine says
1. Those are absolutely lovely. They look both hand-made and classy, which can be hard to do.
2. It’s not crazy at all to stock up on more of your materials. But, I do say this as someone whose mom bought two pairs of the same shoe when she found something that fit and looked nice. (Because by the time she wore through one pair they wouldn’t be on the market any more.)
3. Trying to help not criticize: I am defintely not a caulk expert, but thought that caulk was a little fume-y. Maybe it is but doesn’t have VOCs–or did you use a less fume-y caulk because you’re pregnant?
YoungHouseLove says
I wore a ventilator because I’m a paranoid prego! Haha! John actually took a full shot of me in action but I’m too vain to share it (I’m a mess from morning sickness). It was a sight to see…
Although afterwards I learned we used a green caulk (apparently the GE silicone type we used is on the list here). Good to know so I don’t have to look like Darth Vader next time :)
xo
s
Ammie says
I’m totally with you! I love these and I’d want to continue the tradition and have them all the same, so I’d stock up on the pieces! That one time $2.79/set investment now will really pay off when they’re all displayed together and look so nice. Just my opinion :)
Happy Halloween!
Abby J. says
I would totally buy a bunch of extras supplies too! I do the same thing with crafts I can see doing again. Love these ‘sand globes’! Such a great idea.
Abby
Janelle @ Two Cups of Happy says
LOVE these! This is such a brilliant idea. I echo everyone else and say stock it on up!! Don’t worry if you run out though, because I think mismatched glasses could give a nice collected look.
Gauri says
Wow, I love this! Is it sad that I want to start keeping vacation mementos so I can make some of these?
Michaela says
Please make sure when taking shells from island or other countries, that it is legal to do so. I once had a good conversation with a national park ranger about ‘leave it as you find it’ that really made me rethink taking things. Now on a trip I now take a day to collect shells, make a group of them in the sand, take a photo and leave the shells behind. Eventually, I hope to frame and display those photos.
YoungHouseLove says
Thanks for the tip Michaela! We haven’t been to other countries together yet (John went to London once in college but didn’t bring back any shells, haha!) so that’s good to know! I love your photo idea for the shells too! Will keep that in mind. I bet we could get a picture made into an Instagram magnet or something and stick that in a glass someday!
xo
s
sarina says
I agree with the rest of the group.. buy more if you want these to match.
I also read the story that said experiences vs “things” actually make you happier in the long run. Definitely a case for keeping your car a couple of years longer after payoff and having cool vacations!
We just got back from a quick 4 day vacation in the Dominican Republic.. only 800/person all inclusive. and it was my Birthday present.. so we had multiple reasons to go:) It was so much fun and the memories you bring back will far outweigh that “new car smell”!
We try to take adventures, as I call them, every week. It might be a drive to go troutfishing in the mountains or up to MD for some steamed crabs. Just getting in the car and driving is a lot of fun for us… we have ended up all over the state! Yes, it does cost a little money, but less than you would think and probably not any more than a lot of families I know spend on going out to eat multiple times during the week! Spending time together as a family can also not be underrated. Instead of shuttling your kids to one more activity.. they actually get to know their parents and siblings better and get some new experiences under their belt. Yeah.. it will peter out a little with the kids when High School rolls around.. but until then you can have so much fun with them and open their eyes to so many new and fun things!
YoungHouseLove says
I love your commitment to adventures Sarina! So awesome.
xo
s
Patti says
I love this idea and I would say stock up Sherry! Btw, so many of your commenters are giving me awesome ideas for displaying souveniers, so I’m hoping someone can help me. I have postcards I’d like to display that were sent to me from my parents from faraway places. I’d like to display both sides, especially since the notes they wrote are so special to me…anybody have any good ideas?
YoungHouseLove says
Ooh, does anyone have tips for Patti?!
xo
s
Kaija says
Ikea has a postcard-sized frame that displays both sides.
Nichole K says
Could you hang them with tiny metal clips from a thin wire strung from side to side up in a arch or large opening between rooms? They’d have to be high enough so you can walk under them but maybe it would work between a dining room and living room.
DIY Diva hung instagram photos in her office with one side showing, but maybe the same system would work for exposing both sides of the postcards if you hung it from the ceiling.
http://diydiva.net/2013/09/revisiting-rooms-the-office/
Tawnya says
This is super cute!! The first photo had me thinking they were snow globes, which I thought was clever, but I like this even more. And, add me to the “go buy more now-now-now” group! Oh – to avoid ‘clutter’ you can always use those wineglasses for their intended purpose until you’re ready to create another keepsake. After the little one comes, of course.
YoungHouseLove says
Haha, I like the way you think!
xo
s
Manda Wolf says
Super cute! I have been meaning to buy the stuff to make “snow globes” for a while, but I think I like this idea better. No chance of it leaking, or the water growing something funky!
Ashley@AttemptsAtDomestication says
I LOVE this! What a cute idea! And they look so good!
Erin {Home Everyday} says
I love how you guys incorporate sentimental things into your home to make them uniquely you. I am pinning this for an idea later on :)
robyns says
you hoard those supplies!!!
YoungHouseLove says
Haha!
xo
s
Michelle @ A Healthy Mrs says
What a fantastic idea! So great! And they would look so good displayed together :)
Evie says
Sherry, these are great. You’re young! Buy 30 more glasses (uhm, br**kage happens…) and 25 more wooden pieces. I am serious about this. Once a tradition like this is started, there is no stopping it, and for something like this “matchy matchy” is very good.
jenn aka the picky girl says
I collect different/interesting leaves/flowers from my trips and have made botanical prints from them, complete with these pretty little labels telling the type as well as the city and the date. I love seeing them on my walls. They’re beautiful, but they’re also great reminders of where I’ve been.
YoungHouseLove says
So pretty!
xo
s
Annegirrl says
This is my favorite DIY mini-project you’ve done yet. I love having little vacation keepsakes, but never knew what to do with them. Now I’m sad that my husband ended up tossing out his rock, shell, sand, dirt collection from his time in the Navy. He had collected sand, rock, shells, or dirt depending on where he went on deployment and had them all labeled and stored in old medicine bottles and a tackle box. He ended up tossing it all out earlier this summer in a storage building cleaning frenzy. This would have been the perfect way to keep them around and enjoy them.
Well, we will just have to start collecting new memories from our family vacations. We’ve got beach shells from Hilton Head this year, fairy dust from Disney last year, and next year we’ll pick something up from Maine. I’m off to the craft store!
Eva says
Those are really adorable! I’m not crafty by any means but this might be something even try. I wonder if there is a way to make a tiny version as a ornament?
YoungHouseLove says
Love that!
xo
s
Cara says
Every Christmas I see clear, empty bulbs to use in craft projects. If you found one with a wide enough mouth for your keepsakes (should be easy if it’s sand and shells, maybe not for other stuff), you could use a paint pen to write directly on the bulb. I can see it now! And I might just have to look around for keepsakes that need to be ornaments!
YoungHouseLove says
Really cute!!
xo
s
Bonnie @ The Pin Junkie says
What a great idea! I pinned so I can make one (or two) of my own!
Sarah J. says
i would totally go buy more glasses and plaques to have on hand. plus, if you have the supplies sitting in the cupboard waiting, then you’re more likely to stay on top of it, and not put it off and then have to play catch-up after several trips worth of mementos have piled up. :)
Emily says
Not crazy to stock up on supplies now… I am the same way! Or, I will intentionally start a collection with mix-and-match supplies to avoid the pressure from the start! Maybe go ahead and mix in other shapes now?
Diane says
I would go one step further than just buying extra bases and glasses now — I would go ahead and paint the bases with the same paint. That way, when you get home from a trip, everything will be ready for the newest collection (and you won’t have to worry about whether you still have the paint down the line so everything can be perfectly matchy matchy).
YoungHouseLove says
Two other folks said that too! You’re so smart. Never would have thought of that!
xo
s
Marianne in Mo. says
RUN back to Joanns and stock up, because now that you’ve shared this great idea, they will sell out fast! Wish I had thought of a unique way to remember vacations like yours, all we ever do is photos. And it’s rare that we get a shot of the two of us together either. Too many of the landscape, and trying to remember where exactly it was!
Shannon says
Definitely stock up on the supplies! I know I would be so disappointed if I couldn’t make more to match. They turned out great. My son actually got my started on collecting sand and stuff from vacations. When he was 6 or 7 he wanted a jar of dirt and various things from his great-grandma’s yard to remember her by so he has that in a small mason jar(grandma is still alive and well, btw!) I thought it was sweet so we started using the same size jar to collect sand and shells, etc from our vacations. One thing we love about it is being able to see how different the sand from Massachusetts looks compared to the sand from Daytona Beach, etc.
Kristen says
This is a very cute project (so clever)! I vote to stock up so they all match :)
Chrissy Henry says
I feel like back in the day you used to post about little “crafty” projects like this a lot more. Like the original time capsule post in 2008. I didn’t realize how much I missed those kind of posts until now. I am glad they are back… I like the little things, it is what makes a house a home.
YoungHouseLove says
Thanks Chrissy! I felt the same way!
xo
s
Susan says
I vote for buying the supplies. I recently found some great, classy-looking, cheap plaques at Wal-Mart (don’t judge me) to hold my students’ award certificates. I bought several because we win two or three new awards per year (sorry to brag) and these fit on our award shelf better than frames and look NICE. I did have the company credit card at the that time which took the edge off, ahem. The globes are super cute and to be honest I wasn’t sure about the sharpie originally. You could always use them to make gifts for family if you find another way to display the vacay memorabilia. These would look really cute as Christmas snow globes – put a pic of Clara in there and some cute Christmas doo dads like a big snowflake or maybe a couple of bottle brush trees and then paint the bottom red. So cute! Wait, I feel a project coming on … Also, I scrapbook trips I take myself and that I take with my students. I have many books. It’s a sickness.
Cara says
Using caulk was a stroke of genius. I would totally have hot glued it.
I’m in the “go buy more” camp. I could handle the mismatched (maybe), but it was really lucky to find such a good fit. Who wants the headache of searching next time when you know right now where thy are?
Gennie says
It seems like Gretchen Rubin wrote about happiness from experiences in “The Happiness Project”. Perhaps you read it there?
YoungHouseLove says
Yes, I bet that’s where! I loved both of her books!
xo
s
Kristen S. in Richmond says
I love this! I wonder if I can beat you to the store and buy supplies before you go back and buy them all! I was going to try a shadowbox for our honeymoon beach souvenirs, but I don’t think I have enough sand for it to be visible in a box. This “snowglobe” might be perfect! :)
YoungHouseLove says
Haha, I bet you can! I have to stay home until the evening since every time I leave before dark I’m green and running for the nearest bathroom. Ah the joys of growing a baby. It evens out though… I hate morning sickness, but LOVE feeling the baby kick :)
xo
s
jen says
So we have a neat tradition of trying to find a unique ornament everywhere we travel. Its so fun setting up the Christmas tree and it being a reminder of everywhere we have been.
YoungHouseLove says
I love that!
xo
s
Rebecca W says
That is a great idea. I never know how to display little items like that. I once did a small 4×6 picture in a shadow box of my best friend and I at the beach then used sand and shells at the bottom and the little “butterfly shells” up the sides of the box.
Koliti says
Talk about crafty…
did ya see your stenciled bathroom floor is on Apartment Therapy! http://www.apartmenttherapy.com/stencil-seal-a-unique-alternative-to-flooring-young-house-love-196613
YoungHouseLove says
Ahh!
xo
s
Marci says
The anal, retentive, CPA in me is screaming, “BUY MORE!!!” Super cute idea!
YoungHouseLove says
Hilarious!
xo
s
Lura says
I did something similar to this but using spice jars.
http://www.domesticability.com/2012/12/sand-collection-display.html
I love the globe idea. May have to redo mine as I have shells in our sand but you cant see it. Genius!
YoungHouseLove says
Love those Lura!
xo
s
Alyson says
Not gonna lie, I don’t think it’s crazy at all to buy your craft supplies in advance. The price is right. When my hub and I were just newlyweds, we talked about how many kids we wanted. We joked that the extreme upper limit was 8 (haha!). Fast forward a few months, shopping at Old Navy we found **THE** cutest red and green wool socks ever, and thought, these would be cute Christmas stockings! For all of us! What did I do? I bought 5 pair. 10 socks. The two of us plus our fictional 8 offspring. I mean, what, the entire thing set me back $9 or something? It was a pretty low-risk investment. Fast forward again to now, 21.5 years later. Turns out I’m in the top 5% for fertility (not a real statistic) and despite our efforts to stop earlier, we ended up with 7 kids. For real. We’re still a little shell shocked sometimes. But we still have those adorable matching Christmas stockings! They’re just as cute today as they were that Christmas when I, almost jokingly, bought them. Excellent investment.
Between bouts of throwing up (hope that is calming down for you) get yourself down to JoAnn. You can’t go wrong!
YoungHouseLove says
Haha, thanks Alyson!
xo
s
Diana says
I love this story!!
Danielle says
What an awesome idea! I love snowglobes and have tried making my own (using Martha Stewart’s how-to’s), but they’ve all been Christmas themed. I love, love, love the idea of using them for travel memories/momentos. Now how do I convince my husband we have to go back to Hawaii- ‘just’ to pick up some sand?? ;)
Bailey says
I DEFINITELY think you should pick up a few more of those glasses/wood plaques for future trips – great thinking!
Sara says
Love it! So simply and special!
Steph says
I LOVE this!!! My oldest daughter (4) collect some shells for her room on our last trip away and I’ve been looking for a way to display them! Now all I have to do is find something similar down here in Australia!!
Kaija says
This is so great! My daughter collects rocks and they’re everywhere! HAving them in globes will be so much better. Maybe a LED light through the bottom?
Thank you!
P.S. “I shook that think…”
YoungHouseLove says
Thanks Kaija! All fixed!
xo
s
Marlyn Jimenez says
Love this idea, sooooo cute! <3 Felt inlove with it, it is a really good idea. I was wondering, if I don't use that glue you used, can I use hot glue? or even that cold glue? (wow, those were a lot of 'use' word lol) Please let me know, I am so ready to do this idea. Thank you.
xo
Marlyn
YoungHouseLove says
I’m not sure if this would work with a glue gun. I think it could, so it’s worth a try!
xo
s
Rachel says
Oh please, please, PLEASE go get more while they still have them! It would be awful to have new mementos you want to display and a hodge podge of different glasses/bases.
Susan M says
I totally love it, and don’t think you’re crazy at all! And that’s a great tip about the caulk. I must definitely be cutting mine too big, b/c it is surely a mess when I’m done fixing up around the house…
Pam Fisher says
Hi, Sherry.
Love this idea. I may be taking a trip to JoAnns soon!!
We usually buy a Christmas ornament on all of our vacations. We even have improvised on some, key chain, knick-knack, etc. and turned them into ornaments.
Every year it so fun for us and the kids to reminisce as we take each one out of its package.
A am a big fan of your blog.
Pam
YoungHouseLove says
Thanks Pam! Love the vacation ornaments thing!
xo
s
Shanon says
I am in love and I am going to rip it off :) but go a little mis-match on the “plaques” with different shapes or colors to reflect the vacation. We have a big built in and the top is just too small to put too much on but this would be perfect and then I can have my flower vases back (which currently hold things! I might even glue a picture in there that captured our feelings on the trips along with the momentos.
Great DIY project!!