Well, that can of worms is officially open. We’ve started making some changes in the kitchen. I realize this isn’t totally new news, since we removed the wallpaper in there a few weeks ago, but towards the end of last week we used that little jolt of momentum to start down the path of some more serious changes.
We still want to live in this house for a nice long time (and save up some money) before we take on our full kitchen reno – we’re still changing our minds daily about what configurations and countertop materials we’d like for the long haul – but this is officially the beginning of a series of what we hope to be pretty transformative “Phase 1” improvements so that we can enjoy this room and make the best of it in the meantime (you can read more about those Phase 1 updates and why we like them here).
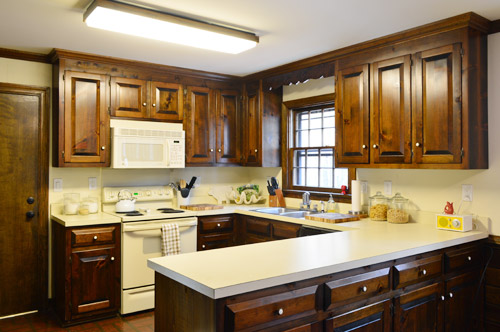
We had hoped getting the wallpaper out would make a greater aesthetic improvement on the space. But instead it just kinda underscored how brown, beige and blah everything is in there. The appliances, counters, and walls kinda wash together in color that certainly isn’t improved by the fluorescent light – while the dark cabinets, trim, and doors just feel looming and heavy in person. Our first course of action was something Sherry’s been ready to do since day one: remove some upper cabinets. Both of us miss the look and the functionality of the open shelves that we had in our last kitchen, so pretty much since move in day, Sherry has dreamed of swapping this long upper to the right of the window for some open shelves to lighten things up.
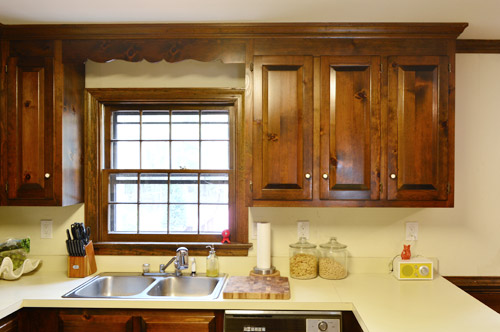
So Sherry unloaded everything that was in them (fortunately we’ve barely used the uppers flanking the microwave, so there was plenty of room for all of this displaced stuff), and then I could start demoing away. First I carefully pried off the crown molding with a crowbar (since I planned to reuse it) and then pounded at this header piece across the window with a rubber mallet.
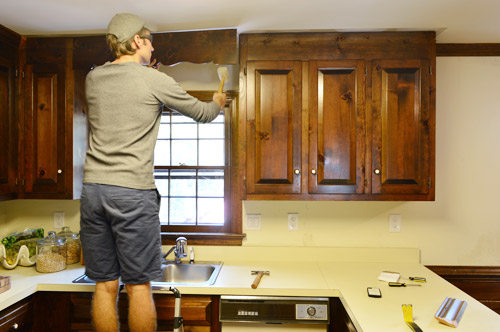
That was the easy part.
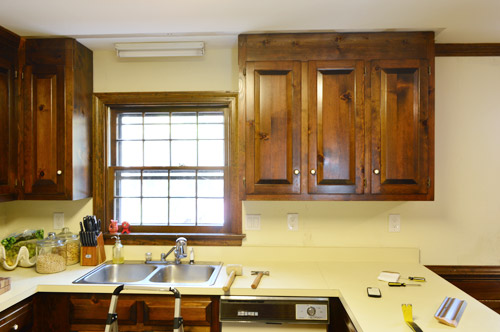
Taking the cabinet down was tougher than we anticipated. We figured it’d just call for removing a few screws like the last kitchen, but it turns out these cabinets were nailed in. So instead it took lots of prying and good ol’ fashioned jostling to free it from the wall. Since it was pretty heavy I took the doors off (so they weren’t flapping in my face the whole time) and I put a can of paint on the countertop to prevent it from crashing down directly on the counter when it eventually came loose. It also saved my foot from getting smashed.
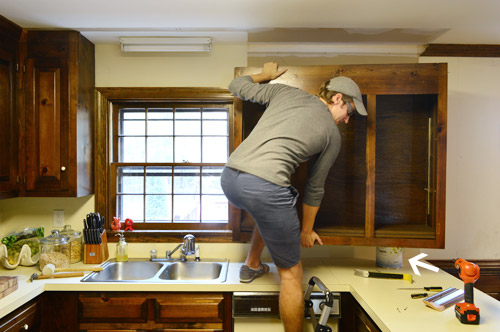
Despite some lack of paint behind it, we consider it an instant improvement. Especially when you’re sitting at the table on the other side of the kitchen. To have a clear shot of the window (which we’ll maintain with some open shelving) is really nice.
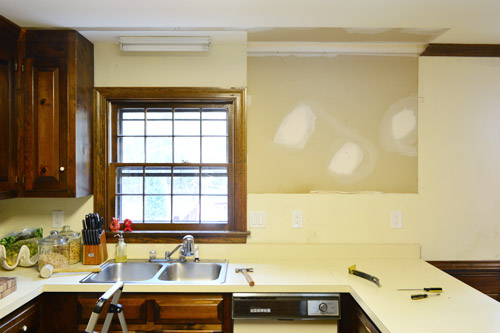
So much so, actually, that we decided to take down the small upper on the other side of the window too. We realized that would keep that wall looking more balanced and would let the window breathe visually.
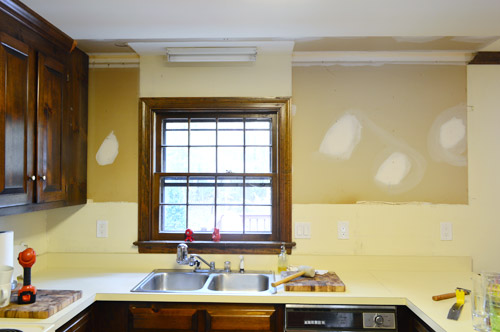
The plan will be to put a pair of floating shelves on either side of the window. We actually already own a set of long white Ikea Lack shelves for the right side (we purchased them about two years ago with plans to put them in our last home’s sunroom, but that idea fell by the wayside and we never even took the shrinkwrap off). And they sell a shorter version that will be perfect for the left side. So even though we’ve removed some cabinetry (which we plan to reuse in the garage) we won’t be losing lots of kitchen storage.
Before we hang those open shelves, we’ve got some painting (and priming) to do to those walls first. But with our cabinet mojo firing at full steam, we turned our attention 180 degrees to another cabinet issue. This utterly useless upper cabinet that was tucked waaaaay back behind the fridge.
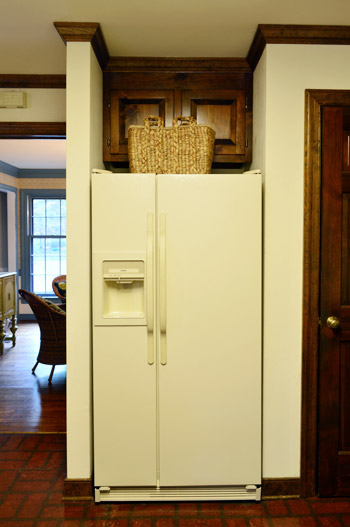
It was so far back that neither of us could reach it without a stool (and I’m a pretty tall guy, so that’s saying something), which is why we threw the basket up there as a lose attempt at disguising it. We wanted to move it forward to be flush with the wall so that it’d be reachable and make it look a bit more like the built-in fridges you see in modern kitchens. Like the other cabinets, I pried off the trim and shimmied its nails loose from the wall. Aaaaaaand then it got stuck.
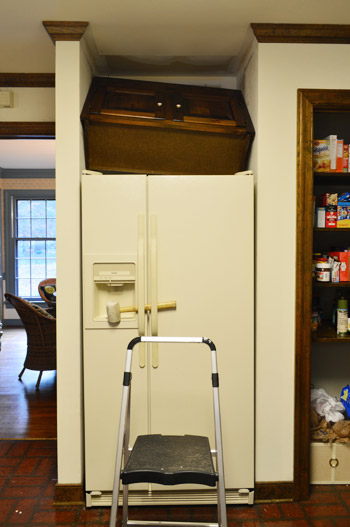
Turns out the wall narrows slightly as you come out and the cabinet was built-in quite snugly. But with a few more pulls (and a couple of drywall dents) it eventually came out. And happily, the dents were covered when we rehung the cabinet.
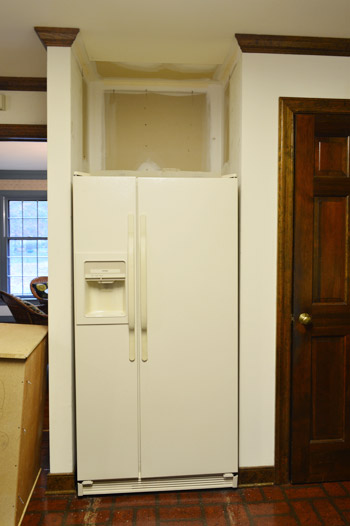
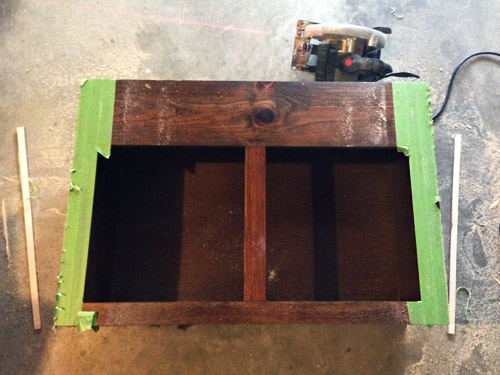
The snug fit alerted me to another problem though. Since the nook narrowed towards the front, I’d have to trim it before putting it back up to get a nice seamless fit. Fortunately the overlapping part is just the face of the cabinet, so it was easy enough to shave off a quarter of an inch on each side with my circular saw. I put tape down on the edges before cutting to help discourage the wood from chipping or scratching during sawing, which worked (the tape sort of shreds itself but protects the wood).
The other problem to solve was how to hang it. It previously had been nailed to the back wall, but now that we were looking to float it about 14″ away from the back, I decided to construct two simple braces out of 2 x 4″s. They were sort of U-shaped, with the short side pieces that would be screwed into studs on both side walls for stability. That gave me a nice, long, sturdy front board into which I could secure the cabinet with screws.
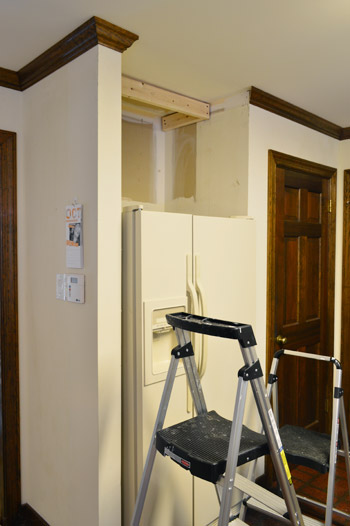
I made two braces – one for the top and one for the bottom of the cabinet – so you can see the bottom one wasn’t installed yet in the photo above. I was very very careful with my measurements during this step, because if I attached the braces too far forward or back, the cabinet wouldn’t sit flush to the wall. There was a lot of measuring three times before cutting once.
Thankfully my triple-checked measurements worked out great and the cabinet sat perfectly where we wanted it. I propped it up in place with some wood, checked that it was level, and then screwed through the back of it into the braces (being sure that my screws went through the thick framing of the cabinet, not just the thin, flimsy back panel).
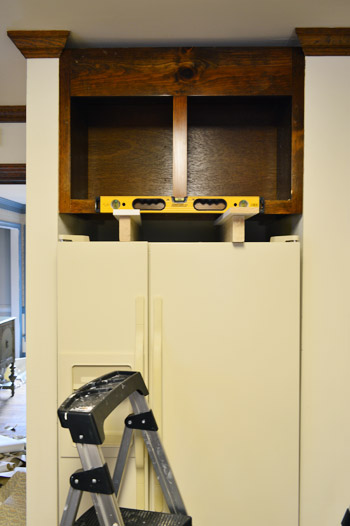
Not only did it look much nicer, but now we could actually put stuff in it. Functionality for the win! The last step in this project was reinstalling the crown molding – a careful process since I was matching existing cuts (of the pieces I didn’t take down) and because I didn’t have any spare pieces on hand- just the ones I had removed at the start of this project. So all it would take is one bad cut and I’d be, well, very angry at myself.
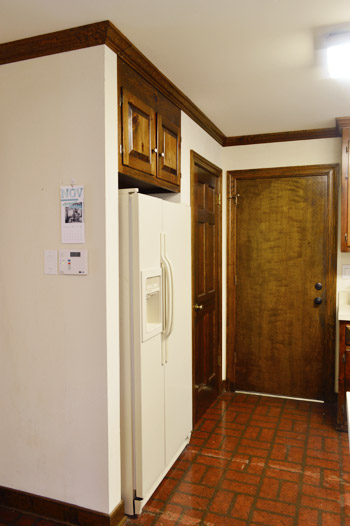
But it worked out well and I got those gaps filled. We’ll eventually be painting these, so I can do some caulk touch-ups then so they’re even more seamless in the long run. And man, it looks a whole lot better than the strange empty wall-hole-looking thing above the fridge that we started with:
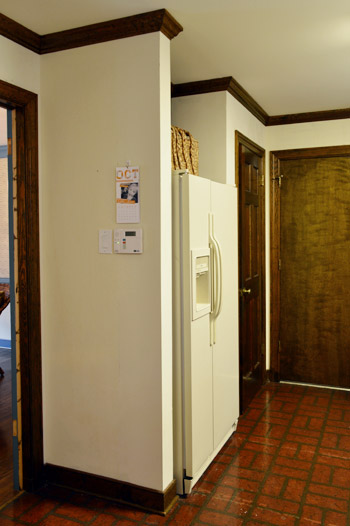
I also hung the crown molding on the other side of the room so it goes all the way around again. This wall looks especially crazy right now, but with some paint and shelves and a pendant over the sink, we think it’ll be a huge improvement.
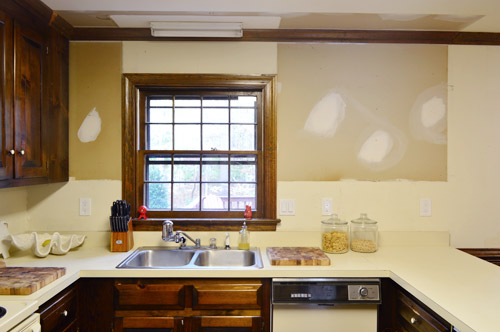
While I wouldn’t consider the space amazingly transformed yet (it’s far from that!) we think these first couple of changes are steps in the right direction. It’s hard to tell in the photos, but in person it already feels noticeably more open and less heavy.
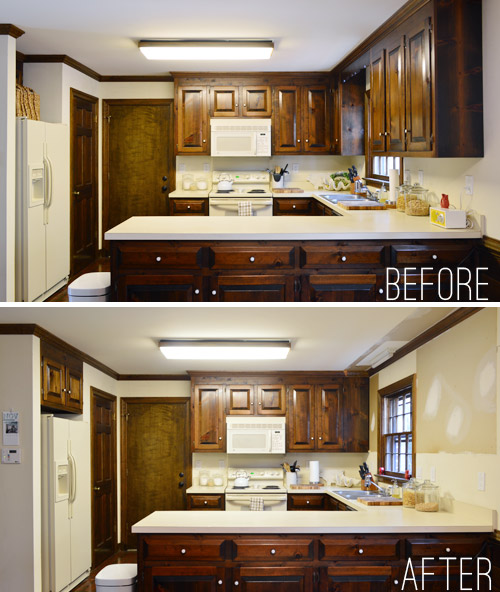
I felt kinda silly putting “After” on that photo above because it doesn’t really deserve that title yet. And actually, there are quite a few steps in this “Phase 1” kitchen makeover before we’re ready to call it done. So here’s our Phase 1 To-Do List as we’re currently envisioning it:
Remove wallpaperMove fridge cabinet forwardRemove upper cabinets on window wall to prep for open shelves
Reinstall crown molding- Paint pantry and garage doors
- Paint walls and ceiling
- Hang floating shelves on window wall
- Paint trim and paneling
- Possibly craigslist the existing microwave and get a countertop one (the we can put in the pantry?) and add a cheap range hood (we’ve seen some like this for $20 on craigslist) to lighten up that wall?
- Update or upgrade the old cabinet hinges and knobs
- Paint the cabinets
- Make solid back to the peninsula (the cabinet doors aren’t functional on that side, and we think it’ll be less busy with a sheet of beadboard or nicely framed out wooden look)
- Replace florescent lights (including the one over sink)
- Replace and center the light over table
- Get a rug for eat-in area? Possibly install peel and stick tiles everywhere?
- Curtains for windows?
Lots of bullets, huh? But thankfully almost every one of these steps will also be “paid forward” to Phase 2 (for example, painting the trim and walls and ceilings and doors and replacing lights will all be things we can carry into Phase 2 of the renovation down the road as well). So there aren’t very many things we’re doing just for Phase 1 that won’t come in handy for Phase 2 later. It’s sort of like the before is the first step on a staircase, and the major reno is the third step, and Phase 1 will just act as that second step to bridge the gap and bring us closer to a bigger transformation down the line (and make us smile in the meantime).
You can also see that there are a whole lot of question marks going on, but we have faith that if we just focus on the one-step-at-a-time approach we can figure things out as we go. Oh and one thing missing from that list is new appliances (except for possibly a tabletop microwave/inexpensive craigslist range hood) which is because as much as we don’t adore the creamy oven and fridge (and as much as we know they might interfere with the final look of Phase 1) we’re trying to be smart and hold off on getting new stuff ’til we’re ready to do a full reno because that way we can stay open to future options like a wall oven, or a gas range, or who knows what else.
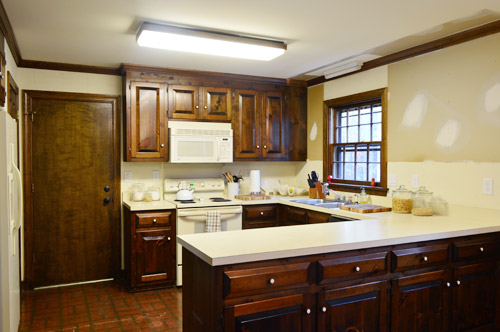
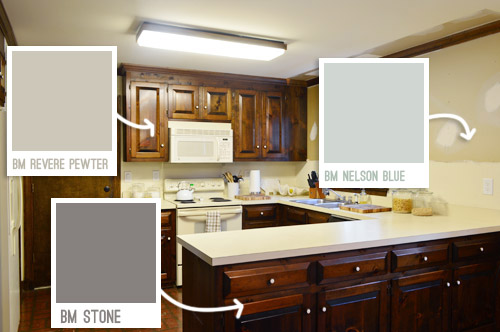
In addition to working around those appliances, we’re going to try to work with the off-white counters for this phase since we’ll likely reconfigure things in here down the line (so our final countertops will likely have different dimensions). Sherry has already brainstormed some colors that she thinks will lighten up the space while working with the existing counters and the cream appliances, and this time we’re not going to our default “paint the cabinets white” instinct!
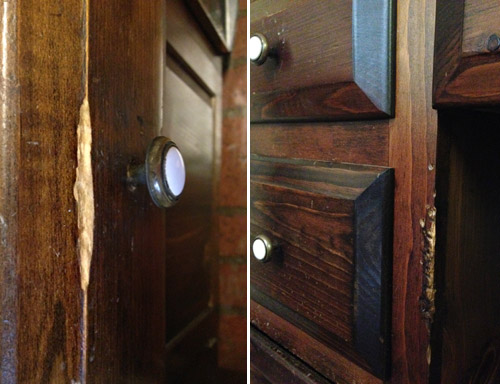
Speaking of replacing the cabinets – I know a few folks have wondered why we’re not going to permanently work with these guys. We’ve talked before about how not getting new cabinets was one in-hindsight regret of our last kitchen reno. But also, these cabinets aren’t in great shape when you get closer. There are so many chips and dents and scratches and gnaw marks (??) in both the doors/drawers and the cabinet frames themselves, that despite any amount of attempting to putty and sand them before painting, we don’t think they’ll ever look flawless (and even if we got new doors, the frames are still gnawed). But the good news is that I plan to repurpose them for a garage workshop, so they won’t go to waste – and painting them will not only allow us to enjoy them more in here before our bigger reno later, but it’ll also accomplish a nice clean look for the garage when we eventually use them out there.
The other question that comes up a lot is why we don’t try doing something with our fake brick floors, like painting them like Jenny did with hers. We would LOVE to be able to do that, but our floors are faux brick vinyl, not brick pavers – so they’re one solid vinyl sheet as opposed to a grouted stone-like material. And while we’ve seen some great tutorials from folks who have painted theirs, ours already scratch so easily that we’re pretty sure it’d be a lost cause. The top layer of vinyl is so old and crusty that it flakes off when we do things like roll the fridge out or move a chair too suddenly. Boo. Update: the plus side of this situation is that our house was built after asbestos was phased out, so we don’t believe there’s a risk for that with the flaking floor – just extreme ugliness.
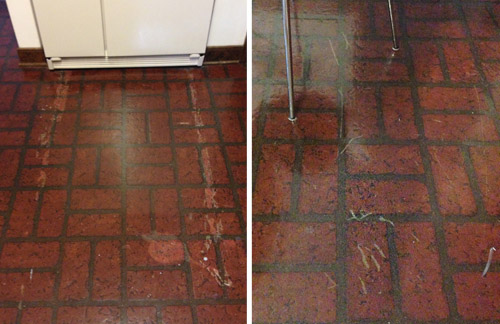
So if we really can’t take them any longer, we’ll probably do some cheap peel-and-stick tiles over them like we did for Phase 1 in our first kitchen (it took us about a day and ran us $100 but we were so happy about the difference they made for the year or so before we could afford our major kitchen reno in there).
Has anyone else opened up a can of project worms lately? Sherry’s crazy excited about it, but I’ll admit that I didn’t quite realize that taking down a few cabinets would result in a page long to-do list (silly me, after seven years of this I should know that by now). But as much as I’m bracing myself for all of the work that we’re about to dive into (priming and painting all of that trim, woodwork, and cabinetry is going to take a while), I’m kinda relieved just to be doing something instead of groaning every time that we walk into the room. Bring it on kitchen!

Erika L. says
Oh goodness I have the exact same faux brick linoleum in our kitchen… I absolutely hate it. So much so that when we painted in there I wasn’t so careful about dripping on the floor. So now we have paint splotched faux brick linoleum… I’ll have to check out some of those linoleum painting tutorials, because replacing it is not in the cards right now for us either!
YoungHouseLove says
Oh no! Hope it works for ya Erika!
xo,
s
Kristen says
The kitchen looks so much more open now without those top cabinets! I’m excited to see the cabinets grey :)
Susan says
What a great phase 1 update, and it’s just the beginning!
The removal of those cabinets makes such a transformation even before any big color changes; great vision.
The cabinet over the fridge looks soooooo much better pulled
forward. Definitely worth the time and effort. (Some video of removing the stuck cabinet could have been pretty entertaining…)
Can’t wait to see see phase 1.2 update!
Lucy says
Hello! Last night my husband and I were discussing updating our tiny kitchen(good timing with this post!). Our cabinets are in good shape, but the color is a very traditional brown oak that looks dated. I’ve been going back and forth on whether to paint or stain them. I would really like a dark cherry look to them. When I Googled “is it easier to paint or stain cabinets” I found this: http://cabinets.rustoleumtransformations.com/. Have you heard of it? And if so, any thoughts on it’s quality and ease of use?
Thanks! And I love your blog…you make house renovations so motivating and inspiring!
YoungHouseLove says
I have heard mixed reviews about that stuff! Some folks love it, and others say it’s sort of pricey and they got better results the old school way (degloss, sand, prime, paint) so I’m not sure! Anyone want to weigh in for Lucy? We love the cabinet paint we use (Advance, which we used on the built-ins in our last house’s office and the kitchen cabinets) since it’s self-leveling, so I’m not sure if we’d ever go with the kit because we’ve been so happy with that method.
xo
s
Julianne says
Really excited for you guys and can’t wait to see what you do to the space! I love when you guys share quick fixes. Those of us who don’t consider ourselves creative thinkers, appreciate seeing that there’s a cheap way to improve the look of any room without having to wait months, or even years to afford the complete change we’d like to see. :0)
Jamie @ Add Some Character says
I can imagine the difference when you’re actually in the space to have all that light shining through the rest of the room! And we can’t wait to see the cabinets painted and the open shelving either. I’m just holding my breath until we can get around to our kitchen but the little things really do make the wait more bearable. Our can of worms will be the guest bathroom that we’ll gut this upcoming weekend… we are excited!
Lauren says
Sometimes I wake up on Monday and I’m like, “Aw man, it’s Monday,” and then I remember that I have your posts to look forward to all week. You never fail to impress! (Okay, it’s not the only thing keeping me going, but seriously, you guys rock).
YoungHouseLove says
Aw thanks Lauren!
xo
s
Rotem says
Not entirely on topic, but what ever happened with the stairs runner? Have you installed it already? Can’t wait to see the foyer with this black and white beautie!
YoungHouseLove says
We’re in the middle of that project too (hoping to update you guys on that on Wed)! We have to tear up the old runner and paint the walls and ceiling around the stairs (so later we don’t risk dripping paint on the new runner) before we can finally add that runner into the mix! I can’t wait.
xo
s
Mike @ Midwestern Bite says
Our kitchen looked exactly like yours except there was another row of hanging cupboards jutting out into the room overtop of your counter. That made it incredibly dark and we ripped them out the first weekend we moved in!
YoungHouseLove says
That sounds awesome!
xo
s
Andrea says
Great progress! Thought overall it is only a tiny bit of what you’ve done, the most exciting part for me was that you removed the header above the window. I would love to do that in our 1960’s kitchen, but I need to keep the cabinets. How did they look after that piece was removed? Were there nails sticking out? Thanks!!
YoungHouseLove says
Everything was in great shape! It just popped right out (and the nails stayed attached to that piece). I’d try using a rubber mallet and just see if it comes out somewhat easily for ya. Good luck!
Thaís Bessa says
It slow da like a great plan, can’t wait to see how things go.
I just wanted to thank you guys for a cool idea. We just bought a new house that needed complete renovation, including new kitchen. We were about to send the old units to the skip and buy shelves to organise stuff at the garage. Then I read your idea to re-use kitchen cupboards at the garage and went for it. The cupboards were in really good shape (they were just not our style at all). The garage got very organised, we saved money and avoided waste! A simple but great idea, thanks YHL! X
YoungHouseLove says
SO glad! Sounds awesome Thais!
xo
s
Amelia R. says
It looks so much better already! And I can totally see where you’re going with the microwave replacement. Good eye, Petersiks!
Might I recommend moving the temporary floor fix closer to the top of your list?Not just for aesthetics (though, oh my, it’s going to improve things DRASTICALLY), but because old flooring can contain asbestos, and scratches and flakes put that stuff into the air.
YoungHouseLove says
Yes, I worried about that too, although some googling has put my mind at ease (our house was built after asbestos was phased out) so we don’t believe there’s a risk. Covering them would make such a nice interim difference like it did in our first kitchen though, so it might just be worth going for it sooner!
xo
s
RobinD says
I improved the functionality of a flourescent fixture by replacing the bulbs with full spectrum bulbs (with at least 5oooK)
The quality of the light was hugely improved.
Looking forward to your new light fixtures down the road!
The kitch looks WAY better with these changes!
YoungHouseLove says
Thanks for the tip Robin!
xo
s
liz becker says
I’m compelled to mention that if you found a cheap (larger)counter for your phase 1, you might be able to have counter seating at your peninsula. I think you would love the function it provides for those impromptu gatherings! I’m sure whatever you do will be fabulous!
YoungHouseLove says
That’s true! Although I’m not sure if seating there would crowd the dining table, so we’ll have to see where we end up!
xo
s
Jamie says
I love the small changes – they make such a difference! I’m looking forward to see what you do next in there :)
My can of worms is that I decided to change our rarely used office into a project room that I can use. I am replacing 5 pieces of furniture (2 book cases, 2 file cabinets and a desk) with a much more efficient DIY project table. Of course now I need to make the desk top, craigslist all the existing furniture, clean out all the file cabinets….and maybe I should paint the room while I’m at it, right? Every day I come up with something else to add to my to do list!
YoungHouseLove says
Oh man, lists! They can make you crazy, but crossing things off feels SO GOOD. Good luck in there Jamie!
xo
s
Jordan says
Oh my goodness, guys, it looks so.much.betterrrrr!! Definitely a breath of fresh air!
I’m doing the same thing– I finally got so fed up with a darn wall between our kitchen and living areas, even after promising I’d wait 12 months before starting anything drastic, I just ripped it down. I made it 10 months though, and I can say it feels a million times better! It’s the little things sometimes :)
Love your blog so much. Thanks for sharing what you guys do!
Taya says
I think it looks great! I totally understand making a space feel like yours a little more until you can do what you really want with the space. Can’t wait to see how it turns out!
Heather says
Our can of worms is our master bath. I just purchased new windows for the upstairs and we decided to enlarge the window in the master bath because the one in there is an odd, foreshortened size that has always looked a little stunted and weird. Doing that, though, now means we’ll have to demo the existing space, which means tearing our some of the tile around the Jacuzzi tub, which means we may as well tear out the JC and get a freestander, which means we’ll have to replace the flooring (charming, builder grade vinyl that is flaking like your “brick”) and if we do the floor we have to make a decision about the vanity and the shower, and the wiring….the whole thing is like pulling a thread on a sweater. Unlike you guys, I’m not sure there’s a logical place we can stop and wait for a phase 2. We’ve lived with it all for 5 years, though, so it’s probably time to dive in.
YoungHouseLove says
Oh man, it’s the old “if you give a
housemouse a cookie” thing. Sounds like it’s going to be awesome when you’re done though! Good luck!xo
s
Alexandra says
Taking down those cabinets was the right thing to do. I feel a bit smug because at the picture I literally thought “That window can finally BREATHE! But I hope they take the left cabinet down as well to balance it out.” Of course I thought it in German :D
Making smaller improvements in Phase 1 (saving the big/more expensive change for later) totally makes sense. I used to think it would be better to just wait it out until you can get everything just the way I want, and not “waste” any time or effort in the meantime.
The result of course is that you have to live with a something you don’t like or even hate. It’s like there’s this niggling source of unhappiness in your home, and that’s no way to live.
It’s much smarter to make small changes so you can live happily or at least content, until you can make the more drastic changes.
Added bonus: It gives you the time to find out what you need from the space, and what the space needs! I had to move around a lot in the last few years, and when I was forced to wait with changes in my new place it always turned out that the delay helped me focus my “vision” of the space, and to better find out what would work or not.
What I am trying to say is that there is a sort of corridor between making big changes to soon and too fast, and settling for something you are unhappy with. This is where your Phase 1 comes in.
(I usually lurk, but for some reason those cabinets seem to have lured me into open commenting. :D)
YoungHouseLove says
I love it Alexandra! You’re so right about that added bonus!
xo
s
HeatherB says
So. Much. Better!!! I don’t know if I could look at that window wall, though. I would’ve been up ’til 2 am slapping whatever leftover paint I had available up, just to get me through until the real paint job.
One question/concern (not sure if already addressed), but have you checked to make sure there are no asbestos worries as far as that flooring? Especially if it is flaking up, I would check on it ASAP, and get it either professionally removed or covered up immediately if there is a problem.
Keep up the good work! So excited!!!!
YoungHouseLove says
The plus side of the bad flooring situation is that our house was built after asbestos was phased out, so we don’t believe there’s a risk for that with the flaking floor. But it’s definitely an eyesore, so getting some peel & stick for the interim would be really nice. I was checking out the floor at a frozen yogurt store the other night. Haha!
xo
s
Melissa F. says
Love what you’re doing in the kitchen. I am a big believer in Phase 1’s. You should think about doing a checkerboard with the peel and stick tiles on the floor. You could get really creative with a combo of grays. I also just saw a cool tutorial online for DIY concrete countertops where you trowel on Ardex Feather Finish on top of laminate. Looked very cool and would make an awesome Phase 1 project!
YoungHouseLove says
Love that!
xo
s
Christi says
Sherry, this is sort of unrelated to today’s post, but my husband and I are also expecting next April, and we just moved into a new house. I’m DYING to paint but worried about fumes.
Would you mind sharing which respirator you use and what projects are absolutely off-limits for you and which you’re still ok with handling? Thanks!
LOVE the progress on the kitchen… can’t wait to see where it goes!!
YoungHouseLove says
I have one of those crazy looking gas mask respirators from Home Depot (doesn’t say the name on it anywhere that I can see, but I regularly buy new filters for it and they fit, so maybe it’s just Home Depot’s basic model. As for paint/primer/caulk, I’ll use the no-VOC or eco kind and other than that I avoid it (John will prime since it’s low-VOC but not no-VOC, etc). Hope it helps!
xo
s
Christi says
Thanks so much!
Chanelle says
Love the gray painted cabinets idea! I just painted mine light gray with black/nickel hardware and navy walls behind them and it looks amazing.
YoungHouseLove says
Sounds gorgeous!
xo
s
Marcy says
It already looks better, can’t wait to see it post-paint!
I’m totally jealous of your smooth walls. Using your last house as inspiration, we took down an entire wall of cabinets and the soffit above the cabinets but since we have textured (knock down they call it) walls, we had to get a drywall guy to come fix the wall. We might have been able to attempt it ourselves but I wasn’t going to take a chance that it wouldn’t be seamless. So I just gaze longingly at smooth East Coast walls.
YoungHouseLove says
Oh no! Textured walls scare me! Haha!
xo
s
Marcy says
me too! But we don’t really have a choice in Colorado. At least we don’t have rounded corners too.
Mia says
It just wouldn’t be a holiday season at a Petersik’s new home without some kitchen reno going on!
One thought: For the mid-stage photos, perhaps use ‘During’ or ‘Phase 1’
YoungHouseLove says
Haha, it’s true! We love chaos for the holidays! As for the mid-stage, I love using Progress (those labels are always on our House Tour page) but I think John just forgot about that and went for the Before & After thing. Haha!
xo
s
Tracey Johnson says
I decided to reno my dark and dingy stair well with black stairs and white breadboard risers. Husbands out of town so less people in the way! I’ve ripped carpet, pulled countless nails, tack stips and staples, sanded, patched, primed, sanded again, wiped, vacuumed and began the every other stair process! Sherwin Wiliams website quoted 4-5 hrs to dry! I thought great, first phase done over night. Wrong! 14 hrs later and the oil base painted steps are still tacky. I’m kinda freaking out here. Yikes! And the dog snuck through the barricade and I also have tiny paw prints too!
What’s wrong with my paint?
YoungHouseLove says
Oh no!!! That sounds frustrating! My only two thoughts are: 1) thin and even coats are key with oil-based paint, so if it went on thick it will take a lot longer to dry and 2)if it’s humid or moist/damp out things can take longer to cure. I’d try opening windows (assuming it’s not super humid, just to get a breeze) and running fans to see if that helps. Can’t hurt to call the store and ask them for tips too!
xo
s
Tracey says
Well, living in Seattle probably is our answer! First extremely wet & rainy weekend of the season! Thanks for the drying out ideas! Will be sure to use less paint on 2nd half of steps!
YoungHouseLove says
Oh man, that explains it! Hope it cures up soon!
xo
s
Tirsa says
Ooooh, I can’t wait to see what you end up with in Phase 1 of your kitchen. Sometimes you must absolutely do something because it is just that bad.
We lived with phase one of our kitchen (our first house) for 8 years and I never regretted painting over the old faded/scratched/stained oak cabinets and laying peel and stick vinyl on the floor. Huuuuuuge improvement.
iris says
I was just thinking about the placement of your kitchen window. You wanted to put shelves back on both sides of the window….I’m thinking if you might just put shelves only on the long side over the peninsula part, but spaced equal from the other side cabinets/window opening, so that your eye doesn’t draw to the lopsided window….would love to see you try this out… Love the new paint colors and Loving all the changes you have done to your Lovely home!
YoungHouseLove says
We thought about that but actually love that the window is centered over the sink, so we’d like to keep that as sort of the centered line (even though the sink isn’t centered on the counter) so shelves on either side of it will hopefully act like “arrows” to draw the eye to the sink and the window and then you’ll hopefully notice the pretty view of the backyard beyond. Will have to see how it goes!
xo
s
Jill says
I disagree that that would pull focus away from the window. I actually think it’d highlight it — the way your eyes are drawn to the blue stars area on the American flag by all the horizontal lines and by the contrast that the square is to the lines.
For totally different reasons, I would also advocate leaving the area to the left of the window empty and leave an equal distance empty on the right before starting the shelves. This space would let the window breathe visually. To me, that looks a bit more effortless than squeezing features in around another feature, and this gives the general feeling of spaciousness (because it looks as if everything fits easily in the space rather than being crammed in a too-small space).
Furthermore, I actually think having ample space on all sides of the window like that highlights the window more (like a halo), makes it the feature of that wall, and also lets it shed a maximum amount of light with no obstruction.
YoungHouseLove says
Thanks for your thoughts Jill! Since there’s that flat part of the cabinet that’s to the left of the window (about a foot of it where there’s just flat wood, no door or anything) we think it looks unfinished without something there, so that’s why we’re leaning towards shelves that go across that whole area, which we think will make it look seamless/intentional again. But who knows where we’ll end up! We might tape things off and change our minds or even hang them and hate it and tweak things afterwards. We promise to keep you posted the whole way!
xo
s
Lil says
*cue singining angels!* What a difference. The cupboard above the fridge change is HUGE! I’d be surprised if you guys aren’t already painting the walls.
Man, you guys really make me wish I could stay at home and reno/blog full time.
Keep going…it’s looking great!
YoungHouseLove says
Haha, I wish we were painting the walls! Now we’re working on the stair runner project. Haha! We truly have never been more all over the place. I blame pregnancy hormones + too many “before” zones that we want to tackle all at the same time!
xo
s
Kelly says
I just realized that your current kitchen layout is pretty much a mirror image of how we plan to configure our new kitchen, except where you have a garage door we have a standard-sized double-hung window, and where your fridge and pantry are we will be doing a wall of tall cabinets around the fridge.
I want to use herringbone carrera marble for ours, but loved the high-end look of taking the backsplash all the way up to the ceiling like you guys did in your last house. However, I’m not sure that will work for our kitchen. We plan to keep the cabinets above the stove for storage purposes (the cabinets will end as yours do with no cabinets under the window, and we’ll add glass inserts to make the look less heavy), and we will not be hanging the cabinet you just removed next to the sink. I thought of taking the backsplash on the sink wall to the ceiling, but not sure it makes sense (and where do you end it, at the edge of the peninsula counter?).
My question for you guys is: if you were to install a tile in your current configuration, how would you envision the backsplash?
YoungHouseLove says
I think the glass cabinets along that stove wall sound gorgeous! I would do that with just a regular backsplash under them since taking it all to the ceiling with those glass-fronted cabinets might not be as easy to envision/do. I think it’ll look beautiful!
xo
s
Crystal says
My husband feels the same way about one thing turning into a long list of to dos. :)
We switched the hinges on our old cabinets from outside to inset and it was easy and soooo worth it. We skipped spending money on any kind of jig but that may not be the way for everyone. I’m guessing you’d be out the cost of hinges since new cabinets would come with them.
YoungHouseLove says
Yeah, I think we might just spray the hinges and hardware in here for Phase 1 since it’ll all get removed for Phase 2. Although since the cabinets will live on in the garage, if spraying them doesn’t seem to work or flakes off of something, replacing them would be a good second option for us because we still want them to be functional when they’re in the garage.
xo
s
Sara says
It’s so amazing how taking down those uppers and changing the over-the-fridge cabinet makes such a change in the space!
Alex says
It’s looking better already!
One tip: DO NOT USE those 12″ Ikea Lack shelves. We installed them as nightstands in a small bedroom and they simply did not hold up. They pull away from the wall with little weight. Evidently, the bigger Lack shelves require installing a support brace first. But not the small Lack. Even if you have studs there, not worth it!
YoungHouseLove says
Oh man, thanks for the tip Alex! John’s sister brought some here for us from Ikea when she came to visit this weekend so we might just give them a shot and see if we can make them work with heavy metal anchors. Will keep you posted if we come up with some trick along the way!
xo
s
Susan says
What’s underneath that faux brick?
If you have wood, you could paint it with a 50/50 white wash and it would look amazing. You could even stencil it!
YoungHouseLove says
We wish it was wood! It’s sadly just subflooring, and likely covered in vinyl flooring glue (so not nearly as flat and paintable as the stuff that was upstairs in our sink nook under the carpeting).
xo
s
Emylee says
I’m gonna need you to swap out that huge fluorescent light next….that’s currently our predicament….and you know it’s all about me!! I have put like a bagillion lights around our kitchen to help with lighting because I don’t even want to turn the fluorescent light on, it’s such an ugly, headache inducing glare. And grey cupboards—-so exciting!
YoungHouseLove says
Haha! I need to find something nice for that spot! Lighting outlet here I come…
xo
s
Karen E. says
Love the kitchen progress going on there! Your pics of the floor reminded me of a old vynal floor I had to deal with years ago. Thats a whole lotta wax build up cracking off, not the actual vynal. I stripped mine with a wax stripper (not a bad job, sorta fun actually to see how much gunk was on the floor!). Then applied a fresh coat of wax for an absolutely beautiful floor! Lighter and brighter too! Could make the floor more bearable until you are ready to update completely. In my experience, at least.
YoungHouseLove says
Thanks for the tip! It totally could be some sort of poly on top that’s cracking off!
xo
s
Donna says
OK, I’ll admit I am waaaaay more excited about your upcoming nursery! ( Who doesn’t love a baby?) Will you guys be waiting until you find out what you are having? And will you be sharing? :)
YoungHouseLove says
Yes! We can’t wait to find out and share – although my anatomy scan isn’t until late Nov/early Dec (and of course we’ll tell the family first, but then we’ll shout it from the rooftops on the blog). Once we know what this little bun is I can’t wait to work on the nursery! I think we started when I was around 6 months with Clara, so maybe in another month or two we’ll dive in!
xo
s
Abbey says
Have you guys ever considered painting your counter tops with the Rustoleum stuff? I think it may be kind of expensive so not ideal for a phase one that was only going to last six months but may be worthwhile for a year or two.. Just curious if you had any thoughts on it or if any other readers have experience with the stuff!
YoungHouseLove says
We have heard good things about that except that it’s super fumey, so we wouldn’t use it while I’m pregnant or when we have a young child. Other bloggers have reviewed it and loved it though!
xo
s
Katherine says
What a difference!
Have you ever thought about getting an induction range or a two-burner induction setup? (I never use more than two burners, but you guys are usually cooking for at least two more people than I am.) I’ve had my eye on these for a while because they’re safer and use much less energy, but they still haven’t come down in price to match other options.
YoungHouseLove says
Sounds really cool! John’s the chef, so I bet he’s going to do all sorts of crazy research. Haha!
xo
s
Laurie says
I am glad that you are doing a Phase 1 facelift on the kitchen. I wasn’t sure if that was in your plans but I wondered as you started making short term fixes in other areas, if the dated kitchen would start to get to you. Question…..have you considered doing a phase 1 fix to the countertops, like that material you can roll over laminate to make them look like stone or concrete? I think it is pretty inexpensive and might be kind of cool in the interim. Maybe even an inexpensive backsplash to make things pretty until you do the big project? Like Botox until you can afford the facelift, ha ha!!
YoungHouseLove says
Botox until the facelift = hilarious! As for the counters, we hear that stuff is really fumey, so I wouldn’t want to use that in the house while I’m prego or even after we have a small child, but we have thought about a few other options (like concrete that you spread on top of counters to make them look concrete) so we’ll have to see where we end up!
xo
s
Bonnie says
There’s a lot to be said about doing some of those “make us smile in the meantime” things.
Dawn says
Just a thought on the counter tops… We had similar off-white counters that we just lived with for a while and I haaaated them! I finally did my own ‘phase 1’ update by painting them and sealing them. It turned out great and two years later they still look shiny and new.
I used the same product bars use on their wood counters that leaves that extremely shiny finish, but is still food/drink safe once it’s completely dry. It seemed a little crazy at the time, but I have not regretted it once. They went from dull yellowish and blah to a super glossy solid-stone look overnight, and no one can believe they’re painted.
Here’s more about it if you want to check it out: http://designingdawn.com/around-the-house-diy-kitchen-countertops/
YoungHouseLove says
Love that!! The shine-factor is amazing. Thanks for sharing Dawn!
xo
s
keisha says
Oh-so-excited to see you begin to tackle this room. I wait with bated breath for the fluorescent light removal… we have one in our kitchen the size of – I kid not – a twin bed – imagine that wood-trimmed box hovering above your head! I’m eager to see how removal / replacement is DIY’d by y’all, even if it’s on a smaller unit than in my kitchen.
YoungHouseLove says
Oh man, that should win the blue ribbon at the county fair!
xo
s
Elizabeth says
All I can say is YAY!!!! Big improvement. And I have the SAME PROBLEMS as you guys… except saving up for Phase 2 is not something that I’m even in a position to do right now. So really looking forward to Phase 1 inspiration!!!
Jen @ The Decor Scene says
Will you guys be using a paint sprayer to at least prime everything first? I’m sure that would save a ton of painting time in there. I can’t wait to see Phase 1 done. I can see your vision and I think it’s going to look awesome in there until you can get to the next phase. :)
YoungHouseLove says
I think we’ll definitely be using the sprayer to paint things we can remove and take outside (the cabinets doors and drawers, the pantry and garage door, etc) but taping off the room and spraying every last inch of woodwork (especially the primer step while I’m prego, which gets much fumier than just painting it on) will probably not be something we do. So some will be by hand, and some will be sprayed :)
xo
s
Jen @ The Decor Scene says
Sorry forgot about the prego part and fumes. :(
But taking all of that other stuff outside or to the garage will really save your hands from all of that painting. ;)
YoungHouseLove says
Yeah, I’m all about the “anything we can move out and spray” method! Haha!
xo
s
Diane says
I just redid the caulk on the bathroom window and have now decided the room needs new paint..can you hear my husband groaning?!
Also my daughter has the exact same kitchen layout as you and they took the long counter out that separates the eating area from the kitchen. They then put a smaller island across from the sink. boy did that open that area up and lighten it.
YoungHouseLove says
That’s exactly what John wants to do! I love hearing that!
xo
s
Kacey says
I have/had the same floor and put self-adhesive floor tile over it for my phase 1 update.
http://m.lowes.com/product?langId=-1&storeId=10702&catalogId=10051&productId=3745597&store=2380&view=detail&nValue=4294934373+4294774744
It not only lightened up the space a lot, I have not had light floors before and this lets me decide if I want it permanently (once I can save up to level the floors first :-/)
YoungHouseLove says
Really cool! Love what you chose!
xo
s
Julia Kent @ The Domestic Blonde says
Oh I am so happy you tackled this project!!! This is the room that needed the most TLC in my opinion. Loving the progress guys and can’t wait for paint (and no more fake brick floors!)
Lena says
“floors are fake brick linoleum, not brick pavers – so they’re one solid vinyl sheet”
Are your floors linoleum or vinyl? Because they can’t be two things. I guess vinyl. http://www.armstrong.com/flooring-blog/2013/08/23/linoleum-vs-vinyl-flooring/
YoungHouseLove says
Yes, vinyl! Sorry for the typo. We both tend to use linoleum as the general term, but vinyl is usually more common and we definitely think these are vinyl.
xo
s
Shannon Griggs says
Wow – this is uncanny! We have a very similar layout in our kitchen and removed the overhead cabinets flanking our window this weekend, too! The really ironic thing about your post is, my husband looks over to me with hammer in hand prior to starting and says, “I hope you like worms, cuz we’re about to open a huge can of ’em!” LOL! We will surely be following along with you as you make updates to your kitchen in the coming months!
YoungHouseLove says
That’s hilarious! Good luck with everything!
xo
s