Well, that can of worms is officially open. We’ve started making some changes in the kitchen. I realize this isn’t totally new news, since we removed the wallpaper in there a few weeks ago, but towards the end of last week we used that little jolt of momentum to start down the path of some more serious changes.
We still want to live in this house for a nice long time (and save up some money) before we take on our full kitchen reno – we’re still changing our minds daily about what configurations and countertop materials we’d like for the long haul – but this is officially the beginning of a series of what we hope to be pretty transformative “Phase 1” improvements so that we can enjoy this room and make the best of it in the meantime (you can read more about those Phase 1 updates and why we like them here).
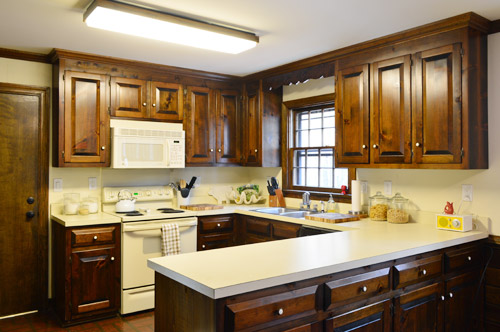
We had hoped getting the wallpaper out would make a greater aesthetic improvement on the space. But instead it just kinda underscored how brown, beige and blah everything is in there. The appliances, counters, and walls kinda wash together in color that certainly isn’t improved by the fluorescent light – while the dark cabinets, trim, and doors just feel looming and heavy in person. Our first course of action was something Sherry’s been ready to do since day one: remove some upper cabinets. Both of us miss the look and the functionality of the open shelves that we had in our last kitchen, so pretty much since move in day, Sherry has dreamed of swapping this long upper to the right of the window for some open shelves to lighten things up.
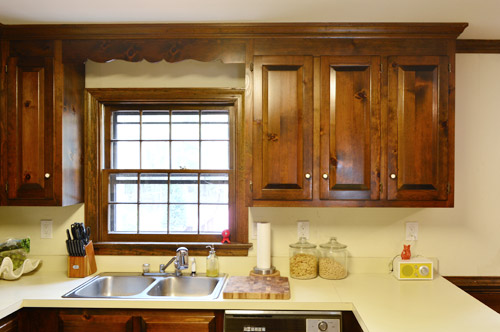
So Sherry unloaded everything that was in them (fortunately we’ve barely used the uppers flanking the microwave, so there was plenty of room for all of this displaced stuff), and then I could start demoing away. First I carefully pried off the crown molding with a crowbar (since I planned to reuse it) and then pounded at this header piece across the window with a rubber mallet.
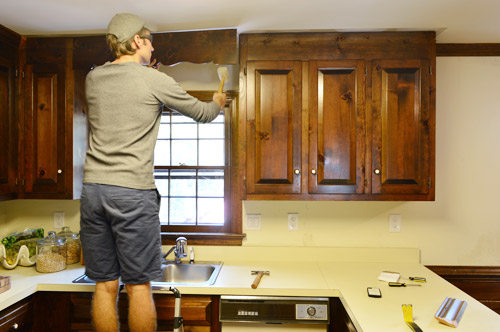
That was the easy part.
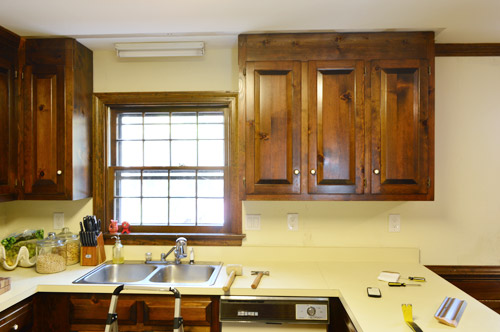
Taking the cabinet down was tougher than we anticipated. We figured it’d just call for removing a few screws like the last kitchen, but it turns out these cabinets were nailed in. So instead it took lots of prying and good ol’ fashioned jostling to free it from the wall. Since it was pretty heavy I took the doors off (so they weren’t flapping in my face the whole time) and I put a can of paint on the countertop to prevent it from crashing down directly on the counter when it eventually came loose. It also saved my foot from getting smashed.
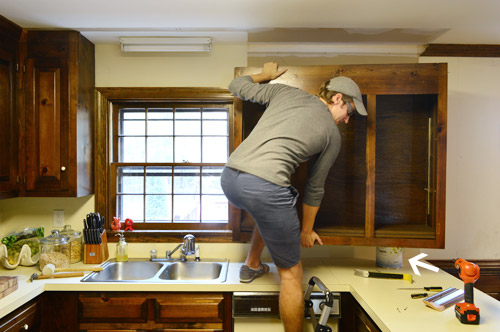
Despite some lack of paint behind it, we consider it an instant improvement. Especially when you’re sitting at the table on the other side of the kitchen. To have a clear shot of the window (which we’ll maintain with some open shelving) is really nice.
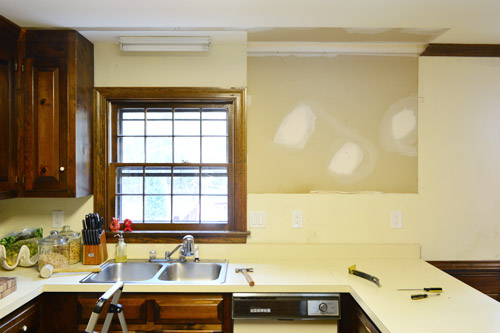
So much so, actually, that we decided to take down the small upper on the other side of the window too. We realized that would keep that wall looking more balanced and would let the window breathe visually.
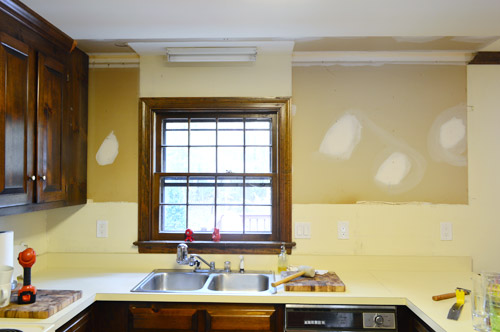
The plan will be to put a pair of floating shelves on either side of the window. We actually already own a set of long white Ikea Lack shelves for the right side (we purchased them about two years ago with plans to put them in our last home’s sunroom, but that idea fell by the wayside and we never even took the shrinkwrap off). And they sell a shorter version that will be perfect for the left side. So even though we’ve removed some cabinetry (which we plan to reuse in the garage) we won’t be losing lots of kitchen storage.
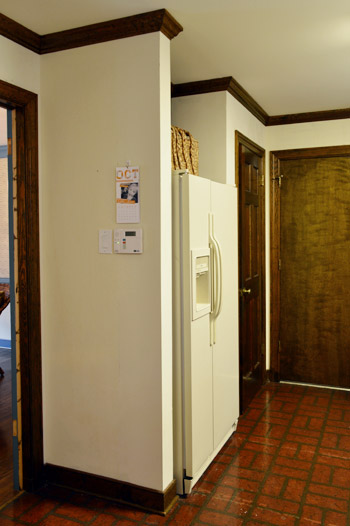
Before we hang those open shelves, we’ve got some painting (and priming) to do to those walls first. But with our cabinet mojo firing at full steam, we turned our attention 180 degrees to another cabinet issue. This utterly useless upper cabinet that was tucked waaaaay back behind the fridge.
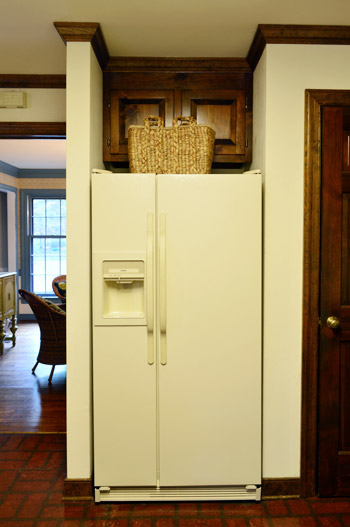
It was so far back that neither of us could reach it without a stool (and I’m a pretty tall guy, so that’s saying something), which is why we threw the basket up there as a lose attempt at disguising it. We wanted to move it forward to be flush with the wall so that it’d be reachable and make it look a bit more like the built-in fridges you see in modern kitchens. Like the other cabinets, I pried off the trim and shimmied its nails loose from the wall. Aaaaaaand then it got stuck.
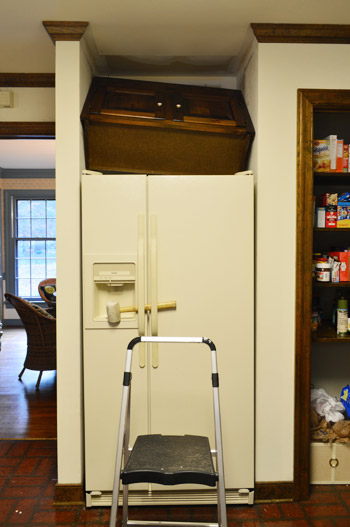
Turns out the wall narrows slightly as you come out and the cabinet was built-in quite snugly. But with a few more pulls (and a couple of drywall dents) it eventually came out. And happily, the dents were covered when we rehung the cabinet.
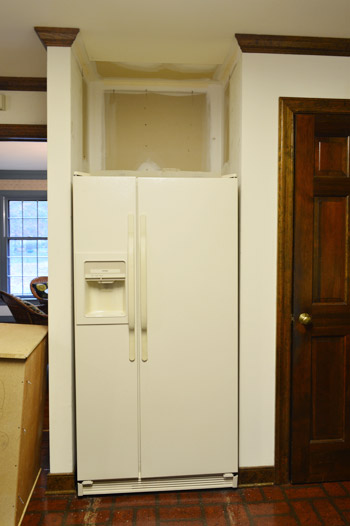
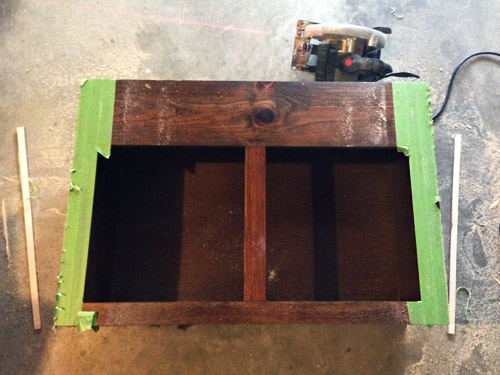
The snug fit alerted me to another problem though. Since the nook narrowed towards the front, I’d have to trim it before putting it back up to get a nice seamless fit. Fortunately the overlapping part is just the face of the cabinet, so it was easy enough to shave off a quarter of an inch on each side with my circular saw. I put tape down on the edges before cutting to help discourage the wood from chipping or scratching during sawing, which worked (the tape sort of shreds itself but protects the wood).
The other problem to solve was how to hang it. It previously had been nailed to the back wall, but now that we were looking to float it about 14″ away from the back, I decided to construct two simple braces out of 2 x 4″s. They were sort of U-shaped, with the short side pieces that would be screwed into studs on both side walls for stability. That gave me a nice, long, sturdy front board into which I could secure the cabinet with screws.
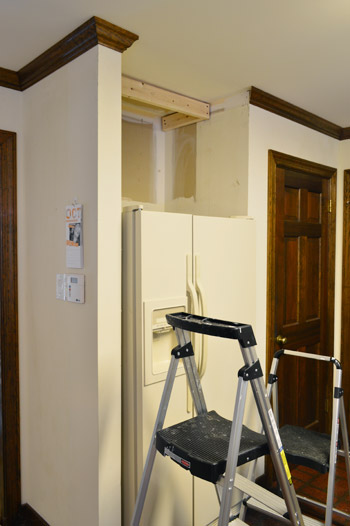
I made two braces – one for the top and one for the bottom of the cabinet – so you can see the bottom one wasn’t installed yet in the photo above. I was very very careful with my measurements during this step, because if I attached the braces too far forward or back, the cabinet wouldn’t sit flush to the wall. There was a lot of measuring three times before cutting once.
Thankfully my triple-checked measurements worked out great and the cabinet sat perfectly where we wanted it. I propped it up in place with some wood, checked that it was level, and then screwed through the back of it into the braces (being sure that my screws went through the thick framing of the cabinet, not just the thin, flimsy back panel).
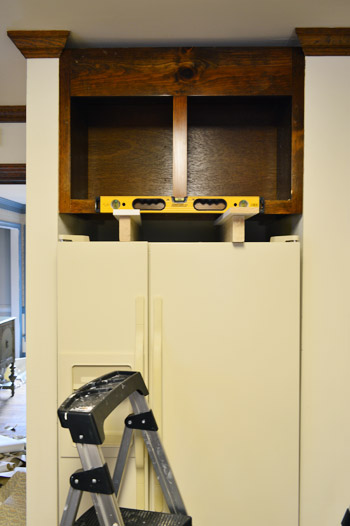
Not only did it look much nicer, but now we could actually put stuff in it. Functionality for the win! The last step in this project was reinstalling the crown molding – a careful process since I was matching existing cuts (of the pieces I didn’t take down) and because I didn’t have any spare pieces on hand- just the ones I had removed at the start of this project. So all it would take is one bad cut and I’d be, well, very angry at myself.
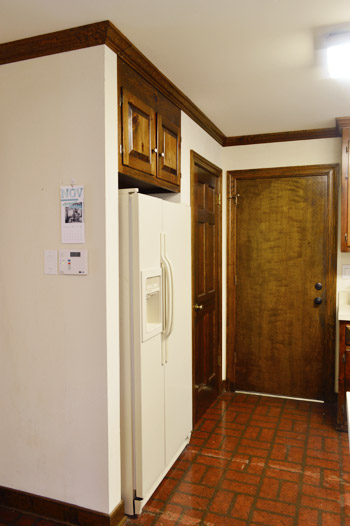
But it worked out well and I got those gaps filled. We’ll eventually be painting these, so I can do some caulk touch-ups then so they’re even more seamless in the long run. And man, it looks a whole lot better than the strange empty wall-hole-looking thing above the fridge that we started with:
I also hung the crown molding on the other side of the room so it goes all the way around again. This wall looks especially crazy right now, but with some paint and shelves and a pendant over the sink, we think it’ll be a huge improvement.
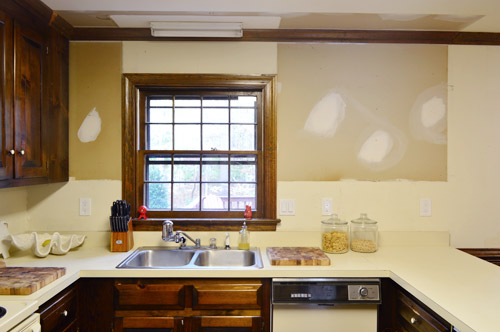
While I wouldn’t consider the space amazingly transformed yet (it’s far from that!) we think these first couple of changes are steps in the right direction. It’s hard to tell in the photos, but in person it already feels noticeably more open and less heavy.
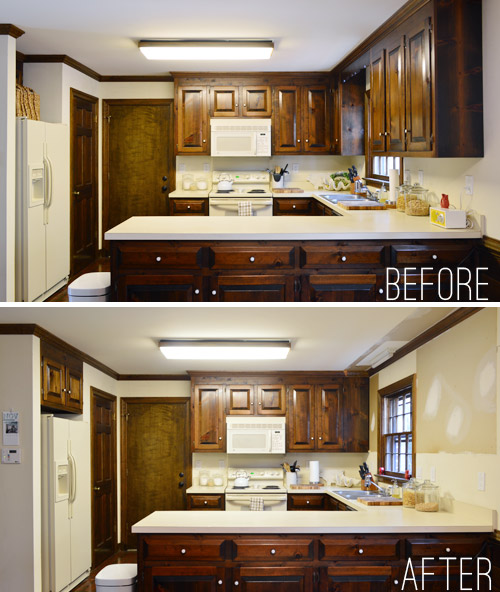
I felt kinda silly putting “After” on that photo above because it doesn’t really deserve that title yet. And actually, there are quite a few steps in this “Phase 1” kitchen makeover before we’re ready to call it done. So here’s our Phase 1 To-Do List as we’re currently envisioning it:
Remove wallpaperMove fridge cabinet forwardRemove upper cabinets on window wall to prep for open shelves
Reinstall crown molding- Paint pantry and garage doors
- Paint walls and ceiling
- Hang floating shelves on window wall
- Paint trim and paneling
- Possibly craigslist the existing microwave and get a countertop one (the we can put in the pantry?) and add a cheap range hood (we’ve seen some like this for $20 on craigslist) to lighten up that wall?
- Update or upgrade the old cabinet hinges and knobs
- Paint the cabinets
- Make solid back to the peninsula (the cabinet doors aren’t functional on that side, and we think it’ll be less busy with a sheet of beadboard or nicely framed out wooden look)
- Replace florescent lights (including the one over sink)
- Replace and center the light over table
- Get a rug for eat-in area? Possibly install peel and stick tiles everywhere?
- Curtains for windows?
Lots of bullets, huh? But thankfully almost every one of these steps will also be “paid forward” to Phase 2 (for example, painting the trim and walls and ceilings and doors and replacing lights will all be things we can carry into Phase 2 of the renovation down the road as well). So there aren’t very many things we’re doing just for Phase 1 that won’t come in handy for Phase 2 later. It’s sort of like the before is the first step on a staircase, and the major reno is the third step, and Phase 1 will just act as that second step to bridge the gap and bring us closer to a bigger transformation down the line (and make us smile in the meantime).
You can also see that there are a whole lot of question marks going on, but we have faith that if we just focus on the one-step-at-a-time approach we can figure things out as we go. Oh and one thing missing from that list is new appliances (except for possibly a tabletop microwave/inexpensive craigslist range hood) which is because as much as we don’t adore the creamy oven and fridge (and as much as we know they might interfere with the final look of Phase 1) we’re trying to be smart and hold off on getting new stuff ’til we’re ready to do a full reno because that way we can stay open to future options like a wall oven, or a gas range, or who knows what else.
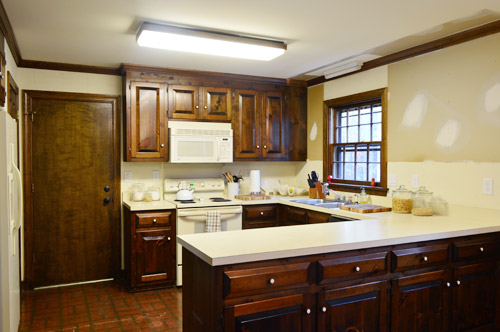
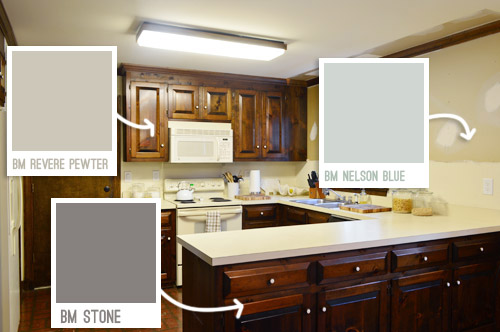
In addition to working around those appliances, we’re going to try to work with the off-white counters for this phase since we’ll likely reconfigure things in here down the line (so our final countertops will likely have different dimensions). Sherry has already brainstormed some colors that she thinks will lighten up the space while working with the existing counters and the cream appliances, and this time we’re not going to our default “paint the cabinets white” instinct!
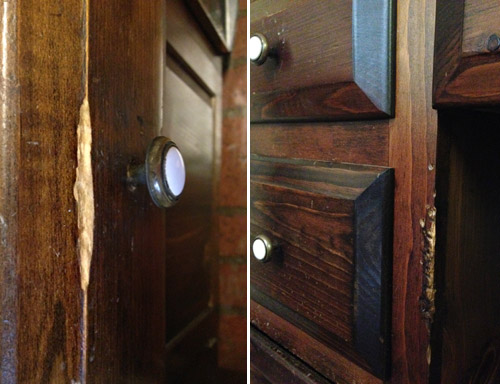
Speaking of replacing the cabinets – I know a few folks have wondered why we’re not going to permanently work with these guys. We’ve talked before about how not getting new cabinets was one in-hindsight regret of our last kitchen reno. But also, these cabinets aren’t in great shape when you get closer. There are so many chips and dents and scratches and gnaw marks (??) in both the doors/drawers and the cabinet frames themselves, that despite any amount of attempting to putty and sand them before painting, we don’t think they’ll ever look flawless (and even if we got new doors, the frames are still gnawed). But the good news is that I plan to repurpose them for a garage workshop, so they won’t go to waste – and painting them will not only allow us to enjoy them more in here before our bigger reno later, but it’ll also accomplish a nice clean look for the garage when we eventually use them out there.
The other question that comes up a lot is why we don’t try doing something with our fake brick floors, like painting them like Jenny did with hers. We would LOVE to be able to do that, but our floors are faux brick vinyl, not brick pavers – so they’re one solid vinyl sheet as opposed to a grouted stone-like material. And while we’ve seen some great tutorials from folks who have painted theirs, ours already scratch so easily that we’re pretty sure it’d be a lost cause. The top layer of vinyl is so old and crusty that it flakes off when we do things like roll the fridge out or move a chair too suddenly. Boo. Update: the plus side of this situation is that our house was built after asbestos was phased out, so we don’t believe there’s a risk for that with the flaking floor – just extreme ugliness.
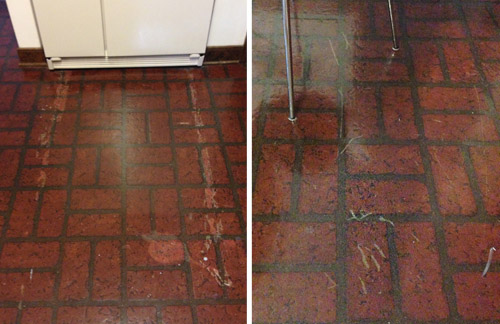
So if we really can’t take them any longer, we’ll probably do some cheap peel-and-stick tiles over them like we did for Phase 1 in our first kitchen (it took us about a day and ran us $100 but we were so happy about the difference they made for the year or so before we could afford our major kitchen reno in there).
Has anyone else opened up a can of project worms lately? Sherry’s crazy excited about it, but I’ll admit that I didn’t quite realize that taking down a few cabinets would result in a page long to-do list (silly me, after seven years of this I should know that by now). But as much as I’m bracing myself for all of the work that we’re about to dive into (priming and painting all of that trim, woodwork, and cabinetry is going to take a while), I’m kinda relieved just to be doing something instead of groaning every time that we walk into the room. Bring it on kitchen!

Meleah says
The kitchen changes look great! Such a difference! I can see it coming together. We just bought this house a year ago and we might be buying and selling yet again. That house will be a huge can of worms, a 1951 foreclosure! I love to fix up unloved houses though.
Corbin says
What a great project!! I wish my landlord would let us redo our kitchen (it needs it!). New fan and follower, can’t wait to see your progress for the kitchen.
Corbin
Decor-Eat
Beth says
I’ll be curious to see what you use for the florescent light because I have the same thing too and I hate it.
Dinka says
Don’t take this the wrong way, but I’m loving your color choices………..for the EXTERIOR of my home!!! We just bought a new place and I’ve been going nuts trying to find the perfect exterior palette. I may have to steal your choices! :-P
YoungHouseLove says
Love it! Send pics!
xo
s
Sarah says
Your kitchen looks similar to mine in functionality but I always feel like I don’t have enough storage space. Do you feel like you will Have enough?
YoungHouseLove says
Really?! We feel like we have so much! Especially with the desk area on the same wall as the fridge (behind the eat-in table). Do you have that part? I definitely think that helps! I also think we’re kitchen minimalists (we don’t have a big Kitchenaid mixer or a waffle maker or a panini maker or any of those gadgets – I think it’s from our days of living in NYC when you had one cabinet and one drawer and a mini-fridge and that was it :)
xo
s
Jennie says
No KitchenAid!? Okay, dudes … that’s where I draw the line. Seriously though, I admire your minimalism, and generally eschew gadgets. However, I love my mixer :)
YoungHouseLove says
Haha! My best friend is so in love with hers it has a name and would be the first object she grabs in a fire. I totally get it if you’re a cook/baker! I’m just the absolute worst in that department.
xo
s
Angel says
It totally is an apartment person thing. We are apartment people and I take cabinet/counter space VERY SERIOUSLY. If people are shocked to hear you have no kitchen aid mixer, wait till they hear we have no MICROWAVE. Yep. Got one small toaster oven (for toast and heating up leftovers). Got rid of the toaster and microwave. Never looked back.
Apartment people also laugh when we see things like slap chop and avocado slicer and corn kernel remover. Its called a knife people! And you only need three. One big one that cuts veggies, a serrated one for bread and tomatoes, and a tiny paring knife from the dollar store (for you know, the avocado and corn cobb). Knife blocks be damned! Lol :)
Kara says
Your kitchen looks a thousand percent better with those cabinets off. Can’t wait to see this evolve!
Bonnie says
Who ever thought over-the-stove microwaves were a good idea? We took ours out (took to Habitat’s restore) and bought a hood/light on craigslist for $20. SUCH a big difference. I don’t feel like I’m cooking in a cave anymore.
YoungHouseLove says
I love that!
xo
s
Katie says
So happy you are setting these little worms free! I can’t wait to see the progression of Phase 1. PLUS, you are including 2 things I would like to tackle in my own kitchen…replacing a couple cabinets with open shelves and peel-and-stick tiles. :)
Melissa Simon says
Everytime I get anxious about our house (been in it for 2 years and have finally almost got all the upstairs rooms painted..eeekkk) and begin wanting to go all ballistic on it with projects, I read one of your posts and what calms my nerves is seeing “Phase 1”. Before I saw that posted previously on your blog, I had never thought about a house having multiple phases of finished. I know it has made me really look at my house and realize it really is a project of love and time. To never rush it and make something fit just for the sake of fiting, thank you!
YoungHouseLove says
Aw, you’re welcome Melissa! Best of luck with everything!
xo
s
Pat S says
Good start! And I couldn’t agree more with losing the over the stove microwave. It looks like the elephant in the room. lol
Carol says
I now feel vindicated in removing three cabinets from our kitchen. It has no windows and had two cabinets floating above nothing on the back wall and one claustrophobically above the kitchen sink. Everyone that comes over helpfully points out that I REMOVED STORAGE SPACE (gasp). But it makes me smile to have it seem larger, so whatevs!
Leah says
The chew marks are likely from a puppy. We had one that chewed off every handle within reach in the kitchen, gnawed the edges of cabinets, etc. Pretty gnarly stuff. My mom got a new kitchen out of that . . . once the dog was old enough.
I love your phase improvements. We live in a boarding school, so we can’t make huge changes, but little ones are totally within our realm. You guys inspire me all the time! The school even pays for paint (within reason, from Sherwin-Williams), so our major “renos” have been repainting. We did the main bedroom, living room, and kitchen this summer. We did our bathroom last weekend and the hallway this weekend, and the home feels so much more like us now. Can’t wait to finish the second bedroom and entry-way to have a completely us place.
YoungHouseLove says
That’s what I thought! I said “puppy marks!” when we first toured the house. Haha!
xo
s
Barbara says
I have to honestly say that I liked it better with the cabinets, but I guess that’s just me.
Living in a 1953 house, I can tell you from what people who have renovated houses have told me is that anything prior to 1980 has nails. Most of the cabinets in these houses have been built on-site, which makes them difficult to remove. Thank gosh someone finally figured out screws.
Jayme @ Keeping Up With Myself says
Our apartment a couple years ago had one of those weird way back above the fridge cabinets. I used it for things I used only once a year like my Christmas dishes and extra candles. And in front of it we had our little basket of medicines and other random things.
If it had been ours to remodel I probably would be convincing my hubby to do that right now! It looks so clean and functional now!
Ashley@AttemptsAtDomestication says
Love how much light it adds! Makes me want to take down some cabinets in my kitchen…
Sharon S says
Very wise decision to plan on re-doing all cupboards in phase 2. While paint etc. can make a kitchen esthetically pleasing, the insides are what make a kitchen function and the old kitchens just don’t have the pull-outs, drawers, organization behind those doors and drawers. Having just re-done our kitchen I can say that it was the best decision we made to start from scratch and bring everything up to date rather than just a quick fix. Of course, your phase 1 makeover is a smart move to hold you over until phase 2 can practically and financially take place. Can’t wait to see the transformation.
Carli says
Ooooo the kitchen renos are always my favourite! I’m excited for Phase 1 renos and the eventual overhaul. Already, with those cabinets down and the one over the fridge tweaked, things are looking better! Good work!
Angela says
I love you guys for completely motivating and inspiring me to get up and do stuff. We are in the midst of “phase 1” changes we have been making in our 70’s ranch, and sometimes I get so discouraged because it seems like it is taking forever and nothing is ever finished (we started on our kitchen in March), but when I read blog posts like this it inspires me to keep pressing on, through morning sickness and all… You also inspired me to document the stuff we are doing in a blog and after attempting that I now really respect how much work you guys put into this blog! Thanks for the little boost of momentum I get after seeing what you guys are doing!
YoungHouseLove says
Aw thanks Angela! You’re so sweet. All the best of luck with everything! We definitely get in those “everything takes longer than we think!” funks, but DIY is so addicting to us because when it’s finally done it’s so rewarding! And sometimes it’s those ridiculously-tough-in-the-middle projects that make us the happiest when we’re done. And just like that, we’re back in love with projects. Haha!
xo
s
Dawn says
I think that fridge nook is screaming for a built in fridge down the road!
YoungHouseLove says
I’d love that!
xo
s
Emily @ DavenportDIY says
That cabinet above the fridge was ridiculous before!! Who on earth thought that was a good idea? It looks SO much better now- good work!!
mary says
Looks good! Can’t wait to see the cabinets painted.
I removed the little cabinet over my frig. It too sat too far back to be used.
Plein Jane says
I had my fingers crossed over the weekend that we’d be able to see those awesome stair runners today! Selfish note: I’ve had a similar project in mind and am waiting to see how yours turn out!
Great start in the kitchen! You’re definitely more patient than I am in terms of waiting on appliances. The color of them, although I’m sure the function is fine, doesn’t help you in the beige-blah department. But I’m sure you’ve already figured out that the other changes will help them “disappear” until you’re ready to replace them for good.
YoungHouseLove says
Oh man, we’re mid-project on the stairs, but hope to share an update on Wednesday! Turns out getting the old carpeting out there isn’t as easy as we thought- and we still have to paint the walls and ceilings before installing the new runner (don’t want to paint after the runner goes in and risk dripping on it). Soon I hope!
xo
s
Britt N says
Love the Nelson Blue! May have to ‘borrow’ that color for the painting job I need to tackle in my bedroom.
Vivian says
It really did make a huge difference … I had to laugh though when John said it let the window “breathe” … pretty sure that’s the first time I’ve heard anyone show such concern for their window’s comfort! LOL.
YoungHouseLove says
John is truly a window-rights activist. He wants them all to have the best life possible.
xo
s
JustMe says
That looks so much more open already, even just at this stage!
Our big project? Painting. I know, nothing too crazy, but what an ordeal! Spackling, priming and painting trim, caulking, etc. And lots of rooms to do. And 3 little boys, 2 cats, and 1 dog trying to smudge paint. Luckily hubby just finally realized how much nicer our house is looking and has been helping, yay!
Also, a BIG, HUGE THANK YOU for a long-ago post about the best cutting-in brush EVER!!! Seriously, I was the absolute worst at cutting in. I tried that brush (and watched Sherry’s cute video about cutting in a hundred times), and I was able to paint my whole hallway myself, using no tape! 6 doors to cut in around, and it looks great. Thanks for the tip!!!
YoungHouseLove says
Aw, I’m so glad! It’s the best brush ever, right?!
xo
s
Roxine says
Just a thought — I am hating on my pantry right now and it occurs to me that you could take out the pantry and create a whole built-in with cupboards on that wall. Create a kind of breakfast/appliance nook on that wall. Fun to plan and dream anyway. :-)
YoungHouseLove says
That would be fun, but I think we have so much not-pretty stuff in there (canned goods, cereal boxes, etc) that it’s nice to keep it covered. I’d love a pretty frosted glass door for phase 2 though!
xo
s
Kathy says
Good luck with those vinyl floors. I look forward to seeing what you do with them! My home had floors that looked like the same fake red “brick” vinyl but I didn’t luck out on the whole asbestos thing. Eventually just covered them up with an engineered wood floor (i’m on a slab) but not before tons of leveling problems. The company had to tear the whole thing out and reinstall because of the problems. Hope your flooring goes much smoother!!! :-)
YoungHouseLove says
Oh no, that sounds like a nightmare!
xo
s
Danielle Oakey Interiors says
I can’t wait to see it! Also, I am sure you have seen this kitchen reno before, but I couldn’t help but think it resembles the layout you have in your home.
http://theinspiredroom.net/2013/04/02/kitchen-remodel/
If you are considering getting a new countertop in Phase 1, maybe opening up the kitchen like this is an option! I must admit, I am pretty jealous that you get to tackle yet another kitchen reno, I need one in my life! HA!
YoungHouseLove says
Ahhhhh, that’s gorgeous! Thanks so much for sharing Danielle. And if you’re jonesing for a kitchen makeover, come on over! We have a paint brush with your name on it! Haha!
xo
s
Megan @ Delightful Domicile says
I’m about to open a can of worms in my laundry room. It started with just wanting to add wall cabinets (currently the only storage is one white wire shelf) but that led to painting the walls which led to a backsplash which then led to a new laundry room sink which led to hidden litterbox storage which led to pet food storage which led to cleaning supply storage and what do I do with the million plastic bags and lightbulbs that are shoved into every available nook. Oh, and artwork.
YoungHouseLove says
Wahoo! Good luck Megan!
xo
s
mp says
MUCH better!
I’m so disgusted with my dysfunctional kitchen that I’m seriously considering demolishing all the upper cabinets and installing cheap plastic garage storage from Lowe’s until I can afford a genuine renovation, since that won’t happen for several years.
Meg says
I just bought my first house, and I’m definitely in the midst of Phase 1, making it more livable and more to my taste without major construction. I’ve opened my own can of worms with the kitchen. It was carpeted when I bought it (What? Yes, it was). The carpet came up and underneath were old linoleum tiles. Since the kitchen is going to be redone at some point soon-ish, I just put in a new subfloor and painted it. It’s colorful, clean-able, and such an improvement. It’s a temporary fix that still builds towards the eventual new kitchen and the cork floors I’ve been drooling over for ages.
YoungHouseLove says
Such a smart fix Meg!
xo
s
Kate R says
tiny cabinets above fridges are like…#3 on my most irritating pet peeve list. maybe it’s because I’m short. or practical. I mean…what do you put in there? they’re never very deep, so you can’t put much, but if they were deep then you couldn’t get to whatever is in there….UGH. I may have too many feelings about this.
that being said, this particular cabinet actually seems useful, and I can’t believe what a difference just moving it flush with the wall made!
Melissa says
Have you considered painting that creamy fridge with chalkboard paint? It might be a cheap phase one fix that helps it blend a little – while also being super fun for Clara..
http://www.pinterest.com/pin/6403624444087928/
Looks WAY better with those heavy cabinets gone and the window exposed. Can’t wait to see what you do with it.
YoungHouseLove says
I brought that idea up to John but he’s not that into it, so we’ll have to see if it he ends up going for it! Haha! He does have a good argument (that if we later want to craigslist or donate it, they might not want a painted fridge as much as one like this) so we’ll have to see.
xo
s
Jackie says
Won’t you want to put the extra fridge in the garage? In which case, paint away! :)
YoungHouseLove says
After seven years of living with only one fridge I think we’re just not extra fridge people, but John’s parents have one and love it!
xo
s
Georgina says
I am really looking forward to the tutorial on how to replace the light above the sink. We have one as well and I was going to cover it with a DIU fabric cornice but I would much rather replace the light altogether. When do you plan on changing your lights? Our kitchen pait is Revere Pewter and our cabinets are white. The rest of our main floor is Edgecombe Grey. Any thoughts for lighting above the sink?
YoungHouseLove says
I’d love to change them as soon as we find something that we like for their replacements, so it will be fast if we find something quickly and could be slow if we have some trouble hunting down some things that we like.
xo
s
Rachel says
I love what a difference removing those cabinets has made! I have been pinning shelves for our utility (linked to kitchen) for months and last week we finally picked up two shelves the length of our utility. We’re just now trying to pluck up the courage to fit them, we’re worried in case we don’t secure them enough. On another note, I completely recommend moving the microwave out the kitchen. Ours is in the utility and it’s there when needed but doesn’t clutter up the kitchen like it did in our previous house. Can’t wait to see the next step!
Laurie at Laurie Jones Home says
It’s funny how all you’re kitchens seemed to have the same before vibe to them! I love the changes and even if they’re small they are already making a big impact, especially the cabinets above the refrigerator!! Can’t wait to follow you along!!!
Liz says
Definitely opens up the space and makes it feel less stuffy (at least in pictures)!
This is in no way meant to be rude but…have you thought about what your blog/career will look like long term? I know you have side projects but not sure if they are big enough to support a family of 4? I know these DIY blogs are all the craze but I can’t imagine they will be around forever. Even so, you clearly have a set style (consistent color palette, open shelving, style/décor across 3 houses, etc.) That isn’t a bad thing – I decided on my home-style a few years back and haven’t strayed too far from it and can’t imagine I ever will. I’m just curious how you see that playing out for YHL? There are only so many times you can move houses or even just tweak a space – especially when it seems like you’ve already chosen a style that works for you. (Again, sorry if my comment/question comes off as rude – it’s totally not meant to be! I’m genuinely curious to see how YHL will look in the future (along with every other DIY blog) once the fan base has already seen every spin on the bloggers personal style.
YoungHouseLove says
Oh yes, I’m sure we’ll end up back in advertising! Heck, we’re shocked that we have both done this full time for over three years. Completely blows us away. We agree that we don’t think blogs will be around forever, and we love things like writing books and doing other side projects, but we don’t think they’ll sustain us forever either. The good news is that we both loved advertising (and have kept ties in the industry, both locally and long-distance – for possible freelance stuff like I used to do) so well just have to see where we end up!
xo,
s
Liz says
You’re both certainly pros at advertising/marketing and I’m sure you’ll have no problem scoring anything in the field – ya know, with this little ol’ blog and shout-outs from Oprah on your resume! ;)
YoungHouseLove says
Aw thanks Liz!
xo
s
Devon says
I’m sooooo excited your painting your cabinets a color! I’m itching to paint mine a dray I think- i live in a lofted condo with beigey 2- story walls and black granite countertops, neither of which are in the budget to replace anytime soon, and I think painting the cabinets will make all the difference! I might submit it for recommendations but I have a few other areas in need of help/budget so tbd. :)
sheryl says
Love it – looks terrific! Have you thought about replacing that window with a bigger window (garden window)? I guess I am assuming that your kitchen faces the back of the house which might make it more doable albeit at a cost….
YoungHouseLove says
I have seen some amazing kitchens with those double wide windows and loved the look, but we’re not sure if it would look right from the back of the house (there’s a big deck back there and the window as it’s sized right now seems to look nice and balanced) so we’ll have to see! No matter what we want to turn the big triple window by the eat-in area into french doors, so that should be an exciting update down the line!
xo
s
Kaija says
Nicely done! What a difference removing those cabinets made! That space above the fridge is so odd. I built a shelf there, where I keep a wine rack and some cookbooks, but all the things that end up on the top of the fridge cover it. Grrr.
Can’t wait to see the lighter color scheme in your kitchen!
P.S. Did I miss the “after” post on the master bath phase 1 with the vanity finished?
YoungHouseLove says
Nope, we’re still working on that (the floors are sealed and we loaded in the closet with some more function and style (finally!) but we have yet to touch the vanity! Haha! We’re all over the place, so we’re in the middle of our stair runner project too. Will report back on stuff as soon as we can!
xo
s
Kaija says
Woow, I had completely forgotten the stair runner! You guys are busy!!!
Ester says
All I could think when I saw the cabinet update above the fridge was secret nook! Hide something! Lol. Hidden nooks and crannies are the best things ever and it makes ur house really yours and special. Maybe a time capsule?? How cool would that be? If you guys stay in this house for the long haul how cool would it be to pull out a time capsule 10 or 20 years from now from when this house was still new to you, and Clara was only 3, and ur second babes wasn’t even born yet! So special
YoungHouseLove says
Love that! We’ll definitely hide something in the kitchen during Phase 2 I think (since we’ll eventually be replacing the cabinets) – we did that in our first house and it probably won’t be discovered for a few decades (the counters and cabinets would need to be removed to find it).
xo
s
Lauren says
I started laughing when I saw this post pop up. Yesterday, I convinced my husband to help me take down one scalloped piece of molding in the kitchen (over the sink, sound familiar?). That one job turned into: taking down the molding, raising three cabinets, and removing a cornice piece. :o) Great minds decided it was the weekend to work on kitchen Phase 1!
YoungHouseLove says
Haha! I love it!
xo
s
kwithme says
My project can of worms is our laundry room. 2.5 weeks ago we developed a leak in our washer. Turns out it is a small hole in the rubber gasket around the door. To complete the fix, the dryer needed to be unstacked. My husband and I did that yesterday as the repairman is supposed to be here today. Well… the room is much brighter without the dryer stacked in front of 3/4 of the window. And it would give me a folding surface. So, we figured we’ll try that out. If we like it, we have to install some shelves as there are two full Ikea Billy bookcases in there with our outerwear, cleaning supplies, extra towels and what not. So that will be a purchase and then I looked at the walls. 11 years, new appliances and 2 kids have not been kind to those walls. So, I got myself over to Sherwin Williams to pick up paint. But because I have been without laundry facilities for 2.5 weeks, I really want it back together ASAP. So, I am painting tomorrow. I just love that we managed to add about 7 hours of work and approx $400 (’cause we’ll probably put in a counter too) to the cost of this repair. *Sigh* this was not even in my top 10 of things I wanted to do to the house.
YoungHouseLove says
Oh man, sounds like a ton of work! Hope it’s amazing in the end though!
xo
s
Tammy J says
Looking great so far!
Allie says
I completely agree with the Sherry! Makes a difference and I am sure that in person it is a difference. What seems little makes the biggest impression. I have experienced that while renovating my home. Love the changes and watching the process. Love following your blog! It is part of my morning ritual :-)
Kaesey says
I think you’ve inspired me to tackle my rather old and drab kitchen. (My husband may not thank you any time soon, though!) Yet another wallpaper removal project for me……
YoungHouseLove says
Go Kaesey, go!
xo
s
Danielle says
Wow, your kitchen is the exact same layout as ours, minus the peninsula. I can’t wait to see what you do with it. We are also in the process of a Phase 1 makeover, but haven’t gotten around to replacing the fluorescent lighting yet. I see you guys also have the back-to-back pantry and garage doors that must bang into one another. We have a bifold door on our pantry, but I’m thinking a regular door might be better.
YoungHouseLove says
Yes, we don’t mind the regular door. Down the line I’d love to get one that’s frosted glass, but even for now this one has been great! I can see how a bifold one would feel like it stuck out/interfered more though.
xo
s
Emily @ Life on Food says
I cannot wait to see the shelves up. We have a similar blocked window problem and have debated about open shelving. Our problem is there is a L-shape and we would lose quite a bit of storage.
Emily Siler says
Can’t wait to see you fix that fluorescent lighting. We have slowly been renovating our outdated kitchen and thats first on our list after the holidays. Looking forward to see what you do with it!
Kat says
Ditto! Please please tell me what to do with my terrible flourescent lighting!
lizkayl says
We replaced the wax seal (and all the other gaskets while we were at it) on our guest toilet– because it was leaking water into the kitchen! No sign of water in the bathroom. Your tutorial and my uncle lead us to believe it wouldn’t be that bad.
We resorted, eventually, to a hack saw to get one very rusted bolt off. We ended up using a car jack to pry the toilet up. I managed to retrieve a screwdriver my husband had dropped down the pipe. The first time, we had the washers UNDER the toilet when we set it down. Raising it up ruined THAT seal (and we learned that the super reinforced one was a bit too thick, anyway). The tank bolt fell on the floor after we reattached the tank- rusted through. And the tank stopper stopped working, so we had to swap that out, too.
But, 4 hours, 3 hardware store runs, and an Arby’s trip later, the water was hooked back up and no apparent leaks, yet. We’ll give it a few days, then caulk.
YoungHouseLove says
Oh my gosh, that sounds harrowing! So glad you lived to tell the tale!
xo
s