Well, that can of worms is officially open. We’ve started making some changes in the kitchen. I realize this isn’t totally new news, since we removed the wallpaper in there a few weeks ago, but towards the end of last week we used that little jolt of momentum to start down the path of some more serious changes.
We still want to live in this house for a nice long time (and save up some money) before we take on our full kitchen reno – we’re still changing our minds daily about what configurations and countertop materials we’d like for the long haul – but this is officially the beginning of a series of what we hope to be pretty transformative “Phase 1” improvements so that we can enjoy this room and make the best of it in the meantime (you can read more about those Phase 1 updates and why we like them here).
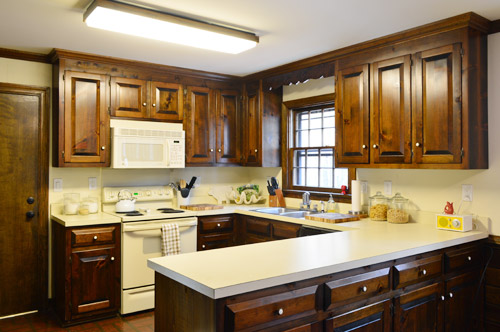
We had hoped getting the wallpaper out would make a greater aesthetic improvement on the space. But instead it just kinda underscored how brown, beige and blah everything is in there. The appliances, counters, and walls kinda wash together in color that certainly isn’t improved by the fluorescent light – while the dark cabinets, trim, and doors just feel looming and heavy in person. Our first course of action was something Sherry’s been ready to do since day one: remove some upper cabinets. Both of us miss the look and the functionality of the open shelves that we had in our last kitchen, so pretty much since move in day, Sherry has dreamed of swapping this long upper to the right of the window for some open shelves to lighten things up.
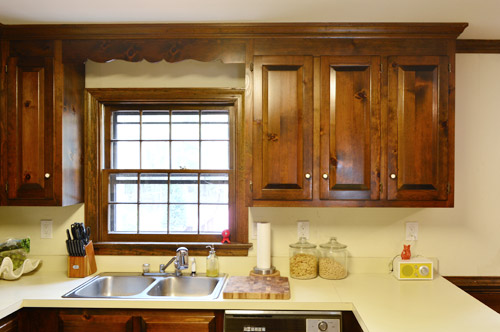
So Sherry unloaded everything that was in them (fortunately we’ve barely used the uppers flanking the microwave, so there was plenty of room for all of this displaced stuff), and then I could start demoing away. First I carefully pried off the crown molding with a crowbar (since I planned to reuse it) and then pounded at this header piece across the window with a rubber mallet.
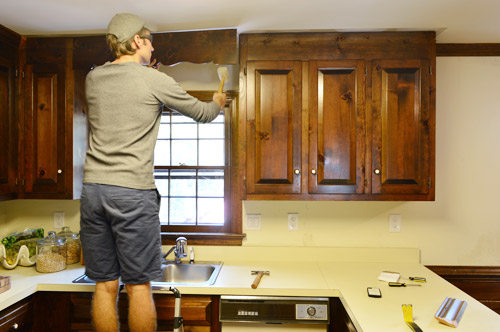
That was the easy part.
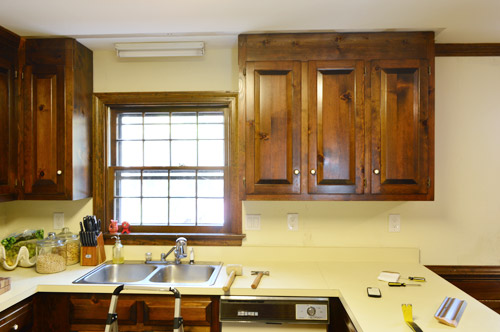
Taking the cabinet down was tougher than we anticipated. We figured it’d just call for removing a few screws like the last kitchen, but it turns out these cabinets were nailed in. So instead it took lots of prying and good ol’ fashioned jostling to free it from the wall. Since it was pretty heavy I took the doors off (so they weren’t flapping in my face the whole time) and I put a can of paint on the countertop to prevent it from crashing down directly on the counter when it eventually came loose. It also saved my foot from getting smashed.
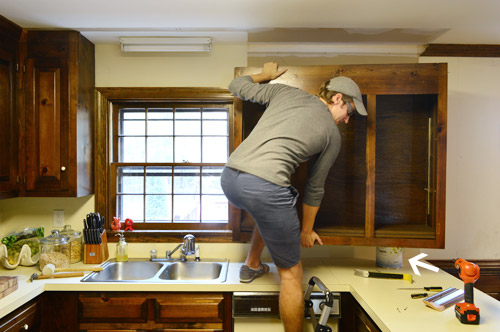
Despite some lack of paint behind it, we consider it an instant improvement. Especially when you’re sitting at the table on the other side of the kitchen. To have a clear shot of the window (which we’ll maintain with some open shelving) is really nice.
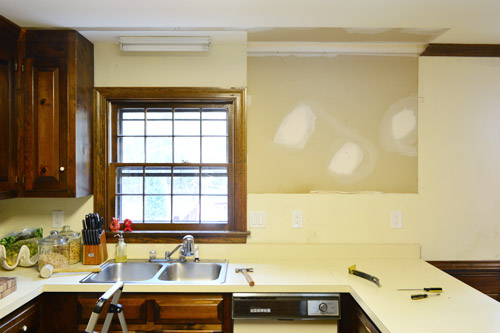
So much so, actually, that we decided to take down the small upper on the other side of the window too. We realized that would keep that wall looking more balanced and would let the window breathe visually.
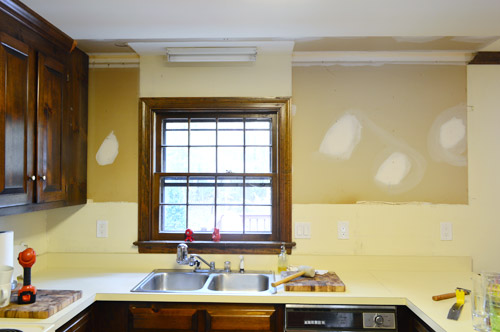
The plan will be to put a pair of floating shelves on either side of the window. We actually already own a set of long white Ikea Lack shelves for the right side (we purchased them about two years ago with plans to put them in our last home’s sunroom, but that idea fell by the wayside and we never even took the shrinkwrap off). And they sell a shorter version that will be perfect for the left side. So even though we’ve removed some cabinetry (which we plan to reuse in the garage) we won’t be losing lots of kitchen storage.
Before we hang those open shelves, we’ve got some painting (and priming) to do to those walls first. But with our cabinet mojo firing at full steam, we turned our attention 180 degrees to another cabinet issue. This utterly useless upper cabinet that was tucked waaaaay back behind the fridge.
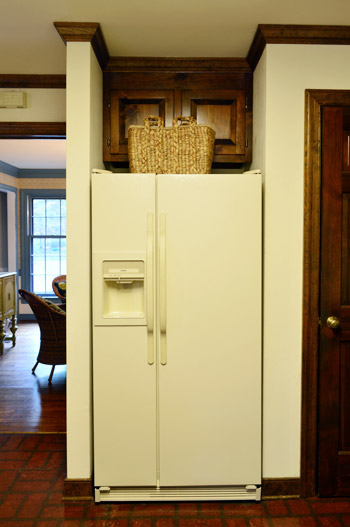
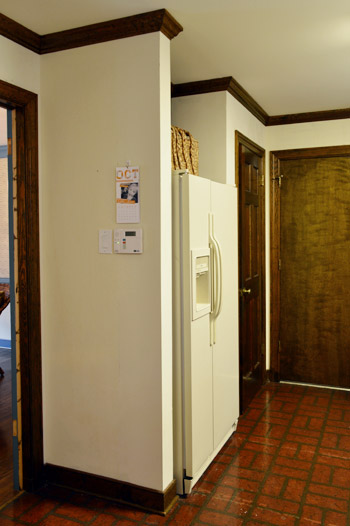
It was so far back that neither of us could reach it without a stool (and I’m a pretty tall guy, so that’s saying something), which is why we threw the basket up there as a lose attempt at disguising it. We wanted to move it forward to be flush with the wall so that it’d be reachable and make it look a bit more like the built-in fridges you see in modern kitchens. Like the other cabinets, I pried off the trim and shimmied its nails loose from the wall. Aaaaaaand then it got stuck.
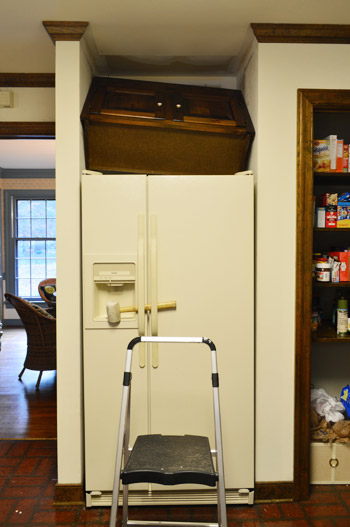
Turns out the wall narrows slightly as you come out and the cabinet was built-in quite snugly. But with a few more pulls (and a couple of drywall dents) it eventually came out. And happily, the dents were covered when we rehung the cabinet.
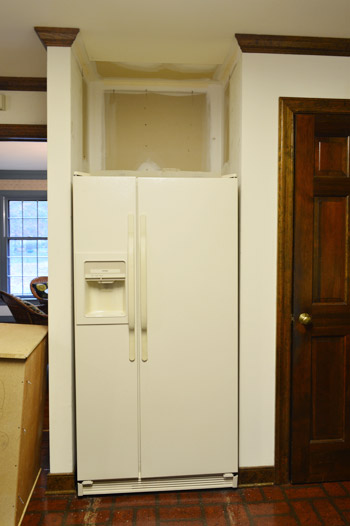
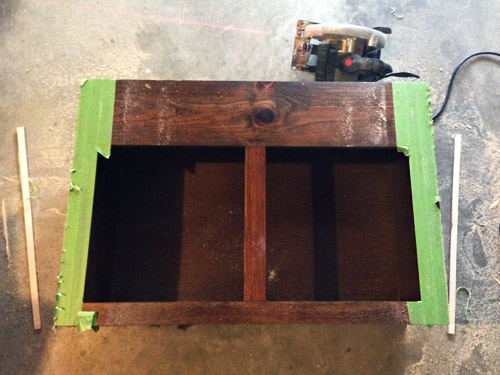
The snug fit alerted me to another problem though. Since the nook narrowed towards the front, I’d have to trim it before putting it back up to get a nice seamless fit. Fortunately the overlapping part is just the face of the cabinet, so it was easy enough to shave off a quarter of an inch on each side with my circular saw. I put tape down on the edges before cutting to help discourage the wood from chipping or scratching during sawing, which worked (the tape sort of shreds itself but protects the wood).
The other problem to solve was how to hang it. It previously had been nailed to the back wall, but now that we were looking to float it about 14″ away from the back, I decided to construct two simple braces out of 2 x 4″s. They were sort of U-shaped, with the short side pieces that would be screwed into studs on both side walls for stability. That gave me a nice, long, sturdy front board into which I could secure the cabinet with screws.
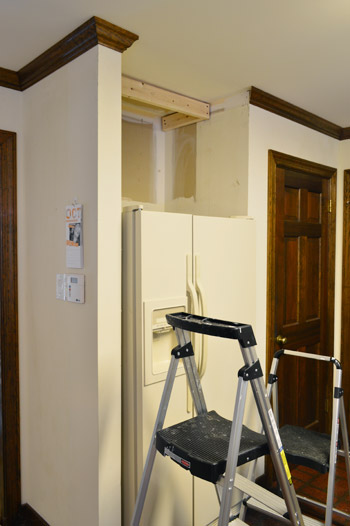
I made two braces – one for the top and one for the bottom of the cabinet – so you can see the bottom one wasn’t installed yet in the photo above. I was very very careful with my measurements during this step, because if I attached the braces too far forward or back, the cabinet wouldn’t sit flush to the wall. There was a lot of measuring three times before cutting once.
Thankfully my triple-checked measurements worked out great and the cabinet sat perfectly where we wanted it. I propped it up in place with some wood, checked that it was level, and then screwed through the back of it into the braces (being sure that my screws went through the thick framing of the cabinet, not just the thin, flimsy back panel).
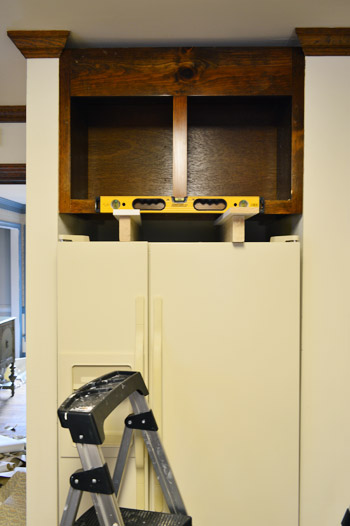
Not only did it look much nicer, but now we could actually put stuff in it. Functionality for the win! The last step in this project was reinstalling the crown molding – a careful process since I was matching existing cuts (of the pieces I didn’t take down) and because I didn’t have any spare pieces on hand- just the ones I had removed at the start of this project. So all it would take is one bad cut and I’d be, well, very angry at myself.
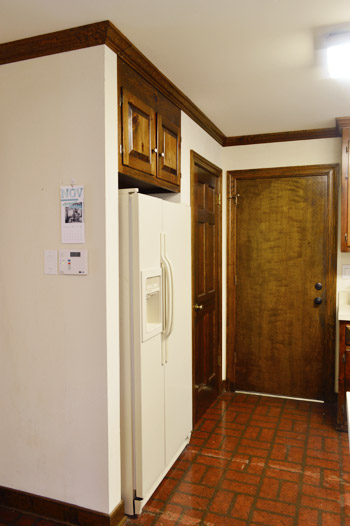
But it worked out well and I got those gaps filled. We’ll eventually be painting these, so I can do some caulk touch-ups then so they’re even more seamless in the long run. And man, it looks a whole lot better than the strange empty wall-hole-looking thing above the fridge that we started with:
I also hung the crown molding on the other side of the room so it goes all the way around again. This wall looks especially crazy right now, but with some paint and shelves and a pendant over the sink, we think it’ll be a huge improvement.
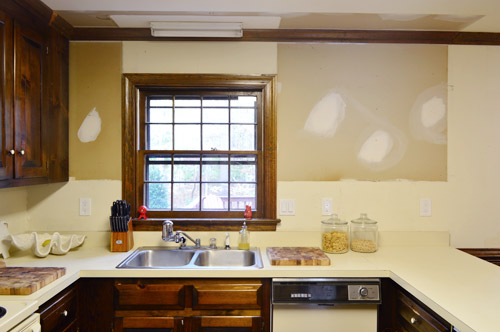
While I wouldn’t consider the space amazingly transformed yet (it’s far from that!) we think these first couple of changes are steps in the right direction. It’s hard to tell in the photos, but in person it already feels noticeably more open and less heavy.
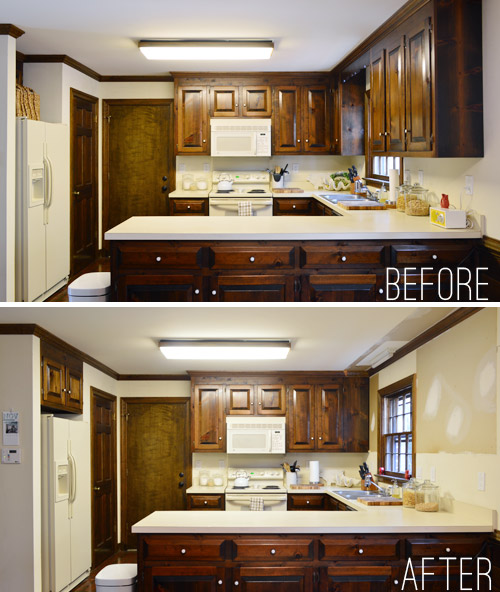
I felt kinda silly putting “After” on that photo above because it doesn’t really deserve that title yet. And actually, there are quite a few steps in this “Phase 1” kitchen makeover before we’re ready to call it done. So here’s our Phase 1 To-Do List as we’re currently envisioning it:
Remove wallpaperMove fridge cabinet forwardRemove upper cabinets on window wall to prep for open shelves
Reinstall crown molding- Paint pantry and garage doors
- Paint walls and ceiling
- Hang floating shelves on window wall
- Paint trim and paneling
- Possibly craigslist the existing microwave and get a countertop one (the we can put in the pantry?) and add a cheap range hood (we’ve seen some like this for $20 on craigslist) to lighten up that wall?
- Update or upgrade the old cabinet hinges and knobs
- Paint the cabinets
- Make solid back to the peninsula (the cabinet doors aren’t functional on that side, and we think it’ll be less busy with a sheet of beadboard or nicely framed out wooden look)
- Replace florescent lights (including the one over sink)
- Replace and center the light over table
- Get a rug for eat-in area? Possibly install peel and stick tiles everywhere?
- Curtains for windows?
Lots of bullets, huh? But thankfully almost every one of these steps will also be “paid forward” to Phase 2 (for example, painting the trim and walls and ceilings and doors and replacing lights will all be things we can carry into Phase 2 of the renovation down the road as well). So there aren’t very many things we’re doing just for Phase 1 that won’t come in handy for Phase 2 later. It’s sort of like the before is the first step on a staircase, and the major reno is the third step, and Phase 1 will just act as that second step to bridge the gap and bring us closer to a bigger transformation down the line (and make us smile in the meantime).
You can also see that there are a whole lot of question marks going on, but we have faith that if we just focus on the one-step-at-a-time approach we can figure things out as we go. Oh and one thing missing from that list is new appliances (except for possibly a tabletop microwave/inexpensive craigslist range hood) which is because as much as we don’t adore the creamy oven and fridge (and as much as we know they might interfere with the final look of Phase 1) we’re trying to be smart and hold off on getting new stuff ’til we’re ready to do a full reno because that way we can stay open to future options like a wall oven, or a gas range, or who knows what else.
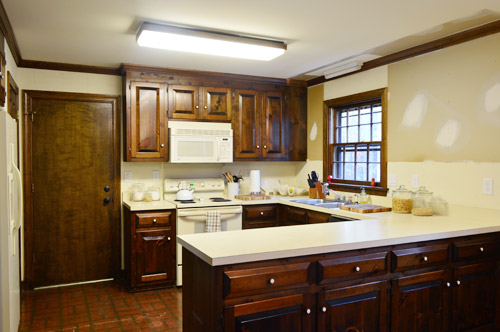
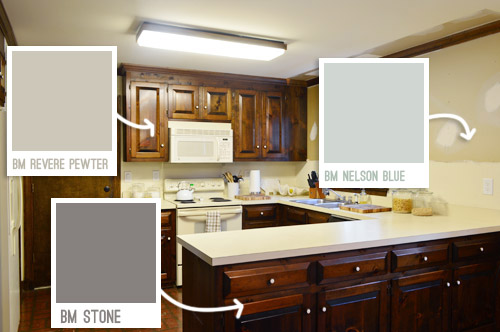
In addition to working around those appliances, we’re going to try to work with the off-white counters for this phase since we’ll likely reconfigure things in here down the line (so our final countertops will likely have different dimensions). Sherry has already brainstormed some colors that she thinks will lighten up the space while working with the existing counters and the cream appliances, and this time we’re not going to our default “paint the cabinets white” instinct!
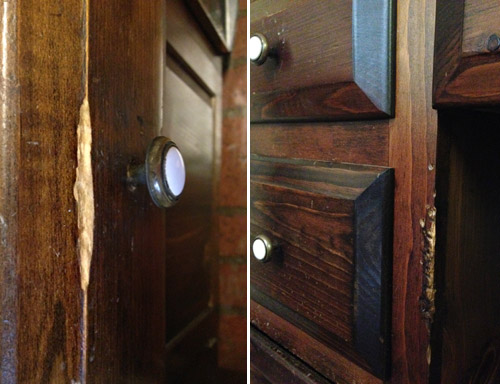
Speaking of replacing the cabinets – I know a few folks have wondered why we’re not going to permanently work with these guys. We’ve talked before about how not getting new cabinets was one in-hindsight regret of our last kitchen reno. But also, these cabinets aren’t in great shape when you get closer. There are so many chips and dents and scratches and gnaw marks (??) in both the doors/drawers and the cabinet frames themselves, that despite any amount of attempting to putty and sand them before painting, we don’t think they’ll ever look flawless (and even if we got new doors, the frames are still gnawed). But the good news is that I plan to repurpose them for a garage workshop, so they won’t go to waste – and painting them will not only allow us to enjoy them more in here before our bigger reno later, but it’ll also accomplish a nice clean look for the garage when we eventually use them out there.
The other question that comes up a lot is why we don’t try doing something with our fake brick floors, like painting them like Jenny did with hers. We would LOVE to be able to do that, but our floors are faux brick vinyl, not brick pavers – so they’re one solid vinyl sheet as opposed to a grouted stone-like material. And while we’ve seen some great tutorials from folks who have painted theirs, ours already scratch so easily that we’re pretty sure it’d be a lost cause. The top layer of vinyl is so old and crusty that it flakes off when we do things like roll the fridge out or move a chair too suddenly. Boo. Update: the plus side of this situation is that our house was built after asbestos was phased out, so we don’t believe there’s a risk for that with the flaking floor – just extreme ugliness.
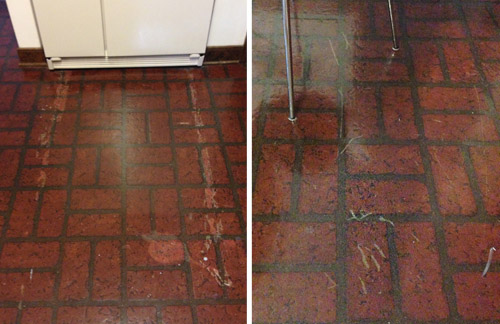
So if we really can’t take them any longer, we’ll probably do some cheap peel-and-stick tiles over them like we did for Phase 1 in our first kitchen (it took us about a day and ran us $100 but we were so happy about the difference they made for the year or so before we could afford our major kitchen reno in there).
Has anyone else opened up a can of project worms lately? Sherry’s crazy excited about it, but I’ll admit that I didn’t quite realize that taking down a few cabinets would result in a page long to-do list (silly me, after seven years of this I should know that by now). But as much as I’m bracing myself for all of the work that we’re about to dive into (priming and painting all of that trim, woodwork, and cabinetry is going to take a while), I’m kinda relieved just to be doing something instead of groaning every time that we walk into the room. Bring it on kitchen!

Mandy says
Love the changes you have made so far but I am wondering if you don’t need that much cabinet space why put up shelves at all?
I think it looks lovely and open without anything around the window.
looking forward to seeing what you do!
YoungHouseLove says
We just loved having our everyday dishes and bowls out on the shelves (so easy to unload the dishwasher!) so we’re looking forward to that easy access instead of having them tucked behind doors. Can you tell we’re lazy?! Haha!
xo
s
Megan Shontz says
You’ll LOVE the painted non-white cabinets. We moved into our new house over a year ago and the entire kitchen was 1980’s oak: cabinets, floors, and even our kitchen table and chairs! We followed your post for painting your H2 cabinets and we used BMs Seattle Mist, which is a soft light grey color. Whoa! What a difference! It was a lot of work, but SO worth it. Now, if I could just get rid of those darn soffits…
YoungHouseLove says
Sounds gorgeous!
xo
s
Casey says
Hi, guys! My husband and I moved in to our house on April 29th, I think it was the same day you guys announced you bought this house! Our house is a fraternal twin to yours… Similar look on outside and same quirks on the inside. We had wooden trim everywhere, wallpaper, and even had that same faux brick vinyl floor in the kitchen. We just addressed the floor last week and installed cork floors like y’all did in your last house. We love them! I was so glad to see all of that dated 80s pattern disappear. And I do have to say that once the new flooring went down the weird older house/Grandparent smell disappeared with it. Hooray! Progress in kitchens! Can’t wait to see what you do in there! Congrats on your little bun!
YoungHouseLove says
That’s so awesome! We fondly remember our cork floors. So glad you have them a spin!
xo
s
Whim&Pearl says
Looks better already – I can’t believe the original cabinet was back so much farther than the frig. I can’t wait to see the paint colors in there.
EM says
Totally with you on getting rid of the vinyl floor. http://www.scientificamerican.com/article.cfm?id=link-between-autism-and-vinyl
YoungHouseLove says
Wow, never heard that!
xo
s
Ellen says
I truly love your ‘phases’ approach to home updates. You guys have inspired several little projects around our home that have made a huge impact without requiring a massive reno. In some cases, we may not ever fully renovate (our kitchen cabinets aren’t my favourite, but they aren’t terrible and there are other $$ priorities), but little tweaks like removing cupboard doors have gone a long way. On the flip side, it was partly your discussions about cost/value/time that helped us decide to just do the flooring in our upstairs properly, rather than fill in with a temporary solution. I am SO glad that is done!
YoungHouseLove says
Congrats Ellen! Sounds awesome!
xo
s
deb molstad says
might not hurt to test that floor for asbestos…looks suspicious
great work on cabinets. every little step is satisfying ;)…
YoungHouseLove says
Thanks Deb! Will do!
xo
s
SJ says
I love the wood trim in your kitchen/living room. It seems from the past, it’s not your thing, but I will be sad to see it go (which I’m assuming will happen)! I’ve spent over a year restoring the original wood trim in my house & it’s definitely a job.
YoungHouseLove says
I totally respect that! Such hard work!
xo
s
Shelley says
Hi guys! I think this is only my second time to comment in 3 years of reading daily, but I was excited to see that you’re considering paint colors for your cabinets that are very similar to what we did in our kitchen a few years ago. Hope it might be helpful to see! I did Revere Pewter on the top and Gauntlet Grey on the bottom:
http://texbamababy.blogspot.com/2010/09/b-kitchen.html
YoungHouseLove says
So pretty! I love it!
xo
s
Sarah says
Love the colors you chose for the cabinets as I have been bouncing the idea around in my head to paint our kitchen cabinets those same colors much to my husband’s chagrin. Hoping you could settle debate regarding the trim and door color in a room with painted cabinets. Would you paint them the color of the cabinets, paint them white, or leave them the stained wood color? We have wood floors in the kitchen as well as oak cabinets and stained trim and doors although front entry and hall doors and trim are white (gotta love inheriting mismatched finishes).
YoungHouseLove says
That’s a toughie! I think we’d do the trim white like the doors and then any crown that’s attached to the top of cabinets would get that cabinet’s color (but the crown over by the breakfast area, for example, would still be white like the trim and doors).
xo
s
Cheryl says
Not sure you’d want to take this on but apparently you can chalk paint over vinyl flooring. Heres a tutorial on how the store near me chalk painted over tile. In her article she mentions that you can also chalk paint over vinyl flooring and even laminate countertops. This store, Fabulous Finishes, is about 15 minutes from me. The owner I a fabulous, talented resource. Her blog and website is full of tips about chalk painting just about everything and she talks about the pros and cons of the various chalk paint she sells as well as the various top coats available. Lots of photos, tutorials, etc. Here’s the website: fabulousfinishes.wordpress.com
And here’s the tutorial on how she chalk painted a tile entry, though I know your kitchen floor is vinyl, I’m sure if you called her or researched her website you’d find tips for painting the floor if you so choose.
http://fabulousfinishes.wordpress.com/2013/07/14/yes-we-painted-that-tile-you-just-walked-in-on-shout-out-to-chalkclay-paint-lovers/
I am in no way affiliated with this company but I have visited the store and have used chalk paint on a desk, chair and headboard. I had no idea you can use chalk paint on just about everything. The good news its toxin free!
At any rate, thought this info would be helpful to you or your readers. In the meantime, love what you’ve done so far. Just removing those cabinets opened the space up. You guys rock! Totally enjoying this new adventure of yours! :)
YoungHouseLove says
Thanks Cheryl! I wouldn’t doubt that it would more on most vinyl flooring, but since ours is literally flaking apart we can’t see how a chair wouldn’t scratch it off with paint on it (since it currently scratches it off without paint on it). But I’m off to check out that tutorial since it sounds useful to know for other instances though!
xo
s
Kat says
Just a tip – if you add a hood, don’t bother with the non-vented ones. We have a non-vented hood and it accomplishes nothing. It just spits back food-cooking-smells into the kitchen a few feet above where those smells originated. But, if your garage is on the other side of your range-wall, could you vent it out there? That’s what we’re thinking of doing, but I haven’t really looked into it.
P.S. I love your blog! I’ve been a dedicated (daily) reader for about two years now. You guys are awesome!
YoungHouseLove says
Thanks so much for the tip Kat!
xo
s
Megan says
Nice work! We have the same awkward mini cabinet above fridge! Except we don’t have the skinny wall on the left side like you do- our fridge sits right up against bottom cabinets, and the top cabinet floats awkwardly above- so I don’t think your solution would work for us… but I’m inspired to figure something out!
Jess says
I’m loving the changes you’ve made to your kitchen. I’m really excited to see the paint colors actually on your cabinets – I think that will make a huge difference in that space.
As for my project can of worms, my husband and I recently had our buck stove insert pulled out so that we could update the tile surround and add tile to the concrete raised hearth. Once we had the stove pulled we decided that the new tile was way too pretty to put the old ugly (brass and wood adorned) stove back. So instead we purchashed a new stove insert. As much as I hated to pay for a new one, it was definitely worth it in the end. Our fireplace looks great and the new insert is a lot more efficient than our old one!
YoungHouseLove says
Sounds awesome Jess!
xo
s
Barbara says
You might already know this, but they make appliance spray paint, a cheap fix for phase 1? I used it before and it worked well.
YoungHouseLove says
Thanks for the tip Barbara! We even mentioned that in our book but forgot all about it!
xo
s
Katrina says
We had that same brick linoleum in the kitchen of our first house and we discovered hardwood flooring underneath! We pulled the linoleum up and then had a pro come and look at it to see if it could be salvaged (so much glue) – getting those floors clean up was the best money we spent on that kitchen!
I just bought a dining room light to replace our current 1980s version, starting the domino effect of paint and curtain selection. I’m struggling with paint color choices – our living room and dining room are the two room in our downstairs that could be painted a different color than the rest, but I’m not sure if that will look weird since most of the rooms downstairs are pretty open to each other.
YoungHouseLove says
You’re so lucky! I wish there was wood under ours. It’s just subfloor :(
xo
s
Leslie says
What are you going to replace the florescent lights with? I’m needing ideas for the hideous florescent lights in my own kitchen.
YoungHouseLove says
I think just some overhead fixture like a semi-flush drum pendant or something else we can easily walk under but not as heavy/rectangular. Will keep you posted!
xo
s
qs777 says
I have not read all of the comments; however, I wanted to chime in re: floors.
While the house may have been built after asbestos was outlawed, I believe builders/contractors were still allowed to use up existing inventory so your floors may still have asbestos in them. Sorry to be Debbie Downer (no offense to Debbies) but better safe than sorry. Love the changes so far!
YoungHouseLove says
Thanks for the tip! Before we rip them out and send anything flying we’ll be sure to get them tested and share our findings with you guys!
xo
s
Shannon [Our Home Notebook] says
I love that you are removing some upper cupboards to make room for open shelving. I so want to do that in our kitchen. Ours are all built together though, not separate units so to take any down I’d have to take them all (but we still need some for concealed storage). So I’m tucking that idea away for a more major kitchen overhaul down the road when we can go for new cupboards, etc. In the meantime I’m so excited to see how yours turns out!
Sophie says
Oh man, Nelson Blue is one of my all time FAVOURITE colours! It’s crazy that I’m this excited over someone else’s kitchen…
YoungHouseLove says
So glad to hear that!
xo
s
Sandy says
Hi John and Sherry,
Isn’t it fun to get your vision for the kitchen started. Looking good, so far!
Just a heads up on the asbestos issue. You may want to have the floors tested anyway. Last year we did some work on our kitchen floors and even though our house was built after asbestos had supposedly been phased out, our vinyl floors had asbestos! Ughh. Turns out that builders could still get their hands on rolls of old sheet vinyl and install it even after the phase out!!!
YoungHouseLove says
Ack! Thanks for the tip!
xo
s
s says
The most recent LACK shelves I bought had different mounting brackets from the previous ones I owned; they have a bracket that the shelf sort of hooks onto, versus the old brackets with the poles that fit into holes in the shelves. I don’t think the new ones seem all that sturdy compared to the old ones. I’m nervous to use them in any place that I actually want to be able to load them up. I hope they’ll work for you in your kitchen!
YoungHouseLove says
Oh no! Thanks S! Since we have the long ones leftover from a few years back they might have the old hardware, but the small ones for the corner will probably be the new method, so we’ll have to report back on how it goes!
xo
s
s says
The smaller ones may not be such an issue (since they can’t hold as much just because of their size. I love floating shelves and wish they hadn’t changed the LACK ones! Good luck!
Megan says
LOVE your color choices and bravery to venture beyond your beloved white! I picked a similar color for my kids bathroom vanity… just not sure I have the guts to paint it yet. Something about painting over new/perfect condition (non-oak!) wood makes me second guess myself!
Do you feel open shelving is a pain to maintain? Meaning, the dusting/keeping things orderly? As much as I love the look (and have it in my living room)… the kitchen just seems too chaotic to have anything “extra” to clean and keep neat. Plus, those extra drawers/cabinets come in handy for art supplies and color books!
YoungHouseLove says
I worried that we’d hate open shelving but it was awesome! I mean, we just used it for everyday dishes we rotated in and out so quickly that they never got dusty, and the shelves themselves just got dusted when we dust other flat surfaces in the house (like console tables, the counters, etc) so it wasn’t a big deal. The funny thing is that even though they were a small added area to dust, they made unloading the dishwash so crazy fast, so I bet they saved us time in the long run. They’re definitely not for everyone, but for us we loved them.
xo
s
Megan says
Thanks for the info on open shelving… I NEVER thought the function/time aspect would be so practical. My computer is acting up, so ignore my second post with pretty much the same comments! Ha! I am on Day 2 of Operation re-stain the fence… and as much as I appreciate a mindless task, I clearly am a tad anxious! :-)
YoungHouseLove says
Aw thanks Megan! Good luck with that fence!
xo
s
Laurie says
Hi guys! Ever think of doing an L shaped banquette along the peninsula? The peninsula would serve as the back of one of the benches. My kitchen had the same U layout as yours (though smaller, didn’t even have room for the dishwasher next to the sink. It was at the end of the peninsula. Weird.) But a U-shape kitchen wasn’t my dream kitchen. I now have no peninsula and an island, and I like it, but I kind of wish I would have just pushed the peninsula out a bit so the kitchen was a bit bigger and then have a cozy banquette.
YoungHouseLove says
We did think about that but plan to make those windows in the breakfast area into french doors that lead out to the deck (we love the idea of entertaining in the warmer months with some people sitting inside and others just outside at a table out there) so we don’t think a banquette would work. Sounds really charming though!
xo
s
Kate says
Can I ask when your house was built? If you have had lead issues, I would be surprised if asbestos wasn’t a concern. They began phase out at the same general time frame, but production of asbestos flooring was allowed to continue for a while afterwards. (Sorry, this is what I do for a living, so I am particular. ;) )
YoungHouseLove says
It’s a very early eighties home. We only had lead in those antique built-ins in the dining room (they pre-date the house, but were added to the corner of the room after being purchased through an antiques vendor, we believe) so there’s not lead paint or anything in the house’s trim/doors/walls themselves (it had been phased out as well).
xo
s
jenn says
love the colours you guys chose for phase 1. cant wait!!
did you see what daniel from manhattan nest did to his apartment floors?
http://manhattan-nest.com/2013/04/17/the-kitchen-has-a-new-floor/
probably a bit more time consuming than peel and stick tiles but definitely seems like something you could re use after.
YoungHouseLove says
Oh yes, I love that post! The story about the rug and the guy selling it are hilarious to me!
xo
s
Avone says
I have a corner cabinet configuration similar to what you have going on to the left of the window. I eventually plan to take down the entire wall into the living room (what would be your deck, I think)…anyway..I was afraid I’d have just a huge empty cabinet box behind the cabinet that I removed. Glad to see you guys have a panel there. I hope mine is the same! *runs to find crowbar*
YoungHouseLove says
Haha, good luck Avone!
xo
s
Megan says
LOVE the progress, especially the paint colors (and your bravery to skip your beloved white!!!). What a great way to tide you over until a complete reno can be done. My only quesion is why you would waste the time/money to do things like update hinges and knobs? That stuff is a project all its own… and definitely adds up. Perhaps John wants an uber stylish garage??? :-)
Oh, and I would also skip the hood idea… I think the wall will feel way less heavy once your painting is done. Just my two cents!
YoungHouseLove says
I think sometimes stopping short of those small details in a Phase 1 makeover can take away from the bigger stuff that took way longer (after all the trouble of painting the cabinets and the walls and the trim, we think “why not just spend a half-hour spray painting the hinges/knobs with one $6 spray paint can?”). But who knows, maybe we’ll get there and they’ll look fine and we’ll leave them alone!
xo
s
Dominique Paolini says
I would have never thought to move that cabinet over the fridge forward. You two are brilliant!
LeslieP says
I would hazard a guess that changing out the lighting will have a very dramatic effect on the look of the kitchen, even more than cabinet removal.
Lisa says
WHAAATT??? Microwave in the pantry? I am sending you guys a huge virtual hug from Colorado… This is a fantastic idea, and I totally think I’m going to do it. Oh goodness, this solves one of my humungo huge problems in my kitchen. You guys are the bees’ knees. :)
YoungHouseLove says
Haha! We keep seeing that in open houses and stuff, so as long as it’s ventilated and there’s a plug in there it seems safe (obviously leave the door open when it’s in use).
xo
s
Emily says
I’ve never understood why the above-the-fridge cabinet is always hung so far back in standard homes. It just doesn’t make any sense!
Jenn says
I had the same kitchen layout and removed my uppers around the sink just like you did. Amazing difference in the light in the room and I love the ease and look and ease of use with open shelving! We are further along in our reno (changed cabinets and countertops and layout, removed a wall) but we waited a full year to live with the original layout before committing to a full gut-job. If you scroll to the end of the post you can see the wall without cabinets, but we basically re-used some old ikea shelves on either side of the sink as well, cutting some in half for the small side.
http://culdesaclife.com/2013/10/09/baby-steps-and-the-big-kitchen-list/
YoungHouseLove says
That’s awesome Jenn!
xo
s
Laurie says
If your house was built close to the asbestos cut-off, you may still have asbestos issue. Mine was built just after but they must have used older materials or ignored regulations because my kitchen linoleum was “hot” and had to be extracted.
Moving the heavy cabinets away from the window does improve it a lot! I did the same thing when I remodeled my kitchen and it does help lighten up the space.
That is going to be a fun kitchen to re-do. It’s a good space and everything you do to it will be such a dramatic change. How fun!
YoungHouseLove says
Thanks for the tip Laurie! We’re convinced we should test it just to be sure before we do anything like rip it out, so we’ll cross our fingers for clean results!
xo
s
Kate Craig says
love the pewter color for the cabinets! And wow, that floor is soooo bad! :(
Bren says
I notice the garage door is different from the pantry door, do any of the doors you removed in the entry/living room areas fit that space? If so, that would be awesome. Crossing fingers.
YoungHouseLove says
Ooh I like that idea! Although I don’t know if there’s a safety thing about that garage door (ex: if it has a steel inside to make it fireproof). It really just looks wooden and solid though, so maybe I could switch it out…
xo
s
Catherine says
Hello from Australia! I love the difference this makes and I’m so inspired to try removing three uppers in my kitchen. Hooray for you!! One Q, though — the three paint colours you’re considering look like the two on the left have a green undertone and the one on the right has a blue undertone. Is that right or is it just the way it looks online? Maria Killiam (mariakillam.com) talks about this a lot on her site and she’s convinced me that the undertones all need to be the same or the colours never look quite right together. Of course I learned this AFTER I made a big mistake with miles of gorgeous wool carpet and a paint colour that had a different undertone! I could never figure out why the room bugged me so much. Do you guys use the principle of undertones when you choose paint colours to ‘live together’ in a room? Thanks!
YoungHouseLove says
I think it could just be the picture (in real life all of the swatches look nice together, even with the cream counter when I toss them down on there) so I usually just use the “eye it in your own lighting situation” test and then if I’m still unsure I’ll get a little test pot of paint to check things out.
xo
s
Kristin says
Just as an FYI – we have our microwave in our pantry, and it works fabulously! Love that it is out of sight but still very accessible. We already had an outlet in there for some reason (it’s not a walk-in pantry, FYI, just two bifold doors), so we went with it. We keep our toaster and toaster oven in there too, though we pull the toaster out to use it on the countertop. No issues w/ the toaster oven and heat though. You can’t see the microwave here but in the last image, the bottom right inset photo is of our pantry doors (painted w/ chalkboard paint) and there’s a layout shown, as well, so you can see that it’s just a “double wide” closet. http://sepia-tone-lovin.blogspot.com/2013/05/finally-kitchen-reveal.html
YoungHouseLove says
That’s awesome! I love to hear that!
xo
s
Shary says
I’m so excited to see the colors you are choosing for the cabinets! We just did phase 1 of our kitchen reno. Our kitchen has the same layout as yours. We had cabinets over the peninsula and a drop ceiling. We removed the cabinets, drop ceiling and florescent lights. Added can lights and pendants and painted the walls BM Palladian Blue. We have the same color appliances and was wondering what to do for paint colors. I also just convinced hubby to do darker lower cabinets. Will you do just the outside of the lower in the Stone or all the lower cabinets?
YoungHouseLove says
I think we’ll do all lowers in stone and all uppers in Revere Pewter.
xo
s
kellyJo says
I am so glad you guys are diving into the kitchen! Mine is incredibly similar to yours – flourescent lights over the kitchen and window? check. Dark outdated cabinets? check. We only differ in that my floors are already done, but I’m a step behind in that I have some horrible soffets I need to remove. I am SO excited for your Phase One ideas. Bring it on!
Kristin says
My husband and I love the open shelf concept! Your window looks fantastic with the cupboards gone. We are going to put shelves up around our window but still debating on which kind to use. What is your opinion on the ikea shelves? We were concerned about the weight of our dishes. Should we “ikea it up” or build them ourselves?!
YoungHouseLove says
We had three giant 72″ ones in our first house’s dining room for years and they were awesomely sturdy (with tons of dishes and plates and cups and mugs and frames on them) so we’ve had a good experience with them!
xo
s
Helen - myliladventures says
Great tip on the paint can underneath the upper cabinet prior to removal! Sheer genius! (glad your feet aren’t crushed nor your counter damaged)
Shannon Riley says
I have this exact faux brick linoleum in my kitchen! OMG! It’s horrible! My house was built in 1953. Guess it was popular back in the day?!
Your kitchen is starting to take shape, though! Can’t wait to see the finished product.
Elizabeth L. says
I can’t WAIT to see what y’all do with the kitchen. The house that my husband and I are in the process of buying has an identical layout even the double sided cabinet peninsula! So this post is already starting to turn the renovating wheels in my head!
Morgan Lewis says
Have yall ever tried tricks to make appliances look like stainless when they are not (cover roll, stainless steel paint, etc.)? I’m interested in doing this myself since we cannot afford to replace the black fridge in the home we just bought (first home, yay!) but since we can’t replace it if it goes wrong, I’m nervous to venture into that project!
YoungHouseLove says
We haven’t tried that yet. Anyone else have experience with it? Is it convincing or does it look streaky and fake? I’d love to hear!
xo
s
sarah m. dorsey designs says
ooh looks SO good already!! It’s amazing how removing those upper cabinets makes it look so much more open!
Chris says
7 years after moving in, we FINALLY laid down some vinyl plank flooring and started repainting in our kitchen. The floor, in a faux oak plank, makes such a HUGE difference in our tiny galley kitchen over the old fake linoleum tile that was in there. We’re painting the lower cabinets BM Kendall Charcoal and the uppers BM White Dove. Changing out the small nasty cabinet next to the stove for a bakers rack gives it a new look too. It feels so rich and NYC now – I barely notice the lack of dishwasher! :)
YoungHouseLove says
Sounds awesome Chris!
xo
s
Michelle @ A Healthy Mrs says
Wow, it already looks so much lighter in there without those uppers! Can’t wait to see what’s next!
Stefanie says
Aack! Where are the photoshop renderings of your next steps?! You got me hooked with your recent updates and now I have to use my imagination!? Too much work on a Monday ;-)
YoungHouseLove says
Haha! That sounds like fun! Maybe as we go we can work some of those in there!
xo
s
Devon says
Have you guys ever considered buying new doors in a style and color you want and painting the frames to match? It seems a lot easier!
YoungHouseLove says
Yes, we actually would consider that but the frames are gnawed as well, so even if we bought new doors the frames aren’t in great shape and would probably always bug us in a few places.
xo
s