Well, that can of worms is officially open. We’ve started making some changes in the kitchen. I realize this isn’t totally new news, since we removed the wallpaper in there a few weeks ago, but towards the end of last week we used that little jolt of momentum to start down the path of some more serious changes.
We still want to live in this house for a nice long time (and save up some money) before we take on our full kitchen reno – we’re still changing our minds daily about what configurations and countertop materials we’d like for the long haul – but this is officially the beginning of a series of what we hope to be pretty transformative “Phase 1” improvements so that we can enjoy this room and make the best of it in the meantime (you can read more about those Phase 1 updates and why we like them here).
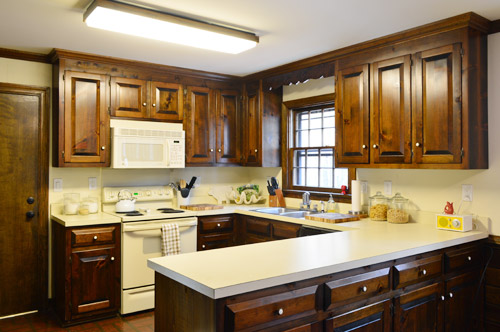
We had hoped getting the wallpaper out would make a greater aesthetic improvement on the space. But instead it just kinda underscored how brown, beige and blah everything is in there. The appliances, counters, and walls kinda wash together in color that certainly isn’t improved by the fluorescent light – while the dark cabinets, trim, and doors just feel looming and heavy in person. Our first course of action was something Sherry’s been ready to do since day one: remove some upper cabinets. Both of us miss the look and the functionality of the open shelves that we had in our last kitchen, so pretty much since move in day, Sherry has dreamed of swapping this long upper to the right of the window for some open shelves to lighten things up.
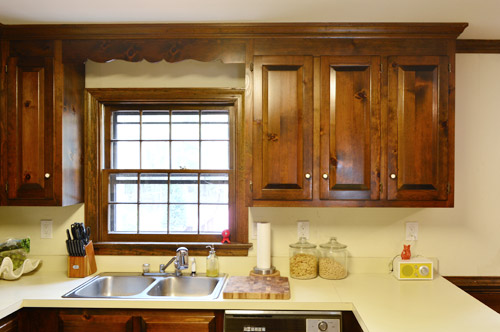
So Sherry unloaded everything that was in them (fortunately we’ve barely used the uppers flanking the microwave, so there was plenty of room for all of this displaced stuff), and then I could start demoing away. First I carefully pried off the crown molding with a crowbar (since I planned to reuse it) and then pounded at this header piece across the window with a rubber mallet.
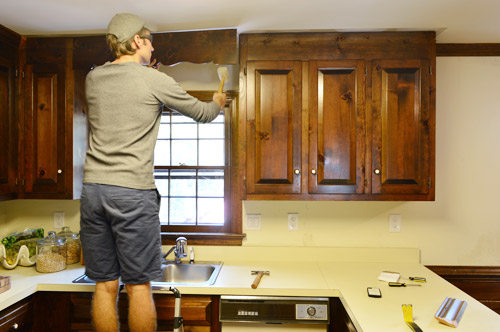
That was the easy part.
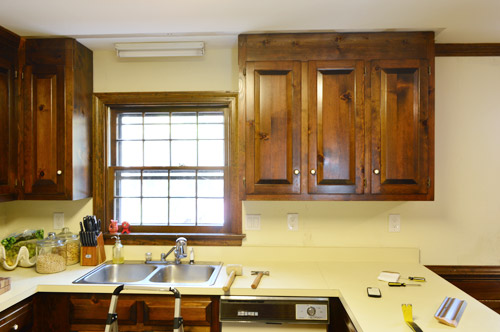
Taking the cabinet down was tougher than we anticipated. We figured it’d just call for removing a few screws like the last kitchen, but it turns out these cabinets were nailed in. So instead it took lots of prying and good ol’ fashioned jostling to free it from the wall. Since it was pretty heavy I took the doors off (so they weren’t flapping in my face the whole time) and I put a can of paint on the countertop to prevent it from crashing down directly on the counter when it eventually came loose. It also saved my foot from getting smashed.
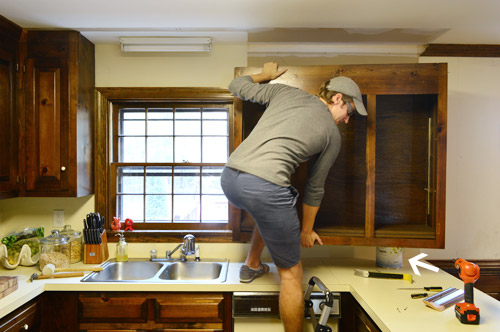
Despite some lack of paint behind it, we consider it an instant improvement. Especially when you’re sitting at the table on the other side of the kitchen. To have a clear shot of the window (which we’ll maintain with some open shelving) is really nice.
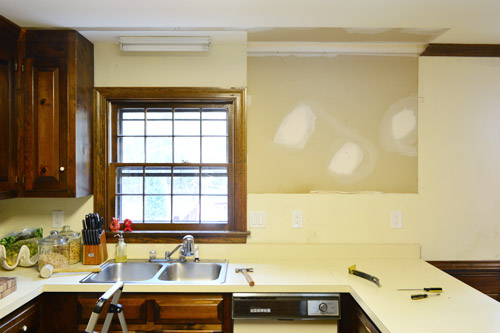
So much so, actually, that we decided to take down the small upper on the other side of the window too. We realized that would keep that wall looking more balanced and would let the window breathe visually.
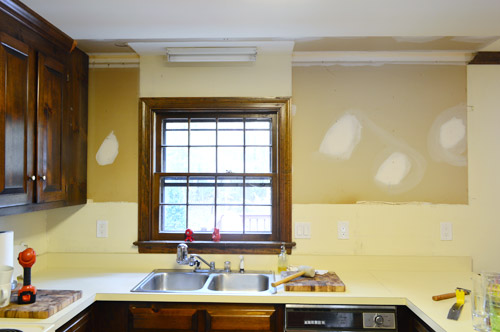
The plan will be to put a pair of floating shelves on either side of the window. We actually already own a set of long white Ikea Lack shelves for the right side (we purchased them about two years ago with plans to put them in our last home’s sunroom, but that idea fell by the wayside and we never even took the shrinkwrap off). And they sell a shorter version that will be perfect for the left side. So even though we’ve removed some cabinetry (which we plan to reuse in the garage) we won’t be losing lots of kitchen storage.
Before we hang those open shelves, we’ve got some painting (and priming) to do to those walls first. But with our cabinet mojo firing at full steam, we turned our attention 180 degrees to another cabinet issue. This utterly useless upper cabinet that was tucked waaaaay back behind the fridge.
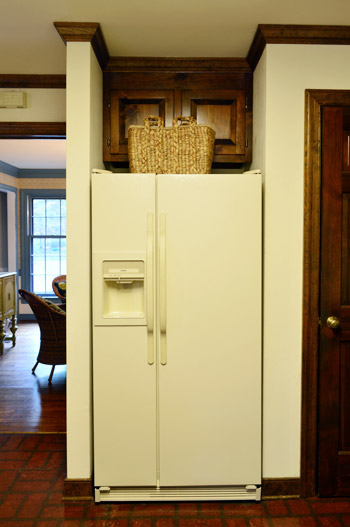
It was so far back that neither of us could reach it without a stool (and I’m a pretty tall guy, so that’s saying something), which is why we threw the basket up there as a lose attempt at disguising it. We wanted to move it forward to be flush with the wall so that it’d be reachable and make it look a bit more like the built-in fridges you see in modern kitchens. Like the other cabinets, I pried off the trim and shimmied its nails loose from the wall. Aaaaaaand then it got stuck.
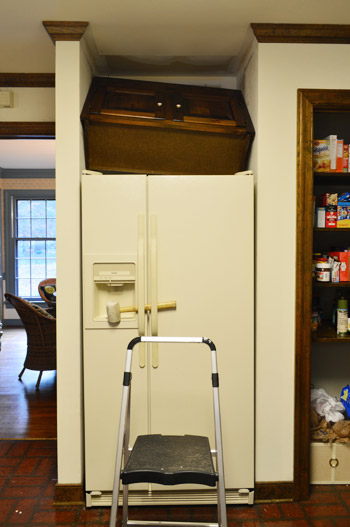
Turns out the wall narrows slightly as you come out and the cabinet was built-in quite snugly. But with a few more pulls (and a couple of drywall dents) it eventually came out. And happily, the dents were covered when we rehung the cabinet.
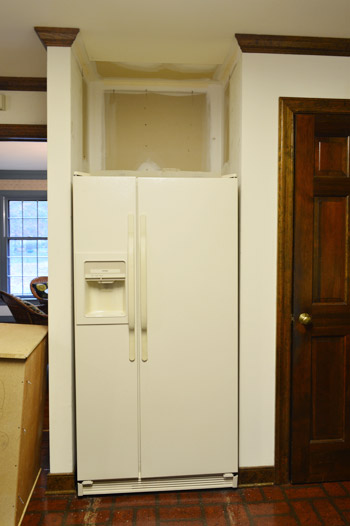
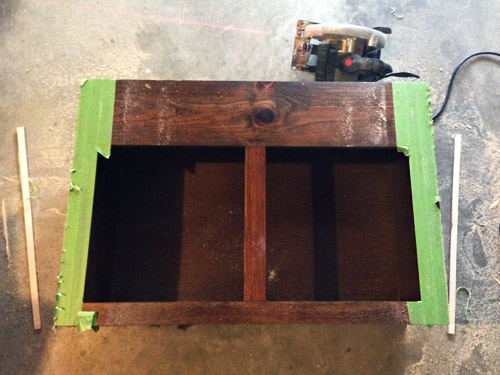
The snug fit alerted me to another problem though. Since the nook narrowed towards the front, I’d have to trim it before putting it back up to get a nice seamless fit. Fortunately the overlapping part is just the face of the cabinet, so it was easy enough to shave off a quarter of an inch on each side with my circular saw. I put tape down on the edges before cutting to help discourage the wood from chipping or scratching during sawing, which worked (the tape sort of shreds itself but protects the wood).
The other problem to solve was how to hang it. It previously had been nailed to the back wall, but now that we were looking to float it about 14″ away from the back, I decided to construct two simple braces out of 2 x 4″s. They were sort of U-shaped, with the short side pieces that would be screwed into studs on both side walls for stability. That gave me a nice, long, sturdy front board into which I could secure the cabinet with screws.
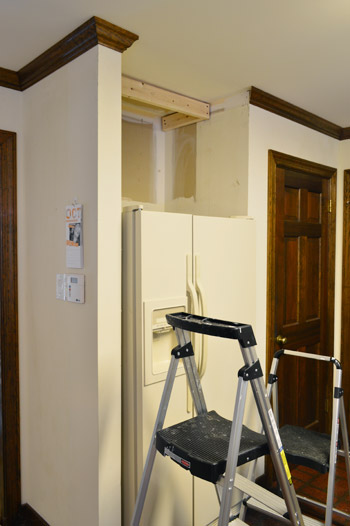
I made two braces – one for the top and one for the bottom of the cabinet – so you can see the bottom one wasn’t installed yet in the photo above. I was very very careful with my measurements during this step, because if I attached the braces too far forward or back, the cabinet wouldn’t sit flush to the wall. There was a lot of measuring three times before cutting once.
Thankfully my triple-checked measurements worked out great and the cabinet sat perfectly where we wanted it. I propped it up in place with some wood, checked that it was level, and then screwed through the back of it into the braces (being sure that my screws went through the thick framing of the cabinet, not just the thin, flimsy back panel).
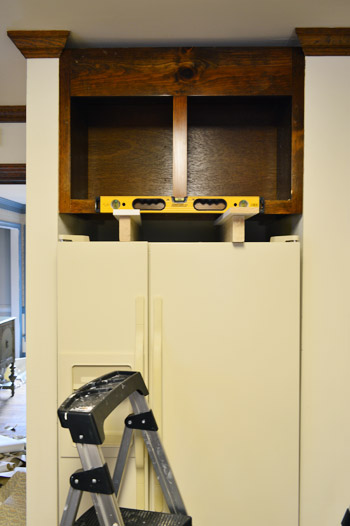
Not only did it look much nicer, but now we could actually put stuff in it. Functionality for the win! The last step in this project was reinstalling the crown molding – a careful process since I was matching existing cuts (of the pieces I didn’t take down) and because I didn’t have any spare pieces on hand- just the ones I had removed at the start of this project. So all it would take is one bad cut and I’d be, well, very angry at myself.
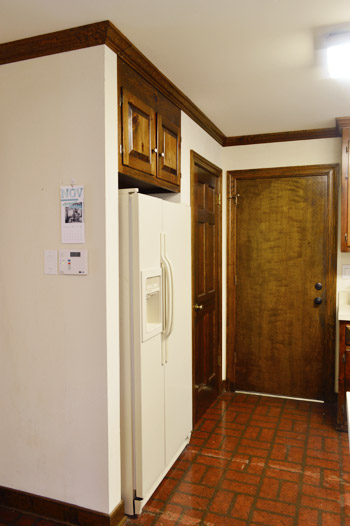
But it worked out well and I got those gaps filled. We’ll eventually be painting these, so I can do some caulk touch-ups then so they’re even more seamless in the long run. And man, it looks a whole lot better than the strange empty wall-hole-looking thing above the fridge that we started with:
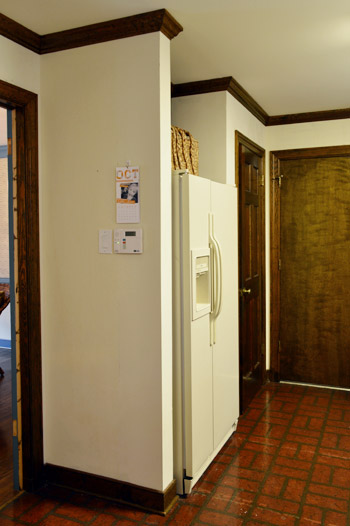
I also hung the crown molding on the other side of the room so it goes all the way around again. This wall looks especially crazy right now, but with some paint and shelves and a pendant over the sink, we think it’ll be a huge improvement.
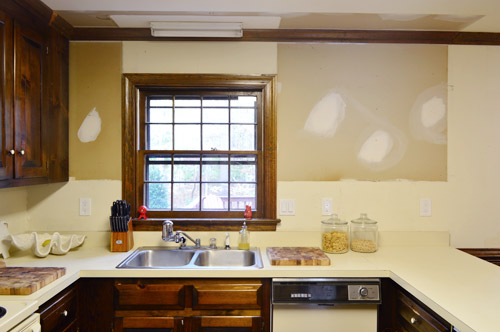
While I wouldn’t consider the space amazingly transformed yet (it’s far from that!) we think these first couple of changes are steps in the right direction. It’s hard to tell in the photos, but in person it already feels noticeably more open and less heavy.
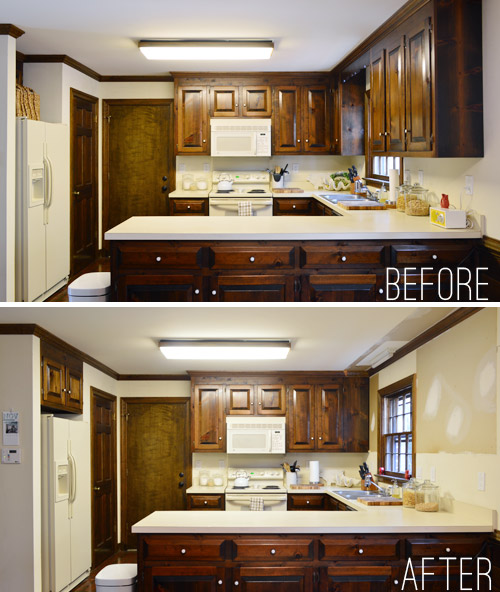
I felt kinda silly putting “After” on that photo above because it doesn’t really deserve that title yet. And actually, there are quite a few steps in this “Phase 1” kitchen makeover before we’re ready to call it done. So here’s our Phase 1 To-Do List as we’re currently envisioning it:
Remove wallpaperMove fridge cabinet forwardRemove upper cabinets on window wall to prep for open shelves
Reinstall crown molding- Paint pantry and garage doors
- Paint walls and ceiling
- Hang floating shelves on window wall
- Paint trim and paneling
- Possibly craigslist the existing microwave and get a countertop one (the we can put in the pantry?) and add a cheap range hood (we’ve seen some like this for $20 on craigslist) to lighten up that wall?
- Update or upgrade the old cabinet hinges and knobs
- Paint the cabinets
- Make solid back to the peninsula (the cabinet doors aren’t functional on that side, and we think it’ll be less busy with a sheet of beadboard or nicely framed out wooden look)
- Replace florescent lights (including the one over sink)
- Replace and center the light over table
- Get a rug for eat-in area? Possibly install peel and stick tiles everywhere?
- Curtains for windows?
Lots of bullets, huh? But thankfully almost every one of these steps will also be “paid forward” to Phase 2 (for example, painting the trim and walls and ceilings and doors and replacing lights will all be things we can carry into Phase 2 of the renovation down the road as well). So there aren’t very many things we’re doing just for Phase 1 that won’t come in handy for Phase 2 later. It’s sort of like the before is the first step on a staircase, and the major reno is the third step, and Phase 1 will just act as that second step to bridge the gap and bring us closer to a bigger transformation down the line (and make us smile in the meantime).
You can also see that there are a whole lot of question marks going on, but we have faith that if we just focus on the one-step-at-a-time approach we can figure things out as we go. Oh and one thing missing from that list is new appliances (except for possibly a tabletop microwave/inexpensive craigslist range hood) which is because as much as we don’t adore the creamy oven and fridge (and as much as we know they might interfere with the final look of Phase 1) we’re trying to be smart and hold off on getting new stuff ’til we’re ready to do a full reno because that way we can stay open to future options like a wall oven, or a gas range, or who knows what else.
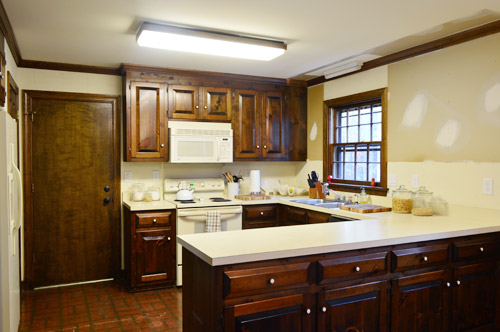
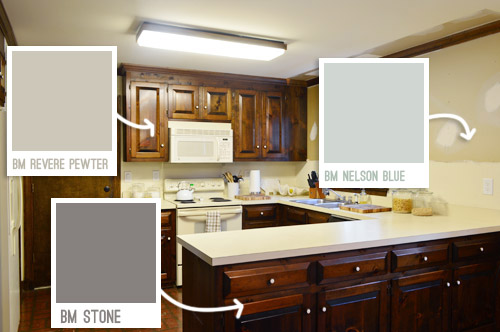
In addition to working around those appliances, we’re going to try to work with the off-white counters for this phase since we’ll likely reconfigure things in here down the line (so our final countertops will likely have different dimensions). Sherry has already brainstormed some colors that she thinks will lighten up the space while working with the existing counters and the cream appliances, and this time we’re not going to our default “paint the cabinets white” instinct!
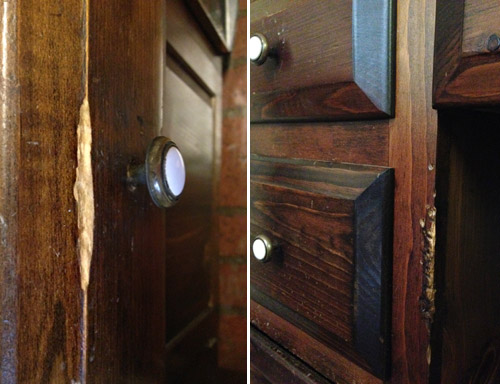
Speaking of replacing the cabinets – I know a few folks have wondered why we’re not going to permanently work with these guys. We’ve talked before about how not getting new cabinets was one in-hindsight regret of our last kitchen reno. But also, these cabinets aren’t in great shape when you get closer. There are so many chips and dents and scratches and gnaw marks (??) in both the doors/drawers and the cabinet frames themselves, that despite any amount of attempting to putty and sand them before painting, we don’t think they’ll ever look flawless (and even if we got new doors, the frames are still gnawed). But the good news is that I plan to repurpose them for a garage workshop, so they won’t go to waste – and painting them will not only allow us to enjoy them more in here before our bigger reno later, but it’ll also accomplish a nice clean look for the garage when we eventually use them out there.
The other question that comes up a lot is why we don’t try doing something with our fake brick floors, like painting them like Jenny did with hers. We would LOVE to be able to do that, but our floors are faux brick vinyl, not brick pavers – so they’re one solid vinyl sheet as opposed to a grouted stone-like material. And while we’ve seen some great tutorials from folks who have painted theirs, ours already scratch so easily that we’re pretty sure it’d be a lost cause. The top layer of vinyl is so old and crusty that it flakes off when we do things like roll the fridge out or move a chair too suddenly. Boo. Update: the plus side of this situation is that our house was built after asbestos was phased out, so we don’t believe there’s a risk for that with the flaking floor – just extreme ugliness.
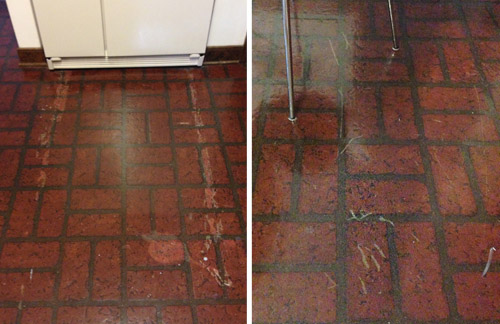
So if we really can’t take them any longer, we’ll probably do some cheap peel-and-stick tiles over them like we did for Phase 1 in our first kitchen (it took us about a day and ran us $100 but we were so happy about the difference they made for the year or so before we could afford our major kitchen reno in there).
Has anyone else opened up a can of project worms lately? Sherry’s crazy excited about it, but I’ll admit that I didn’t quite realize that taking down a few cabinets would result in a page long to-do list (silly me, after seven years of this I should know that by now). But as much as I’m bracing myself for all of the work that we’re about to dive into (priming and painting all of that trim, woodwork, and cabinetry is going to take a while), I’m kinda relieved just to be doing something instead of groaning every time that we walk into the room. Bring it on kitchen!

Anne says
Really opened it up! Just curious, I know you have the house color palette but now that you’re painting everything, it seems like everything is a shade of gray – blueish gray, tannish gray, and all shades of gray in between. Just curious if you’re going to add color with accessories or if you’re going to go bold with a room like you did your guest room in the last house.
YoungHouseLove says
Oh yes, I think every color of the rainbow will end up in this house with accessories/fabrics/textiles (rugs, curtains, vases, art, etc)! Sometimes it just takes a little time for rooms to fully develop like that, but I love layering those pops of color in. For example, in Clara’s room we just did red, pink, & blue raindrops with a big poppy colored door! So as rooms come together I thing colors will work their way into each room.
xo
s
Kerrie says
I’m in Australia and you never see the microwave over the oven configuration here. As its not something I have ever actually seen, it always worries me because I don’t understand how the steam from the oven doesn’t cause electrical issues for the microwave. I’m also a big fan of having the microwave off the bench top as they do take up a lot of room, and can make bench tops look cluttered. Basically, I am a big fan of your microwave/ range hood plans. Great fun, cheers
Rebecca says
I vote for removing ALL the upper cabinets, except that little one over the fridge. That one looks so much better lined up properly.
Rebecca
YoungHouseLove says
That would be awesome, but unfortunately we need that storage space I think. Although who knows down the line if we reconfigure things where we’ll end up!
xo
s
Molly says
I am sure even phase 1 will be beautiful! I was wondering if you have one of those fancy schmancy fake photos-hmmm…what do you call those that you do??? You know so we can actually see how it will look when you are done with the first phase. Do you have any idea what I’m talking about? :-)
YoungHouseLove says
Haha, photoshop? We didn’t do any “photoshopping” to picture things yet (probably because there are so many question marks right now) but maybe we can do some when we go along and have more things hammered out!
xo
s
Natalie says
It looks so much more open! I love it already! :)
Sarah | The Cyclist's Wife says
Major improvement already. Hey, have you seen the chalk painted refrigerators? You can find images on Pinterest. It’s a pretty cool idea for a temp change to an old fridge.
YoungHouseLove says
Those are fun! I brought that up to John but he’s so practical he pointed out that later it might make it harder to Craigslist or donate when we get new ones. We’ll have to see where we end up!
xo
s
Megan says
I’m so excited to see what you do with your cabinets. I have a similarly heavy kitchen (and cream appliances wha wha!) that I just am not sure will look good painted white. I’ve been batting around a dark grey on the bottom and light grey on top idea for a while. If you guys do it, that has to mean it’s a good idea right?
YoungHouseLove says
Haha, I don’t know… we make mistakes for sure!
xo
s
Lorraine says
I’m so glad you showed up the upclose of the cabinets b/c each time I see it from a distance I was thinking “wow what a shame”. Thank you for that!!
P.S. I’d love it if we could somehow get an email when you reply to our comments.
YoungHouseLove says
Aw thanks Lorraine! We’d love if you guys could get emails too, unfortunately whenever we add that capability it slows down our site and even crashes it. Hopefully we can get it up and running sometime though!
xo
s
Pat says
Just wondering…but do you always tackle your kitchen reno’s before the holidays or is it just luck? :)
YoungHouseLove says
Haha, luck I think!
xo
s
rae parkin says
Oh you guys! Your new house is practically identical to the house we custom built in 1981! Why would you not spend a little bit of money for a consultation with a professional designer to get a plan for your changes? Seems like you are failing in so many ways. A friend of mine spent $135.00 for a consultation with a designer with credentials. She took that good advice,and made the changes.It enabled them to sell the house later for $675,000! In Canada! Unless you are house flippers, cheap isn’t the way to go,for a home you want to live in. Love,Rae Parkin.
YoungHouseLove says
Thanks for the tips! We always use a pro kitchen designer for our real renos, this is just Phase 1 (using what we have while we save up for the real reno in a few years). At that point we will get new cabinets and counters and appliances and will definitively consult an expert for advice – we have a certified kitchen designer that we love and have used for our first house’s kitchen (and also consulted for our second house’s kitchen as well).
xo
s
Shawna says
Have you considered installing a wider/larger window?
YoungHouseLove says
We’re not sure how it would look from the outside although we love the idea! No matter what we’ll be changing the windows out in the eating area for French doors so we’re really excited about that!
xo
s
Babyfratt says
Like you, we also took down the cabinets on either side of our window over the sink. However, we only put shelves on the right side. On the left, where all the other cabinets were, we created a bookcase. It was PERFECT for the smaller wall (like you have), and gave us that much needed space for our cookbooks. Might be something to consider, since the two walls are very different sizes.
Oh, and we repurposed the one big cabinet as a new space for the kiddos backpacks and shoes when they got home from school.
YoungHouseLove says
Sounds really cute!
xo
s
Kathy says
This is exciting! I am wondering what ideas you have for a more permanent floor in your kitchen and livingroom someday? Solid wood like upstairs?
YoungHouseLove says
So far we love the idea of heated tile floors someday.
xo
s
Amber says
The kitchen looks so much better already! :) I was just wondering if you’ve considered keeping the open space to the left of the window and creating an equal space on the right side between the window and the floating shelves? Might add some symmetry and help maintain that nice airy feeling you’ve created.
I love what you did with cabinet over the fridge as well – makes a big difference!
YoungHouseLove says
We could try taping that off to see what we think! We loved how fast it was to unload the dishes with open shelves so we wouldn’t want them to be too small, but we’ll have to see where we end up!
xo
s
Diana says
The part that has me the most jealous right now is having any sort of a pantry. Our house is 80+ years old with lots of cabinets but no pantry which means cans, boxes, and other items are spread out in 4 locations which drives me crazy!! I told my husband our next house needs some sort of pantry! /rantover
Amber says
My house didn’t have a pantry either when I bought it, but there were two entrances into the kitchen from the livingroom beside it. The entrances were on either side of the livingroom fireplace, and while the extra light flowing through the rooms was nice, it wasn’t all that practical. We removed a small section of baseboard heater, framed the wall out and boxed in one of the entrances and made it our pantry with 2 18” french doors so the pantry doors wouldn’t swing too far into the room when opened. On the livingroom side, we made the old doorway into a built-in bookcase, which made it blend well with all the paneling around the fireplace. You’d never know it used to be a doorway. Putting that pantry in gave us the freedom to add a row of 4 windows on the back of the house instead of cabinets. (:
Sue says
Yay for your kitchen progress! I need to do something with mine (old mobile home, with the original avocado green double sink and 70’s floral wall paper to go with the beat up cabinets), but the project that has me pulling my hair out at the moment is my front porch. The decking was OSB (who’s bright idea was that??), and had developed a hole, right at the top of the stairs. I had been given some left over Trex decking, but heaven forbid it could be as simple as just laying that down. Nope, I’ve discovered that there is NO framing under my porch! So now I have to tear it down and rebuild it from the ground up. Right now, I’m just in total denial mode.
Ann Marie says
I’ll be joining you in the kitchen (figuratively, of course)! I took the week off work to prime, paint, and install a tile backsplash (my first!). Wish me luck!
YoungHouseLove says
Luck!
xo
s
Kate Thompson says
Ekkk! LOVE!!! Makes me SO excited!!! I also about two weeks ago began working on our kitchen! Removed the scrolly curvy piece of wood and seriously stood there and went *SIGH* !! hahaha So excited to get it back together and all the touches in order!! I shared my blog there, you can see where are project is going with my “dream board” and what we have started!!! :D Can’t wait to see your list of your’s get smaller and smaller!!! Hehehe Looks great!!
Gwen, The Makerista says
It seems like I’m always opening up a can of project worms, but not usually on this big of a scale. :)
I really admire your patience to live with what you’ve got and wait for the right idea and funds. That takes a lot of wisdom and maturity!
Eleni says
That same flooring is still in my grandpa’s house!! Must have been a very popular choice in the 70s!
Lindsay says
Just wanted to let you guys know I just sent you an email of a screenshot of a random ad that came across your site while I was reading comments this morning.
YoungHouseLove says
Thanks Lindsay! Will check it out!
xo
s
Joseph says
I know nothing about hanging cabinets so I’m just curious, why did you need to build the bracers behind the cabinet? Why not just screw them into the studs through the sides?
YoungHouseLove says
It’s generally stronger if you can go through studs on the back and the sides instead of just the sides (sides-only made us worry over time it would wobble front to back, so for stability we liked the idea of bracing it in the back a well).
xo
s
Joseph says
Oooh, I missed that you guys were doing both. I thought it was just the back and just couldn’t wrap my head around that one.
YoungHouseLove says
Sorry, I don’t think we mentioned the side screws actually! Will add that detail!
xo
s
lee says
What an improvement already!
The lucky thing is the way your fridge was sandwiched between 2 walls, it looks perfect.
Our old 60’s house has the fridge cabinet lined up with 1 more set of cabinets on the same wall, around the corner would be the same position as your tiny cabinet left of your sink. Our configuration is similar except no peninsula bar, we have the L shape. I would like to remove the R of sink cabinet like you did but it will be a while before a big remodel. There is also no counter space to thr R of our stove due to a corner cabinet which once held a wall oven. The old counter top range was removed and lost cabinet below when someone put in a slide in standard range.
Our cabinets are not nearly as nice as yours just the flat kind with a tapered off edge you know GRANDMA style.
Can’t wait to see what you do next.
lee says
forgot we also have that curvy cornice above the sink that likewise hides a tube fluorescent. I think removing that instantly allows more reflected light also the eye can go further past it, which visually expands the space.
YoungHouseLove says
Aw, thanks Lee! Good luck with your kitchen!
xo
s
Janine says
Hey!
When you paint your kitchen for an interim fix, why not go totally bonkers and paint the cabinets something colourful? People rarely get the chance to do a “temporary” kitchen, so why not have fun with it?
RA RA EMERALD GREEN CABINETS! WOOOOO! This kitchen is the colour of money!
Or you know. Turquoise. Love a good Tiffany blue kitchen.
YoungHouseLove says
Haha, you’re hilarious Janine! And that does sound tempting… but since John’s going to reuse the cabinets in the garage as a work room I’d hate to force him into something he’s not down with (he is voting on the colors too). I also think since we’re trying to work with the counters and appliances that we have, those bold colors might just look terrible next to the cream counters (we tried a bold green vanity in the bathroom with a cream counter and ended up having to repaint it because our eyes were crying out in pain, haha).
xo
s
Sally says
Re: range hoods. This is an interesting study from where I work (Lawrence Berkeley National Laboratory). http://newscenter.lbl.gov/feature-stories/2013/07/23/kitchens-can-produce-hazardous-levels-of-indoor-pollutants/
YoungHouseLove says
Wow! So interesting! I used to covet gas stoves (we always have had electric) but it sounds a little scary now!
xo
s
Amber says
I did a lot of research on range hoods when I was picking mine out, and a lot of checking building codes. One of the problems with having an effectiveness rating for hoods is that the installation has a lot to do with how effective it will be. The more bends in the vent pipe and the longer the pipe runs before it gets outside, the less effective the hood will be. You don’t want to get a hood that is too powerful either, as it could suck too much air out of the house and backdraft your appliances (furnace, fireplace). Most areas have building codes that forbid hoods over 400 cfm to be installed without “make-up air” which is just another vent to bring outside air into your house. That’s to make sure you don’t backdraft. Problem is, in the winter that air will be cold. It’s not as worriesome with a drafty, late 70’s house like mine, but as my hubby and I have been fixing up the place, we’ve made it much less drafty. So my advice is to get a hood with multiple fan speeds that won’t require make-up air from the inspector, good lighting, a style you like, and then scour the internet for user reviews.
YoungHouseLove says
So interesting! Thanks for the info Amber!
xo
s
Karen says
Hey Sherry! Just an FYI – I hear/see this from designers on HGTV all the time: NO blue paint in kitchens!! Blue tends to make food unapealing, and yeah, want to stay away from that in a kitchen. Kitchens are supposed to have warm colors and bedrooms are supposed to have coolor colors that calm peeps down, (uh, like blue). That’s what I heard anyway, and I know you guys are rebels so it’ll be interesting to see what ya end up with!!!! :-)
YoungHouseLove says
Aw, thanks Karen! Our first kitchen was a soft blue-green color and we LOVED IT! Miss it to this day. So I guess we’re rebels. Haha!
xo
s
Jen O says
Just a thought on that scratched-up linoleum: What may be getting scratched are the old wax layers. Removing the old wax might brighten up the floors and give them a clean surface again so you don’t need replace them with a Phase 1 budget flooring.
YoungHouseLove says
Someone else said that too! I can definitely see it being wax or some sort of poly that’s flaking off. Just not sure we can strip them with anything that’s not too fumey for a prego momma like me, so we’ll have to see where we end up!
xo
s
Allie says
Lookin’ good! And in answer to your open question, yes! My hubs and I just opened a can of worms as well. Recently we painted the burgundy foundation and exterior doors of our house a slate gray. I was so excited b/c I thought it would be a good phase one change til we could paint our mustard yellow siding next spring. But the two colors totally clashed, so I finally convinced hubs to do a hardcore siding painting (a neutral tan/gray called Charcoaled Heather) with me over the next few weeks (our house is pretty small, so it’s really not that bad) before everything freezes! So crazy!
Allen says
I can’t believe those florescent lights are still there! I’d have ripped them out before I unpacked anything!
Ethne @ Wom Mom Blog says
Yay, I’m super excited you’ve started on your kitchen!!! Also, glad you wrote about why you’re not using the current cabinets, because from far away, they look like super nice woodwork, but up close, not so much. Who knows, maybe you’ll end up with black for the new ones!!!
Karen says
I’m soooo on the Phase 1 bandwagon now! Agree that the kitchen looks so much better with those cabs down – and love the idea of open shelving. Question: Could part of Phase 3 be to actually widen the window? Let in more light! How cool would that be? Just curious.
YoungHouseLove says
It would be awesome, and whenever I see a giant window above a sink on Pinterest I swoon. We’re just not sure how it would look from the deck (that’s right behind this window) and since we plan to change the triple window to french doors someday, we’re not sure if widening that window would put the whole thing above our budget, but we’ll definitely keep you posted!
xo
s
Stephanie Ayer says
Take all the cabinets down and do exposed shelves or take off the door fronts on the upper cabinets. It will look TONS better!
YoungHouseLove says
I did consider that, but John (ever the practical guy) thinks we need more concealed storage than that, so the sink wall of open shelving plus the closed doors on the stove wall will meet our needs more I think.
xo
s
Crystal says
How come no photo shop end version? I’m not seeing the vision :(
YoungHouseLove says
There are just so many question marks and still-up-in-the-air decisions, so once we figure out more of what we’re going for we’ll try to do some of those for ya!
xo
s
Karen says
Do you see any way to use the wood cabinets for phase 1? I know you said they are bit beat up, but I would love to see your style with darker cabinets.
YoungHouseLove says
We considered that a bit, but thanks to those gnaw marks and dents that we showed in those photos, we’re afraid it’ll just never look nice in wood form. We can putty them and try to obscure them more with paint, so that’s why we’re leaning that way.
xo
s
Andrea says
Have you ever thought of doing a paper bag floor in the kitchen. It is a cheap fix and apparently is pretty durable after a few coats of poly. Plus it looks corkesque.
Her is an example of it from yankee magazine: http://www.yankeemagazine.com/article/home-3/flooring
YoungHouseLove says
That’s a fun alternative too! Thanks for the link Andrea!
xo
s
Maureen says
So crazy, these are two renos that I am doing or have done in the last few months. When I started my reno, my plan was to somehow get the refrigerator cabinet flush with the walls and turn it into a wine rack. I have been trying to figure out the best way make it happen but had only been visualizing building the cabinet out – never dawned on me to move it forward! Thanks so much for thinking that up!
I also removed the cabinets over my peninsula and am replacing them with open shelving. Out of curiosity, what do you plan on putting on your lack shelves? I love the floating look, but don’t have confidence in them holding my dishes, etc.
YoungHouseLove says
We had 72″ Lack ones in our first house that we filled with mugs and dishes and frames and glasses! They really held up (for years, and are still standing now!) so that’s the goal again this time. Will keep you posted!
xo
s
Michelle says
I am constantly amazed at the work you two do. Every time you post something “to be continued” like this kitchen post, I feel like I’m reading a good book and don’t want to put it down. (Just one more chapter!) I do have a question, and apologize if it’s been addressed before, but you make such a good team-do you ever disagree about which direction to take a project? How do you decide who “wins”? I think my husband and I avoid a lot of DIY because I’m right and he’s wrong. Obviously. Thanks!
YoungHouseLove says
Oh yes, we disagree all the time! I think the best way to solve it is not to do/paint/buy anything unless you both agree. It slows you down, and sometimes someone’s sad to leave a piece of furniture (or a paint color or an idea) behind, but it’s the best way we’ve found to create a house that we both love without anyone feeling annoyed by a certain choice or item that they never were that in love with!
xo
s
Stardancer says
Removing those cabinets actually made the kitchen look bigger. Maybe because it looks less closed off? It’s going to be really awesome.
Marcy says
I just had to post some pictures on your forum because we had an upper cabinet situation even more claustrophobic so I can definitely relate to how big of a difference it makes.
http://forums.younghouselove.com/discussion/2230/kitchen-progress?new=1
Also can relate to how one task always dominos into a page long to-do list. :)
YoungHouseLove says
Woah! That’s amazing!
xo
s
Hannahhenning says
Wow! What a difference! Love the new configuration! You guys have such a good eye for paring down and opening up.
Kristen O. says
WOW! The before and after are amazing! It looks like you almost doubled the size of your kitchen by taking the uppers out.
Leslie says
Cabinet moving for the win! What a difference. Nice start, you two!
Nikki says
I like the idea of the gray cabinets, as I have been noticing this trend a lot more lately. I do have a question though, do you think you are done with white cabinets for good? I still love the look of them, but am wondering if they are still a good choice or not (with wear and tear, etc.) I just love how bright and clean they make a kitchen look!
YoungHouseLove says
We love white cabinets, so I think we’d totally do them again (although we’re also open to other options, so it’ll depend on the counter/backsplash we eventually fall for I think). They seemed easy enough to wipe down if you get a rogue drip, etc – and we too thought the whole room looked bright and happy with them!
xo
s
Amy says
Wow, you two are at my favorite get-er-done, make lemonade from lemons, we’re not gonna take it anymore, DIY stage! And I’m lovin’ it so much because it’s chock full of inspirational ideas that even the average Jane/Joe can do on even the tightest budget. For example, I just knocked off painting all of my drawer pulls and knobs in the kitchen with less than one can of ORB spray paint – inspired by your past posts, and every time I walk into the kitchen now I’m soo glad I did it, plus I saved about a minimum of $100 (and that would have been for the cheapest ORB knobs off the shelf!). It’s crazy how simple changes like that feel so great and how it suddenly feels like it’s finally mine cause my stamp is on it. :D So, thank you for continually sharing even your littlest projects here because they are continually inspiring me! :D
YoungHouseLove says
Aw thanks for the sweet comment Amy! So happy to hear about your DIY coups!
xo
s
Jill says
Love the colors you’ve chosen for the cabinetry. Can’t wait to see Phase 1 come together. ;) I like the idea of doing it in diff phases. Why live with “meh” while saving money for the big “ta-da”… life is too short for that!
Brandy says
Oh my goodness! What a great idea! I would have NEVER thought to move the cabinet above the refrigerator forward. Genius!
http://www.basicallybrandy.com
Melanie says
Good on you both! We have been doing up our place over the last year and feel your pain! Looking forward to keeping abreast of your progress!
Melanie
Pebbledashedpad.wordpress.com
carisa says
I am shocked that you got those cupboards out in one piece! my husband and I have been working on our kitchen remodel, same level of dark and old as yours, and those cupboards nailed to wall were a pain to get down!! Love the small updates in phases, that is what we are doing too!
YoungHouseLove says
Thanks Carisa! We got really lucky! When that one over the fridge got stuck we were like… uh…. this is a new one. Ha!
xo
s
Kim says
Ooh, I like the two-tone paint choices for the cabinets. I was thinking of doing the same thing for phase 1 in our kitchen. This pin got me thinking about doing a darker color on the bottom and a lighter shade/color on the top… http://www.pinterest.com/pin/111323422012614691/
YoungHouseLove says
What a gorgeous shot!
xo
s