Let’s talk about knocking out a few walls and framing a few new ones, shall we?
For two weeks we had virtually no progress in our laundry area, except for rethinking our approach and considering contractor bids. So by comparison, things happened so swiftly over the last few days that it nearly put our heads on spin cycle. What started out looking like this…
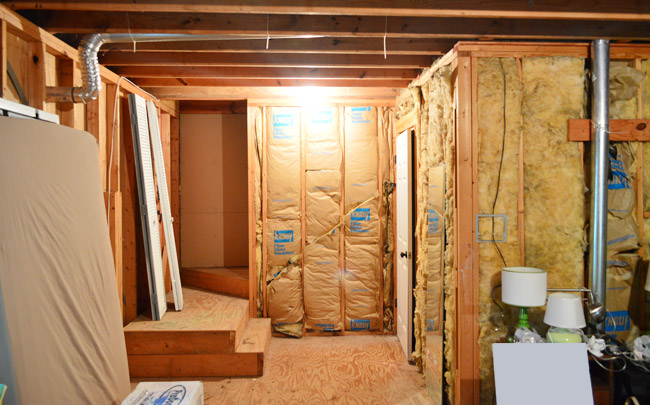
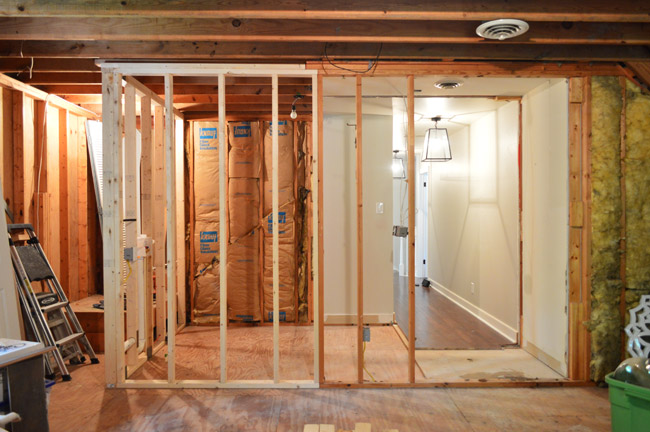
…is now looking a bit more like this. Yowza.
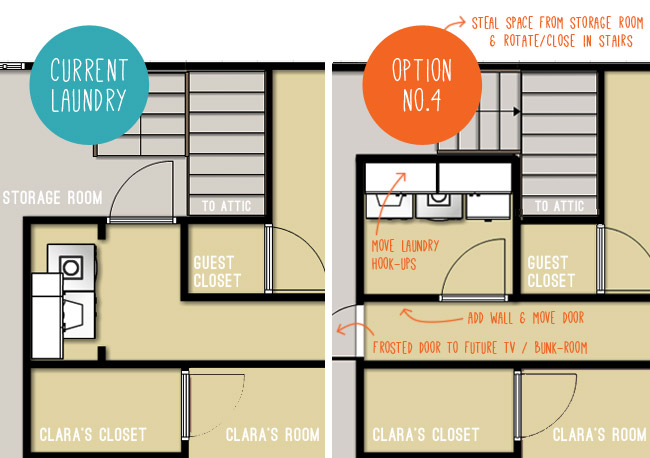
Let’s rewind to early last week, when it clicked that maybe we could do more ourselves and sub-contract certain jobs out instead of relying entirely on one contractor and his team. As you may recall from this post, Option 4 is our goal:
We put together a to-do list for all of the tasks ahead of us and decided to take this approach: do what we’re capable of and when we get to a line item that’s outside our comfort zone, call in a pro. Here’s what that list looked like (I added an asterisk to the items we’ve hired out or are considering hiring out):
- Move washer & dryer and remove cabinetry
- Demo cased opening, side wall, back wall, part of the floor and the attic step
- Frame new walls & doorways*
- Move laundry plumbing hook-ups & drains*
- Move laundry electrical (plus other lights, switches, and outlets)*
- Move dryer vent
- Hang drywall
- Add insulation
- Mud, tape, and sand all the drywall seams in the new room*
- Rehang laundry door
- Add new frosted door to attic
- Prime & paint laundry room and hallway walls
- Tile & grout new laundry floor
- Add baseboard and door casings
- Add upper cabinetry and shelving
- Tile & grout laundry room backsplash
- Reinstall washer & dryer
- Add lower cabinet
- Add ceiling light fixture
- Hang art, ironing board, and bring in other laundry room items
- Finishing touches and repairs (drywall in garage, step in attic, etc)
You already saw that we moved the appliances, so let’s talk demo – which started on Tuesday, with a careful prying off of all of the baseboards and trim so that we can hopefully reuse some of it.
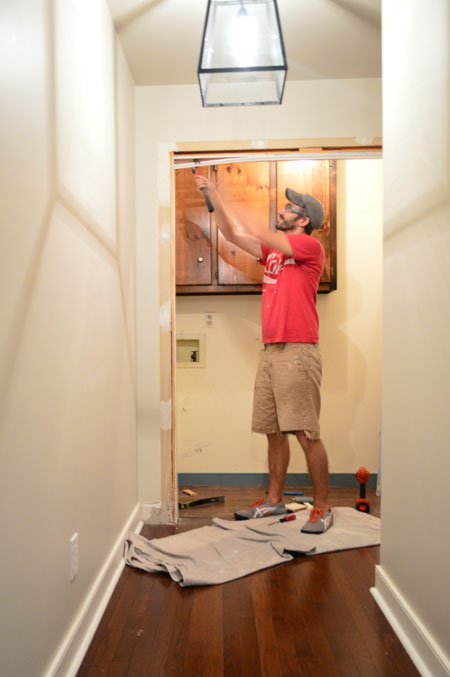
Next came drywall demo, which only involved the cased opening at this point (we were trying to leave the walls to the storage room intact as long as possible to keep the A/C in). As for the actual demo-tools I used, I knocked things out with a rubber mallet and pried things off with a crowbar.
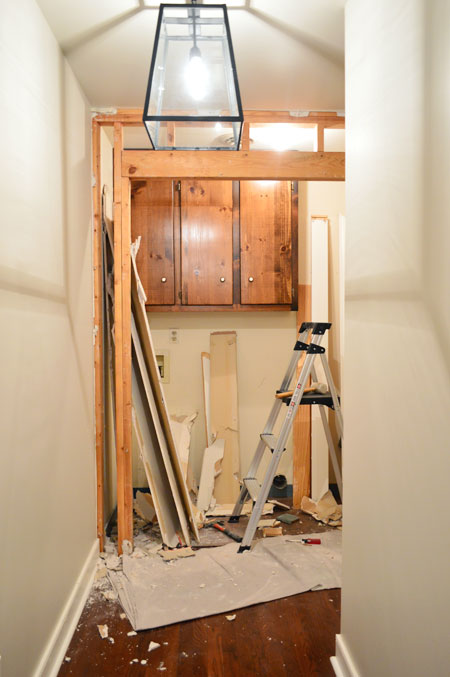
As for clean-up, I have been sweeping small stuff into garbage bags and collecting a pile of the big stuff in the attic. At some point I’ll get either a small dumpster or another Bagster (I very much look forward to hurling things out the storage room window into the trash bin below – although we can reuse some items, like some studs and trim).
Next on the demo list was removing the old cased opening framing.
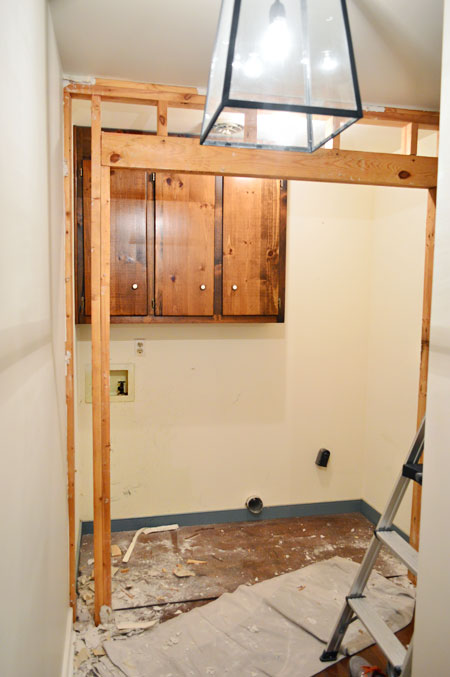
This probably required the most brute force of anything – lots of hammering at 2x4s and prying nails apart. Slowly but surely things came down.
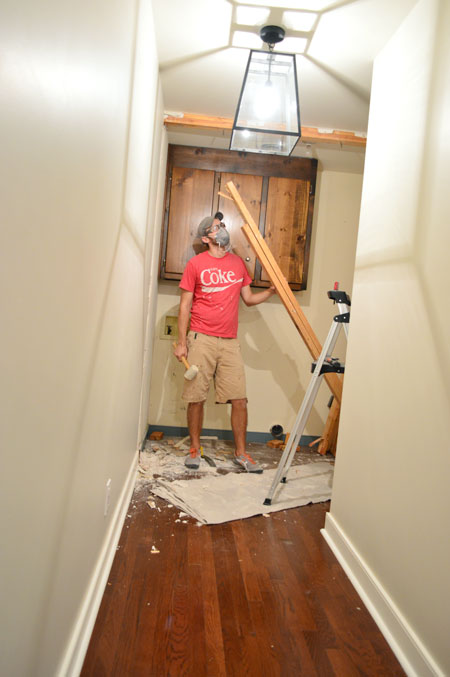
Once that was all out of the way, we removed the upper cabinet so the space was officially empty.
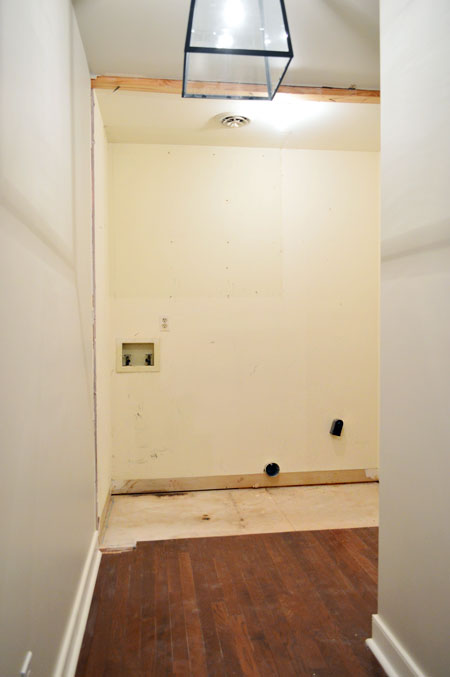
Demo was not just limited to walls, though. I also had to remove some of the hardwood flooring since the framing for our new laundry room wall needed to be attached directly to the subfloor. It was a little weird to be tearing out floors that we had laid just last year, but whatchagonnado?
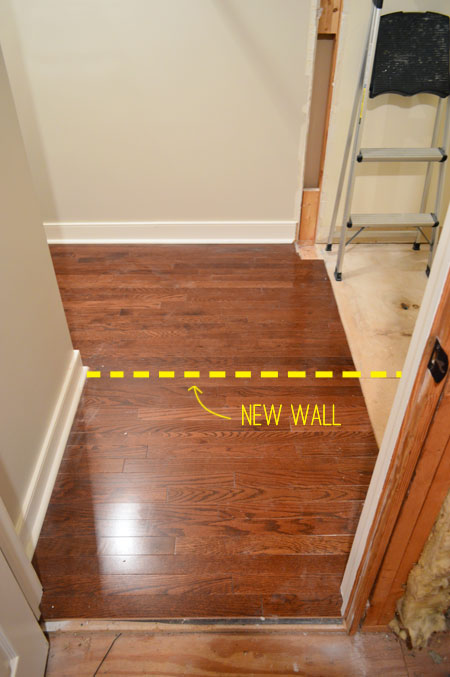
Since we used Elastilon to lay our floors (basically a big adhesive sheet) it wasn’t the same process as prying out nailed planks. I managed to pry off the first few pieces with a flat-head-screwdriver-turned-chisel (that Elastilon is ridiculously sticky) and then it started to lift up in sheets.
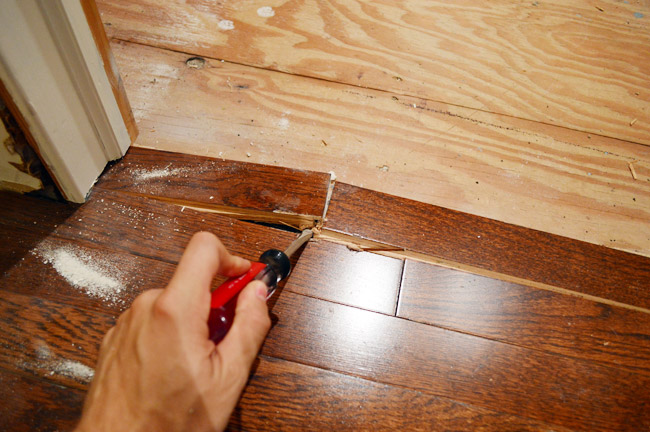
At that point I was able to separate it enough to get my knife in and slice through the Elastilon layer underneath, and eventually I could remove the exact section I needed. I also removed the particle board subfloor so that the plywood was ready for framing. Looks awesome, no?
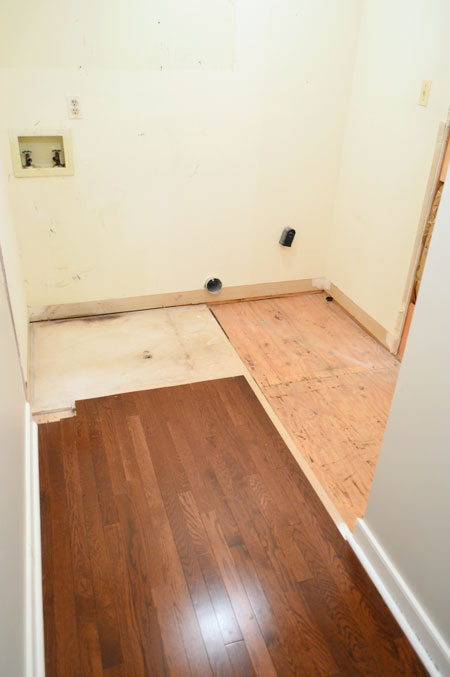
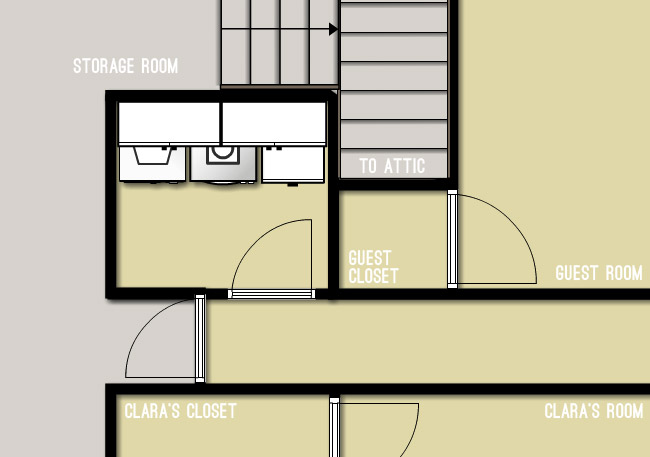
The process of removing the floor confirmed one change to our plan that we had been contemplating for a few days: bumping the frosted door to the storage room (aka: future bunk/TV room) forward a bit. So rather than it sitting in the existing back wall, it will be framed to go right where the hardwood floors end. Not only does this save us from having to extend the hardwoods (we’re thinking we’ll do carpet in the TV room) but it also shortens the already-quite-long hallway a smidge. Thirdly, it will create a small vestibule at the entryway of the TV room for the door to swing into (rather than into the middle of the room), which may make furniture placement in the room easier down-the-line.
My last demo step before framing began was prying (and cutting) out the single attic step that was in the way. I’ll rebuild it on the other side of the platform later.
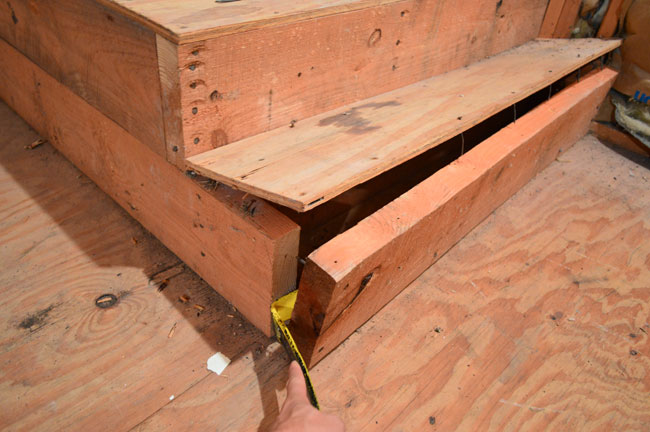
That was as much demo as our framing guy recommended doing before he arrived (we used David of Chicas Construction, who helped us raise our sunroom ceiling last year). Obviously there are still more walls that need to come down, but we all agreed it would be best to leave them up for as long as we could (again, to keep the hot storage room from overworking our AC). The last half of the framing couldn’t be completed until the plumbing and electrical was moved anyway (which couldn’t be moved until the first part of the framing had been completed) so we always knew framing would be tackled in two parts. So it just made sense to do demo in two parts to go along with that.
On Wednesday morning it looked like this…
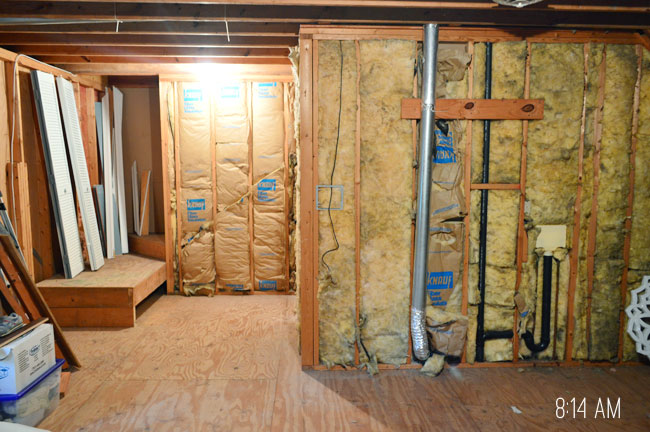
…and less than three hours later we had two new walls thanks to David.
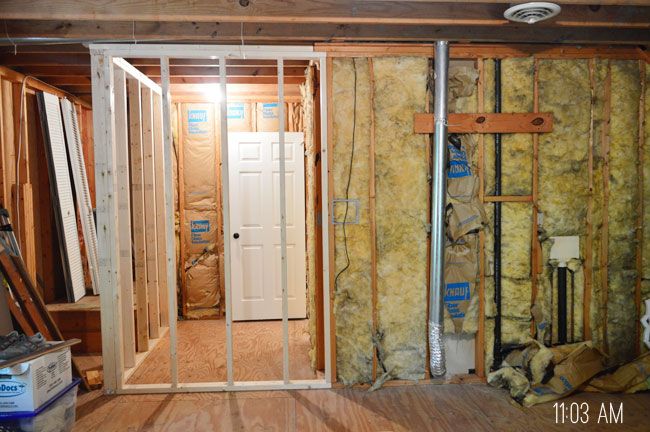
After observing him work his magic, I’m pretty sure it’s a task I could’ve managed, but it definitely would’ve taken me MUCH longer. And since he was so speedy, we were able to have the plumbers (Scott & Mike’s Plumbing Services) out just hours later to disconnect the old hook-ups and add new ones.
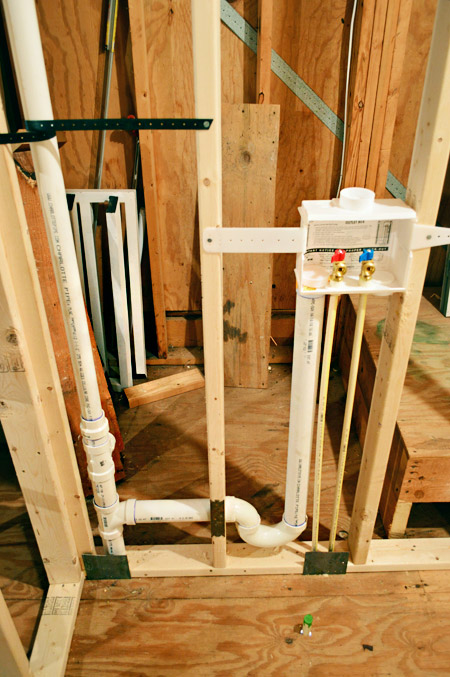
It only took them about 3 hours to make the change, especially since all of this sits above our garage – giving them easy access to everything without making a big mess inside the house. Of course, they still had to cut out a big section of our garage ceiling, so we do have that repair on our to-do list. But we have been talking about drywalling the whole garage (two big side walls are unfinished anyway) so we might try to get it all done at once.
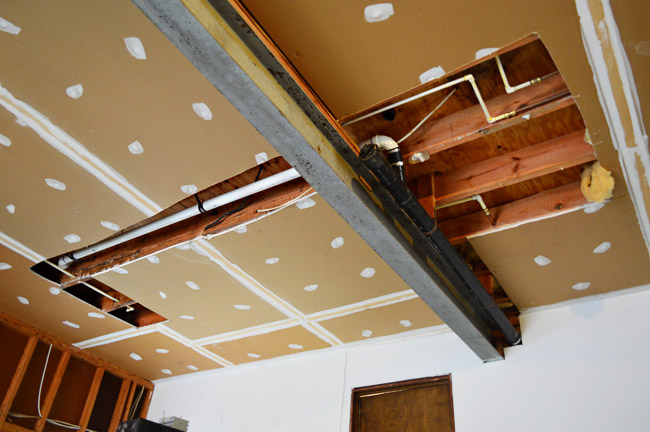
Having that area cut open actually made life easier for the electricians (S J Ryan Electric), who arrived the next morning. They were able to move the laundry outlets in a flash, but there was still lots to be done in terms of moving light fixtures, switches, and outlets.
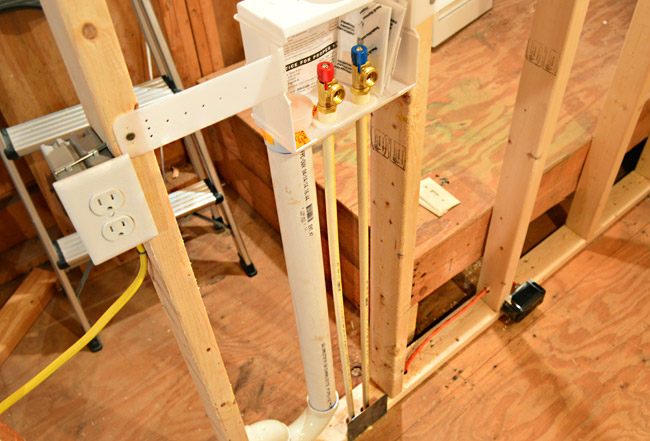
For instance, putting a ceiling light in the laundry room (with a switch at the future laundry doorway) and moving some of the storage room lighting & switches. Sherry and I brainstormed where we wanted everything to be moved ahead of time (time is money when people work by the hour) and were able to come up with a nice solid plan for relocating everything so it makes sense. For example, now we have a light above the attic stairs, an outlet in the future laundry room to plug in our iron, and a fixture box in the laundry room that will be centered in the room after we add upper cabinets (if we hadn’t been thinking we would have just centered it in the room but after the upper cabinets were hung it would have felt off-center since it would be closer to them than the other walls).
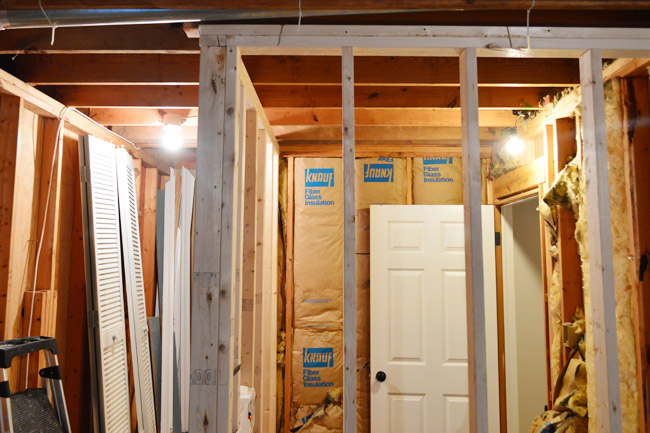
That was all done by Thursday afternoon, so we called our framer to come back out to finish framing on Friday buuuuuuut… he had food poisoning. He’s like the nicest guy ever so he was saying he would come out on Saturday or Sunday if he was feeling better, but we told him not to worry. We wanted him to focus on feeling better and, well, we had other messes to make over the weekend. The good news is he’s here this morning (feeling much better) to finish everything up so we can hopefully start hanging drywall soon!
With the plumbing and electrical stuff relocated, it was time to proceed with the second phase of demo, so I had some fun with that over the weekend.
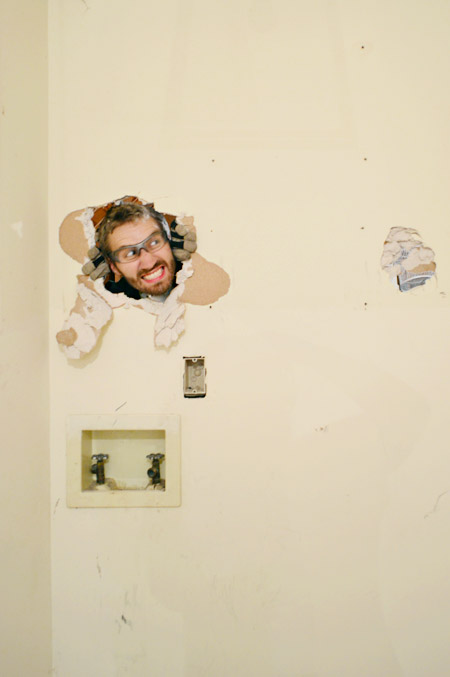
First I bashed down some drywall, which fortunately came down in pretty big sheets for the most part (hence my growing pile of trash/reuse items that you can see near the window). Speaking of the window, here’s our first peek at the daylight we’ll be getting into the hallway now.
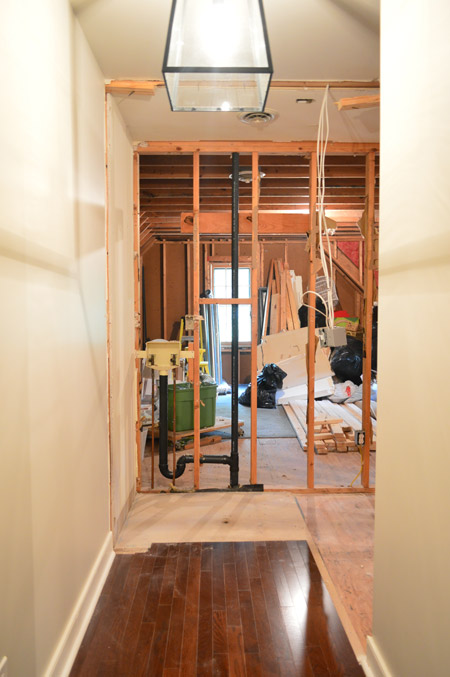
I could also take down a bit more of the framing too – namely the old wall with the storage room door in it, which would give us our first real feel for what the new laundry room will be like. Don’t mind the dangling outlet boxes. The electricians added them in a way that makes them easy to be set right into the freshly framed wall that David is working on right now for us.
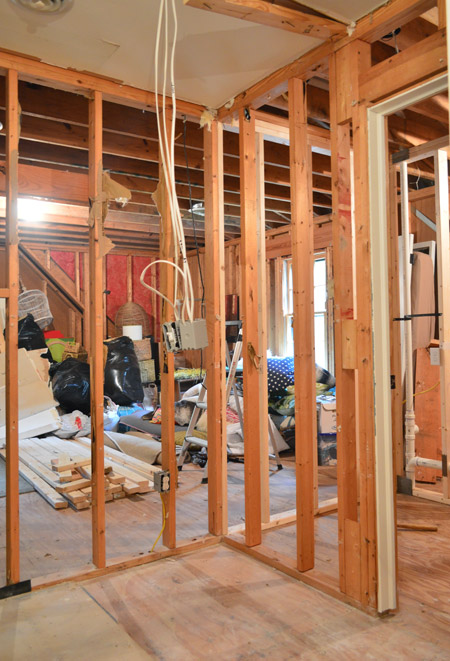
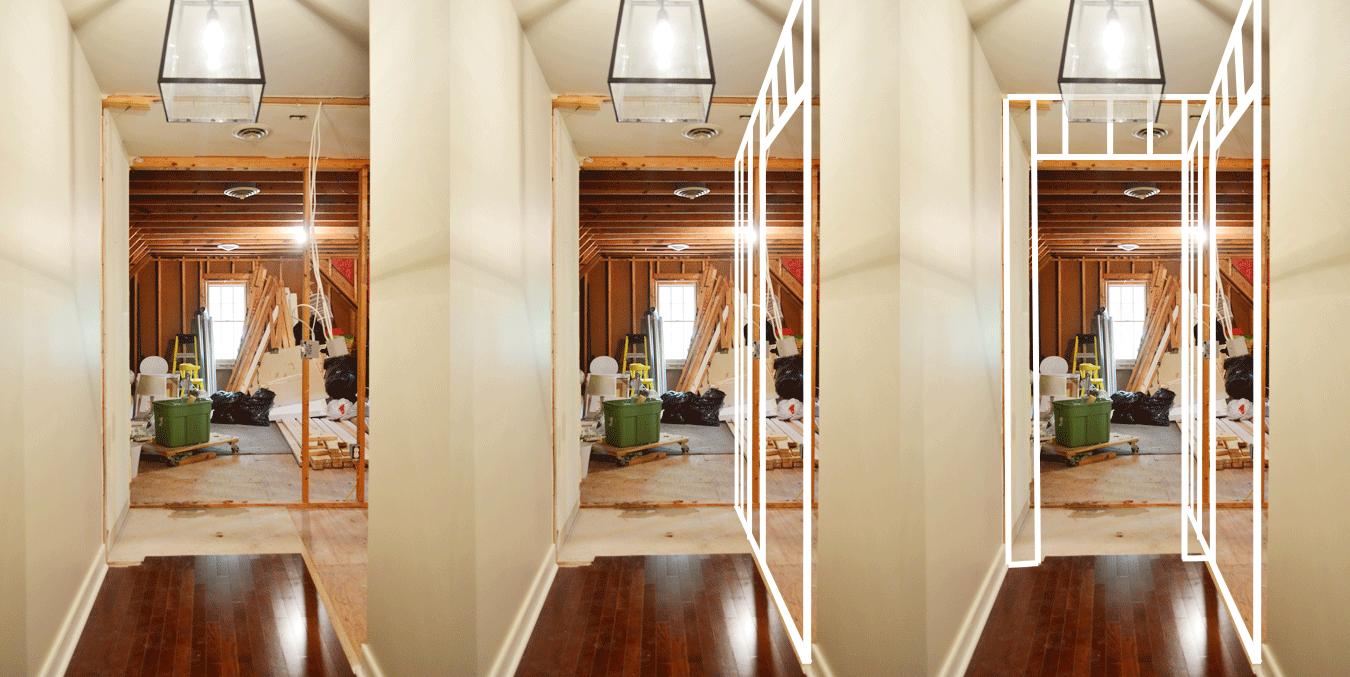
Here’s the same area with the framing down (and white lines added to remind you where the last wall will be framed in). It’s feeling ever-so-slightly like a room.
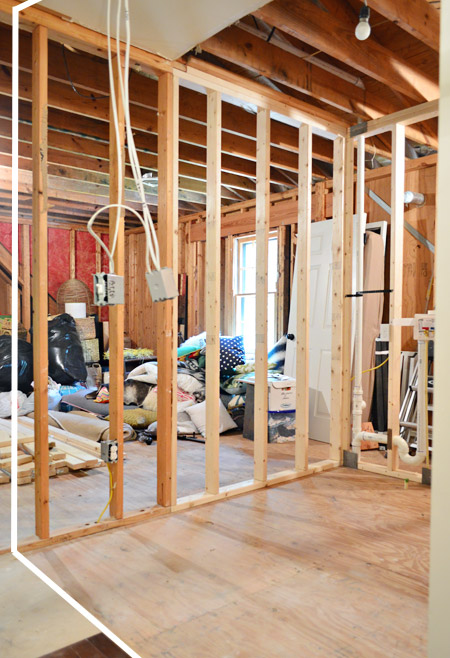
I could also take out part of the other wall, since the area with the old washer hook-ups will now just open into the storage room. The plumbing was all disconnected already, but the plumbers left the old pipes in the wall for me to remove during demo. All it took was some cutting with my reciprocating saw and it all came down…
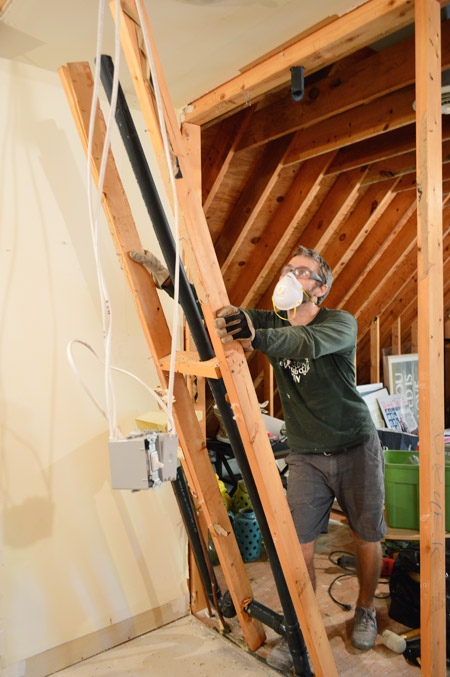
And that, my friends, is how we got to the picture that you saw at the beginning of the post.

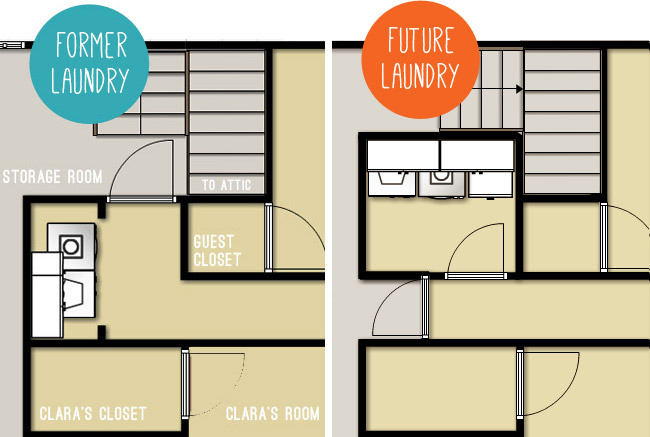
The next step construction-wise is going on right now, which is getting those remaining two walls framed – both the one to close off the laundry room, and the one for the frosted door into the storage room. I whipped up a little GIF to help show what I mean (David does it almost this fast):
I realize that’s still not crystal clear, so I’ll make one last attempt by showing you an updated version of the floor plan. I can’t tell you how satisfying it was to change the “Current Laundry” label to “Former Laundry.”
Once framing is complete, we’d love to hop right into drywalling (which we’re going to give a go ourselves – although our mudding skills could use some practice) but we need to cross of some other little items first, like rerouting the dryer vent.
Move washer & dryer and remove cabinetryDemo cased opening, side wall, back wall, part of the floor and the attic stepFrame new walls & doorways*Move laundry plumbing hook-ups & drains*Move laundry electrical (plus other lights, switches, and outlets)*- Move dryer vent
- Hang drywall
- Add insulation
- Mud, tape, and sand all the drywall seams in the new room*
- Rehang laundry door
- Add new frosted door to attic
- Prime & paint laundry room and hallway walls
- Tile & grout new laundry floor
- Add baseboard and door casings
- Bring washer & dryer back in and hook them up (and party like it’s 1999)
- Add upper cabinetry and shelving
- Tile & grout laundry room backsplash
- Reinstall washer & dryer
- Add lower cabinet
- Add ceiling light fixture
- Hang art, ironing board, and bring in other laundry room items
- Finishing touches and repairs (drywall in garage, step in attic, etc)
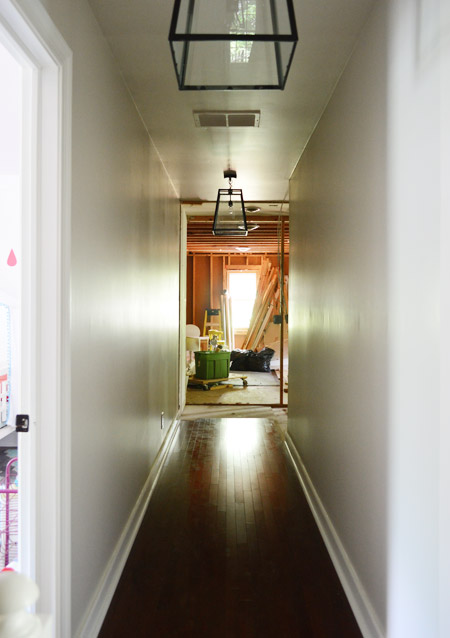
I’ll leave you with the last shot I took before taping up a few big drop cloths to keep the hot attic air at bay. It’s some glorious, glorious natural light that’s finally shining on that end of the hallway.
Oh, and we owe you a cost update too. Maybe in our next post once we have the final bill from the framer? So far his estimate, plus the totals for the plumbing and the electrical help are looking great compared to the line items in our two contractor estimates.
What did you guys do this weekend? Did anyone else wield a rubber mallet and tell some drywall who’s boss?

Nods at Daydreaming Bride says
love how detailed this post is & well done at making so much progress.
I was feeling pretty good for getting a hallway painted today but you guys put me to shame!!
Danae says
What a great way to reclaim wasted space! I am so inspired by you guys and your DIY-genius!
Jill says
For July, you guys picked a fabulous week weather-wise to have the non a/c space opened up! (At least here in DC, so I’m assuming/hoping RVA will be good too!)
Its all looking better already, it will be much less claustrophobic in that hallway!
Kristen says
WOW! Amazing progress! The only upgrade I did to the house this weekend was buy new table lamps for the bedroom. And I was proud to get that done! We did have company all weekend, though, and there is deck cleaning and staining materials at the ready, hopefully to be done next weekend.
Emma Clayden says
Love the light, will make a huge difference to the end of the house. Any heads up on the kind of flooring for the new laundry?
YoungHouseLove says
I know it sounds crazy but John loves the idea of wall to wall carpeting to make it a cozy den/TV room with bunks for lots of sleepovers. I’m mostly sold on it too, so that’s where we’re leaning…
xo
s
bridget | 623designs:interiors says
You meant wall to wall carpeting in the storage room (not the laundry room) right?
Here in the South, wall-to-wall carpeting is pretty common, so that doesn’t sound crazy at all…unless you really were talking about the laundry room. ;)
YoungHouseLove says
Yes, sorry! Meant the storage room!
xo
s
bridget | 623designs:interiors says
Any ideas for laundry room flooring yet?
YoungHouseLove says
Yes! Can’t wait to share what we picked as soon as it comes in!
xo
s
Jennifer Olszowy says
Does your attic have a fan to pull the heat out of it? When we lived in Richmond we added one, and it helped A LOT! Just thought I’d ask. It was a cheap fix to help reduce our air condition use.
YoungHouseLove says
We had one of those in our last house and it was awesome! We don’t have one here but would totally consider adding one!
xo
s
Meg says
Natural light ahoy! You’re making such excellent progress, and this laundry nook is going to be so awesome when you’re done!
I’m super excited that we finished the renovation of our master closet last weekend, and it looks so much better, refreshed and clean compared to when we bought the house a few months ago. For the first time since May, I’m not living out of trash bags, suitcases and other nonsense! WOO!
rosemary willman says
I’m a huge fan of top hung pocket doors ( not unsightly metal tracks on the floor)in work tight spaces. A regular door takes up valuable floor space. From your floor plan you would have a wall wide enough to accomdate a pocket door. With a pocket door, it frees up the wall behind the doorway for art or a blackboard etc that otherwise most of the time is hidden if a regular door is in an open position. A frosted glass door with the word LAUNDRY stenciled would look great!
Liz S says
STOP! What is going in front of the door? Is that the dryer or cabinets? How much space is there? I’m picturing a battle between the room door and appliance doors, those battles are the worse.
YoungHouseLove says
There’s thankfully more than enough room for the door to swing open without hitting the appliances or the cabinetry. Whew! We measured it about 100 times to make sure! It’s only a 32″ door (many doors are 36″) so that helps even more!
xo
s
Priscilla says
Lookin’ good Petersiks! Can’t wait to see the progress! It’s like instant gratification to see someone’s renovations move forward over the weekend – but it’s also very inspiring! Makes me want to shut this laptop, get off my butt & get to work on our house ;)
Janette @ The 2 Seasons says
You might want to consider a solartube for the laundry area. We have three in windowless areas and LOVE them. We had three in our last house, also.
YoungHouseLove says
Thanks Janette!
xo
s
Jessica says
Might I suggest insulating the laundry room with a super dense, noise blocking insulation? That way down the road, you can run laundry and the noise won’t interfere with movies, games etc in the bonus room. The plans look great-what a terrific solution!
YoungHouseLove says
Thanks Jessica! We’re researching insulation options now. So much to learn!
xo
s
Barbara says
This is going to be great. Have you considered what you’re going to do on the hallway wall of Clara’s room? Something to break up the loooooooong hallway feel. Art? Wainscoting? Recessed bookshelves?
YoungHouseLove says
I’d love art and wainscoting in that long hallway!
xo
s
Nora says
Hey there. Looks amazing. I was wondering about a vent fan for the laundry room. You have a dryer vent naturally. However, maybe it’s a code thing-y here, but do you also need a vent for the laundry room in general? It doesn’t have a window and all that washing & drying can get steamy, like a bathroom, so an overall vent helps reduce mold etc. Just a thought. A lot of the laundry rooms around here (soggy pacific nw) seem to have them. Can’t wait to see it all come together!
YoungHouseLove says
Thanks Nora! We don’t tend to have those here (never had them in our previous houses either) but it’s an interesting thought!
xo
s
Dolly says
Will you have a regular air vent (for cooling/heating) in the laundry room? My Californian house was built in the 1960’s and we don’t have air vents in our bathrooms (just heated electric fans). It is ok in the summer since we have windows, but a pain in the winter. It gets pretty cold and we have to run the electric fans instead of the using the furnace for heat. I hope you can add an air vent in your laundry room for the heat and AC!
YoungHouseLove says
Thanks Dolly! We are planning to reroute the one you see in the vestibule area to be in the laundry room so it stays heated/cooled (there are other hallway ones, so that reconfiguration should hopefully be pretty straightforward).
xo
s
Carrie says
Awesome progress! I’m really looking forward to seeing it continue and the end result, of course. This is also really motivating because we have a basement that needs an overhaul and my husband and I are trying to wrap our brains around how to afford subcontracting out some of the work and doing some ourselves. In the past my husband has done it all, but we just don’t have time now with two kiddos in the mix. Thanks for the inspiration!
carolyn says
Any thoughts on using a pocket door to the laundry room? I’m pretty partial to pocket doors anyways, so maybe it’s my bias, but it looks like you’d have enough room and then that’s extra space without a door for folding/ironing/etc.
YoungHouseLove says
We heavily debated that option, but decided we’d prefer the same classic six panel doors that we have in the rest of the hallway (with a frosted door on the end of the hallway as the star). Thakfully there’s more than enough clearance for it to swing open (the drawing isn’t really to scale, but in person the room is really deep!). Will have to share a photo of the door leaning on that framed wall so you guys can see :)
xo
s
K says
You probably already thought of this, but what if the pocket door had the same six panel style as the other doors, best of both worlds?
also, I’ve heard about (but not looked into) windows and doors that have blinds inside the double panes. it could be a way to have an unfrosted door with privacy. Although I’m sure they cost a pretty penny.
Thanks for getting me motivated!
YoungHouseLove says
That sounds really pretty too!
xo
s
Jessica K says
Maybe this wouldn’t be to code, or maybe you don’t want any obstructions to the attic, but… Have you considered putting the attic door between the first and second sets of stairs? If you did that, you could extend the second step and add a cushion to create a reading nook in the corner of the future bunk room. You would have to climb over that to get to the attic, but we only go up to the attic 2-3 times per year anyway…
YoungHouseLove says
That could be fun!
xo
s
Dawn Nowak says
Are you planning to add a sink to the laundry room?
YoungHouseLove says
We would have loved a sink, but we mapped it all out and measured and remeasured and think it’ll be too tight, so we’re going without. It’ll be nice to have a little countertop area to set things down on though!
xo
s
Lauren says
You should have put a sink with a countertop lid, so you could have both! Lid down for counter, lid up for sink!
YoungHouseLove says
That would have been awesome but it would have been such a small sink we figured the cost to plumb it wasn’t really worth it, so we’d rather just have a counter with accessible storage space under it (not stolen by a sink).
xo
s
Vicki says
“I love it when a plan comes together!”
Dana@chocolateandsunshine says
Seriously, what a space that will be!!
You aren’t just designing, creating and diying. You are contractors. Love all that you do.
I have such a tiny laundry room and recently updated it, but about 4 of mine would fit into your grand space. With a growing family, you will be so happy you are doing this.
Lena says
If you can add in an overflow floor drain for the washer too.
This is working out really nice as it will make it really easy to close off the attic access in the bonus room when the time comes too to separate the attic from the bonus room without impeding on the rooms usage.
YoungHouseLove says
We added one when the plumbers were here! So nice for that peace of mind!
xo
s
Megan says
You guys have made so much progress so fast. I am so impressed! It is looking great! :)
HeatherB says
To steal a quote from God, “Let there be light!”
It looks sooo awesome, and I am really glad you gave a shot looking down the hall toward the window…I was wondering how it lined up, and the answer is very well :) Side note: is the storage space already connected to the air conditioner? It looked like there was a vent in there already, but it might have been an optical illusion as to placement…
And is it just me or does it sort of feel like this is how it should have been when the house was first built? The whole go-traipsing-through-the-laundry-room-to-get-to-the-bonus-space (even if it is just attic storage) always seemed a bit off to me for a house that otherwise seems to be well laid out.
So glad you took the plunge, too. I was getting so excited and then when it seemed it might be cost prohibitive and you’d have to wait, I was pretty disappointed. Glad you figured a way to get it done–and maybe pick up some new skills along the way? Work out the taping/mudding muscles?
Keep up the good work!!!
YoungHouseLove says
Yes, the storage room has heating and cooling vents, we just keep them closed for now since the attic is open to that space and it’s not heated and cooled, and that room isn’t insulated and drywalled yet. I can’t wait to open those vents though!
xo
s
Wendy says
So does this mean do laundry done over the past few days? How is that working out for you? Good thing you have serious capacity in the top load!
YoungHouseLove says
We’re about to take a ride to Grammy’s house to do some laundry. Underwear ration is running perilously low…
xo
s
Kelli says
I love the new layout! I’m sure you guys have already taken care of this, because I know you’re typically super careful to keep your family safe, but here goes anyway: please be sure that you included the storage room window in your security system! Especially since your floor plan is so publicly available, it would be easy for a bad guy to see that as a vulnerability. It’s kind of fresh on my mind right now because we’re in the process of upgrading/updating our system.
YoungHouseLove says
Thanks Kelli! We got all windows and doors armed even before we moved in, along with motion sensors and other fun stuff. Our house is like Fort Knox ;)
xo
s
bridget | 623designs:interiors says
Looking good! I love the posts where you tear up stuff.
It took me a little while, but now that the walls are knocked down I can see where this is going, and I can’t wait to see the rest. Having a nice laundry room makes the process a lot more enjoyable.
Reenie says
WOW!! Moving right along. Love the natural light coming in. :)
Alishia says
Looks great guys! Can’t wait to see the finished product.
My home improvement this weekend involved testing out my prowess sanding our wood floors to see what I could do on my own.. then getting scared and stopping. eh. ;)
Amelia says
What kind of planning/permit process did you have to go through, and what amount of time does that add to the process?
YoungHouseLove says
Thankfully when you use subs you can negotiate who pulls the permits, so we had our licensed and insured electricians, framers, and plumbers pull the permits they needed. Some sub-contractors are more likely to make you do all the permit work (which really isn’t too bad, we did them ourselves when John built the deck).
xo
s
Emily says
Looks good! Quick question- since y’all are acting as your own GC on this project, did you have to get the permits from the city/county on your own or did the plumber/electrician do that? (or did you even need permits for this?)
YoungHouseLove says
Thankfully when you use subs you can negotiate who pulls the permits, so we had our licensed and insured electricians, framers, and plumbers pull the permits they needed. Some sub-contractors are more likely to make you do all the permit work (which really isn’t too bad, we did them ourselves when John built the deck).
xo
s
Lynn @ Safebeauty says
That is alot of demo going on and changes. I love every bit of it. I’m really looking forward to seeing your drywall post. We are going to be putting drywall up in a little space in our hallway. I think it’s easier in my head because I’m realizing the last time we did it we had the help of my contractor uncle – this time, not so much. To see how you guys tackle ceiling to wall corners will be nailbiting. :)
My best, Lynn
Loey says
How are you handling not having a washer and dryer especially with a newborn in the house?
YoungHouseLove says
We can last about a week and then it’s chaos, so we’re planning a little drive to Grammy’s to do some laundry soon ;)
xo
s
Darcy says
I LOVE this SOOO MUCH! I am soo impressed that your readers think so highly of you that they take their time to come up with options for you — And this particular idea was soo BRILLIANT! And then you guys love it, and RUN with it!! I have always loved that you guys read your comments and respond to them!! Just think — if you were like everyone else, you would have missed this amazing idea!!
Kudo’s to you and to the very smart reader that made this plan!! I think this is just PERFECT — I think that it is always a good sign when it seems like it should have always been this way!!
That light coming in is GORG!! I can’t believe all that you got done in less than one week! Can’t wait to see what happens next! Sherry — have you got to go TILE SHOPPING yet?!?! We know how much you love that! Are you going to tile the floor and get to do a backsplash, like your original thoughts?
YoungHouseLove says
YESS! Tile shopping was fun. We picked something and can’t wait to share the photos as soon as it comes in! The original backsplash tile is still in the mix too, so I can’t wait to see it together.
xo
s
Roxanne says
Too late to think about a pocket ddoor to the laundry, but did you consider a barn-style slider to clean up door swings? It light take too much space out of the hallway width. Just a thought. Love this much more efficient use of space you settled on, great job!
YoungHouseLove says
Those came up a ton in reader suggestions so we heavily considered both of them, but we settled on a regular door for the laundry and a frosted one for the storage room. The drawing isn’t to scale, but there’s a ton of room for it to swing open without interfering (will share a picture of the door propped up against that wall for scale for you guys in our next post).
xo
s
Jody Jaggie says
SO MUCH BETTER! I am glad you listened to the comments on working on a better solution rather than a quick update.
Lindsay @ The Newlywed Notebook says
I think this might be my favorite project of yours to follow along on, and I’ve been readying your blog for years!! A little pathetic that I’m obsessed with your laundry room? Maybe. But I feel no shame. :)
YoungHouseLove says
Haha, I’m right there with you! I’m glad you guys are excited because when I tell non-DIY-loving friends how excited I am about a laundry room I think I see their eyes glaze over.
xo
s
Cindy Riddle says
It’s hard to tell from the pictures, is the ceiling of your garage insulated? I don’t know if that is code or not. (I live way up North where most garages are fully insulated)You’ve mentioned often that your future bunk room space is un-insulated. If it isn’t I would insulate when fixing the drywall on the ceiling.
This remodel is looking so great. Your floor plan was pretty good before this, but now? WOW! Not that I am trying to rush you, but this is so much better than I initially thought you would do with the space when you first bought the house. I can’t wait to see what you end up doing in the Master Bath!
YoungHouseLove says
Thanks Cindy! The garage ceiling thankfully is fully insulated, they just had to remove some to run that stuff along that row, so that area needs to be reinsulated and closed up when we drywall.
xo
s
Melanie says
oh drywall demolition….we had a mini-flood in our basement last month due to a sump-pump failure and we are just finishing up having all the drywall repaired. THE MESS. UGH. If I never see drywall dust again it will be too soon. We want to re-do our garage/mudroom/laundry area entry at some point (there’s a closet and a small ‘drop’ area which is all but useless to us with little kids, benches and hooks/cubbies would be much better). But this experience has left me cold on drywall…UGH. We hung the drywall ourselves and are having the finishing done professionally. I’ve been told drywall finishing is an art and I don’t want it to look terrible, or like I cheaply DIY’d it, you know?
YoungHouseLove says
Yes! It’s totally an ART! We are debating getting a pro to mud and tape it for us after we hang it too! Don’t want it to look sub-par at the end of this laundry room makeover tunnel :)
xo
s
Peggy McKee says
I’m really impressed!
One suggestion: Instead of frosted glass, use clear glass and a net curtain. I think the frosted glass will really cut down the amount of light you’ll get in the hall. (You can put up the net curtain when guests are expected.)
YoungHouseLove says
Never heard of that! Thanks for the tip Peggy!
xo
s
Jamie D says
You know, clear glass isn’t a bad idea because you all can do the frosted window film (I’ve used it in two places in my house thanks to you all!!) until the bunk room is done, then remove it down the line!
YoungHouseLove says
We were thinking about that too! Just not sure if when people sleep there once it’s a bunkroom (ex: friends come with their kids and they sleep in the bunks) if we’ll want to give them more privacy, but I guess we could always just keep it frosted…
xo
s
Wendy says
Or put a fun homemade roman shade on the inside for privacy when needed.
YoungHouseLove says
That’s a sweet idea too!
xo
s
Amanda says
Removing the laundry room to get the light from the window is totally worth it. You can already see a major difference from the last picture in the post! Can’t wait to see the rest of the progress.
brynne says
Looks like you are getting a TON more wall space in the new room. You should definitely put some thought into storage solutions. Perhaps a built in ironing board? Or some space to hang or fold clothes?
YoungHouseLove says
We’re having so much fun debating our options! I think once we have the floor tiled and the washer and dryer back in place we can tape things out on the floor and plan the rest of those finishing touches!
xo
s
Betsy Slater says
Look at all that light! It’s like a smile at the end of the hallway.
On another note, I know this is silly but I have to tell you how glad I was to see John in closed-toed shoes for these demo pictures. Any time I see him doing projects in flip-flops I get nervous!
Susan Wedel says
Great post! Love your blog! I wonder if you’d like a pocket/sliding door into the laundry room. It would give you more space in there.
YoungHouseLove says
Those came up a ton in reader suggestions so we heavily considered both of them, but we settled on a regular door for the laundry and a frosted one for the storage room. The drawing isn’t to scale, but there’s a ton of room for it to swing open without interfering (we’ll share a picture of the door propped up against that wall for scale for you guys in our next post).
xo
s
redkimba says
Doesn’t it make you wonder what the original builder was thinking when he blocked off all that natural light with a clunky and inadequately small laundry room? Wouldn’t it have been easier to just build it your way from the beginning? The layout is so obvious.
It’s kinda like the situation I faced when I bought this foreclosed property last year to live in. The kitchen hadn’t been renovated since 1972 (we found the date scrawled in black crayon on the back of the cabinets when we tore them out.). The cabinets were falling apart inside, a wall cabinet had been installed as a base cabinet, the counter space was poorly laid out and covered in neon orange laminate.
Neon Orange. The house last sold in 1996 so the previous owners had lived with that kitchen for 17 years and never bothered to change the neon orange countertops.
I just don’t understand it. (in my best Marge Gunderson Minnesota accent)
(Yes, I fixed it. It cost about $5000 of Ikea cabinets and butcher block counter tops. It’s just a mystery to me how some people lack imagination)
Flagless says
Some people also lack money. The five thousand dollars may be nothing to you, but it may be a huge amount for others. Don’t assume that everybody’s situations are the same.
redkimba says
Perhaps I should clarify: I haven’t had a full time job since I was laid off from my high salary position in research in mid-2011. I HAD to sell my house in NJ and buy a foreclosed fixer upper in PA. The kitchen was unusable. Not just dirty. I mean, I couldn’t use the sink, countertops and half of the appliances were missing. It took me $5000 of money I could ill afford to spend (did I mention my brilliant 17 yr old starts college this fall and that I am a divorced mom supporting us both on my crappy part time jobs and living off the profits of the house I sold in NJ? No? Well, I am) to make the kitchen a place where actual cooking could be accomplished. That meant, buying a refrigerator and stove as well as new cabinets, sink and countertops.
What surprised me was the people who had lived there previously did nothing to the kitchen that had been put in back in 1974. They didn’t even bother to buy a cheap quart of countertop paint and paint the neon orange countertops. That’s not a matter of money. That’s something else entirely.
abigail Delphenich says
Be careful if you park your car in the garage, with all the drywall cut out it could let carbon monoxide in to your house, especially if you run your car for a bit to get it to cool down.
I am loving all the hard work, it looks so awesome. Good job as all ways.
YoungHouseLove says
Eeks, thanks for the tip!
xo
s
Alix says
Amaaaaazing progress!! This is awesome; can’t wait to see more!
I was just curious…the unit in the floor plan next to the dryer is a lower cabinet, right? (I’m assuming for some concealed storage.) Any reason why you aren’t pulling the trigger for a big basin sink? I know there are fewer and fewer delicates made these days to warrant handwashing garments, but I’d think with all the painting you cats do (big jobs and art), having a spot to clean brushes and rollers and other messy tasks without relying on the kitchen sink would be awesome! Or…maybe it is a sink! Anyway, just wondering! :) Congrats on all the hard work so far!
YoungHouseLove says
Thanks Alix! We would have loved a sink, but we mapped it all out and measured and remeasured and think it’ll be too tight, so we’re going without. It’ll be nice to have a little countertop area to set things down on though!
xo
s
Lauren says
You should have put a sink with a countertop lid, so you could have both! Lid down for counter, lid up for sink!
YoungHouseLove says
That would have been awesome but it would have been such a small sink we figured the cost to plumb it wasn’t really worth it, so we’d rather just have a counter with accessible storage space under it (not stolen by a sink).
xo
s
RobinD says
Oh how exciting! You lived in your home and waited until you knew what you wanted – and evaluated all options.
I’ve been in my new home 8 months and it’s SO HARD to wait, but really, it’s the best way to make GOOD decisions.
Nothing like a laundry room on the same floor as the bedrooms.
Christine says
These changes look to me like how the house should have been in the first place… the ultimate for any reno project, right? As for us, this weekend, we finally moved into our new house! We’ve had the house since June, but unexpected repairs, etc., pushed back getting all of our stuff there. Whew. How did we get all that stuff!?
YoungHouseLove says
Congrats Christine! That’s so exciting!
xo
s
Christine D. says
It’s amazing how fast you guys are making progress. I’m so happy to hear that you’ll be tackling the taping/spackling yourselves. At the end of this year, we’re attempting to drywall/tape/spackle a bedroom in our house that’s currently all paneling with wallpaper over it. I am a little intimidated by it, but I’m sure you’ll come up with some great tips for me!
Teresa says
Wow…this is going to be a great laundry room. I am amazed how much progress you have made. I don’t know how my poor sister-in-law lugs laundry up and down steps from her basement where her washer are dryer are.