This is a smorgasbord of an update, since the exterior of our house has changed in a bunch of different ways since last year when we painted it white with masonry paint that lets the brick breathe (you can read all about that project & the cost right here).
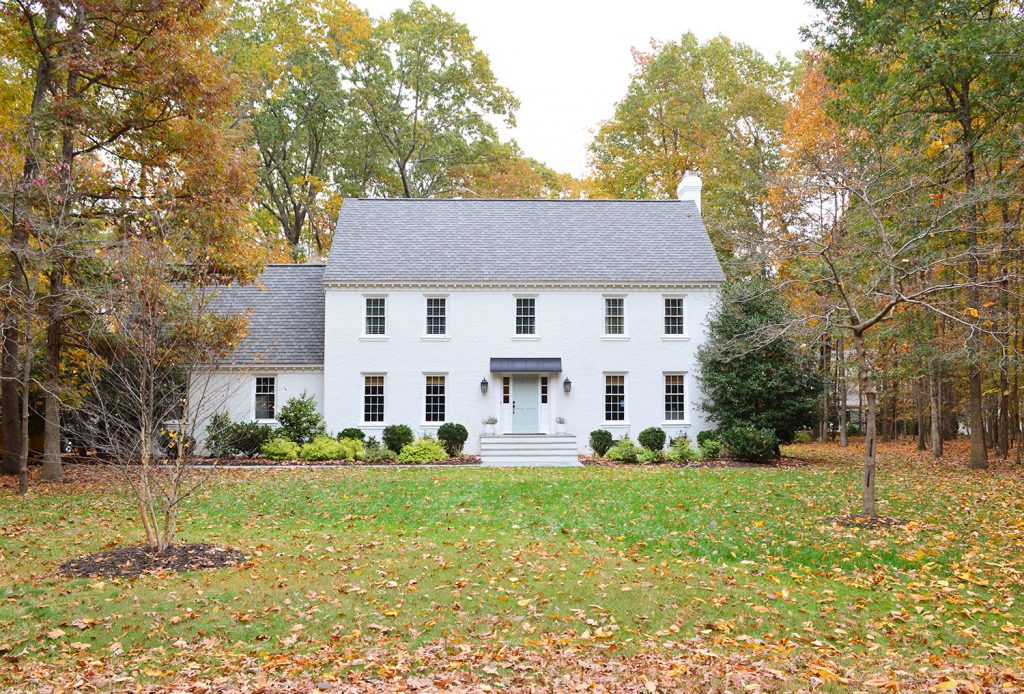
It’s my very favorite makeover we’ve ever done to date, but as I mentioned in that post (probably 10 times if I know myself), the exterior was still very much a work in progress after the house got painted. So without further ado, let’s talk about the new path we added, the awning, the new porch lights (we not only switched them out, we lowered them when we hung the awning) and a bunch of other landscaping related things that have happened over the last 12 months. And the few remaining things that we’re still working on… because that’s how it goes ;)
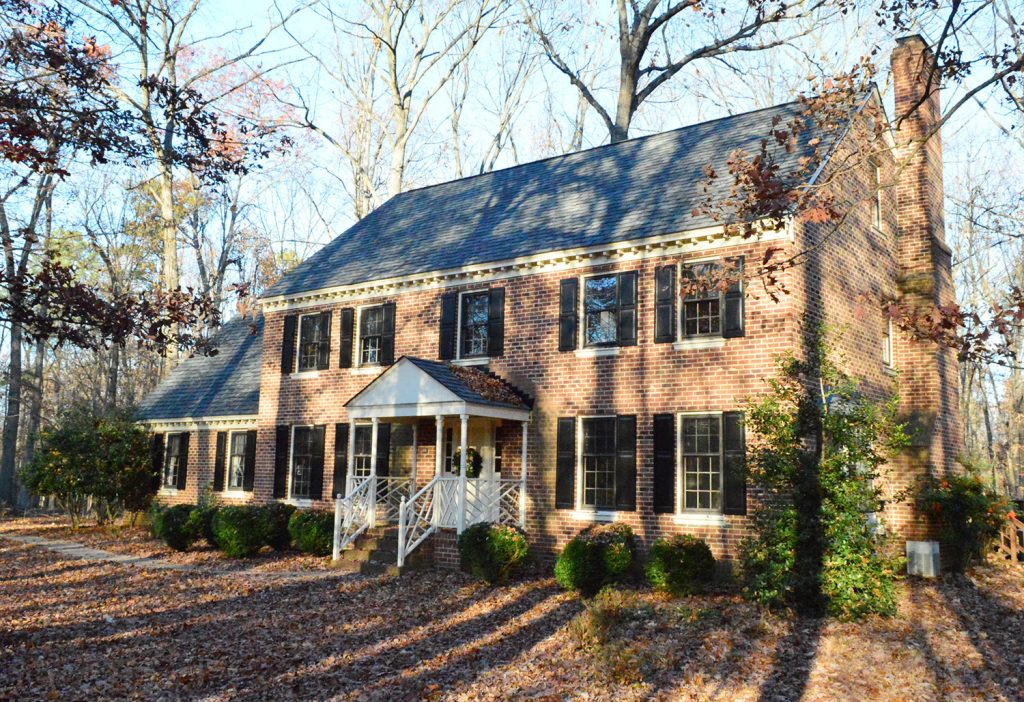
First let’s take a second to look back at the before shot because it blows my mind every time. Did I ever tell you guys that my dad texted me in all caps last fall saying “YOU MOVED AND DIDN’T TELL ME?!?!?” because he saw a picture of our house painted white on Facebook and couldn’t comprehend that it was the same house… so he literally thought we moved without mentioning it to him?! It was my favorite text convo of 2018.
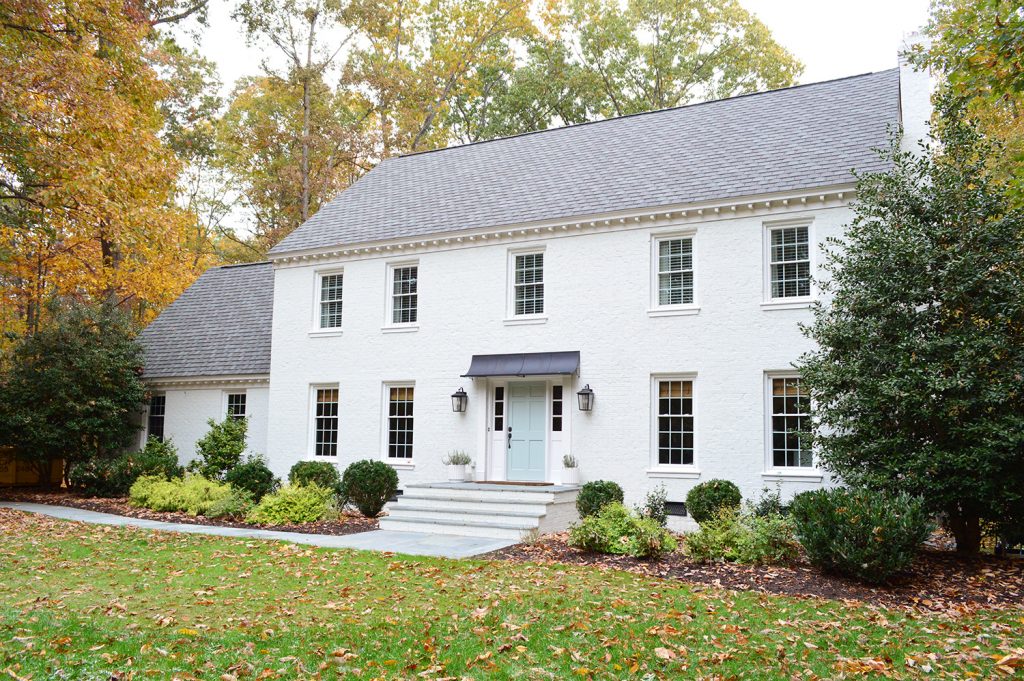
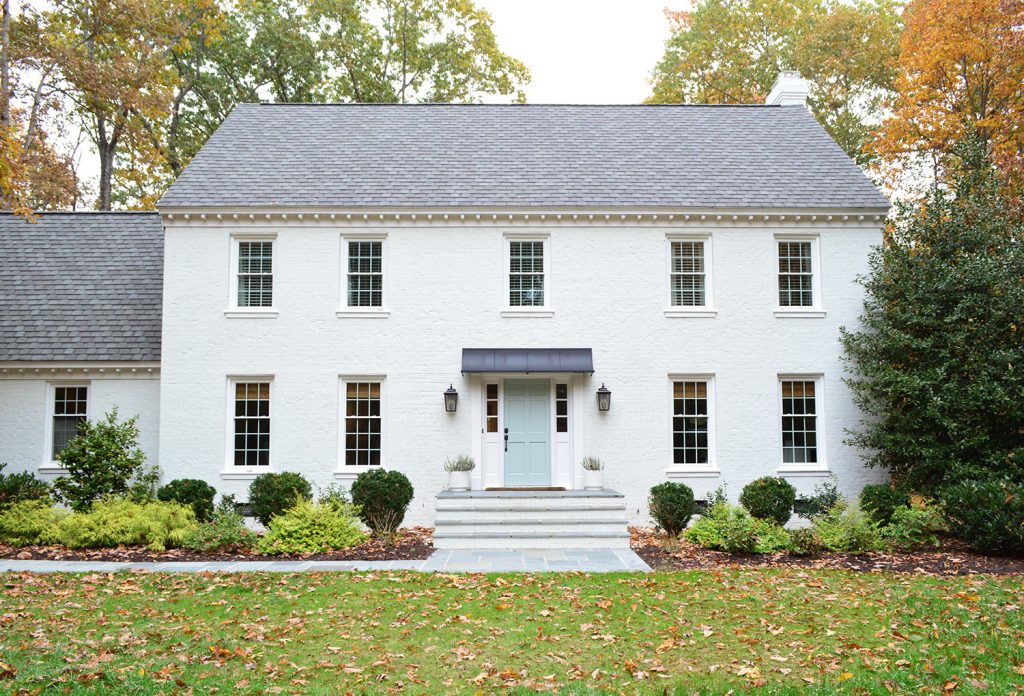
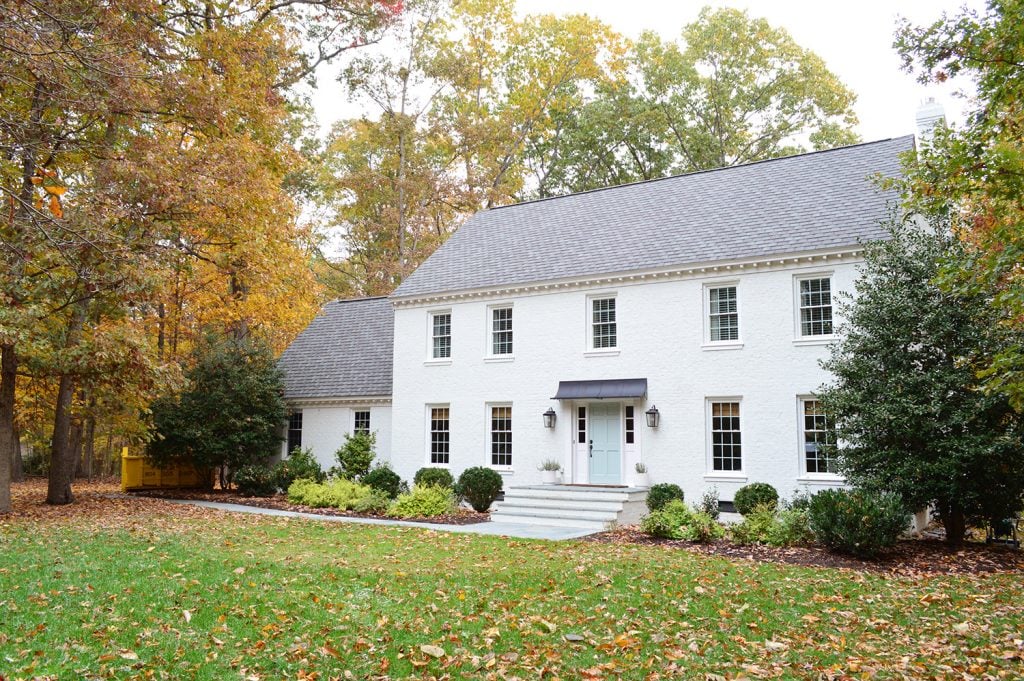
But back to the present day. Here we are now (we took these photos just a few days ago, so this is currently how things are looking outside).
And just for comparison, this is a photo from last fall, so you can see some of the updates pretty obviously when you compare the two photos. We felt like the facade around the door was a little flat looking from some angles, so we mentioned wanting to add a little something over the door in the form of a slight awning. Nothing huge like the old portico we knocked off the house when we painted it, but just a little something to define it a bit more.
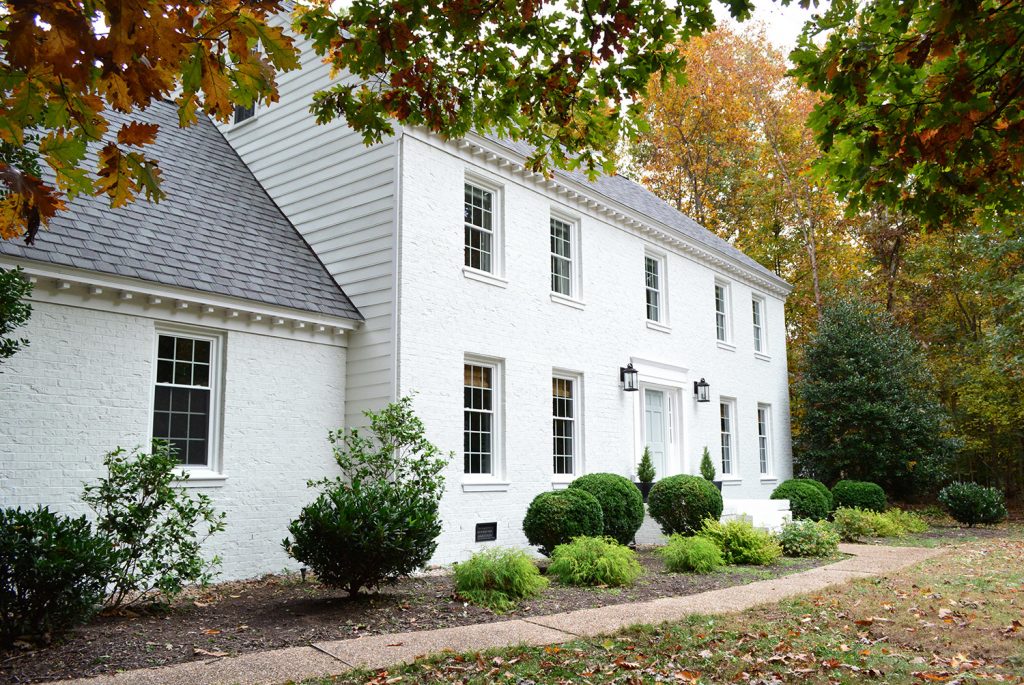
Enter this awning that we had shipped all the way from the UK, stage left. Yes, that’s right. And I’m aware that it sounds like something Ariana Grande or Lady Gaga would do, but I fell in love with some inspo pics with a sloped gracious awning like this on a white brick house and couldn’t find any ready-made options that were even remotely similar except for this one all the way in the United Kingdom.
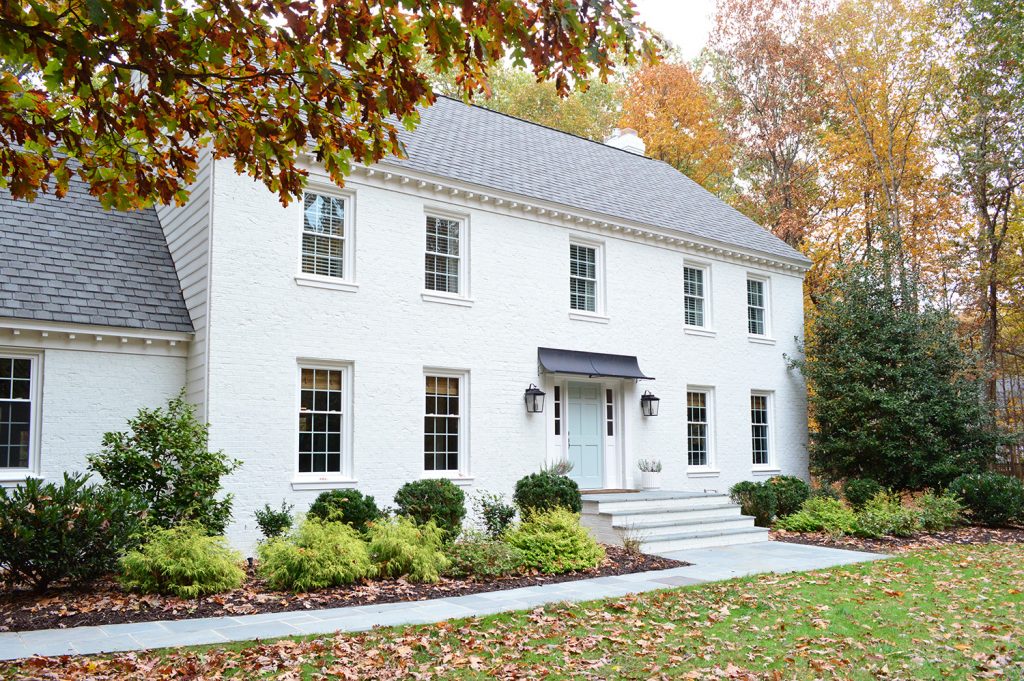
Of course off the bat I assumed buying something that didn’t have to be shipped from a different country would be more affordable, so I consulted with some local pros & some online awning companies and every single quote to get one that looked like the ready-made U.K. one that I loved was 2-3 times more expensive than just paying the extra shipping to have it sent right to our door. Insane right?!
Literally 3-4K quotes were rolling in, and the one from the UK (at the time that we bought it, since exchange rates are always changing) ended up being around $1,500 including shipping). It’s 8′ wide since we have sidelights, so this thing is a beast. It arrived in a big wooden box that we affectionately called “The Coffin” for months before we finally cracked it open and hung it.
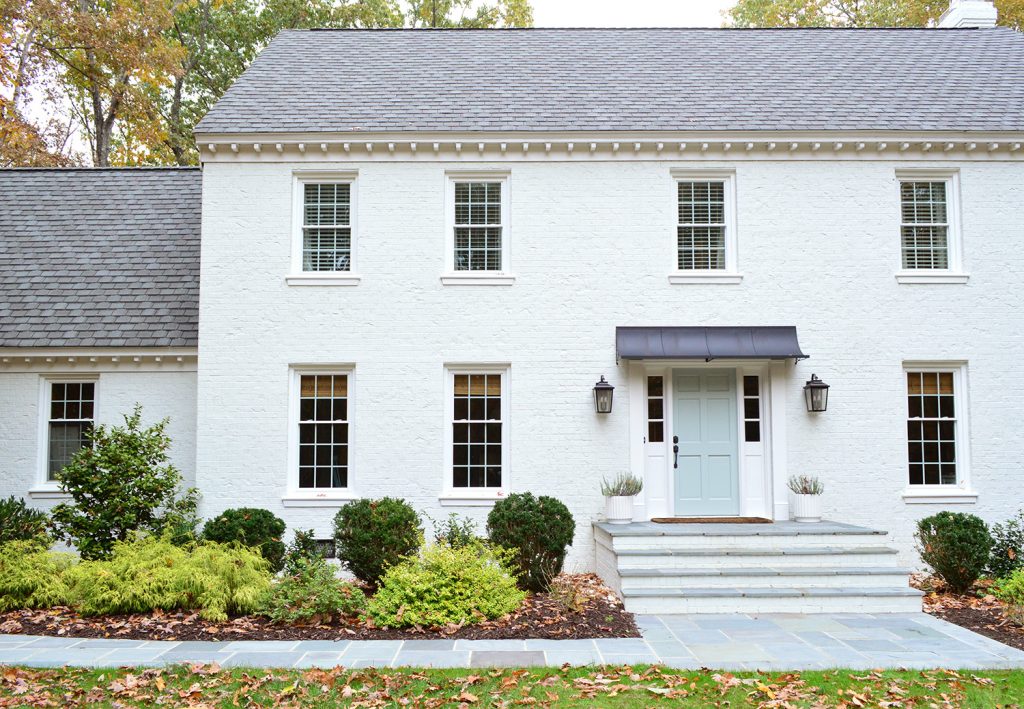
So as much as I love hiring local pros to create something that we can’t find ready-made and available to us (which is what we do 99.9% of the time), in this case I liked the idea that this UK company commonly makes and installs this exact product without issue (whereas someone trying to copy it and make it for the first time might run into some unexpected issues with the production or the way it functions or how it holds up/warps/flexes over time). So that gave me some nice peace of mind when I ordered it. It even has a hidden drip edge across the front of the awning that’s ever so slightly sloped so water funnels out each side if it’s wet/raining (instead of streaming down and dumping right on the person walking in or out of the door). Really smart design. So far we’re very happy customers.
Let’s flash back to a before shot from this angle, just because it amazes me every time. Look at that giant rocket ship of a portico coming off of the house. I love that we bought the house with it, because those railings get to live on at the duplex (it was MEANT TO BE! More on that here), and it just feels a lot more classic to us without that big hulking thing out front.
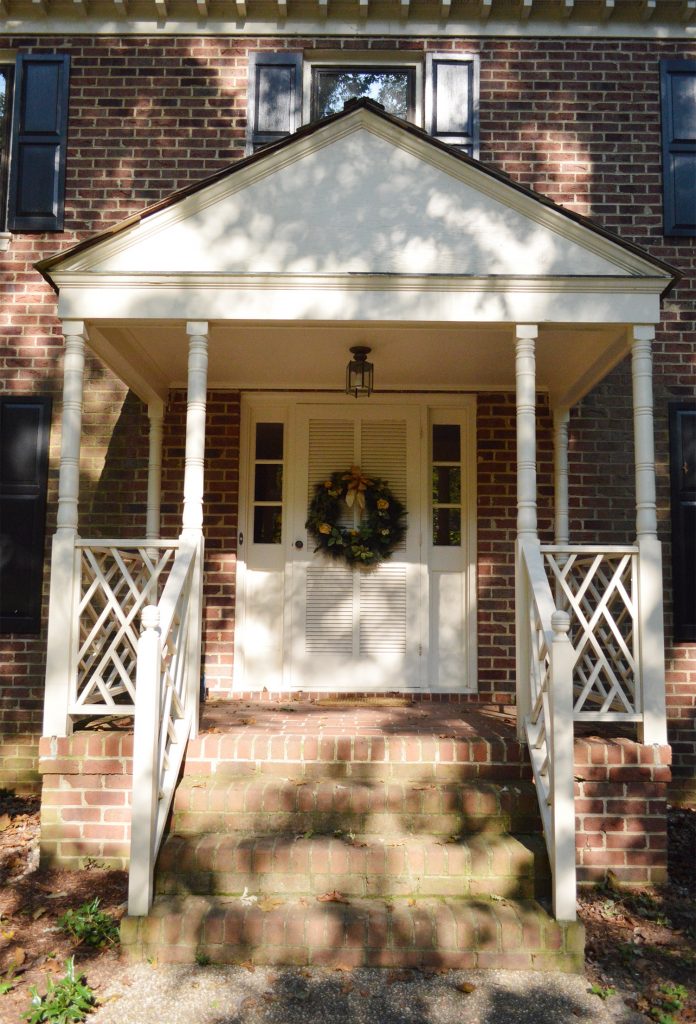
We’ve lived without it for a year and never miss it (packages get left by the garage on the side of our house which has a slight overhang, so not having this out front didn’t change much at all). We also enter and exit the house through the garage every single time, so it’s not like we stand in the rain when we unlock the door now – but those are good things to consider if you’re taking the big overhang off of your front door. My BFF goes in and out of her front door all the time and not having a larger awning or overhang would drive her crazy.

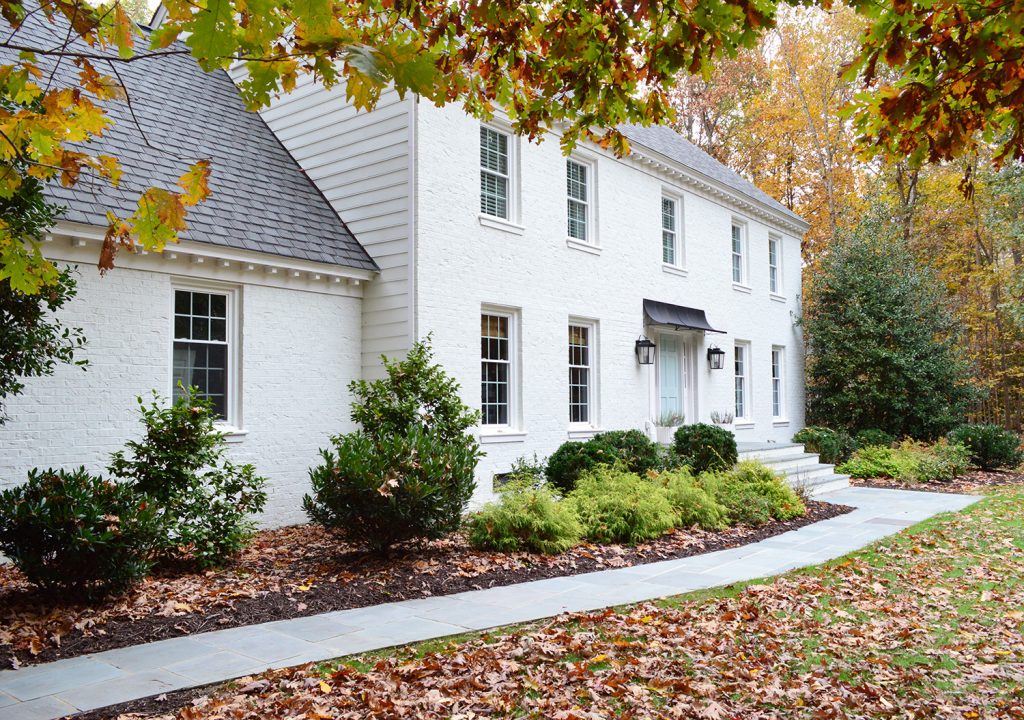
Oh and this photo above shows you another update, which is that we planted a tree! It’s the one on the left side of this photo, which balances the existing dogwood that we have over towards the right side of the house. We used to have a second dogwood out front, but it died a few years back, so this fall we bought a tree that’s all over our neighborhood (it seems to love the conditions here) and is very very lovely when it’s not in stick mode (UGH, FALL IS THE WORST). It’s called a river birch and they are truly gorgeous trees. Can’t wait to share more photos of this whole front yard in the spring when the dogwood and our new river birch baby are all greened up and lush again.
We also did a bit more landscaping in the front beds – mostly things that were already there last year have just filled in a little (and I clipped the ridiculous looking ball hedges to be a little shaggier so they look less like the big red cement balls out front of Target). We also added three peonies that I randomly found at Costco (here are some great pro tips for growing peonies, btw). You can’t really see them in that smaller bed on the right side, but in the spring if they bloom I’ll share about 347 photos.

We also added one white hydrangea bush on each side of the steps (they’re currently in stick mode, which I think all of them are in right now, but the deer ate them in the summer just like I feared/knew they would (when they were not in stick mode, and, in fact, were in lovely full bloom mode). I just can’t let go of how good a row of white hydrangeas would look with some boxwoods in the front beds – but the deer always treat them like a salad bar (even when I try every single method known to man to deter the deer – our deer are lovely and sweet but also SAVAGE when it comes to eating plants). Oh well, I tried.
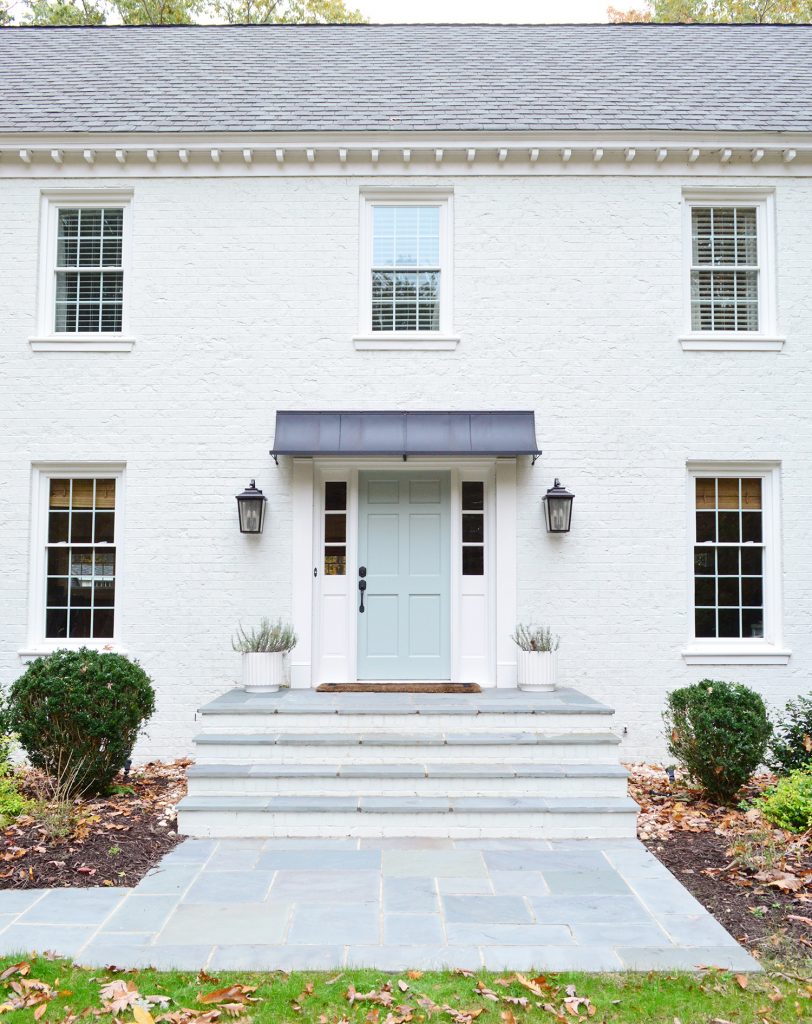
Ok, onto the front path! We talked all about this project on the podcast (more on that here) but you can see it below in all of its glory. We love how it came out.

Bluestone is forever my favorite outdoor stone and the big happy surprise was that it was significantly less than some of the other natural stone options for paths and patios (for example slate and fieldstone was around twice as much when I priced it out locally). As for how much you’ll spend having this done, bluestone is usually around $10-13 per square foot installed (yes, that price includes the material & the labor by a pro), so measure out how many square feet you want and it’ll give you a good idea. Just remember to get a few estimates and meet with a few different pros to see who you mesh with best (more on why that’s a step we’ll never skip again on this podcast).
Speaking of meshing with people, waaaay back in my original we-painted-the-brick-white post, I shared a pic of Reese Witherspoon on her front steps and talked about how we dreamed of topping ours with thick stone like hers. I think I nailed the pose.
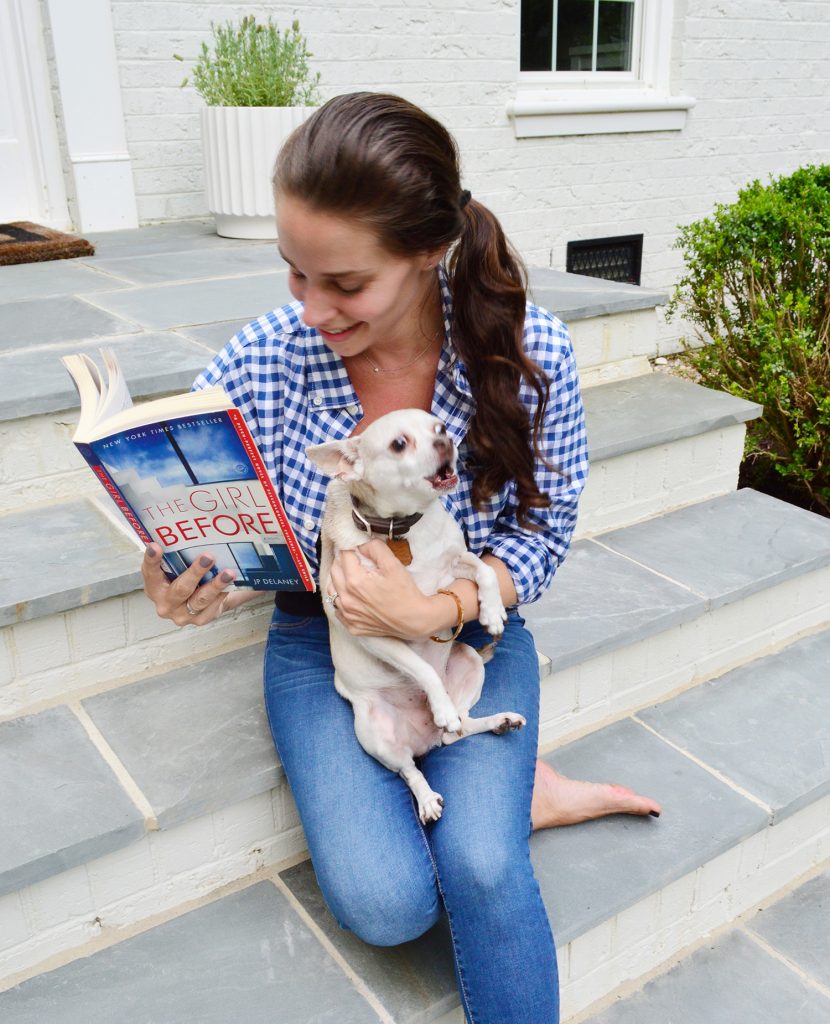
Please take a moment to appreciate: 1) my closed eyes, 2) the fact that I wore John’s shirt since my entire closet is black, and 3) Burger’s intense desire to bark at the dog that walked up our street at the precise moment this photo was taken.
Oh but if you look up at the bigger photo of me channeling Reese above you’ll see some of the discolored yellow-ish marks on the brick “risers” of the steps (it was taken a while ago, before John primed & repainted with Romabio to cover the latex paint the pro we hired used on our steps instead of using our breathable paint – ack). You can hear that whole story here and I’m happy to report that they look great again thanks to the primer + correct paint going back on (much less of a yellow tint and there’s no more stain seepage).
This photo was taken a few days ago so you can see the difference – it matches the house exactly and isn’t as oddly beige in some spots anymore (for comparison, scroll back up & look at the big picture of me & Burger, and you’ll notice the brick to the right of my left shoulder has a vertical seam that looks oddly yellow).

We also got the steps widened before we added the bluestone on top (by the same pro who added the stone), so they’re finally the graceful welcoming stairs that I’ve always pictured leading up to our door. It was around $450 to go that extra mile before adding the stone on top, and we’re glad we went for it.
For comparison’s sake, here’s the original setup one more time, just to refresh your memory. The steps pinched in and always felt oddly narrow…

… so it’s really nice and open feeling now that they’re all that same width as the landing up top and the nice large area of bluestone that we added below.

You can also see the new-ish lanterns that we got last winter I think. They’re even bigger and we like that they’re less narrow, and their new placement is so much better. We originally just hung them to fill two holes in the brick that were exposed when we removed the portico – but that placement looked extremely odd & high once the awning went up.
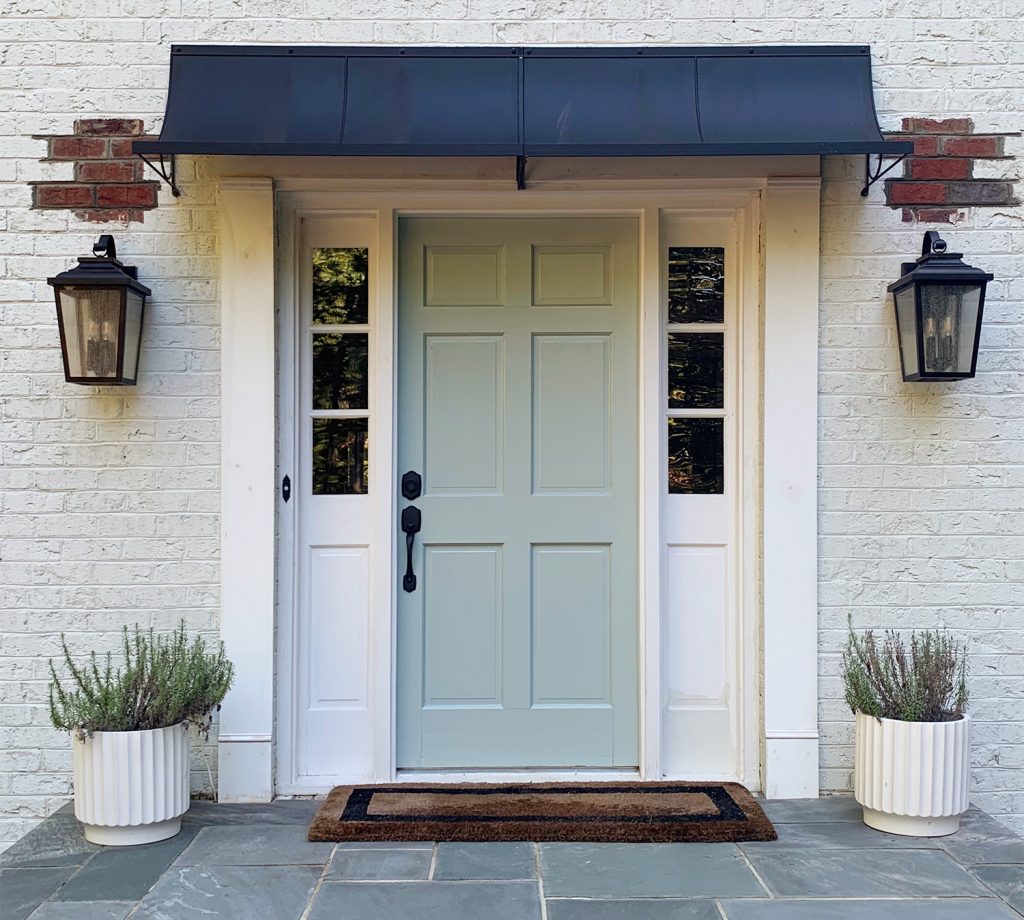
So it felt good to finally get those brick holes patched, and put the lanterns were all the other door-flanking lights around the neighborhood are located. In case you’re wondering, it seems to be common practice to line up the middle of the light with the cross rail of the door (that’s the horizontal plank of wood on the door that’s about 12″ from the top) so that’s what we did and it looks great.

As for what’s next out here, a bunch of you have already heard this, but on the podcast we chatted about why we suddenly had clarity on wanting shutters again (tune into this podcast for more on that). We’re not going to go with black though – tonal inspiration images have me super excited.
So our new shutters are currently on order. It’ll be a few more weeks or months if it gets too cold to paint them, but I can’t wait to show you guys the photos whenever we get them up. These are the exact louvered shutters we got, and I think they’re going to look so good (we love how they came out at the duplex). I definitely want to add operable hardware like we did for the duplex too.
As for what else is on the front yard agenda, I’m sure we’ll keep chipping away at the front landscaping (the target ball bushes are less intense since I went ham on them with a clippers, but they’re still not my fav) so I’m sure over the next few years things will continue to slowly evolve up there. Maybe someday I’ll even figure out some way to have white hydrangeas, but hold me back, because if that happens you’ll never see photos of anything else. I’ll start a new blog called Hydrangeas & White Brick and it’ll just be a new angle every day with musings about life and inspirational quotes. Actually, I’d read that blog…
*This post contains affiliate links, so we may earn a small commission when you make a purchase through links on our site at no additional cost to you.
