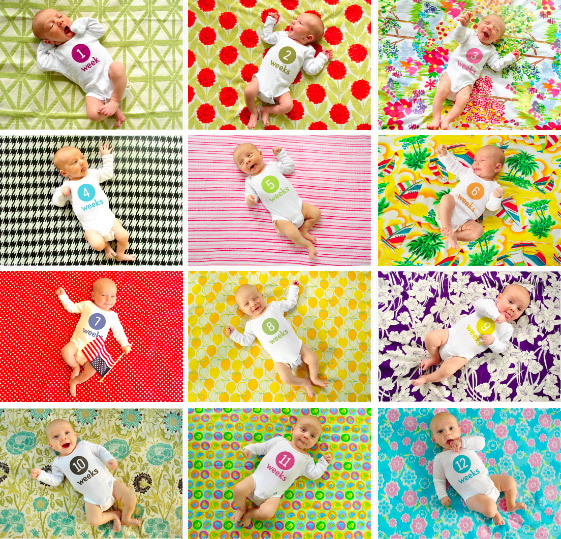
Many of you have asked questions here, on Flickr, and on Facebook about how the weekly photos that we’re taking to document Clara’s first year are really done. After answering a bunch of you individually, we figured the topic deserved a quickie “how to” post to collectively take care of anyone else out there who’s been pondering how we end up with images like this. You know we love a step by step tutorial. And documenting photos of your family can definitely fall under DIY art and decor – especially if they’re framed or even collected in a big coffee table book (which we eventually plan to do).
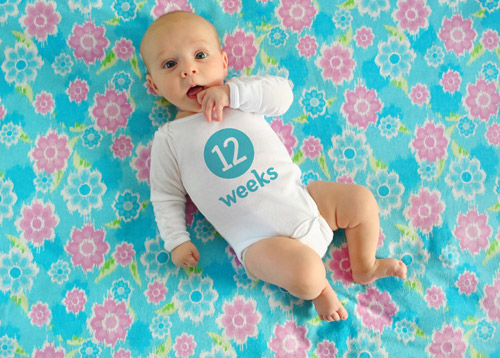
We’re not professional photographers, expert photoshoppers, or even seasoned baby wranglers… but after twelve weeks of taking shots of Clara on a fabric background and adding her age to her onesie “in post” we’ve developed a system that seems to work pretty well.
- Clara wears a plain white onesie (so far the same one, although she’s about to outgrow it) and we use Photoshop to add the text later
- We’ve only need one yard of fabric for each shot at this point, which helps keep the cost of the project down
- We usually snag our fabric at discount stores like Hancock or JoAnn Fabrics and use 40% off coupons to further save money
- We’ve also used already-owned fabric (and on-hand blankets & pillow cases) as backgrounds that are 100% free
- We shoot them in the evening (around 5:30-6:30ish) because the light is indirect, which means no harsh shadows and no squinty baby
- We take the photos in our sunroom because it gets the most natural light (you might get a similar look by setting your baby on a blanket outside in the early evening).
- We use a Nikon D3000 (which we’re learning to use thanks to a lot of your advice).
- To keep photos looking consistent from week-to-week we always white balance the camera against Clara’s onesie before we begin (most DLSR cameras have a setting for this)
- We usually take between 75-100 shots to get one final frame we both love (yeah, we’re a little obsessed with the beanette)
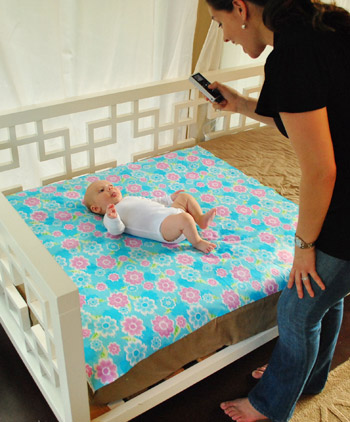
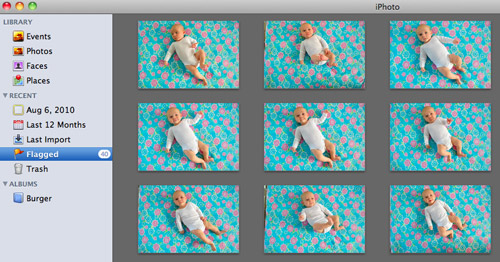
Now that we’re all caught up, I thought I’d breeze through what happens after we’ve snapped away at our tiny model and it’s time to finalizing our weekly image. First up is the sometimes long, often difficult process of selecting on our single favorite image. We use Apple’s iPhoto to sort through all of them, deleting the bad ones and flagging the good ones until we’ve narrowed it down to the one that not only represents Clara best at that age, but also isn’t too similar to past weeks’ photos (since we like them to feel as diverse as possible when it comes to composition).
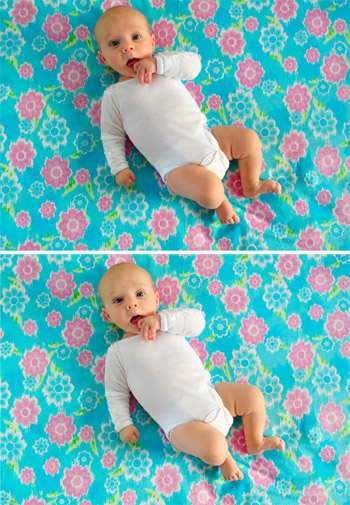
Once selected, we pull the winning image into Photoshop. Again, we’re not experts, but we’ve honed a pretty good process for achieving the fairly convincing look of text printed on a onesie. First we do some basic touch-ups like cropping the photo or lightening it up a smidge if necessary, and occasionally we do a bit of virtually smoothing out if the fabric has any crazy wrinkles that the iron didn’t seem to take care of (with the Healing Brush and the Clone Stamper). As a comparison of sorts, here’s the original picture on top as it looked straight from the camera, and the slightly lightened and de-wrinkled version below it:
Then we add the text. At this point we usually just copy the text layer from the previous week’s file, but in case you’re starting from scratch we use a font call Fyra for the circled number and Otari for the word “weeks.” Both are free from the site FontSquirrel. Once dragged in we make sure the week is correct (in this case, we changed the week number to “12”) and we rotate the whole thing to line up with the angle of Clara’s body.
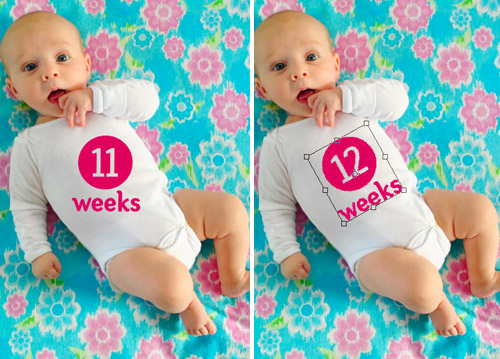
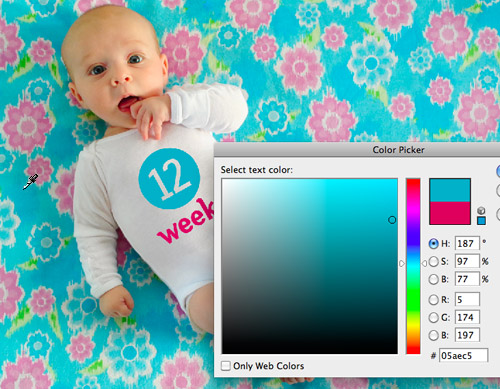
Then we select the color for the text. Usually we snag some color from the fabric itself (using the Color Picker tool) so the whole image coordinates, but sometimes we pick something complimentary to the fabric, like week one’s plum-magenta text that we liked against the green background.
The trick we came up with for making the text appear to be printed on the onesie is a combination of layer style and opacity. We set the text layer to “Multiply” and bring down the layer opacity to somewhere between 60% – 80% depending on how saturated the color is. Note: sometimes we have to adjust the color slightly after these steps to make sure it hasn’t gotten too light or washed out.
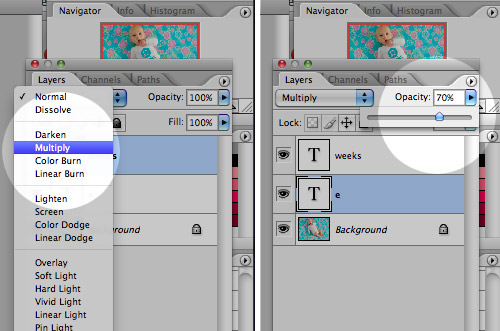
Here’s what the image looks likes before and after the “Multiply” and “Opacity” steps. You can see how it has subtly picked up the shading of the onesie behind it which tricks our eyes enough into thinking that it’s been there all along. Oh, and sometimes Miss Clara’s outfit is a bit wrinkled so I have to do some text chopping and skewing, but I haven’t gotten that process down enough that I’d feel comfortable advising others. Just trust me that it’s easier when her onesie is smooth (which is definitely the case lately since she’s outgrowing it)!
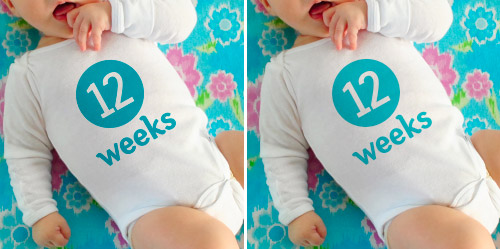
With that, we’re done!

Now that we’re nearly 1/4 of the way done with this year-long project we’re getting even more excited to amass all 52 images so we can get them printed in a nicely bound book for our coffee table (and the coffee tables of a few adoring grandparents). Plus we definitely think Clara herself will get a kick out of looking back at her weekly growth (and range of adorable expressions) when she gets a little older. Note: You can see bigger versions of the current dozen here on Flickr (we add the latest one every week there too).
Oh, and as for all of this fabric that we’re slowly collecting, the jury is still out on what we’ll do with it (make a quilt, sew some baby clothes, etc). Though our latest idea is that we’ll whip up an eclectic-looking banner or bunting that we can break out for birthday parties and even yearly growth pictures of Clara (sort of as an homage to her first year on Earth). At least until she gets too old and embarrassed to indulge us.
We hope this little picture play-by-play was helpful to anyone looking to adopt a similar method of documenting their child (or pooch, we could totally get behind that!). We’d also love to hear about any fun ways you guys have captured changes in your kids, family, or even your home – or if you’ve spotted someone else doing it in an interesting way (like the adorable Mila’s Daydreams project that we love). Spill those sentimental beans.
PS: If you’re looking to achieve a similar look but don’t want to bother with Photoshop, we learned of a company called Sticky Bellies that sells removable monthly milestone stickers that can be applied to any clothing.

Leeann says
This is such a wonderful idea. I’m so sad I didn’t think of something similiar with my now 18-month-old son. (Clara runs a close second to him in my eyes as World’s Cutest Baby!) Although I’m not sure how well he would have cooperated with me once he became mobile. He’s very stubborn! I’m looking forward to seeing how you adjust the photoshoots to Clara’s growing independence, so that maybe I can copy this idea when we decide to expand our family.
Adam says
QUILT! (That’s all the comment I have for today).
diane says
Great tutorial. One suggestion is to take all those fabrics, have the corresponding photo applied and make a photo quilt that way…could be interesting to see the photo of the fabric On the fabric.
She is darling, enjoy her every minute.
candace @ thecandace.com says
Sooo cute, especially the video! Clara is a star! Thank you for the photoshop tips!
Melissa says
One word. CUTEEEEEEEE!
georgia says
Awwwwwwwww shes the cutest!!!
I loved her little wave at the end made me laugh!
Lacey says
Awww! Week 11 has to be my favorite Clara!…and week 2 my favorite fabric :)
Nicole says
If you want to make a coffee table book you should use Inkubook. I used their service to make my wedding book and it was fantastic. Plus, they have tons of coupons (I think you first book is BOGO).
Carolyn says
Thanks for your advice, I really appreciate it! Going to add handprint making to next Monday’s to-do list.
chrissy says
i tried the photoshop thing when my son was born, but it looked too pixel-ish and you could tell that the photo was altered. i ended up getting a pack of sticky bellies out of frustration/desperation. those were MUCH easier/convenient and don’t have that photoshopped look to them.
Jeff says
My sister in law gave me “Sticky Bellies” as a shower gift. It was by far the best gift I got! SOOOOO SIMPLE AND SOOOOO CUTE!
Kristin says
How adorable! I like the idea of using the fabric for a 1st birthday bunting too, especially because it can then be added to Clara’s hope chest or time capsule.
Christine says
seriously- how can you not love babies after watching that.. what a cutie!
Cheryl says
Bring Clara north for a visit! I’m officially in love :)
jja says
You look amazing! So fresh and groomed! And Clara is so cute!!!
Only thing is you talk so fast and I as not being native enlish have really problems to understand.
YoungHouseLove says
So sorry Jja! The good news is that we summarized the video for you right in the post (all those bulleted points under the video are basically everything that we said). Hope it helps!
xo,
s
Melissa says
Loved the video!! Clara is such a cutie!! =)
Linda says
I love this post, thanks so much for doing it! Do you have any suggestions for how to do the week number on a onesie if you don’t have Photoshop?
YoungHouseLove says
Hey Linda,
Maybe get little numbered patches, buttons, or pins that you can add to a onesie for a DIY week indicator that you can switch out for each picture? Good luck!
xo,
s
May says
I love this tutorial! I did something somewhat similar with my daughter Kate’s monthly photos from last year just prior to her first birthday (see link below)
http://thecharps.com/blog/?p=1489
but after seeing your amazing white onesie + fabric combination, I will definitely put this on my to-do list when we decide to have baby #2 (especially since we recently purchased a DSLR camera). I’ve always loved date tees but really couldn’t justify the price. Thanks for the lovely and cheap ideas. Your blog is just lovely!
meghan leimenstoll says
I saw you have 200 comments on this post – and I have to admit I didn’t read them all – but this post reminded me so much of my new favorite blog: http://milasdaydreams.blogspot.com/
check out this sups-creative new mom who takes FULL advantage of her little girl’s slumper.
Thought you guys would get a kick out of this.
Enjoy!
YoungHouseLove says
Oh yeah we love that blog! We even linked to it at the bottom of this post!
xo,
s
Carmen says
Hey, what distance do you guys take the picture from?
YoungHouseLove says
Hey Carmen,
If you’re able to watch the video you’ll see I just take the photos from my standing height leaning over Clara on the daybed. So it’s probably only a couple of feet or so. But you’d have to adjust depending on your camera lens and how much it will capture. Hope that helps!
-John
Carmen says
Thanks so much!
Rebecca says
Maybe I’m not getting something, but I downloaded the fyra font and can’t figure out how to make numbers above 9 in the same circle together. When I try to do 10 I get a 1 in circle and a 0 in a circle. How do I get 10 in the same circle? Maybe it is because I am using Word not Photoshop?
YoungHouseLove says
Hey Rebecca,
Good question – sorry I didn’t address this. The font is a bit difficult once you get about 9. Once you get into double-digits they start to correspond to various letters – but they didn’t make it easy by making A = 10, B = 11, etc. Instead 10 is a lower-case Q, 11 is a lower-case W and other randomness. I actually created a quick key for myself so I wouldn’t have to guess each week what letter to type in. You can download it here: http://images.younghouselove.com.s3.amazonaws.com/2010/08/NumberFont.jpg
Hope that helps!
-John
Rebecca says
Perfect, Thanks!
Bev says
Hi,
Sooo bummed I missed the boat on this by a few weeks. I’ll be doing a month-by-month version of my baby instead! Quick ? for ya- My startup disk on my computer is full thanks to my mamarazzi tendencies and the zillions of photos on my computer. What do you guys use and recommend for storage of all your digital photos?
Thanks!
Bev
YoungHouseLove says
Hey Bev,
We use Flickr (we have an upgraded unlimited account) since it safely stores them off site in case of a fire and also have an external hard drive (called Lacie) where we transfer things once a month (in monthly labeled folders). Hope it helps!
xo,
s
Erin says
I know this is a little late, but I vote to use the fabric for baby clothes. It’s pratical and some of them are really easy to make, like pillow case dresses. I think you may even be able to use iron-on stitching for it? Then, later after you’ve gotten good use out of it save it to make a quilt.
Kerri says
You guys do so many of your projects using Photoshop. I’m actually look to take the plunge and buy it with my new educator discount but I’m curious as to what version you guys use. Thanks :)
YoungHouseLove says
Hi Kerri,
We’re currently using Adobe Photoshop CS2 version 9.0.2. Hope that helps!
-John
Erin C. says
I can’t wait to see how you guys and Clara handles this photo shoot when she starts rolling over and crawling away. It definitely gets more difficult to make them sit still. Good luck!
YoungHouseLove says
Hey Erin,
She’s already rolling over and grabbing the fabric like crazy! Luckily we’ve learned to dangle things above her to keep her interest and to pin the fabric down in each corner to keep from creating insanity!
xo,
s
Tiffany says
Thank you for great, easy directions! Can’t wait to do this come January!
Theresa says
Somewhat related (not sure the best place to ask this question)… Do you have any suggestions on what to do with adorable printed baby clothes that might have gotten a stain on them and therefore you wouldn’t hand them down, but would still like to do something creative with the fabric? I thought about using it as a matte for a picture frame – any other suggestions?
YoungHouseLove says
Framing them would be cute- or you could cut squares out that don’t have stains on them and create a modern quilt (or even stretch them over a canvas to make wall art). Have fun!
xo,
s
Jordan says
Question on the Fyra font, once you are in double digits, i.e. 10 weeks. How do you keep it from doing a circle around the one and a circle around the 0????? Thanks for the help, such a wonderful idea!!!!!
YoungHouseLove says
Hey Jordan,
I figured out that the double-digit numbers come up when you type in letters. Start with the top-left of your QWERTY keyboard in lowercase and work your way across the rows and you’ll see that q=10, w=11, e=12, etc. Once you’re done doing lowercase start over again with uppercase.
Have fun!
-john
Sara says
Thank you for posting! I love these photos! My husband and I don’t have kiddos yet, but can’t wait to do this when we do. You guys rock!!!
Amanda Whitmire says
Thanks for the wonderful idea! We are using your idea with our new daughter Naomi. We don’t have the best light up here in Oregon, but we’re doing the best we can. Gotta remember to iron our fabric! ;-)
Mindy says
LOVE this idea! I wish I would have thought of it! Maybe for the next baby :)
Becka says
Hi Sherry,
I love this idea.
Do you remember where you got the fabrics for weeks 12, 18, 20 and 22?
I look forward to see the weekly photos.
Thanks!
YoungHouseLove says
They were all from JoAnn we believe. Anything after week ten was from there. Love it! So cheap.
xo,
s
Carissa says
for those of you who don’t have photoshop, google’s free photo program Picasa does the job just as well and you can achieve the same look!
YoungHouseLove says
Great tip!
xo,
s
Sarah says
Have you guys considered using a plain white background and filling it in (in photoshop) with a digital pattern or something like digital scrapbook paper?
YoungHouseLove says
We thought about that for a minute or two but we love the ease and true-to-life look of using actual fabric. Plus it’s so fun to troll the clearance racks for discounted yard remnants.
xo,
s
Emily says
This is so cute. Do you know what song was used in the video?
YoungHouseLove says
Just check out the link at the end of the video for that info. Hope it helps!
xo,
s
Julia Hull says
So Clever and Adorable! Love the real fabric…it keeps it “Real”
Awesome Tutorial!! Bravo
Blessing to you and your young family!
Julia
Kelley says
Hey guys,
LOVE your blog. Quick question… what lens are you using with your camera?
Thanks!
YoungHouseLove says
Hey Kelley,
We just use the stock lens that came on our D3000. Hope it helps!
xo,
s
Rooma says
I went through few of your initial comments but couldn’t go beyond 50 :P. Not sure if you have mentioned how did you get the creasing effect on the number and week. Would you be able to mail it to me ([email protected])? or reply at my comment so that I can track it? I am expecting this coming feb so hope to do the same as well! :)
YoungHouseLove says
Hi Rooma,
No worries – the creasing effect comes most weeks just from the process above where the layer is set to “multiply” and make it semi-transparent. It allows the crease and the shadowing on the onesie to be seen through the text which makes it look like I actually creased it too. When the onesie is really wrinkled I do give it a little bit of an extra “crease” by rasterizing the text layer, selecting a portion of the text on one side of the crease and using free transform to stretch or shrink that part of the text. But that’s only happened two or three times. Hope that helps!
-John
Rooma says
Thanks for the reply John. :)
Also, how come none of the pics have any daipers popping out? I read your cloth daiper post and the ones you use seem to be quite big to nicely sit inside the onsies. I have seen pics of other babies who use cloth daipers and almost always they are peeping out from somewhere.
So what trick do you guys use for that one? :)
YoungHouseLove says
Once a week for the picture we put her in a Seventh Generation disposable diaper (so it’s not a shot that’s all about the big bright cloth diaper and you notice her cute face instead). Haha, so that’s our secret.
xo,
s
Lisa L says
Very COOL! And I vote for using the fabrics to make a quilt. Then you can give it to your daughter when she turns 16 or leaves for college.
shelly says
I <3 it! She's such an animated girlie so I love seeing her new pics! You'd totally have enough fabric at one yard/week to do both the quilt and the b-day banner! You could even use the b-day banner while she's growing up and later once she graduates or gets pregnant (something big) give her the quilt. (I hope she's not reading this over your shoulder in case you use this suggestion. shhh :)
Chira Speers says
Hi! I’ve been reading your website for the last hour and a half…I love it! This is so adorable, and such a sweet and fun idea to do…I wish I had done it! I’ve been taking monthly photo’s of my almost-one-year-old. I love looking back at them, it’s so amazing to see how much they change! I love that you collect fabric, too! You have such amazing ideas! And, your baby girl is so sweet and precious! Thanks for all the ideas!
Hannah says
This is such a cute idea!! I’m due with my first in April, and have been taking weekly belly pics. I am going to continue with a weekly baby pic once she arrives!
Laura says
We would love to know where you found the apple and pear fabric (if you can remember). We would love to use it in our new kitchen. Thanks!
YoungHouseLove says
That was from JoAnn Fabrics. On sale!
xo,
s
Mandy says
I love this so much! When you are all finished you should take a square of fabric from each background and sew it ( or use the the iron on stitchery tape ) together to make a blanket for her.
YoungHouseLove says
That’s the plan! Can’t wait.
xo,
s
Ann says
I am a photoshop virgin. Which program of photoshop do you use? Is it easy to use? Any suggestions?
YoungHouseLove says
We use Adobe Photoshop CS Version 8. We learned how to use it in college (it’s pretty intuitive) so you’d probably be ok with a How-To book from the library (or Barnes & Noble). Hope it helps!
xo,
s
Ann says
Thanks!
Katelyn says
I just started reading your blog(s) and I love you guys’ work! Do you have a book maker in mind for Clara’s book when the time comes?! If not, I would definitely recommend Blurb (blurb.com). I have made three books through them so far and they’ve all turned out great!
Thanks for sharing!
k
YoungHouseLove says
Thanks Katelyn! We’ll have to check them out! They’re definitely contenders.
xo,
s
Rebecca says
I totally agree with the quilt idea for the fabrics. What about doing monthly pics from the 1 year point onwards? I think that’s what I’d do. Amy Butler Designs has some great free quilt designs you could use. Love the Clara photo project and will be copying this when I have kids :0)
YoungHouseLove says
Yup, we’re definitely planning to do monthly pics after 1 year! And thanks for the free quilt design recommendation! Off to check it out…
xo,
s