The wallpaper in our dining room is gone. Phew! Hooray!
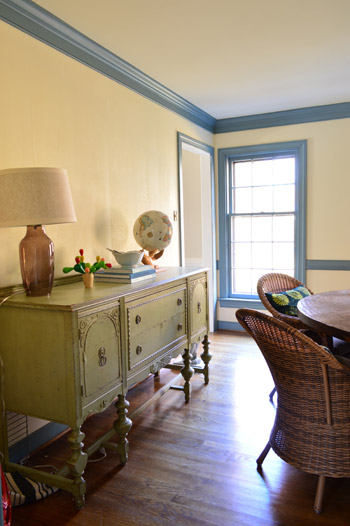
Ahh, fresh ready-to-paint walls, you make my heart sing. (And seemingly endless blue trim, you make my eyes twitch).
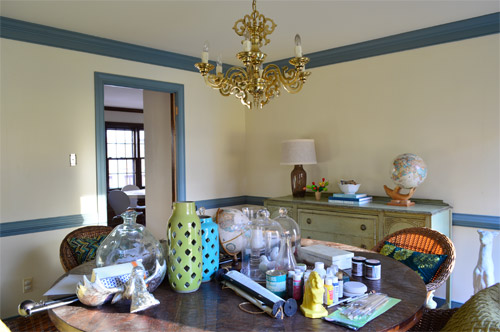
You might remember that each time I tackle wallpaper removal I’ve tried out a different method so I can report back to you guys on who’s the fairest of them all what’s the most effective of them all. Yes, I’m the Anderson Cooper of wallpaper. Except less handsome and more pregnant. Up until this point, I had tried boiling water sprayed on with a spray bottle for method #1, a steamer for method #2 (the one that’s in the lead so far for the easiest), and warm water mixed with Dr. Bronner’s soap along with a wet rag to get the underlayer as method #3.
This time’s method was recommended by a former professional painter named Sarah (who did her fair share of wallpaper removal before many a paint job) and her suggestion was “the dry stripping approach” which was followed by a round of “wet stripping.” Sounds saucy, eh? Don’t worry, it’s rated G. Essentially she said she just peeled the paper by hand without spraying it or scoring it with anything, and then used a large damp sponge to saturate the underlayer and peel that off as a second round. So I gave that the old college try…
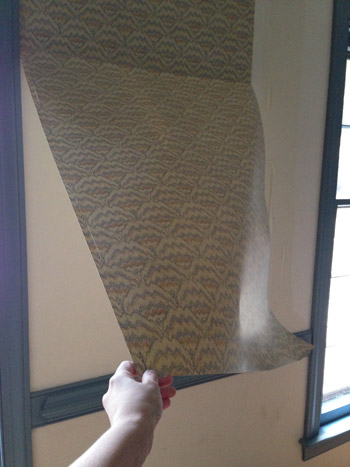
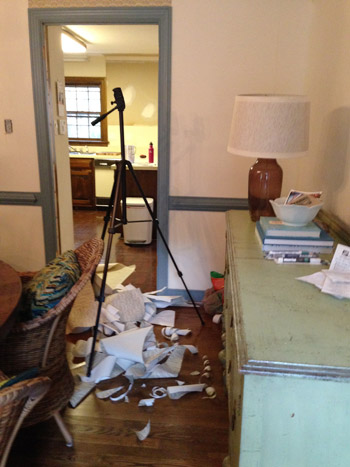
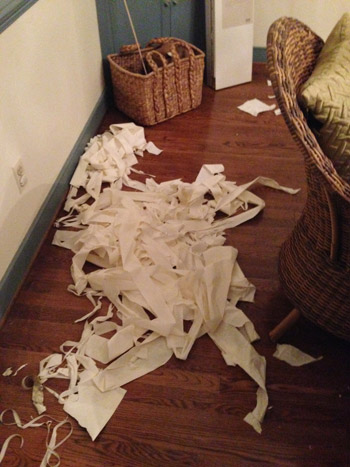
A lot of it actually came off in big sheets like the swatch above. Although you can see from this pile that there were a fair amount of thinner strips and leftover corners that I went back in for. It was by no means fast, but not super slow either. Surprisingly, I’d rank this dry stripping method as taking the same amount of time as spraying it all down, waiting for it to soak in, and then peeling it. Maybe even slightly faster because there’s not that spraying and waiting step. Obviously this won’t work for all situations, but if you have drywall that seems to have been properly prepped for wallpaper (as ours was) then you’ll hopefully have the same luck (especially if it’s old – this stuff was 30 years old and at some of the seams it was already loose and ready to be yanked).
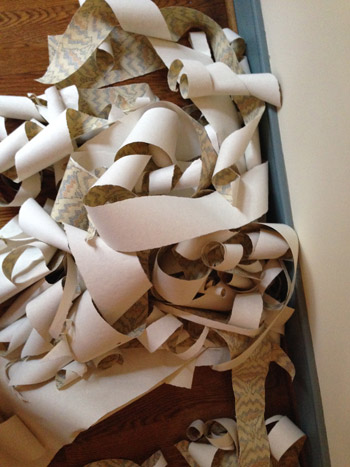
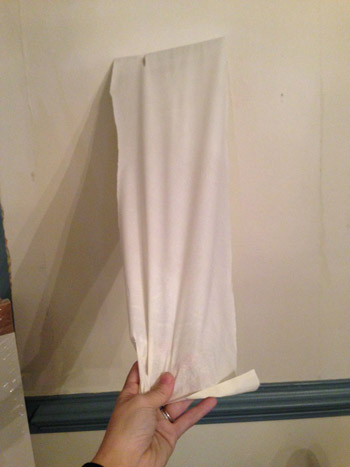
This “dry” approach only took off the top layer of wallpaper for the most part (some other methods, like steaming especially, took care of both of them in one fell swoop if I was lucky) so I just ignored the white papered/glued underlayer and just pulled off the glossy top patterned part of the wallpaper, slowly making my way around the room over the course of a few days.
This is that underlayer I was talking about. As for how I loosened that up and peeled it off…
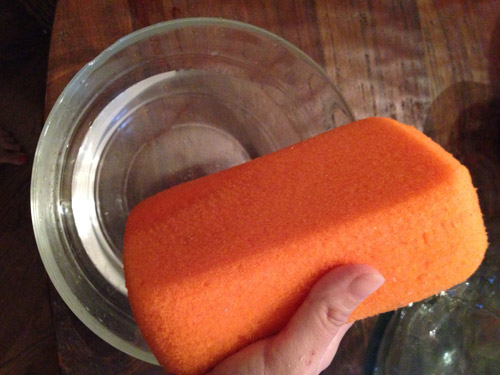
… I just dunked a large sponge in warm water…
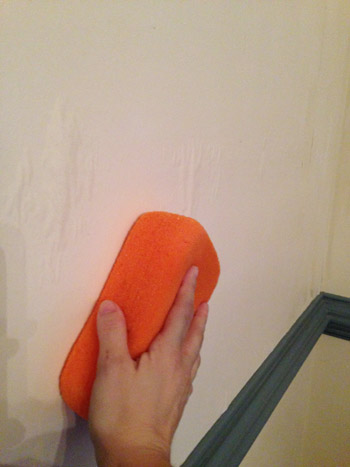
… and wiped down the walls with it. That seemed to deposit enough water to soak through that underlayer so it started to loosen (see how it’s bubbling away from the wall on either side of the sponge in this picture?).
Then I could just peel it off. This was the slow-going part. You can see from the pile below that it came off in tiny slivers for the most part, so each wall took about an hour and a half just to free it from this clingy glue-riddled film.
One challenging area that this room had were the seams next to those corner built-ins, which appeared to be installed after the wallpaper was in place (meaning the wallpaper was pinned down behind the sides of each one). My solution was to use an exacto knife to slice the edge of it. I scored it a few times to be sure I got all the way through, running the blade right against the trim so I could get the closest cut possible.
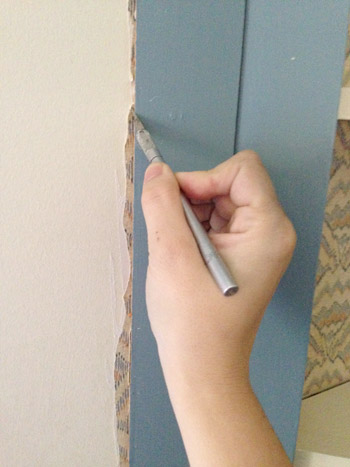
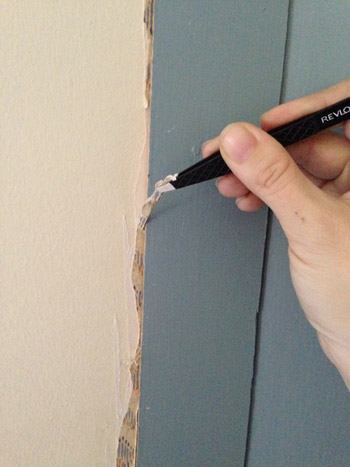
Then I used a tweezers to grab each of those strips, and slowly I could work my way down each side of each built-in to get a nice clean look.
And now for my nemesis. The wallpaper inside of those two built-in bookcases. It was wasn’t properly prepped like it was on our primed walls – instead it was glued with some sort of permanent adhesive to the unprimed and unsealed plywood backing of those built-ins, which pretty much made it a permanent application. Which I discovered after spending about two hours on just one of those cubbies (with seven more to go) and getting a lumpy and rough looking result in the one that I was able to sloooowwwly strip. So at that point, I called John in and we made the executive decision to OBI (officially bag it).
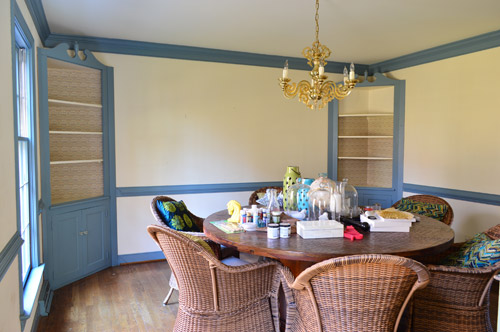
We figure we can either paint, re-wallpaper, or even add some starched fabric right over those stubborn wallpapered areas since getting them down to the bare wood is next to impossible (and they’re actually a lot smoother and better as a foundation for any of those options with the existing wallpaper in place since that one cubby got a lot rougher and bumpier when I tried to remove the paper).
So that’s sort of a bummer, since there’s technically still a little bit of wallpaper in there mocking me from inside those built-ins, but I’m so relieved to finally have the actual walls of the room completely free of paper, and ready for some paint – along with that blue trim!

Oh and to prep the walls before paint after removing wallpaper, I’ve had luck in all of the other rooms just by spraying them down with a vinegar and warm water mixture and scrubbing them with the nubby side of a sponge to make sure any residual glue is gone before painting. I’ve heard that there are some primers that are great after removing wallpaper to block leftover glue, but so far we haven’t had any issues with glue surviving after my vinegar rub-down, and it’s nice to save that priming step (and that money on specialized primer) and just use the vinegar that we have in the pantry.
Aaaand, just because I like to cross things off, here’s how my before-the-baby-comes goal of no more old carpeting/no more blue trim/no more old wallpaper is coming along:
- de-blue-trim-ify the dining room
de-wallpaper the dining roomfinish Project No More Graph Paper in the kitchen- strip the bold blue master bathroom wallpaper
rip up the old carpet runner on the stairs- paint the blue trim in the office
Slowly but surely! Can you believe we still have another whole room full of wallpaper laughing at us from upstairs? What do you think our final method should be? Maybe fabric softener? We keep hearing good things about that…
So far the steamer has been the fastest and easiest, although every other approach that we’ve tried has been 100% free using stuff we have around (we borrowed the steamer from John’s sister so that was free too – but it does involve renting or borrowing or buying something if you don’t have access to one in your house). Have you ever tried to remove wallpaper that was seemingly super glued to plywood? It’s enough to make you shake your fist at nobody and mutter “this is the most fun I’ve ever had in my life” while rolling your eyes so far back into your head that they make actual sound affects as you roll them. Not that I’d know…
Psst- John’s over on Young House Life chatting about the half marathon he ran this weekend for the folks who requested a post about that.

Vivian Foster says
I just helped a friend de-wallpaper her new house and by far the garment steamer worked the best….especially on the border paper.
Congratulations on the progress … it’s an awful job but so rewarding when it’s over!
YoungHouseLove says
Thanks Vivian!
xo
s
Amanda says
I completely understand how you feel about wallpaper. I only had to remove it from two rooms but the walls underneath are textured. (The wallpaper only partially covered the walls.) This meant that I couldn’t scrape anything against the wall or get the wall too wet. (The texture then came off with the wallpaper.) I could find no tips for removing wallpaper from textured walls so went with the method you described here. I pulled off what I could with the paper dry and then went back with a damp sponge and tweezers. The wallpaper didn’t stick well to the textured walls so this would have been a fairly easy process had the previous owners not superglued the wallpaper in certain spots to keep it from peeling off. It was a major celebration when I could finally call the place “wallpaper free” – hope you get to celebrate soon too!
YoungHouseLove says
Oh Amanda, that sounds terrifyingly frustrating.
xo
s
Isabel says
Me, me, me! I’m sicker of wallpaper than you are! It only (insert extremely sarcastic tone here) took me 4 weeks to remove the wallpaper in the top half of a 10×12 room with 2 doorways, 2 windows, a floor to ceiling bay window and a built-in. Since I had the pleasure (again, insert sarcastic tone here) of trying 50 different methods, I would suggest coupling the fabric softener with the steamer on your final round. I think that was the wining combo for us and it would probably take care of both layers at once. Our drywall was never painted, it was wallpapered from the start, so we sanded it with a super fine sanding block to remove any leftover glue and smooth it out (of course my husband had to comment on how smooth his side was without sanding…) and then used Zinser (sp ?) to prime since the drywall had this weird dot pattern going on. We also had to do some minor spackling but the walls are now white and smooth as a baby’s bottom :-)
YoungHouseLove says
Ooh, never thought about pairing the steamer with fabric softener! Love that it worked so well for you! (but hate how annoying that process was – eeks). Love that it turned out as smooth as a baby’s bottom. High fives for that!
xo
s
Kerry says
“Yes, I’m the Anderson Cooper of wallpaper. Except less handsome and more pregnant.”
Sher-dog, you’re killin’ me!
Sarah Q says
Have you tried “Wallpaper Chomp”? When I needed to pull down old wallpaper I picked up a bottle at Home Depot. After scoring the paper and then saturating with the Wallpaper Chomp, the paper, backing, and adhesive all came down really quickly and very cleanly.
YoungHouseLove says
Someone else recommended that! Will have to check it out!
xo
s
rachel laree says
How are you managing hormones and peeling wallpaper? Or maybe its a zen for you. I just had my second april 15 and Im stil hormonal without the peeling of wallpaper! Bless you Sherri for having the gusto to peel-o! Lol
YoungHouseLove says
Haha! I think I just try to get into the zone. So I put on some music I like and we get Clara tucked into bed and I hear John clicking away on the computer and I’m in the dining room getting down and dirty with glue-stained fingers.
xo
s
Molly says
I love the wallpaper posts! Maybe misery loves company, but we bought my childhood home and had to remove a ton of wallpaper too. Although tedious, it is such a cheap way to change the room!
We used the fabric softener method with probably the same success you have had with the other methods. The benefit for us is that it made the house smell great and it made me feel like we were getting rid of any gross smells that wallpaper seems to keep.
We hit issues with a bathroom that was plaster walls rather than drywall. I was also pregnant at the time and was the main wallpaper pealer, but for that room, my husband bought some commercial wallpaper removal goo (I don’t remember the name) and he used a scrapper and a lot of elbow grease. It wasn’t fun. He ended up doing a lot of patching and sanding. So…no great advice, but I feel your pain and your posts make me smell fabric softner :)
YoungHouseLove says
Aw thanks Molly!
xo
s
Annie says
I feel so much better now that the wallpaper is out of the dining room! :)
You must be exhausted. Question, what’s up for Thanksgiving? I keep feeling like you need the dining room done by next Thursday!
Do you guys ever just run out of DIY energy? I’m repainting my tiny down stairs bathroom and I just quit yesterday. I didn’t love the color and I just got frustrated. I tried to talk my husband into finishing it by saying ridiculous things like, “You’re such a better painter than me”. Didn’t work.
Annie
YoungHouseLove says
That’s so funny! As for the DIY energy question, oh yes, we ebb and we flow. I think that’s the DIY way. Some weeks you’re flying along and other weeks you’re like “why is everything taking 10 hours longer than I thought it would?!” We just try to switch gears when that happens (move onto something else we can do/share if something’s not going to be done in time for a post about it) so there’s a lot of project juggling at our house Haha! As for Thanksgiving, thankfully we’re doing it at a relative’s house, so there’s no time pressure on the dining room. Although last year we hosted Christmas, so that might be in the cards again (and knowing us, we’ll be halfway through painting the cabinets or something, haha!).
xo
s
Michelle says
Fabric softener is full of all sorts of chemicals you probably don’t want to be sniffing at the moment…. Dip the sponge in a water/vinegar solution and wet the wall down, do a section, go back to where you started as the solution should have saturated into the under layer and peel it all off at once! Vinegar dissolves that wallpaper adhesive like magic!!! No burning yourself and no synthetic chemicals!!
YoungHouseLove says
Thanks Michelle! I was thinking of doing something eco like Seventh Generation. The vinegar and water approach has worked for me in the past though!
xo
s
Kristi says
Just an idea for the built-ins, because I have totally researched different ideas because I have a similar problem. Purchase foam core board (or just use large pieces of cardboard) measure and cut pieces to shimmy into the back of each shelf. Cover said piece of cardboard with fabric, fancy paper, or cloth using spray adhesive and then shimmy into place. It makes it so you can change it out – even for the holidays (imagine covering in a nice wrapping paper). I am not sure where I found this idea – but I love the versatility of it and it is not permanent!
YoungHouseLove says
SO SMART!
xo
s
Shellie says
AKA- Tip #1 in the Young House Love book :)
YoungHouseLove says
One of our favorites ;)
xo
s
Teri says
I’ve removed wallpaper from 2 houses now. Most has gone off w/o a hitch (just hard work), but I ran into big problems in our master bathroom earlier this fall. Multiple layers of wallpaper that had been painted over and patched (not sure why) at the seems with plaster. I believe there is a special circle in H-E-double hockey sticks for whoever did that. Note to self: the next house will not have wallpaper.
YoungHouseLove says
Argh! I feel the same way! I used to think wallpaper was no big deal, but now I think I have a two room limit. Five is three too many. Haha!
xo
s
Paula says
I’m with you – I never thought of wallpaper as a dealbreaker when we looked at house because we are not afraid of a little hard work, but after removing it from two (very tough) rooms, I think that is my limit. We were in a house the other day with HORRIBLE wallpaper in the stairway – all the way up to the probably 20ft ceilings at some points and I was thinking “never. no way.”
Amanda B. says
I painted over wallpaper in my kitchen (applied way too strongly to un-primed drywall, ugh). I followed some tips I found online and had great results. The main one is that you have to seal the paper first with an oil-based primer (I used Kilz). The reason is that a water-based primer will soak the paper and cause it to bubble. The oil-base primer truly seals it in, and then you can use water-based paint overtop. Kilz is nasty stuff, but if you can seal off the room and ventilate for a few days, it’ll be worth it for the result!
YoungHouseLove says
Thanks for sharing the tips Amanda!
xo
s
Barbara says
I feel your pain.
2400 sq. foot home and every wall had wallpaper…
YoungHouseLove says
I BOW TO YOU!
xo
s
Jessica says
I know this post is about your wallpaper removal, but I must say that your buffet table steals the show. Every time you guys post pictures and it’s in there, I immediately focus on it. I’m completely enamored with it! The color makes the gorgeous detailing pop. It’s just such a fun and functional piece. It’s weird, I know, but I had to let you guys know.
YoungHouseLove says
Thanks so much Jessica!
xo
s
Erin says
Agh! By “this,” I meant “covered the back of a cabinet in fabric. :)
YoungHouseLove says
Gotcha! Haha!
xo
s
Shannon says
Love that the wallpaper is gone. I’m really looking forward to the day all the blue trim is gone(although I’m sure not as much as you!)
YoungHouseLove says
THERE WILL BE DANCING IN THE STREETS!
xo
s
Betsy says
As someone who has bought a house with the EXACT same blue trim and wall paper situation, I really feel for you! I know it feels like it’ll never end, but I’m so impressed at the work you have done and you’re getting so close!
What I found (unfortunately near the end) was these AMAZING WallWik hydro sheets. A friend let me borrow her set and I was so impressed that I bought a couple of my sets and have been loaning them out to friends for YEARS (sorry you don’t live closer!)! You soak them in water, stick them to the walls (go with me here, I promise you, they just stay) and then you peel off that section of wall paper (and bottom layer!). It’s the best for really difficult paper that’s good and stuck. And it’s the most efficient way I’ve found to get it off cleaning without water EVERYWHERE and without having to sponge down the entire wall. I see that they have a whole bunch of products they are selling now, forget those, and focus on just those hydrosheets!
Don’t know if that helps – and I know it’s not free – but I’m telling you, it’s absolutely worth the investment!
Happy wall paper removal! And remember, you’re doing a great job and in a few years… you’ll forget how bad it really was! :)
YoungHouseLove says
Thanks so much for the tips Betsy! So helpful!
xo
s
Larissa says
I know you guys are planning on opening up the area between the kitchen and the living room. What about between the kitchen and dining room? I can’t tell if the floor plan would allow for that, but it seems like it would be really nice to have all that open space.
Thankfully, in our new-to-us house there is no wallpaper to speak of. And the previous owners got rid of all the popcorn ceilings for us!
YoungHouseLove says
We have thought about widening that door, but it would mean biting into where our pantry and our fridge are in the kitchen, so we’re not sure yet if we’ll be reconfiguring them. Will keep you posted!
xo
s
Linden says
Any tips for removing painted-over wallpaper? The previous owner of my house painted all the walls of my house before I bought it and in several rooms, they painted right over the wallpaper. I’d really like to put some fresh paint on the walls, but I need to get the paper off first.
YoungHouseLove says
Someone else asked that and there are some great tips back in the comments for ya! Hope it helps!
xo
s
SuperCutePetContest says
I can totally see how this would start off as a fun challenge. Something about peeling things sounds fun,(like dried elmers off your fingers!) but after doing it for so long I know you are tired of it!
Bill says
You’ve probably told us, but what are your walls, plaster or sheetrock?
Also, how are your “not-nailed-down” wood floors holding up now that the weather is changing?
DIY-on!
Bill
YoungHouseLove says
They’re drywall here (first house was plaster) – as for the floors, they’re looking awesome! So happy with them.
xo
s
Alli says
As at least one previous poster mentioned, we used DIF when we took down the wallpaper at our house. I will say though, the success if it depends on the wallpaper. What is now our son’s nursery used to be a nursery, but had wallpaper on one wall that was neon green with smiling little bugs on it. That almost broke me! I spent hours taking it off that one wall because it was very plasticky and came off in little slivers. I was overjoyed to get strips that were 2″ long! My husband was helping me at the beginning, but had to switch to another room because I was getting too ticked off at it and very agitated, ha! Of course he switched to a room where the wallpaper came off in sheets, so that didn’t help my mood much either! (wallpaper removal jealousy, is that a thing?)
Anyway, as I’m sure you can vouch for, it’s like a weight lifted when it’s finally gone. Great job with your perseverance and it looks like you’re almost done with the wallpaper, hooray!
YoungHouseLove says
Thanks Alli!
xo
s
kim says
My friend might have you beat they were redoing her nephews room. 7 layers of wallpaper. The bad kind. And then some weird rainbow-y/care bear type mural they had to sand down, prime and paint over. Shudder.
YoungHouseLove says
Shudder is right! Yikes!
xo
s
Debby says
When I first moved into my house, there was a lot of wallpaper to remove and every other wall, ceiling and the trim was painted an old style green color. I feel your pain. As a veteran wall paper stripper, I would NEVER install wallpaper on a wall. Stencil yes, wallpaper no. It is too hard to change. I am totally not on the wallpater trend train.
Kodie says
Oh girl, you have my sympathies. My current house (where bad decor went to die, btw) had 9 rooms full of wallpaper (all at least 30+ years old!) in 7 different patterns. The wallpaper seams in my family room were held onto the wall by scotch tape and small nails. (Seriously wish I was making this up!) Long story short, I have spent WAAAY too much of my life stripping wallpaper and have found this method to be the most effective. Especially in the family room, where even thought the seams were held on by the tape and nails, the rest of the walls were covered in THICK yellow glue that took me at least a week to get rid of. At this point, I have tried all of the methods you have, but peeling the top layer, then sponging down what’s left is my favorite. (If you can have a “favorite” way to remove wallpaper glue!) The dining room looks so much better and more up to date immediately! Way to go!!
YoungHouseLove says
Thanks Kodie!
xo
s
Ethne @ Wom Mom Blog says
And a better ad for Revlon’s tweezers, there could never be. Can’t wait to see what theme you pick for the DR!
YoungHouseLove says
Ha!
xo
s
Rosemarie says
Honestly I think I would prefer stubborn wallpaper over what we got. Our wallpaper was so old that it easily came off without any method, just pulled it right off. But we discovered underneath that the plaster walls are all nicked and damaged. I think the walls were never painted just wallpapered and maybe a previous wallpaper removal did the damage. So now instead of jumping right into painting we have to skim coat and sand all the walls in the kitchen bathroom and hallway. Blah. It’s taking forever. Lol do yeh almost wish I had your wallpaper especially since I kind of like peeling things off (my husband is confused by this).
YoungHouseLove says
Oh no! So sorry Rosemarie, that sounds terrible!
xo
s
Barbara says
I just wanted to say thanks for offering all the different options for removing wallpaper, and a review of each one, because it helps those of us who are too afraid to strip wallpaper without hearing some pros and cons from other sufferers.
My husband and I bought a house a little over two years ago, and every single wall is covered in wallpaper, and that INCLUDES the ceilings. It was all painted over by the previous owners daughter when she was trying to sell the house, so we’ve been too afraid to strip it (knowing it will take a lot of time and patience), but seeing not only what you write, but what other readers suggest has made it seem like it might be possible to one day not see wallpaper seams all over everything.
YoungHouseLove says
Aw thanks Barbara, so glad it’s helpful for ya!
xo
s
Lizzi says
Fabric softener is the best! I used it in my large kitchen where the wallpaper had been applied (with zero prep) to glorified cardboard/fake wood sheets that had been nailed over plaster. The rest of that story is a disaster, but the fabric softener worked like a charm!
Megan says
Slowly but surely! Only one more room left. Our home had wallpaper in every! single! room! In our kitchen, it was 3 layers deep. We lived here 6 years and I just stripped the wallpaper from the 2nd to last room. Only one more to go and I just can’t get excited about it!
Lisa says
So, today for some reason I was trying to figure out whose posts I like to read more. But I can’t, it’s a tie. I like John’s clear, straight view of things and I like Sherry’s gansta-like twist on things. (Fellow Eminem lover here. BTW, did you know his new Rap God song was not written, he freestyled it in one take? Genius.)
Anywho, just wondering how do you decide who writes what posts?
YoungHouseLove says
Whaaa?! Didn’t know that about the one-take freestyle. Pretty dang cool. Yes, I said dang. I’m a rebel.
As for who writes what, we usually just casually chat about it and I might say “dibs on wallpaper since I did that alone” and he’ll say, “Ok, I’ll take building the cabinets and add in your pics from sealing the floor and loading in the closet” – seems to work out pretty organically I think.
xo
s
Laurie says
I’m really lucky, I’ve only ever had to remove a single room of wallpaper before. That feeling of cold, wet strips of paper flopping around your arms when you try to get something done is super annoying.
I do, however, have trim I need to paint. I have a fraction of what you have and yet I’ve managed to procrastinate the project because I really really don’t like doing it. Instead of professional painters, I’d hire someone to come in and do the set up (tape off) and clean up. All I would have to do is the painting part. Then the project would be fun.
Tania says
I am so scared…wallpaper is next on my to do list. Every bedroom in our house has a border, and the bathroom is full wall covered papered. Our master bedroom has a rose border, with a dusty rose ceiling that perfectly matched the dusty rose carpet that we finally, finally finally ripped out and replaced with wood floor last week. It took us an hour to get about a foot of wallpaper off before we quit. In our living/dining/kitchen we had a ton of wallpaper borders as well but we had the wall retexturing hired out and they actually recommended just spraying the texture right over it. So far, a year later is still looks great and you would never guess there was wallpaper under there. I’m tempted to do that again, but I think we’ll just have to fight this one, inch by inch. BOO.
YoungHouseLove says
You can do it Tania! Good luck, girl!
xo
s
Bill says
Even with primed and sized walls, I had to very careful using a steamer on sheetrock walls. My living room, primed and sized by me in 1986, required 5 gallons of joint compound before repainting in 2008.
Are you seeing any sheetrock damage from the steamer?
Bill
YoungHouseLove says
We haven’t had any issues with that but we only used the steamer in one space (the foyer). Someone recommended a combo method (steamer + fabric softener) so maybe we’ll try that in the bathroom and report back!
xo
s
Deborah says
So sorry about the wallpaper in the built ins! It’s kind of a selfish thing, though – we bought a house a couple of months ago that has some questionable wallpaper. And in one of the bedrooms, there’s a built-in desk & hutch that was wall-papered inside directly on the wood. I was hoping you’d find an easy solution for me! This particular wallpaper gem is a mustard yellow plaid that is also textured. I think I’m leaning towards painting over it, so I can’t wait to see what y’all do!
YoungHouseLove says
Others have recommended just slipping a new sheet of plywood over it and painting that to get a nice smooth painted look without the wallpaper being behind it, so we might try that!
xo
s
Lori says
If you decide to go the fabric softener route – make sure you use unscented. We don’t even use fabric softener when doing laundry. I made the mistake of buying a scented softener when stripping our kitchen of its horrible border and nearly vomited from the smell.
While it did work, it was more messy than simply using the warm water method, which I switched to for our office border.
The lady who owned our house before us certainly had a thing for borders. Thankfully, we have finally removed them all.
YoungHouseLove says
Thanks for the tip! I’m extra barfy these days, so that’s definitely something to consider!
xo
s
Eris says
Wow. This looks great! I know how time consuming projects like this can be. We’re renovating our entire house ourselves and we’ve come to appreciate things like this even more than the big reveals at times. It’s so easy to say “oh let’s just peel an entire room of wallpaper” (which we have in every room by the way) or “lets put up all new baseboards”, that some times its easy to lose sight of all the really hard work that goes into making these things happen. Cannot wait to see all that blue trim painted white!!
YoungHouseLove says
Isn’t it funny how in your head you can say “then I’ll get rid of all the blue trim and then I’ll remove all the old carpeting and then all the old wallpaper will come down” – haha! Meanwhile it’s months later and you’re still chipping away at it!
xo
s
Jacqui says
I feel your pain! We just bought a 100 year old house that was wallpapered everywhere! In the first bedroom we tackled there was 5 layers of wallpaper, plus a coat of pain in the middle. We had to remove the paint like the wallpaper; peeling it off in pieces!
We did buy a steamer though, we figured with the amount of wallpaper in the house it would pay for itself in the number of unshed tears of frustration!
Wish you all the best my de-wallpapering comrade!
YoungHouseLove says
Aw thanks Jacqui! A steamer is totally the way to go I think, at least after 4 rooms of experimentation.
xo
s
Linda says
Sherry, I hate to tell you – but you actually pretty much lucked out in the removing wallpaper arena since it seems to me your prior owner actually had the walls prepped properly. So many people skip that step and that’s the reason that any potential home buyer who’s removed wallpaper will pretty much automatically drop their offer price by thousands upon seeing even a smidge of wallpaper anywhere. No matter how nice the wallpaper may be.
But you’ve done a tremendous, tremendous job.
YoungHouseLove says
Aw thanks Linda! Hearing people’s horror stories about walls that weren’t prepped have me thanking my lucky stars everyday!
xo
s
Megan says
Yay for wallpaper removal!! I just had wallpaper taken out of two bathrooms and it is such a great feeling! I copped out and had my painter do it (an old friend of the family) but it’s so amazing what a difference it makes. Can’t wait to see what you’re going to do with that room. :-)
Malissa says
So, just out of curiosity, did you have a contingency plan for if the walls had NOT been properly prepared? If so, what would it have been? I’ve always been curious as to what someone could do if they found themselves with permanent wall paper (besides just papering over it again). Thanks!
YoungHouseLove says
I probably would have used a scoring tool to get the moisture behind the paper since we hear that can help sometimes. I hear it’s a lot harder and even more slow-going, but there are people who have done it, so it’s possible! Good luck Malissa!
xo
s
Rebecca Monce says
A friend recently recommended your blog to me… now I know why. I’ve been removing wallpaper in our 1926 craftsman for the past week and only have 1.5 walls done :/ To be fair I can only work on it here and there but still, it’s going WAY to slow!! Most of it is 2 layers and in some spots 3 but the top layer is painted over. Steam worked the best on the 1 wall that wasn’t painted over but it doesn’t penetrate that latex very well. So I’ve been scraping the top layer off and steaming off the backing layer. I did find some signatures and ‘April 26, 1941’ under some of the muck though :) 6.5 walls and 2 ceilings left… wish me luck!
YoungHouseLove says
Oh my gosh, that’s crazy! Lots and lots of luck Rebecca!
xo
s
Serena says
I think it’s hard to compare wallpaper removal methods just by doing a few rooms. I’ve had two houses covered in crazy 80s wallpaper, so I’ve removed 10-15 rooms worth of wallpaper, and every room has been different! I eventually settled on a version of the method you used in the dining room and used that for about 8-10 of the rooms (just because it’s basically free and requires no special equipment), and my results were significantly different between rooms using the same method. Even within the same room it sometimes varied in effectiveness. It really depends on the type of walls, type of wallpaper, how well it was put up, and how the walls were prepped. I’m not sure that there’s a better or worse way to go about wallpaper removal except that some methods are cheaper than others.
YoungHouseLove says
I think you’re completely right! It’s so interesting to hear from folks who have said “fabric softener did nothing for me” and others who say “it was the best, and I tried everything!”
xo
s
Marcie says
Congratulations on completing another room of wallpaper stripping! (Insert trumpet blare.) I did a small room in our house that had THREE layers of well adhered wallpaper! I started with the fabric softener method. After about an hour I started to break out and it eventually became a full body rash that lasted more than a week! Miserable. I’ve since determined it’s the perfumes in the softener that are the culprit. I didn’t want to use my usual Seventh Generation brand to save money so had bought some cheap dollar store softener. Vinegar and lots of elbow grease eventually got the job done just as effectively…sore muscles but no itch!
YoungHouseLove says
Thanks for the tip Marcie!
xo
s
Michelle says
12 hours, wow. Great work, Sherry! By the way, your posts always brighten my day. It’s fun to see your progress – the victories big and small.
YoungHouseLove says
Thanks Michelle!
xo
s
Amy says
I loathe wallpaper removal! I really damaged the walls when I removed wallpaper in our bathrooms.
You really amaze me with all you accomplish, with Clara and being pregnant. I’m 21 weeks pregnant and our daughter is almost 2 and I can barely get housework done. Will pick up DIY when my kids are older I guess.
YoungHouseLove says
Thanks so much Amy!
xo
s
Julianne says
You’re getting soooo close! Don’t torture yourself with the next room, though, lol! I swear by the steamer and the largest plastic putty knife you can find, shoved under the wallpaper to peel it off while you steam! :0)
Michele says
After all of that work, one would deserve a margarita or martini for all their efforts….. maybe in a few months you can celebrate your victory over the heinous wall paper. Congrats for keeping your sanity during this process, looking great!
YoungHouseLove says
Haha, thanks Michele! I’m raising an imaginary glass!
xo
s
Jen Keane says
I dunno, I think I could almost vie for “more sick of wallpaper”…
My house is 38 years old, and in those 38 years, some of the rooms had several changes of wallpaper. How do I know that? Because no one ever took the wallpaper down. They just wallpapered right over it.
In my kitchen, there were 5, yes 5!, layers of wallpaper. To make matters worse, some of the wallpaper had been painted over, with water-resistant kitchen paint (in a hideous shade). Every piece had to be scored because nothing (not remover, water, anything) would soak through. Then the scored pieces only tore off in tiny strips. They had built some wooden boxes to hide some pipes, and wallpapered right onto them, so the wallpaper just didn’t come off there at all. Oh, and of course, none of the drywall surfaces had been properly prepped… I think that the layer of wallpaper we eventually stripped down to was the original wallpaper that the builder put in the house – a sort of tour de force of brown and orange flowers, 70’s style.
My hall, stairs, and landing also had about 5 layers of wallpaper. I bought a wallpaper steamer and went to town, and removed every scrap (as my walls were getting a fresh skim coat of plaster) but it took *forever*.
The previous owners (more than one lot) really outdid themselves when it came to layering. When I pulled a lot of panelling off the wall in the hall, I discovered that it had been put up over, you guessed it, wallpaper. I also discovered that they had layered the baseboard (skirting board) too! They left the original builder skirting board, put on the panelling, and then tacked the new skirting board onto the old one.
After my fire this year, the house was gutted, and we discovered even more layery goodness – one of the rooms upstairs had an entire carpet laid down on top of another carpet!
I wonder if they were opting for layers of decoration instead of insulation?
YoungHouseLove says
Oh man, that’s crazy Jen!
xo
s
Jen Keane says
Aha, a picture!
Here you can see the painted over wallpaper on the top half of the kicthen. This was textured wallpaper that was supposed to look like tiles, which was painted over with yellow waterproof paint. This layer of paper/paint was over another layer of textured white wallpaper, and… well, you get the idea.
The bottom half had been hidden behind a built-in bench thing, so at least there was only one, very stylish layer to strip there.
http://i0.wp.com/www.zenbuffy.com/wp-content/uploads/2013/11/580177_10151449603842921_1694607815_n.jpg
YoungHouseLove says
Oh man! That must have been quite the battle!
xo
s
Kelly says
Wow, such an improvement. I actually kind of like the cream + blue look. So much better than the wallpaper + blue look, haha.