The wallpaper in our dining room is gone. Phew! Hooray!
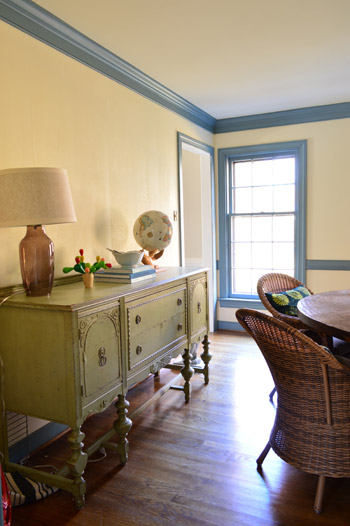
Ahh, fresh ready-to-paint walls, you make my heart sing. (And seemingly endless blue trim, you make my eyes twitch).
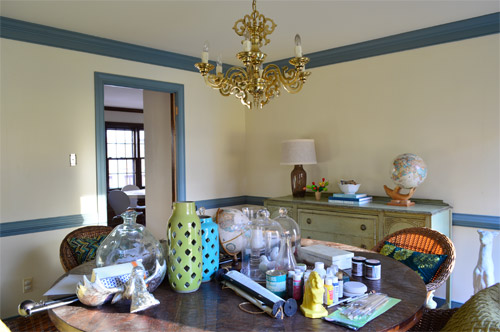
You might remember that each time I tackle wallpaper removal I’ve tried out a different method so I can report back to you guys on who’s the fairest of them all what’s the most effective of them all. Yes, I’m the Anderson Cooper of wallpaper. Except less handsome and more pregnant. Up until this point, I had tried boiling water sprayed on with a spray bottle for method #1, a steamer for method #2 (the one that’s in the lead so far for the easiest), and warm water mixed with Dr. Bronner’s soap along with a wet rag to get the underlayer as method #3.
This time’s method was recommended by a former professional painter named Sarah (who did her fair share of wallpaper removal before many a paint job) and her suggestion was “the dry stripping approach” which was followed by a round of “wet stripping.” Sounds saucy, eh? Don’t worry, it’s rated G. Essentially she said she just peeled the paper by hand without spraying it or scoring it with anything, and then used a large damp sponge to saturate the underlayer and peel that off as a second round. So I gave that the old college try…
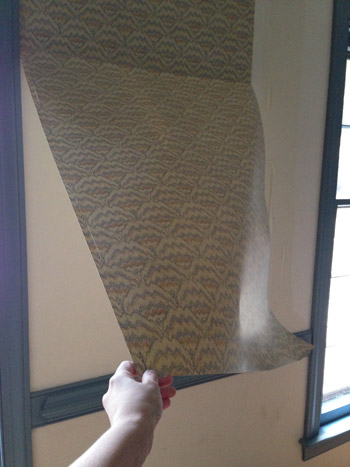
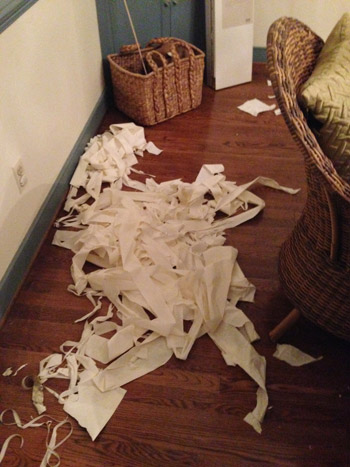
A lot of it actually came off in big sheets like the swatch above. Although you can see from this pile that there were a fair amount of thinner strips and leftover corners that I went back in for. It was by no means fast, but not super slow either. Surprisingly, I’d rank this dry stripping method as taking the same amount of time as spraying it all down, waiting for it to soak in, and then peeling it. Maybe even slightly faster because there’s not that spraying and waiting step. Obviously this won’t work for all situations, but if you have drywall that seems to have been properly prepped for wallpaper (as ours was) then you’ll hopefully have the same luck (especially if it’s old – this stuff was 30 years old and at some of the seams it was already loose and ready to be yanked).
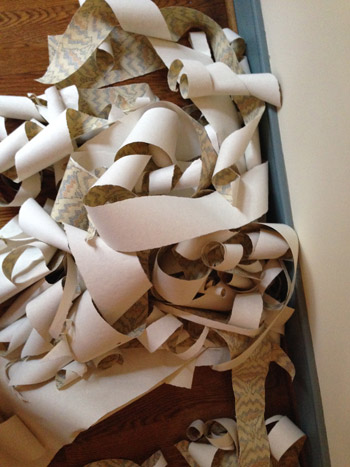
This “dry” approach only took off the top layer of wallpaper for the most part (some other methods, like steaming especially, took care of both of them in one fell swoop if I was lucky) so I just ignored the white papered/glued underlayer and just pulled off the glossy top patterned part of the wallpaper, slowly making my way around the room over the course of a few days.
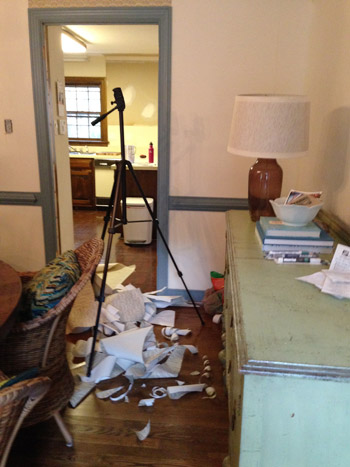
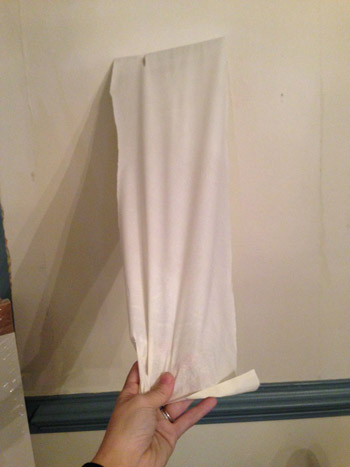
This is that underlayer I was talking about. As for how I loosened that up and peeled it off…
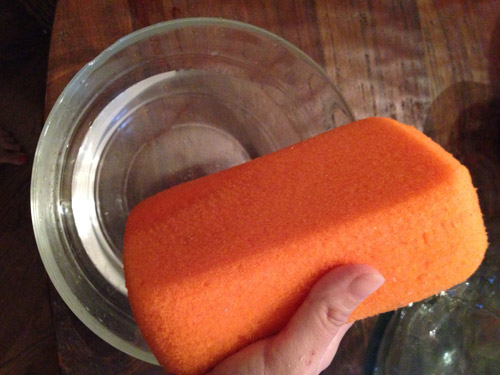
… I just dunked a large sponge in warm water…
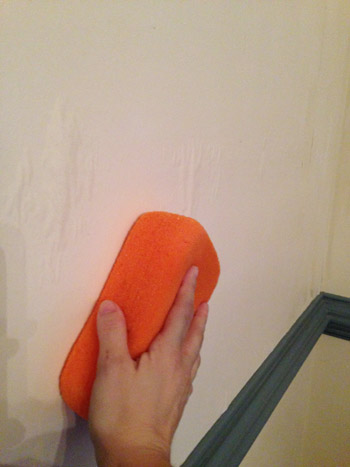
… and wiped down the walls with it. That seemed to deposit enough water to soak through that underlayer so it started to loosen (see how it’s bubbling away from the wall on either side of the sponge in this picture?).
Then I could just peel it off. This was the slow-going part. You can see from the pile below that it came off in tiny slivers for the most part, so each wall took about an hour and a half just to free it from this clingy glue-riddled film.
One challenging area that this room had were the seams next to those corner built-ins, which appeared to be installed after the wallpaper was in place (meaning the wallpaper was pinned down behind the sides of each one). My solution was to use an exacto knife to slice the edge of it. I scored it a few times to be sure I got all the way through, running the blade right against the trim so I could get the closest cut possible.
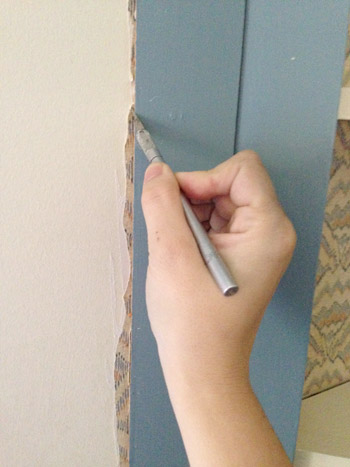
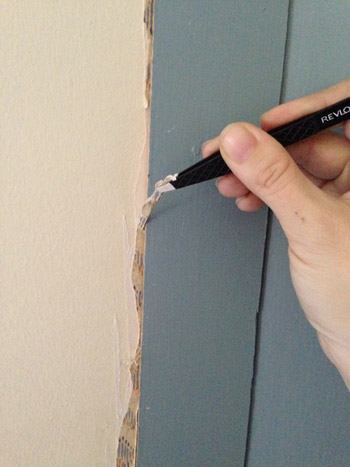
Then I used a tweezers to grab each of those strips, and slowly I could work my way down each side of each built-in to get a nice clean look.
And now for my nemesis. The wallpaper inside of those two built-in bookcases. It was wasn’t properly prepped like it was on our primed walls – instead it was glued with some sort of permanent adhesive to the unprimed and unsealed plywood backing of those built-ins, which pretty much made it a permanent application. Which I discovered after spending about two hours on just one of those cubbies (with seven more to go) and getting a lumpy and rough looking result in the one that I was able to sloooowwwly strip. So at that point, I called John in and we made the executive decision to OBI (officially bag it).
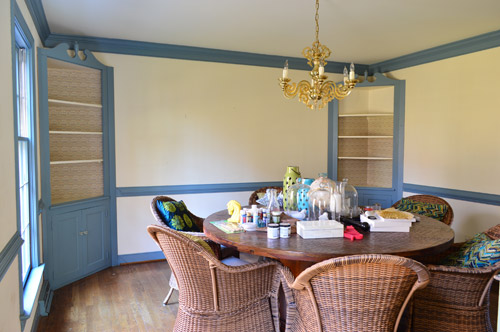
We figure we can either paint, re-wallpaper, or even add some starched fabric right over those stubborn wallpapered areas since getting them down to the bare wood is next to impossible (and they’re actually a lot smoother and better as a foundation for any of those options with the existing wallpaper in place since that one cubby got a lot rougher and bumpier when I tried to remove the paper).
So that’s sort of a bummer, since there’s technically still a little bit of wallpaper in there mocking me from inside those built-ins, but I’m so relieved to finally have the actual walls of the room completely free of paper, and ready for some paint – along with that blue trim!

Oh and to prep the walls before paint after removing wallpaper, I’ve had luck in all of the other rooms just by spraying them down with a vinegar and warm water mixture and scrubbing them with the nubby side of a sponge to make sure any residual glue is gone before painting. I’ve heard that there are some primers that are great after removing wallpaper to block leftover glue, but so far we haven’t had any issues with glue surviving after my vinegar rub-down, and it’s nice to save that priming step (and that money on specialized primer) and just use the vinegar that we have in the pantry.
Aaaand, just because I like to cross things off, here’s how my before-the-baby-comes goal of no more old carpeting/no more blue trim/no more old wallpaper is coming along:
- de-blue-trim-ify the dining room
de-wallpaper the dining roomfinish Project No More Graph Paper in the kitchen- strip the bold blue master bathroom wallpaper
rip up the old carpet runner on the stairs- paint the blue trim in the office
Slowly but surely! Can you believe we still have another whole room full of wallpaper laughing at us from upstairs? What do you think our final method should be? Maybe fabric softener? We keep hearing good things about that…
So far the steamer has been the fastest and easiest, although every other approach that we’ve tried has been 100% free using stuff we have around (we borrowed the steamer from John’s sister so that was free too – but it does involve renting or borrowing or buying something if you don’t have access to one in your house). Have you ever tried to remove wallpaper that was seemingly super glued to plywood? It’s enough to make you shake your fist at nobody and mutter “this is the most fun I’ve ever had in my life” while rolling your eyes so far back into your head that they make actual sound affects as you roll them. Not that I’d know…
Psst- John’s over on Young House Life chatting about the half marathon he ran this weekend for the folks who requested a post about that.

Kaesey says
I’ve run into wallpaper on unprimed wall board – disaster. We ended up just taking the board down and putting up new drywall. I’ve never tried to get it off of plywood, though. I think you’re right to just go over it with fabric or paint. Otherwise I just see lots of sanding in your future……
Sassy Apple says
You know, I truly believe this house was waiting for you. ‘Youngsters’ wouldn’t have had the cash to purchase it as their starter home AND upgrade. ‘Mature Folks’ (that’s me) would take one look at that and say, ‘I’ve been down this road before. No. Way.’ Only younger, energy-filled professional DIYers would ever tackle your home. My gosh, you purchased your own job security!! Don’t worry about someone saying anything is a ‘filler’ post….I guarantee they’ve never removed copious amounts of wallpaper or painted a whole house of trim. I have, and I’m amazed at how quickly you’ve been moving. Keep up the good work!
Your friend in one of your ‘fringe’ demographics ;)
YoungHouseLove says
Aw thanks SA!
xo
s
Mandi says
When you vanquish the last of it, I would love to see a total of the running linear feet of blue trim you think you painted in this place, lol! (…and doors too, I know. Calculate square feet worth of doors, there.)
YoungHouseLove says
Haha! John would LOVE to calculate that. So funny!
xo
s
Ashley says
Oooh, do the fabric softener method next, please! I used to watch Sell This House on cable years ago, and they would always use the fabric softener method and make it look so easy. Like, ripping off giant sheets at a time easy. And I always wondered if that would really work in real life, or if it was just some “TV magic.”
YoungHouseLove says
Wow that sounds awesome.
xo
s
Camilla says
Hi Guys! have you thought about opening the dinning room to the kitchen?It would feel much more connected to the rest of the house and bring more light to the kitchen. Just a thought :)
YoungHouseLove says
We have! We’d love to open that doorway but it would eat into our current pantry and fridge so we have to see of we’re planning to reconfigure those and if it would work.
xo
s
Cindy O. says
In our 1945 house the previous owners redid a bathroom and put up white textured wallpaper (were they trying to make the walls look like a popcorn ceiling or what?) Anyway, it was fine for awhile (other priorities) but I’m over it and am going to use all of these great tips to strip that stuff off of those walls and put up some lovely, calm and non textured paint. I’m a little worried about what I’m going to find underneath it to deal with though before I can paint… I’m going to bravely channel you, Sherry, and proceed!
YoungHouseLove says
Good luck Cindy!
xo
s
Rainey says
Thanks for sharing about your real life as it happens. In real life, not every day is filled with exciting reveals. I appreciate that your blog covers the super fun as well as the more mundane tasks that go into improving a home. It helps me have patience when projects I’m working on are moving slowly. After all, the joy is in the journey, right?
You guys are admirable in so many ways, so don’t let anyone make you feel bad about taking longer than a month to remove all your wallpaper. There are others of us (like me) who are amazed that you manage to raise a kid, write books, blog regularly, DIY, and design a house on the side all at the same time.
YoungHouseLove says
Aw thanks so much Rainey!
xo
s
Sue says
For some reason, the previous owner of our condo only used wallpaper in the kitchen. It is a weird beige seashell pattern…and we live nowhere near the ocean, or any body of water for that matter. Even after reading all your wallpaper posts, it just literally hit me today that I will need to take it down. Talk about denial! Haha. So I really appreciate all your insight into the process, not to mention all the other awesome posts I enjoy reading daily. Keep on keepin’ on!
YoungHouseLove says
So funny! Good luck Sue!
xo
s
Holly says
Our house was built in 2002 and the builders installed the ugliest wallpaper in the kitchen and bath. From the style of paper you would think our house was much older than it was. They installed it directly on the drywall (no priming) so it was a pain to get off. Lots of dings in the drywall to patch and lots of times the drywall paper came off too. We used so much spakle! And they wallpapered before putting the kitchen cabinets up, so I know what you mean about scoring around everything. There was also a border in our bedroom, but it was on top of paint so it was a breeze!
YoungHouseLove says
Oh man! I don’t envy all of that spackling!
xo
s
Melissa says
Oh I feel your pain! I had a very challenging wall paper removal job (http://msgfun.blogspot.com/2013/01/wallpaper-gift-that-keeps-on-giving.html). I’m happy to report that nearly a year later, we have conquered our wallpaper demons and I’m putting my wallpaper removal tools on craigslist because I don’t have any more of that work on the horizon! Count your blessings that they prepped the walls properly and used a more traditional wallpaper product!
YoungHouseLove says
Amen! And congrats on your victory!
xo
s
Nichole says
Our first house was covered in wallpaper…that was original to the house (about 25 years old at that time) and on walls that were not prepared for wallpaper. The stuff was practically superglued to the walls. We had the best luck using the Dif gel from the hardware store, but even then we ended up with a lot of drywall damage and had to float out the walls to prepare them for paint. When we got to the entry/stairs/upstairs hall we finally called in a pro we knew well. He looked at it for about 5 minutes and told us to mud the seams, use a thick primer and paint over it or re-drywall. Needless to say we chose the former. Shockingly enough it worked like a charm! So, I am super-envious that your walls were prepped and your wallpaper came down easilyish. Good luck in the home stretch!
YoungHouseLove says
Wow, that sounds like so much work Nichole! Congrats!
xo
s
Kathryn says
Not sure if you’ve mentioned this before, or if somebody has already asked this question??… Have you guys considered knocking the wall down inbtw your kitchen and dining room for a more open concept?
YoungHouseLove says
We’d love that but that’s where our fridge and pantry are so we’ll have to see if we like the function of them there more than opening that up, or if we can figure out a new configuration that we love.
xo
s
HeatherM says
Okay I have to ask- If you try a method like the dry strip/wet strip and find after 20-30 minutes that it isn’t going nearly as fast as the steamer, why do you stick with the less productive method? We won’t be mad at you for doing something in a more productive manner. In fact, it seems like you are spending way more time on this wallpapering than you would if you tried each method and then just jumped to the fastest method for the majority of the spaces. I get the motivation to provide a comparison of each method, but if something isn’t working the best, don’t keep at that method for 12 hours on our behalf! Especially if you could get it done in a fraction of that time with the steamer. Also, I would be curious as to how the cabinet paper would do with water and vinegar in the steamer. I just hate to see you guys give up on something!
YoungHouseLove says
Good question! Steaming was only slightly faster (if you check out that post it was a really close call to being the same as my first method) and we don’t own a steamer, so by the time we borrowed/rented/bought one it might have been the same amount of time spent (the foyer still took around 6 hours to do with the steamer, and it’s about half the size of the dining room). But if we ever tried something that straight up didn’t work, we’re definitely cool with bagging it and coming up with an alternate plan (like we did in this post for those stubborn built-ins).
xo
s
kelly says
Howdy! First time commenting so let me just take a moment to say that I love your blog, and thank you for posting.
As for wallpaper removal, we had 8 full rooms of it in the last house we owned (two were doubled) and this was my experience: Different kinds of wallpaper required different removal methods.
I used all of the methods you have already used, as well as the fabric softener, and DIF. I also had to resort to scoring at times (which I know you have avoided, but much of my paper would not come off without it). Like you, when I started, I was on a quest to find the “perfect” tool, but by the end, I would just try several different methods in the new room (starting with the least egregious process first) and settle on the one that worked best for *that* room. (Which was usually not the same as any of the other rooms… wheee!)
Also… In your post about avoiding the scoring tool, you mentioned that you didn’t want the paper to come off in small pieces, but that was not my experience… my scoring tool kind of “perforated” the wallpaper, but did not slice it to bits (it was a Zinsser). The advantage of scoring is that you can usually get both layers (outer and inner) at once.
Also… for the *really* stuck on paper, I definitely needed to score to get the liquid (water, steam, or DIF) through to the back. Sooo… I wonder if that might help your stuck-on paper in the cabinets? (Although personally I would stick with the OBI plan!)
Ugh. Just thinking about this is giving me the willies. Good luck! :)
YoungHouseLove says
Thanks so much for the tips Kelly!
xo
s
Franna says
Hi YHL,
Love all of your posts! We had a house built in 1912 with beaucoup de old wallpaper adhered to plaster. Ancient plaster. We had really good luck with the fabric softener method until we realized the wallpaper was actually holding some of the walls together (and up). They had even wall papered the ceilings upstairs (plain white and we left that for fear of what might happen if we removed it). Good luck with everything! F.
YoungHouseLove says
Oh no! That sounds rough!
xo
s
Stephanie says
Curses to those people who picked out that wallpaper ages ago and thought, “I love this wallpaper. And so will generations to come and generations to come…”!! :-P Makes you start to understand why some people just paint or wallpaper OVER old wallpaper. But then you perpetuate the crime! Congrats on all you’ve accomplished!
D Young says
In older homes is there an issue with removing the wallpaper and disturbing the old paint? I’m thinking about some old paint and health considerations that come with that.
YoungHouseLove says
That’s a good point! Anyone know? In our case the paint underneath didn’t flake or peel but if you noticed that it would be smart to test it for lead before continuing I think!
xo
s
Michelle @ A Healthy Mrs says
It must feel so good to have all of the wallpaper off in the room! I love finishing things like that — so satisfying :)
heyruthie says
I TRULY feel your pain. My parents had this *exact same* wallpaper in the dining room of their 1970’s colonial in Springfield, VA. They also had the *exact same* blue trim in there.
A few years back, we removed it. This post was a delightful little throwback to that experience. Not! Congrats on getting it off!
YoungHouseLove says
So funny! Throwback Wednesday.
xo
s
Seventies Girl says
They say you don’t really own a home until you have touched every square inch of it! (Did I read that on your blog??) Wallpaper removal certainly gives you that opportunity for sure! After owning 3 homes and stripping paper in each one, I can say I have experienced the joys of home ownership!! Love your blog and really respect the work and family life you are creating.
YoungHouseLove says
That’s so funny! We truly are getting our grubby paws on every inch of this house!
xo
s
Cheryl says
Sherry… I remember from your other posts that you try to decrease your family’s exposure to BPA, and I wondered if you knew that fabric softener has a significant amount of it as an ingredient. I know it’s on your list of the next thing to try on your next wallpaper stripping endeavor, and since you’re pregnant, I thought it might be worth mentioning so you could look into it.
YoungHouseLove says
Thanks Cheryl! I was planning to use something eco like unscented Seventh Generation fabric softener (it’s plant based like Dr Bronners soap, which I used for Method 3). Not sure if it’ll work but I might just give it a try!
xo
s
Dana says
I saw this today online and thought of your built-ins:
http://bit.ly/1iw5njA
Perhaps you could cut out a fascia for them that looks like this? I suppose the whole thing would hinge on John’s jigsaw skills. :)
YoungHouseLove says
Holy cow that’s awesome!
xo
s
Pam says
Maybe someone has already offered up this idea (no time for extra reading today) but I would ditch those built-ins before painting. You creative people can do better with that space, they seem not-charming enough to keep.
YoungHouseLove says
Thanks Pam! We have seen some inspiration images that have convinced us some altering (removing the scrolly part, adding crown molding, chunking up the shelves, etc) might save them, but who knows where we’ll end up!
xo
s
Julia@Cuckoo4Design says
I can’t wait for the blue trim to be gone ;)
HeatherM says
Regarding the environmental hazards question above (that hinted at lead paint)… Here is a quote from the CDC “In housing built before 1978, assume that the paint has lead unless tests show otherwise.” (Source http://www.cdc.gov/nceh/lead/tips.htm). Here is another quote from the same source: “Children and pregnant women should not be present in housing built before 1978 that is undergoing renovation.”
So bottom line, if you are disturbing the paint on ANY wall or structure/ built in (including and especially if you are putting wallpaper with potential lead-paint residue on the floor of your home until you clean it up), you should DEFINITELY test said wall for lead paint. My in-laws live in an old neighborhood, and when they were remodeling their home a contractor accidentally fell through their ceiling, so they decided on a whim to have the ceiling tested for lead… sure enough it was positive. So at 7 months pregnant they had to move out of their home. Fortunately my in-laws let them move in to their spare room so they could still keep an eye on their construction next door. They moved back in just a week or two before the baby was born. Lead is most dangerous to kiddos under the age of 6, so if you have little ones around, that should be extra incentive to give the issue due diligence and test things for lead. I know lead seems like it isn’t a big deal, but when I was a nurse at a children’s hospital we used to see a lot of kids in with lead poisoning, and those kids were SICK (and it was preventable).
YoungHouseLove says
Great tips HeatherM! Thanks for sharing! Our house was built in 1981, but our last two were 50s/60s and we’re definitely fans of lead testing (we had that done at inspection time by pros as well as doing it with test kits when we were taking walls down/disturbing paint).
xo
s
Victoria says
Oh dear – your blue trim/eye twitch line almost made me spew milk out of my nose! You guys have the best sense of humor. That is one of the reasons I love to follow your blog – excellent writing, humor, slice of life, and, of course, the diy. Love it all.
I don’t have any wallpaper to tackle in the home I am renovating (big sigh of relief) but I do have a “sticky” situation in the kitchen. I know that the gorgeous original hardwood floor is hiding under 2 layers of linoleum in the kitchen. I fear the linoleum is glued to the hardwood and then more linoleum is glued on top of the first linoleum. I want the whole house to reveal its beautiful hardwood but I don’t know if it will be possible to get the linoleum off the hardwood. It would just be so beautiful to have the hardwood floor flow into the kitchen like the rest of the house but my husband thinks it will be impossible to get the linoleum off without destroying the hardwood. If anyone has experience with this “sticky” problem please comment.
congrats on stripping the wallpaper off in the dining room. You really are fierce!
YoungHouseLove says
Oh man, that is a sticky situation. Anyone have tips or advice for Victoria? Maybe try prying back just a tiny area under the sink or in the corner just to see what you’re dealing with? Good luck!
xo
s
JG says
Victoria – Make sure you test the linoleum layers and their glue for asbestos. Unfortunately a lot of the old glues and linoleums contain it, and that would certainly affect the scope of the project!
Scraping and heat often work for the glues, depends what kinds you have. Worst comes to worse, you can have the wood floors sanded down and refinished after the removal.
YoungHouseLove says
Great tips!
xo
s
Vicki Jane says
Oh Sherry , I would take your wallpaper woes in a heartbeat. I am currently stripping room number 5 in our 100 year old villa in Auckland New Zealand. All the rooms are scrim which is basically very wide rough sawen planks aprox 25 cm wide covered in some type of hessian sacking. Ours still has some of the old printing from the original use. Some type of cocoa bean importated from Siam! This is nailed on with little tacks every 10 cm. then a glue is applied ( made from rendered down horse hooves) over which a very fine liner paper is then laid. Then the wallpaper is put on over. I have uncovered 8 layers in this room so far and am rapidly losing the will to live. I am also having to strip all the liner paper as the scrim has come unglued and due to all the gaps between the boards, the room seems to “breathe” when the wind lows in the wrong direction.
The steamer is the only thing that works, I spray water over the liner paper then steam away and slide a knife between the paper and the hessian.
Once removed I then have to paint the walls in a thin mix of p v a glue and water, wait it it dries then apply a liner paper, dry, then wallpaper. There is no painting these babies. The gaps are too big and really the only way would be to apply a whole new plasterboard cover and then we would lose all the yummy period features that we bought the house for.
Slow and steady will eventually get there and I have talking books going while I do the work.
YoungHouseLove says
Oh man, that sounds hardcore – best of luck Vicki Jane! Books on tape are an awesome way to pass the time too – I’ll have to try that.
xo
s
Katy D. says
When I was young (6 or 7 tops) my mom took down wallpaper that spanned from our living room to our dining room to the hallway. It had been left by the people we bought the house from. Think hideous floral wallpaper from the 80s/90s. I think my mom did the dry tear and then we used a water bottle to spray warm water on the backing. She ‘let’ my brother and I spray and then gave us old credit cards/gift cards and let us scrape off the backing. We thought it was super cool! haha My brother was probably around 4 at the time and he did great! We wore gloves too(we also thought that was cool). We were apparently very easy to please as children…haha!
YoungHouseLove says
That’s so sweet!
xo
s
Trish says
I’ve had my fair share of wall paper stripping experiences too, but nothing beats the room that had wallpaper covered by paint covered again by wall paper. The only way we could get it down to the bare wall was to chip it bit by bit with a putty knife. Luckily it was a small room! But I totally agree that using a steamer is the way to go and it’s well worth buying one if you have a lot of stripping to do. What a difference in that dining room with the bare walls. Even the blue trim doesn’t look that offensive with the clean walls! Keep up the good work. Your home is looking great!
YoungHouseLove says
Oh man, that sounds so hard! I can’t imagine chipping away with a putty knife, an inch at a time. You’re a champion!
xo
s
Meghan says
I love these wallpaper posts because I really feel your pain!! Last summer, after I bought my fixer-upper/gut-job of a first house, my mom and I spent weeks upon weeks peeling off not one, not two, but three wallpaper layers in each room. We’re talking living room, dining room, 3 bedrooms, one bathroom and the stairwell. Plus my house didn’t have a functioning air conditioner when we bought it, so summer + peeling wallpaper = a miserable sweaty, wallpaper peeling duo. We scoured the internet for different methods and tried a lot of what you have done. We rented a steamer from a tool rental place and that seemed to be the best progress over the DIF gel, fabric softener, hot water methods. Good luck with the last room- you’ll feel so good when it’s over!!
YoungHouseLove says
Oh man, I feel hot and sweaty just thinking about that!
xo
s
Noelle says
Hey John and Sherry,
I love your blog! I am curious, do you plan to paint the drywall or add texture and then paint? Would love your thoughts on this.
Thanks!
YoungHouseLove says
We’ll just paint it since it’s nice and smooth. We’ve heard from some folks who have less smooth drywall who do add texture or skim coat first though!
xo
s
carol says
Have you ever tried warm water with Downy (or liquid fabric softener of your choice)on the wallpaper? It works better than plain water for me…you can put it in a spray bottle and use your paper tiger then spray it down. BONUS: it smells great! Sometimes old wallpaper has a nasty old stale smell to it :(
YoungHouseLove says
Never tried that!
xo
s
Phoebe K says
Maybe you should try this method next time? Burger might not get up as high.
http://taildom.com/blog/wp-content/uploads/2012/04/bad-pet-03.jpg
YoungHouseLove says
Bahahaha!
xo
s
Lauren says
Yay! Can’t wait to see some pics of some holiday meals in that dining room! I’m wondering if y’all have a goal to get it done for a first Christmas dinner, what a wonderful memory that will be!
YoungHouseLove says
We might host it again this year, so we’d love to have it looking fresher in there!
xo
s
Amy P says
Hey YHL!
Not sure if someone already mentioned this, but since I know how concerned you have been about VOCs, etc I just wanted to point out that fabric softener is full of VOCs and many other unfriendly chemicals… just something to look into and think about!
YoungHouseLove says
Thanks Amy! I was thinking something plant based/eco like Seventh Generation fabric softener (unscented). I used Dr Bronner’s soap for Method 3 (also eco/plant based) and it seemed to work, so I hope it still does the trick without any chemicals.
xo
s
Jen says
It has been a few years now but our house was covered with wallpaper when we first moved in too. Lovely harvest gold and rust farm scene…some painted over but most in its original charm. We used DIF and it worked great. Not sure what is in there. The real trick was to sponge it on and let it set for about 15 minutes or longer. Then we would sponge more on and wait again. We repeated that cycle several times allowing the solution to really saturate the paper. We put towels down to catch the drips. After several rounds, it was time to pull the paper off. The bonus of all the waiting was that it came off in nice big chunks and if we were careful to wipe the wall down while it was still wet, the glue came right off without scrubbing. I wonder if the sponge, wait, repeat method would work regardless of the product used. Best wishes in finishing up your rooms!
YoungHouseLove says
Thanks for the tips Jen!
xo
s
Mary says
I just tackled the wallpaper in three rooms in our house. Not fun. But I found a FABULOUS product called Wallpaper CHOMP at Home Depot. The saleswoman recommended it and I bought it thinking “yeah right”. But I was SHOCKED at how well it worked. I peeled the top layer of the paper off–which was easy. Sprayed Wallpaper CHOMP all over the walls and let it sit for 5 minutes. The rest (backing) of the paper came off in huge sheets. I was so shocked I called my next door neighbor over to watch–I needed someone else to witness it! He bought some the next weekend and had the same results. Saved me easily hours of work.
YoungHouseLove says
Thanks for the tip Mary! Sounds awesome!
xo
s
Claudia A. says
Too much for me! I swore after removing wallpaper from 3 bedrooms with 10 foot ceilings and 2 bathrooms I would NEVER do it again. Back in the day, when I was young and stupid (I need to add broke here too), I bought a 100 yr old Victorian Cottage to restore. Pfft! Too old for that stuff now…my next will be a new condo! LOL
YoungHouseLove says
I can only imagine how much work that must have been Claudia!
xo
s
Dani says
Who is more sick of wallpaper than you? Me, quite likely. 1548 sq feet. Of that only the 2 back bedrooms were lacking wallpaper. Master bedroom, 2 baths, living, dining, hallways, kitchen, laundry room… most of it covered in vinyl wallpaper. Removing it and the glue may be the hardest thing I have ever done. I was starting to feel like Dori, only stripping instead of swimming. Just keep stripping, just keep stripping.
I feel your pain.
YoungHouseLove says
Holy cow, you win! I can’t even imagine!
xo
s
Cheralee says
Oh, Sherry. The living room is the last one in our house to be officially have a Before and After. I couldn’t take the textured brown(!) wallpaper-mâché looking stuff anymore, so I was excited to see you starting yours, too. I decided to do the hot water method because it’s free and my decorating budget is pretty much $9… I realized we have two and three layers before I get to wall and the whole time I scrape at stuck little bits, I think of your sheets of paper coming off. I must be muttering, too, because my husband asked who is Sherry and why do I wish she was here? :)
YoungHouseLove says
Hahaha! Oh man, I feel your pain Cheralee! Go get ’em! Wishing you smooth sailing from here.
xo
s
Trish says
I have done my share of stripping wallpaper and have to say it is my least favorite thing to do. I’ve found the best method (never having tried a steamer) was just soaking the paper with warm water (no fabric softener or soap added), waiting 10-15 minutes and it peels right off, with the assistance of a putty knife. As for the cabinet, my husband put wallpaper over fresh drywall when we built our house. That was never going to come off. The advice we got, and followed, was to use oil based paint over it before painting with latex. Worked. I know you want to avoid fumes, so maybe this could be a John thing?
YoungHouseLove says
Thanks for the tip Trish!
xo
s
Taylor says
You are my twin… A few days earlier! My wallpaper don’t come off together, they used some sort of waterproof paper so I am having to peel off the top layer then use warm water for the underlayer… And exact same situation with all of the caulk! It’s pinning it all down ahhh! Seriously this should be a punishment for ppl who commuted crimes!
YoungHouseLove says
Oh man, good luck Taylor!
xo
s
Susan says
After taking wallpaper down in every room of a 5 bedroom, 3 bath home including kitchen, living room, dining and family room, I will NEVER put wallpaper up in any house I live in. We used the steam method and it worked great except the house was very humid. Love your posts and read your email every day!!!
YoungHouseLove says
Aw thanks Susan! Everyone from the every-room-removal-club deserves a medal!
xo
s
Lara says
I have to say Sherry, after I read this post, my immediate thought — “She is amazing!” To do alllll that you do (whether we have the privilege of knowing or not) while carring on normal life with a three year old, in the midst of constant reno, AND dealing with pregnancy –whew! I don’t know how you do it and then to read someone mention redundant wallpaper posts?! You guys are doing a fabulous job and until we’re walking a mile in your shoes, none of us can gripe! Thank you for all the insightful glimpses into your lives and don’t forget to take care of yourself!!
YoungHouseLove says
Aw thanks Lara!
xo
s
Zuzanna says
It seems to me like most American homes have drywall…Is it just your homes or is it quite normal over there? Here in Europe you are mostly dealing with brick with a layer of plaster over it. Do you ever get brick walls anywhere?
YoungHouseLove says
Here, at least in our area, it seems like most homes from the 50s and earlier have plaster (our first house had plaster walls) and houses that are newer than that typically seem to have drywall. We do get brick walls, but usually just like our fireplace wall or the wall in our last house’s den which was once an exterior wall but then they added an addition and painted it white.
xo
s
Jenn says
When are we going to see some belly pictures!!?? DO you have feelings about it being a boy or girl? With my son I had a dream it was a boy.
YoungHouseLove says
I think we keep flip flopping! I knew Clara was a girl for sure, but this time I think mostly boy, but sometimes I swing girl. NO idea! Haha! As for belly pics, yesterday we shared a hint of a bump in a photo on Facebook and Instagram, so that’s over there for ya!
xo
s
yetunde says
Well, you less-handsome-more-pregnant-Anderson-Cooperish woman, you rock! I woulda just feigned ignorance of the wallpaper like the previous owners of my house did.
(I know there’s wall paper under that paint because I can see the ridged pattern; but I ain’t even gonna go there!)
YoungHouseLove says
That’s right Yetunde, just give it the cold shoulder! Haha!
xo
s
Jaimie says
I completely feel your pain when it comes to the wallpaper! Every single wall in our new home had wallpaper (that nasty thick, textured kind) and NONE of the drywall was primed beforehand. If I ever had any thoughts that maybe a wallpaper accent wall would be cool, I’ve completely changed my mind about it now!
Laurel G says
Do you know if the family/kids that grew up in this house/previous owners, follow your blog? I think it would be really fun for them to see all of the love you are putting into this house.
YoungHouseLove says
In our first and second house we heard from the old owners, which was so amazing! We haven’t heard from these previous owners yet, but we’d love to!
xo
s
Sara says
We had wallpaper boarders to remove in three rooms of our house when we purchased it (nearly five years ago, wow!) It was a pain in the butt. I can’t imagine walls and walls of wallpaper. My in-laws have a TON of wallpaper in their house. It makes me cringe to think about having to take it down one day. We actually painted over the boarder in one of our bathrooms–I know that’s usually a no-no, but it was smooth and you can’t tell at all! :-) We tried the steamer method and the scoring and spraying method–neither worked better than the other for us!