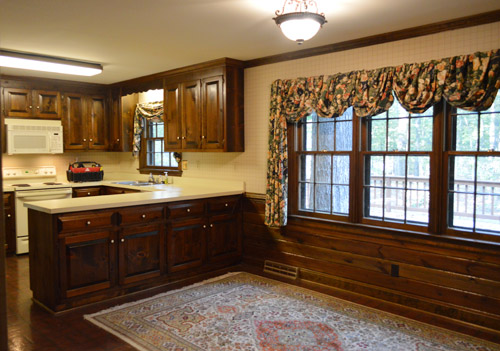
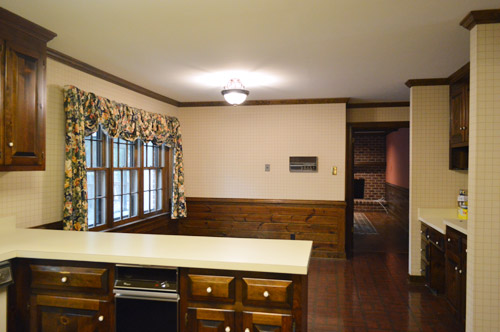
Remember when the kitchen looked like this back when we first laid eyes on our house?
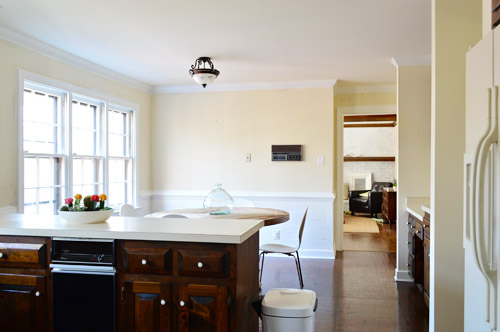
Whelp, now it looks like this…
It’s crazy how different certain angles look in person.
It’s like walking into the room and wondering who added five extra lights. It’s just so much brighter.
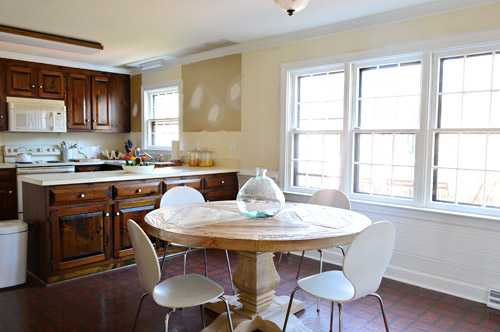
Yes, we dove headfirst into priming and painting the kitchen baseboards, crown molding, and window trim (52. freaking. panes.) and ended up just going all out and tackling the paneling and the doors to the pantry and the garage while we were at it. We have nothing against dark paneling, we just prefer the painted look for our house, especially after drooling over a few awesomely classic spaces that inspired us (like this one, this one, and this one).
I’m not going to lie – it was not an easy process. But it was SO WORTH IT. The room feels so much brighter and less heavy and we find ourselves actually looking out the windows now (when that trim was dark it stopped your eye, but now that it’s white, suddenly the outside world is the thing that’s emphasized, like a pretty little forest focal point).
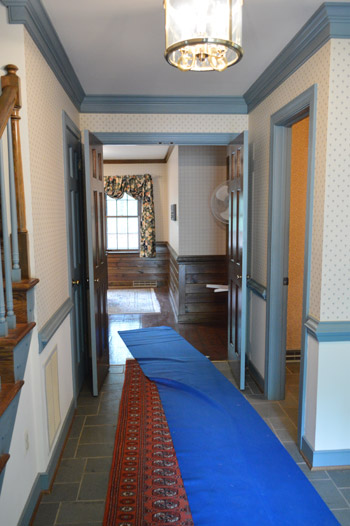
One of my favorite new views is from the front door. Here’s a shot we took during inspection (don’t mind the chaos, there were a few old furniture items being moved out by a crew at the same time).
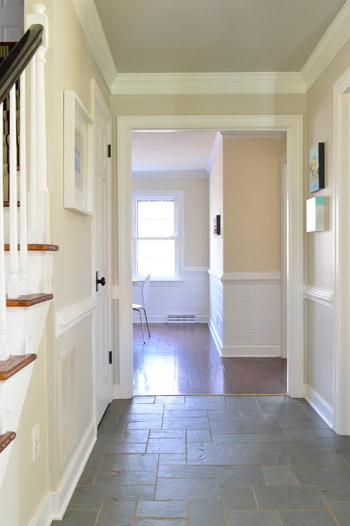
And here’s a shot we took yesterday afternoon. Ignore all the beige… we’re planning for some airy color on the kitchen walls to break things up (more details in this post). And the lower cabinets will end up nice and dark for contrast too. Eventually we also think we’ll end up with big dark (heated) tiles on the floor too, so that should help to balance/ground things. White paneling + softly colored walls + dark floors + a rustic wood table sounds like a nice mix.
All told, it took two coats of primer followed by two coats of paint applied by hand. We decided only to use the sprayer to paint things we could remove and take outside (like cabinet doors/drawers when we get to that stage) since we’ve used it once inside (to paint all of the baseboards/trim/doors upstairs while the carpeting was ripped up) and we noticed a pretty decent amount of overspray.
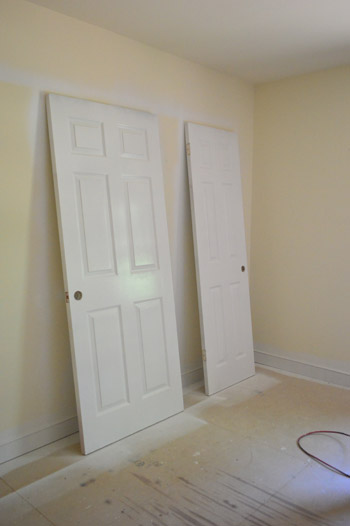
Based on that experience (and using it outside for things like painting the sunroom ceiling planks) we just think our type of sprayer is better for outdoor use unless we’re working in truly gutted indoor spaces. We’ve seen other folks tape off the entire room and spray every last inch of woodwork, but this room has four different doorways to other spaces that we’d need to fully block off (any paint seepage onto the wood floors in the dining room or living room scared us greatly) and we worried it wouldn’t save much time if it took us 10 hours to tape everything off anyway.
So John and I just chipped away at it over the past five days (Burger refused to lend a paw – that diva). Thankfully we found an awesome stainblocking primer that has no-VOCs but actually works so I could join in on the fun (some others gave us wood-bleed like you wouldn’t believe, but this one was awesome). It’s called Kilz Premium – just make sure you get the one with the label that says “no VOCs” and “stainblocking” since they have a bunch of different types. As for the paint, we’re still using Simply White (in semi-gloss) which has been our choice for all the trim and doors upstairs and in other rooms that we’ve tackled downstairs (like the foyer and the half bathroom). But we’ve got a round-up of other popular white paint colors you could choose from.
Gif time, baybay:
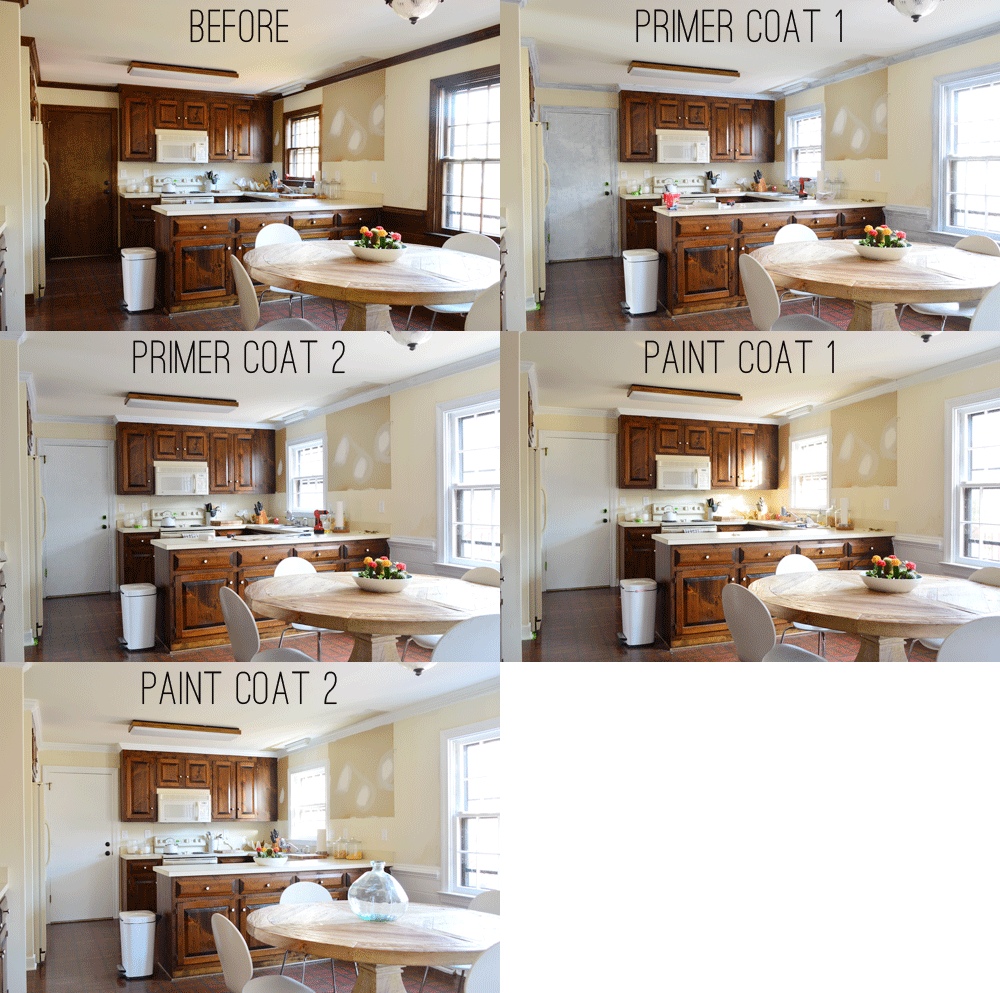
Two coats of the Kilz stuff followed by two coats of paint took us about 12 hours. The first coat is always the hardest (for some reason it just takes longer to get into all of those nooks and crannies and around all of those edges the first time, but your brush or roller seems to glide over them more easily as you go). So it was probably around 4 hours for the first coat and then 3 for the second coat and then 2.5 for the following two coats.
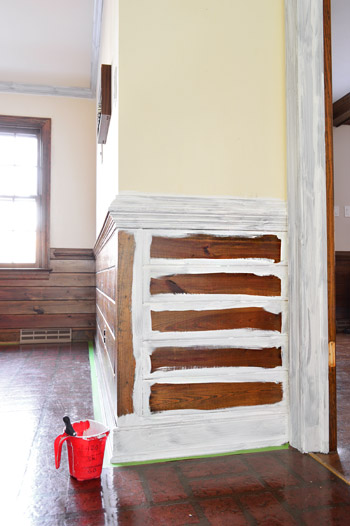
As for the application method, a regular old 2″ angled brush was what we both used to tag-team the trim as well as those window frames, and then we used a roller along with a brush on the paneling (a brush got into those crevices and then a roller could be passed over the fronts of each board to smooth them out). Here’s an example of what I did with a brush, and then John rolled the flat parts so it all blended in. Update: If your trim or paneling is super shiny and lacquered we always recommend sanding and using a liquid deglosser before the priming step. In our case it was chalky and dry wood without a thick layer of sealer, so we went right to primer and paint, which held nicely.
Now I’m like Jasmine rolling in there singing A whole neeeeeew world.*
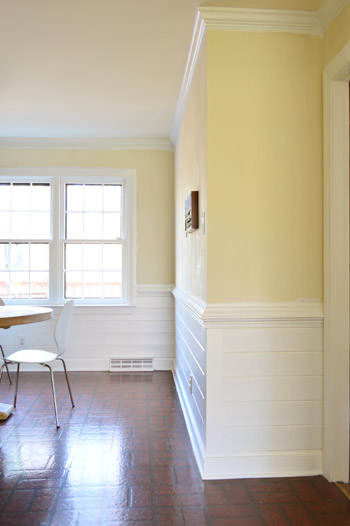
*And then I see the intercom and turn into Ariel belting out You want thingamabobs? I’ve got twenty.
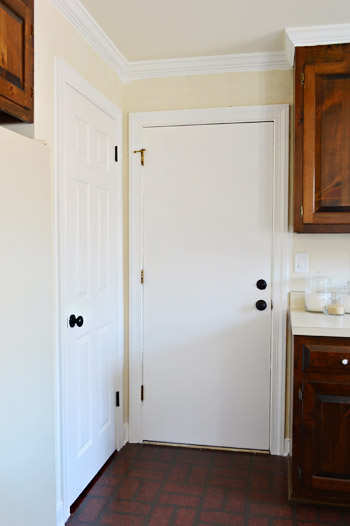
This corner. Huuuge difference.
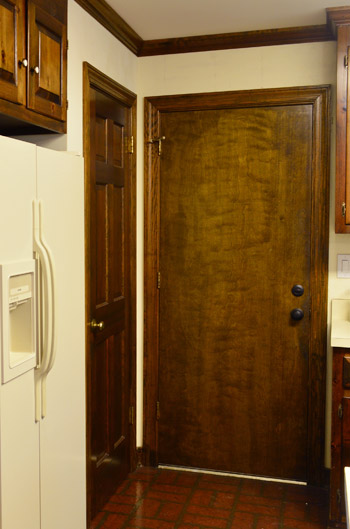
The door straight ahead leads out to the garage, and the one on the left is the pantry. Someday it would be awesome to have a paneled door that leads to the garage, but it’s wider than the other doors in our house (and needs to be fire-safe) so we might have to order one or miraculously find it at the ReStore or something. For now the white paint is a welcome upgrade.
We didn’t have to paint the pantry door since we had one upstairs in our storage room that we sprayed white back when we sprayed the other doors up there but had never rehung (it was the between our bathroom and sink nook, but it blocked things off so we’re happier without it). As for the garage door, we could have removed it and sprayed it outside, but that would have meant an exterior door being off the hinges for a few days (drafty + not secure) so we just painted that one in place. Still need to replace those brass hinges though…
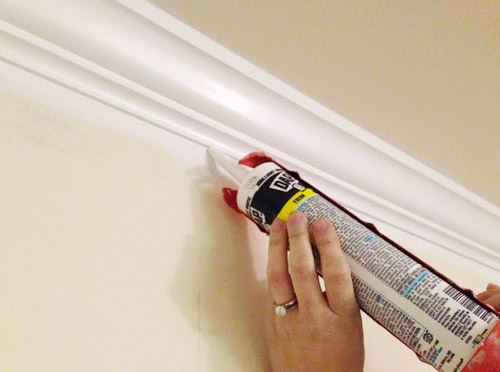
Oh and a quick tip for anyone tackling wood trim, paneling, or crown: it’s not unusual to see all sorts of dark cracks that need to be caulked after you get some primer and paint going on. Something about dark wood tones hides those cracks and shadows, but then when it’s painted they stand out. So our advice is to look for those after one or two coats of primer (you won’t be able to see them before you apply anything, since they only pop out at you as the wood gets lighter) and then fill ’em with paintable caulk (we like paintable Dap window & door caulk in white). As long as you get ‘er done before your final coat of paint, it should go over them for a nice seamless finish.
So now our to-do list in here looks a little something like this:
Remove wallpaperMove fridge cabinet forwardRemove upper cabinets on window wall to prep for open shelves
Reinstall crown molding(you can read about how we did those first four things here)
Prime & paint the pantry and the door to the garage
Prime & paint the trim, crown molding, & baseboardsPrime & paint the paneling- Patch and paint the ceiling
- Replace the florescent light in the cooking area and the pendant over the sink
- Replace and center the light over the dining table
- Paint the walls (you can read about the color we’re leaning towards here)
- Hang floating shelves on the window wall
- Possibly craigslist the existing microwave and get a countertop one (the we can put in the pantry?) and add a cheap range hood (we’ve seen some like this for $20 on craigslist) to lighten up that wall?
- Paint the cabinets (you can see the colors we’re leaning towards here)
- Update the old cabinet hinges and knobs
- Get a rug for eat-in area? Possibly install peel and stick tiles everywhere?
- Curtains for windows?
Psst – To read why we’ve chosen these steps for Phase 1 (for example, why we’re painting the cabinets, why we’re not going to attempt to paint the linoleum, and what’s on the agenda for Phase 2) there’s lots of background info in this post for ya.
There are still a lot of uncrossed items, but we’re so excited about how far this room has come already! What were you guys up to this weekend?

jennT says
I didn’t think I’d like the paneling painted, but I do. and it totally opens up the space. nice work!
but most of all I love the floating fan in the Before pic.
YoungHouseLove says
Haha! That’s hilarious! Didn’t even notice that when I added that picture. Someone must have been carrying it the second I snapped that!
xo
s
Betsie says
It looks like a whole new paint color on the walls too! I kept thinking, “Why would they leave those big patches unpainted where the cabinets used to be???” And then I realized that you hadn’t painted the walls, just the paneling! It looks so great!
YoungHouseLove says
Thanks so much Betsie! Can’t wait to get those unpainted spots gone!
xo
s
Jess @ Little House. Big Heart. says
Is it weird that I love painted paneling? I didn’t even realize yours had such detail until you painted it! It look fabulous!
YoungHouseLove says
I know, right?! I’m with you. When it was wood I thought “eh, it’ll be nicer when it’s painted to tone it down” but it’s so nice now that it’s something I’d actually add to another room! Like from scratch and spend money on and everything. Who would have thought?!
xo
s
Melissa @ HOUSEography says
looks amazing!! Great work!
Julie says
My husband and I bought our first house almost three months ago and we have an intercom, too! It cracks me up. We found out that the garage used to be used for a beauty salon so that explains the weird outdoor intercom/doorbell, but the indoor one was apparently just for pleasure. The hubs has gotten attached to the intercom now so I guess its staying but we’re at least going to look for an updated faceplate.
YoungHouseLove says
That’s so funny!
xo
s
Brittany says
Love it! Can you tell me the process of painting the fire door leading to the garage. We have a very similar door – real wood, but since it has been sealed, there is no texture. Should we use paint or spray paint? Newbie to all of this, so any help would be appreciated!!! :)
YoungHouseLove says
We just used a small foam roller on the door (two coats of primer and two of paint). Definitely remove the hardware or tape it off carefully for a nice clean look. Good luck!
xo
s
Diane says
We have wood trim everywhere and some of it appears to be in bad shape with wear (nicks, scrapes, and such). The house was built in 78. I’m wondering if I should do what you guys have done or should I just replace most of it….
We have to replace all the doors because they are plain hallow frame doors with no paneling and we would have to pull up all the carpet before we could paint the baseboards.
My question is, did you guys sand at all? Like most of the trim in my house looks like yours the glossy wood look but like I said their are portions of it that is worn down or where the lacquer has worn off over the decades.
YoungHouseLove says
Our wood was actually chalky and dry (didn’t appear to be sealed or polyed or anything) so we just went with primer and paint. But if yours is glossy I would sand it and even use wood filler on any dings. Then sand it again and use liquid deglosser to wipe it all down before priming and painting. Should look like new!
xo
s
Diane says
Great re-fresh! Bright and white and happy! One suggestion – you could ADD molding to that fire safe exterior door to make it look paneled. I did this with a hand saw and miter box, so John could knock it out with power tools much faster. I used a very lightweight trim (from a Restore) and after caulking and paint, it looked like a new paneled door.
YoungHouseLove says
Love that idea!
xo
s
threadbndr says
Such an improvement! Question – Is the chair rail in the foyer at the same level as the paneling in the kitchen? Did you think about painting the ‘below the chair rail’ area in the foyer white to match?
I spent the weekend cleaning out the basement with still more work to do down there. I’ve lived in this house since 1984 and things kinda (cough) stacked up. (Not QUITE at “Hoarders” level, but still terrible…..) I’m planning on replacing the furnace and A/C and the contractor needs access EVERYwhere. ACK!
YoungHouseLove says
I never did before we painted this, but now that it’s painted and looks so awesome I would totally do that! I was thinking the dining room was a good candidate for that too, so we’ll have to see where we end up!
xo
s
Christian Harrison says
Have y’all ever thought to do some posts where you invite the previous owners back to view your changes? You could interview them about their choices about the space, about your choices, about stuff they like … you get the idea.
I just see all of these changes, and wonder “what would the previous owners think?”.
YoungHouseLove says
We have loved hearing from the previous owners of our first and second home, so we’re hoping someday to hear from the ones who lived here! It’s so awesome to hear how they used spaces and even see old holiday photos of their family in the house!
xo
s
Sarah S says
Looks AWESOME!!! I am still trying to push myself to finish painting the hunter green trim and doors that consumes our entire 2 story foyer (2 doors trim are done). I like seeing how far you guys get. It’s inspiring. Now if I could only pick up the brush :)
YoungHouseLove says
You can do it Sarah!
xo
s
Megan says
Looks so good!! Wow. Aren’t you now just itching to paint the cabinets? Or are you tired. Okay, so I know that you are planning on painting the cabinets grayish… but I really want you to do something bold (Since it is a phase one)… like kelly green a la the kitchen from Grimm….
I would love you forever if you did. Okay, so I will anyway, but since I am too chicken to do it, you should :)
YoungHouseLove says
I think with the yellowed counters (similar to the color of the counter in the half bathroom) I’m afraid of kelly green… remember we tried that in there and it looked so bad with the yellowed tops? We’re definitely still playing around with swatches though, so who knows where we’ll end up!
xo
s
Koliti says
You’ve opened up the space and are breathing new life into your house. I like the white trim and thanks for the primer info – good to know about the stain-blocking & no voc option.
Cora says
Ok, so my jaw dropped and my eyes popped out (well not literally). This is amazing!!!!!! It looks like a brand new kitchen!!!!!! Great job guys!!! Also, it looks so bright in there you might have to wear your sunglasses at night…haha.
Kelly says
I can’t wait to see what you do to replace that florescent light. We have one in our kitchen and I hate it, but have no clue about replacing it. We need the light but that thing is not pretty. Love your blog!! xoxo
dawn says
Love it! I feel your pain on painting trim. I just finished painting over blue trim and blue shelves in a bedroom. It too took two coats of primer and two coats of paint. It made such a difference When I finished I just sat in the room and admired the trim. Congrats on getting a beast of a job done.
YoungHouseLove says
Wahoo! Congrats to you too Dawn!
xo
s
Kelly says
I LOVE your kitchen table and chairs! Where are they from?? The kitchen looks great!!
YoungHouseLove says
They’re from ebay about 8 years ago (I was living in a tiny apartment in NYC and ordered them – they were orange wood but I painted them white and they’re still going strong).
xo
s
Mikki says
Hey…Idea… Since you are waiting for a fire-rated, paneled door leading out into the garage, why don’t you make one yourself with a twist? Take 6 (or as many as you’d like) frames and using the velcro command strips (or something like it) place them where the panels would be. Now here’s the twist…inside the frames, place Clara’s school work, or projects, or inspirational sayings or photos, anything really would work. You can change them as often as you’d like, and then your frig doesn’t become a catchall for that type of stuff. It’s also out of the way on the garage door. I would take out the glass and replace it with plexi just in case the door got slammed, etc..
Or…you could just remove the glass, insert cork and use the panels with tacks. As I’m writing I’m thinking of all the different things thaat could be done…darn…I don’t have a garage door like yours! Either way, it seems like a Sherri project just waiting to happen!
YoungHouseLove says
Fun idea Mikki! Thanks for the suggestions!
xo
s
Jodi says
whoa. it looks AMAZING!
Kathy says
I’m wondering what the paint color is on the kitchen wall (the one that backs up to the family room and that you can see from the foyer). Thanks!
YoungHouseLove says
The kitchen walls aren’t painted yet (that’s the color that was under the wallpaper). The foyer is Edgecomb Gray along with the living room walls though. Hope it helps!
xo
s
Kristen says
How did you paint he windows?
I am buying an house with wood windows and trim and I want to paint the window sashes black, and all the wood trim tough out the house white.
Did you just free-hand then scrape off any mistakes with a blade?
YoungHouseLove says
Yup, we don’t tape off or anything, just cut in as well as we can, knowing that we’ll get some on the windows. Then we use a razor to get it off afterwards.
xo
s
Katie says
After you do a project like this does it really get the ball rolling to want to focus on Phase 1 kitchen projects (painting the walls, cabinets, etc) or since it was such a big project are you now dying to focus on another room to give yourselves a break from the kitchen?
YoungHouseLove says
I think we like the feeling of getting rolling in a room, and seeing how much of a difference we can make, but we definitely ebb and flow when it comes to DIY. For example, we’re still sore from this paint-job, so we’re not going to dive right into cabinets or living room paneling painting tomorrow, but we have some nice logical next steps before that, so it’s nice to just sort of alternate big and small as we go.
xo,
s
Chelsea @ Riding Escalators says
Wow. Wow. WOW. Seriously. WOW – what a difference!!! I’m hoping our kitchen turns out the same way (which is what I was working on all weekend!)
http://ridingescalators.blogspot.com/2013/11/kitchen-renovation-step-4.html
YoungHouseLove says
Go Chelsea, go!
xo
s
Rebecca C. says
It looks so great already! I am in love with the paneling now. Everything just looks so much brighter! I can’t wait so see it when phase 1 is completed!
Sarah E says
Looks amazing! I was thinking about doing some white beadboard in my kitchen, but I’m loving the look of your white paneling actually so I may switch it up. Question for you about caulking the trim. When we installed new baseboard trim during our renovations, I made sure to caulk around it all to seal up the gaps left {it’s an old house}. But, now that it’s getting colder and the wood is shrinking, the gaps are reappearing. Any advice on how to prevent that from happening? Or maybe we just need to make sure we caulk well in the winter months so we know they are filled in nicely? :-) Thanks!!
YoungHouseLove says
Oh no! I would try using Dap paintable window and door caulk in white. It’s made for changes in temps (windows and doors deal with that) so it seems to keep from shrinking. Hope it helps!
xo
s
Valerie says
LOVE the newfangled use of GIFS! Such a dramatic effect!
MLS says
Love it so much! I like the difference in the windows the most. That really does seem to open up the room in the pictures, in person it must be fantastic. I can’t wait to see if you decide to put up window coverings or not. Definitely worth singing about! (I think I fail at being a mom of a girl because I totally missed the princess/song mixup. I blame it on having four boys first.)
YoungHouseLove says
Haha! I can’t believe I did that after years of belting out songs like that in the car at age 8 (much to my brother’s chagrin).
xo
s
Jennifer R. says
ao.much.better. :)
ErinEvelyn says
Oo oo oo! I have a tip for the fire safe garage door leading to the garage! In our old house, the former owners had put in an extra closet in our bedroom with inexpensive (but surprisingly sturdy) flat-faced hollow-core bi-fold doors. Looked VERY blah & compared to the 2 other raised-panel doors in the room, so hubby & I found some simple wood trim and constructed frames that mimicked the panels on the other doors. Glued ’em right ON to the face of the flat door! Not EXACTLY the same as our other doors in the room, but the basic shapes were the same. It was the BEST fix we ever did in that room! Your fire-safe garage door just needs 6 small “frames” made of the right little trim pieces to echo the 6-panel pantry door, in Simply White, of course. :)
YoungHouseLove says
Love that tip! Thank Erin!
xo
s
Kate says
Wow! Loving how light and bright it looks now. =)
Lisa @ Double Door Ranch says
Oh this makes me so happy! That crisp white paint will bring a smile to my face every time. I can’t believe you got it done so fast! It feels like I’d be working on that for months.
Last week we had our bi-annual landscapers come out to clean up all the TONS of leaves (such a luxury!!) So I actually got to relax a little this weekend. Went to see Catching Fire–SO GOOOOD!!!
YoungHouseLove says
Oh man, I’m so excited to see it! John even agreed to go with me if he got to stuff his face at the food-eating cinema while we watched. Ha!
xo
s
Michelle @ A Healthy Mrs says
I can’t get over the difference!! It’s amazing! I can’t wait to see what comes next :)
Lauren (in PA) says
That is such a fantastic transformation….I’t funny, I thought you had painted the walls and was looking for the paint color name! Duh!
Can’t wait for more kitchen transformation!
Do you watch The Goldbergs on TV? It’s a funny show…they were using their intercoms in the episode I just watched…thought of you guys, of course!
YoungHouseLove says
So funny! Haven’t seen that show, but will have to check it out!
xo
s
Julianne says
Wow…what a huge difference! I bet it’s such a joy to sit down for a dinner after these changes! Gotta L.O.V.E. that table! Fantastic find! :0)
Megan says
Looks awesome, guys! Will be nice to focus on a pretty winter landscape instead of dark wood. :-)
Two random questions…
You mentioned using the door from upstairs for the pantry, wondering what you did for repairs on the old frame? I removed our laundry/mudroom door for the same reasons (visually/functionality), but the hinges are embedded in the frame and I don’t think I could patch it well enough. Thoughts?
Secondly, with the holidays rolling around… wondering if you’re going to use your YHL sphere lantern (which I think you unveiled around Christmas?). We currently have it over our dining room table and LOVE it. Do you see it fitting into your new house or did you leave it behind with no plans to purchase again?
YoungHouseLove says
That light’s one of our favorites, so we’d love to bring it back into our house! Maybe in the dining room or even over a big island/work table in the office if we add one in there! And as for the door frame, we haven’t removed the wallpaper or painted the trim/walls of that bathroom, but when we do, I’ll try to take photos or even a video about how we deal with old doorframes for ya!
xo
s
Julia says
Ahhhhh… I feel like I can breathe better and it’s not even my house.
Julia
http://www.baker-builder.com
Jenny says
What a difference the white paint makes…and 12 hours doesn’t sound bad to me. Last fall we painted the paneling in our 60’s era finished basement. I didn’t add up the hours (afraid to, probably) but I know it took multiple weekends. But like yours, totally worth it in the end!
Laura says
Oh my goodness! It looks so much better and seeing the change actually brightened my day here in dreary Houston. :) It’s been extra fun to watch the changes in this house because it just seems like it really needed some extra love and it’s lucky to have you as owners. :)
Lynn @ Our Useful Hands says
I’m pretty sure that 99% of those cheer girls in the video are all mothers now and are pretty embarrassed of their old school video. That being said, this was my jam back in the day and we used to yell “Le’t get ready to ruuuumble!!!” to each other just before the wrestling started in our house (4 brothers, no sisters) every time. I love how us parents used to jam back in the day but now have more Disney movie references in our heads than we’d like to admit. I love the way the operation lighten things up in the kitchen is going. I can’t wait to see the contrasting effect the cabinets will make to liven up the place too. Q: I know in the past you sprung for a super nice range hood. This time around are you putting more money into other things that you have found more value in or is that move more of a Phase 1 thing?
My best, Lynn
YoungHouseLove says
John wants to go all out on appliances in this house since we plan to be here for a looong time. He’s talking about things like reading Consumer Reports and everything! Haha! Just don’t want to upgrade any major appliances before we get to Phase 2 (if we reconfigure the space, we might need a wall oven or end up with a fridge that can be bigger than that nook) so the range update will just be with a cheap one from craigslist since I see them for around $30 and we figure we can sell our current cream microwave/range for that price, so it shouldn’t be too bad.
xo
s
Maureen says
I was so surprised last night to tune into OWN on XM radio on my way to a meeting. Who do I hear? I knew it the minute I heard the voice…so recognizable. Well you have guessed it for sure. So why were you three on OWN radio last night. It was so fun to hear my favs all in the same place!! Is there something you need to tell us?!? I am pretty sure you have enough going on right now.
Take care of yourselves.
Love it all so far.
Maureen
YoungHouseLove says
No way! That’s crazy! They must have been playing our video from Super Soul Sunday on there! Wish we had caught it!
xo
s
Theresa says
I never even noticed the kitchen was cream before! Seriously, I would’ve guessed much darker because the wood was so dark! I’m so glad you guys lightened it up! LOVE it!
Jeanne says
The kitchen is looking sooo good. What a difference that lighter color makes. That floor has got to be doing something to you though. In the pics my hair stands on end when I look at it. I don’t know how much more ugly this gentle reader can take! I most ardently and fervently support your ‘peel and stick’ something for Phase 1 for the kitchen floor. :)
YoungHouseLove says
Haha, thanks Jeanne! we’re definitely going back and forth on that, so we might just do more updates and then tally our total and see if we think the extra $100 or so is worth it for the next year of not seeing that old floor anymore, haha!
xo
s
Kaija says
That is an amazing difference! The wainscoting looks so good!
I was painting as well. I have been holding off on painting a hallway that has 4 doorways and a shallow linen closed that I’m turning into a built-in. This has been on hold because I want to replace the doors, and use pre-hungs when I have the money for them & labor. I figured it would be just easier because I’ll have to replace & repaint so much of the trim then. But… I got tired of waiting and now all the old trim is primed, wall repairs done, and I’ll be priming the walls tonight, and painting over the holiday weekend! Woot woot!
YoungHouseLove says
Wooot! Congrats Kaija!
xo
s
Kati @ This Wandering Life says
In the GIf, it’s a magical changing centerpiece!
YoungHouseLove says
Haha! I like how the drill scoots along the counter for a second.
xo
s
Kelli says
We have wood windows at our new house that we will be painting white, but I’m terrified we’ll mess them up or they will stick when we try to open them. Did you paint the entire frame (open it up and paint inside) or just paint what is visible when they are closed. Does that make sense? Any tips would be much appreciated!
YoungHouseLove says
Oh yes, I have this movement pattern I do when I paint them. So they all get opened and I paint the bottom, then I work my way up and open the tops down and paint the tops and then I close them both and get the area that was overlapping. Just try to get them in a few positions to paint everything, so when you open the window you won’t have a slice of brown on the bottom!
xo
s
Ethne @ Wom Mom Blog says
Most excellent!
Jenny says
It looks amazing!! It’s incredible what a little paint and time can do. We’re gearing up for a Phase 1 in our kitchen, too. I can’t wait to see the rest! xox
Jen says
Looks so great guys! Totally worth the hardwork you put into it. Im curious to know if you will tackle the items on your to-do list in the order they appear?
YoungHouseLove says
We usually just try to go one step at a time (some discovery about the next step might move something else up or down the list). DIY is a fickle beast. Haha!
xo
s
Angela says
“Now I’m like Jasmine rolling in there singing A whole neeeeeew world.*
*And then I see the intercom and turn into Ariel belting out You want thingamabobs? I’ve got twenty.”
Bahahahaha… *wipes tear from eye*
Kati says
P.S. – Do you guys copyright your little YHL heart? I thought you were on my Facebook when I saw this- just thought if you didn’t already know about it you would like to. http://www.likebook.me/
YoungHouseLove says
Thanks for the tip Kati! We have a trademark for the pattern you see on the side of our site (four hearts making sort of a clover shape) but don’t just own that little heart (I think it’s really hard to claim something that ubiquitous, so since we certainly weren’t the first ones to use a heart, we’re completely with sharing it). Hearts for everyone! Haha!
xo
s