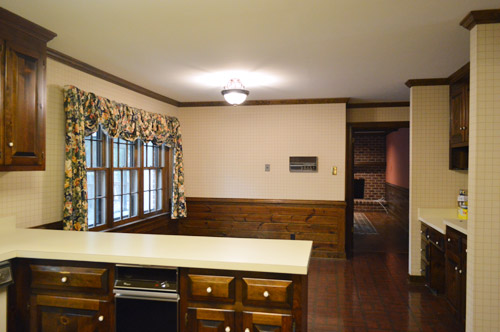
Remember when the kitchen looked like this back when we first laid eyes on our house?
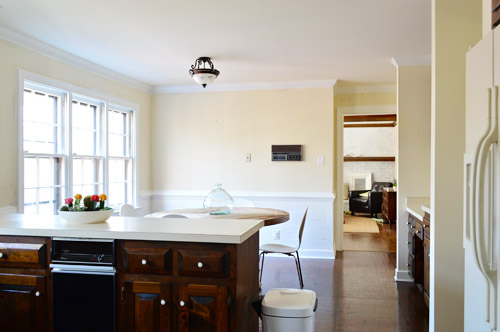
Whelp, now it looks like this…
It’s crazy how different certain angles look in person.
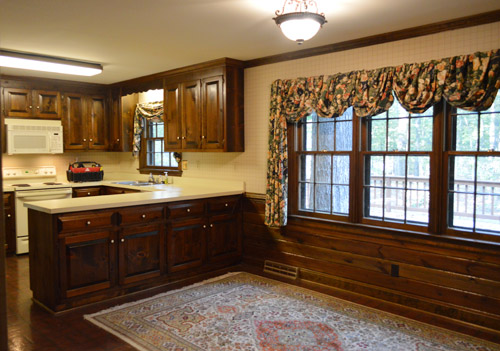
It’s like walking into the room and wondering who added five extra lights. It’s just so much brighter.
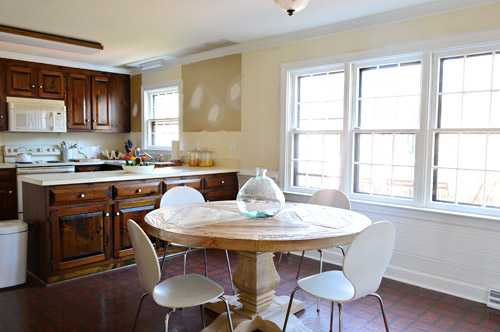
Yes, we dove headfirst into priming and painting the kitchen baseboards, crown molding, and window trim (52. freaking. panes.) and ended up just going all out and tackling the paneling and the doors to the pantry and the garage while we were at it. We have nothing against dark paneling, we just prefer the painted look for our house, especially after drooling over a few awesomely classic spaces that inspired us (like this one, this one, and this one).
I’m not going to lie – it was not an easy process. But it was SO WORTH IT. The room feels so much brighter and less heavy and we find ourselves actually looking out the windows now (when that trim was dark it stopped your eye, but now that it’s white, suddenly the outside world is the thing that’s emphasized, like a pretty little forest focal point).
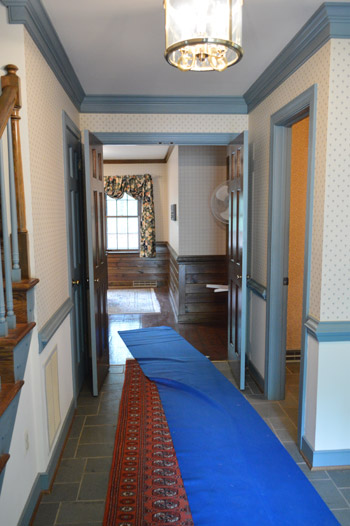
One of my favorite new views is from the front door. Here’s a shot we took during inspection (don’t mind the chaos, there were a few old furniture items being moved out by a crew at the same time).
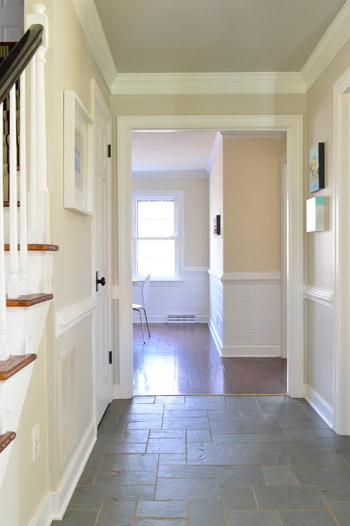
And here’s a shot we took yesterday afternoon. Ignore all the beige… we’re planning for some airy color on the kitchen walls to break things up (more details in this post). And the lower cabinets will end up nice and dark for contrast too. Eventually we also think we’ll end up with big dark (heated) tiles on the floor too, so that should help to balance/ground things. White paneling + softly colored walls + dark floors + a rustic wood table sounds like a nice mix.
All told, it took two coats of primer followed by two coats of paint applied by hand. We decided only to use the sprayer to paint things we could remove and take outside (like cabinet doors/drawers when we get to that stage) since we’ve used it once inside (to paint all of the baseboards/trim/doors upstairs while the carpeting was ripped up) and we noticed a pretty decent amount of overspray.
Based on that experience (and using it outside for things like painting the sunroom ceiling planks) we just think our type of sprayer is better for outdoor use unless we’re working in truly gutted indoor spaces. We’ve seen other folks tape off the entire room and spray every last inch of woodwork, but this room has four different doorways to other spaces that we’d need to fully block off (any paint seepage onto the wood floors in the dining room or living room scared us greatly) and we worried it wouldn’t save much time if it took us 10 hours to tape everything off anyway.
So John and I just chipped away at it over the past five days (Burger refused to lend a paw – that diva). Thankfully we found an awesome stainblocking primer that has no-VOCs but actually works so I could join in on the fun (some others gave us wood-bleed like you wouldn’t believe, but this one was awesome). It’s called Kilz Premium – just make sure you get the one with the label that says “no VOCs” and “stainblocking” since they have a bunch of different types. As for the paint, we’re still using Simply White (in semi-gloss) which has been our choice for all the trim and doors upstairs and in other rooms that we’ve tackled downstairs (like the foyer and the half bathroom). But we’ve got a round-up of other popular white paint colors you could choose from.
Gif time, baybay:
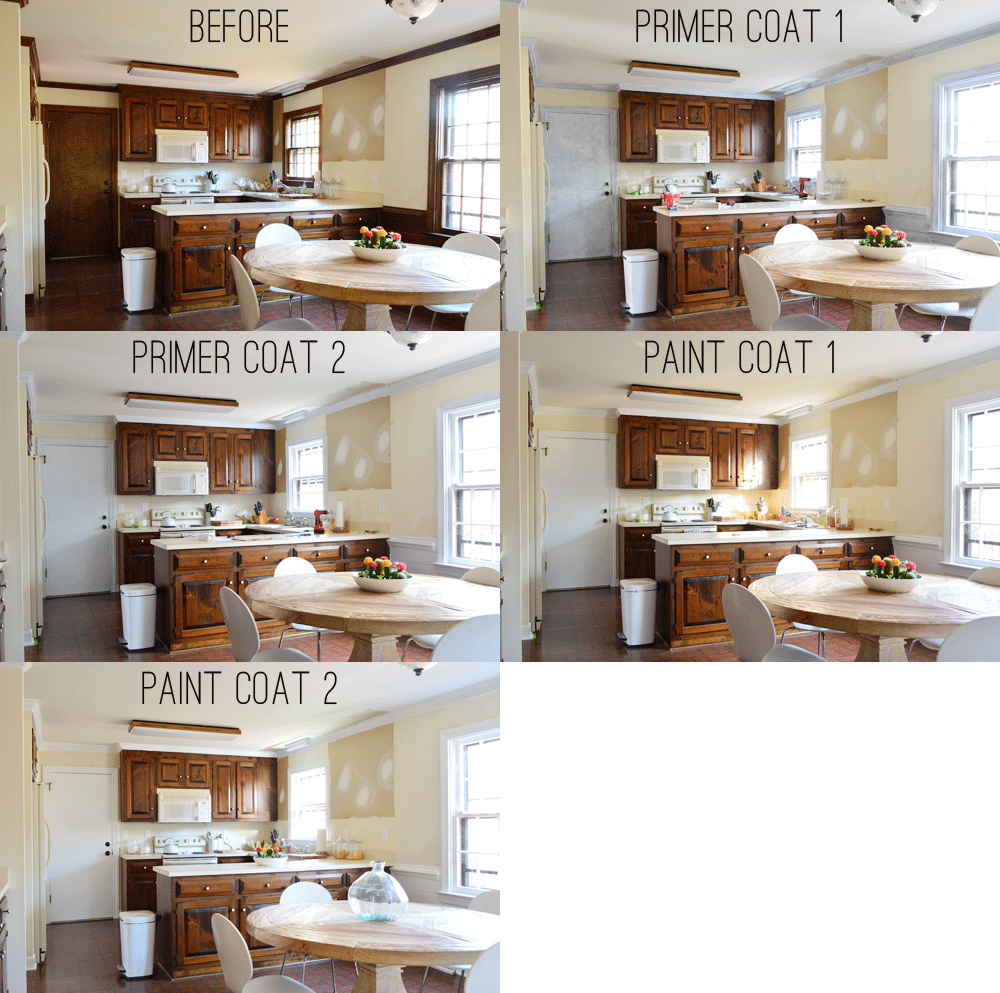
Two coats of the Kilz stuff followed by two coats of paint took us about 12 hours. The first coat is always the hardest (for some reason it just takes longer to get into all of those nooks and crannies and around all of those edges the first time, but your brush or roller seems to glide over them more easily as you go). So it was probably around 4 hours for the first coat and then 3 for the second coat and then 2.5 for the following two coats.
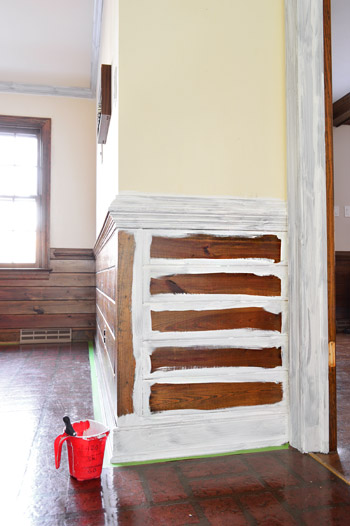
As for the application method, a regular old 2″ angled brush was what we both used to tag-team the trim as well as those window frames, and then we used a roller along with a brush on the paneling (a brush got into those crevices and then a roller could be passed over the fronts of each board to smooth them out). Here’s an example of what I did with a brush, and then John rolled the flat parts so it all blended in. Update: If your trim or paneling is super shiny and lacquered we always recommend sanding and using a liquid deglosser before the priming step. In our case it was chalky and dry wood without a thick layer of sealer, so we went right to primer and paint, which held nicely.
Now I’m like Jasmine rolling in there singing A whole neeeeeew world.*
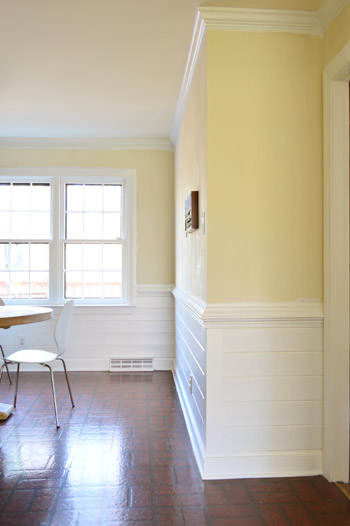
*And then I see the intercom and turn into Ariel belting out You want thingamabobs? I’ve got twenty.
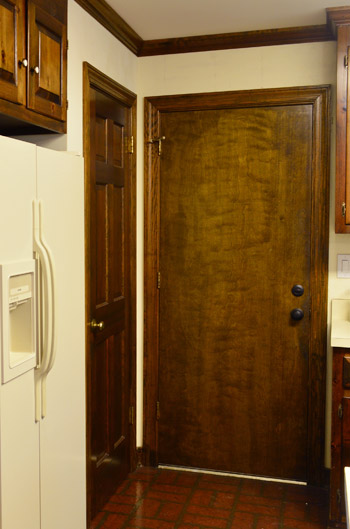
This corner. Huuuge difference.
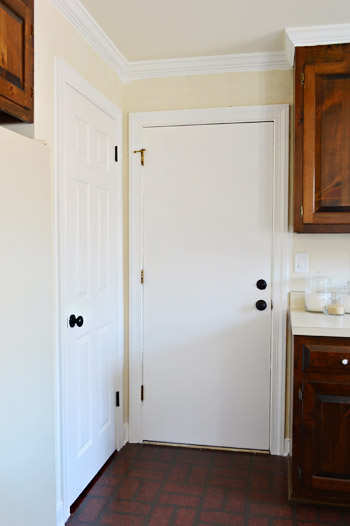
The door straight ahead leads out to the garage, and the one on the left is the pantry. Someday it would be awesome to have a paneled door that leads to the garage, but it’s wider than the other doors in our house (and needs to be fire-safe) so we might have to order one or miraculously find it at the ReStore or something. For now the white paint is a welcome upgrade.
We didn’t have to paint the pantry door since we had one upstairs in our storage room that we sprayed white back when we sprayed the other doors up there but had never rehung (it was the between our bathroom and sink nook, but it blocked things off so we’re happier without it). As for the garage door, we could have removed it and sprayed it outside, but that would have meant an exterior door being off the hinges for a few days (drafty + not secure) so we just painted that one in place. Still need to replace those brass hinges though…
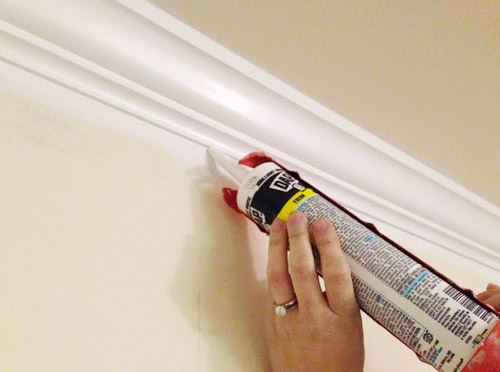
Oh and a quick tip for anyone tackling wood trim, paneling, or crown: it’s not unusual to see all sorts of dark cracks that need to be caulked after you get some primer and paint going on. Something about dark wood tones hides those cracks and shadows, but then when it’s painted they stand out. So our advice is to look for those after one or two coats of primer (you won’t be able to see them before you apply anything, since they only pop out at you as the wood gets lighter) and then fill ’em with paintable caulk (we like paintable Dap window & door caulk in white). As long as you get ‘er done before your final coat of paint, it should go over them for a nice seamless finish.
So now our to-do list in here looks a little something like this:
Remove wallpaperMove fridge cabinet forwardRemove upper cabinets on window wall to prep for open shelves
Reinstall crown molding(you can read about how we did those first four things here)
Prime & paint the pantry and the door to the garage
Prime & paint the trim, crown molding, & baseboardsPrime & paint the paneling- Patch and paint the ceiling
- Replace the florescent light in the cooking area and the pendant over the sink
- Replace and center the light over the dining table
- Paint the walls (you can read about the color we’re leaning towards here)
- Hang floating shelves on the window wall
- Possibly craigslist the existing microwave and get a countertop one (the we can put in the pantry?) and add a cheap range hood (we’ve seen some like this for $20 on craigslist) to lighten up that wall?
- Paint the cabinets (you can see the colors we’re leaning towards here)
- Update the old cabinet hinges and knobs
- Get a rug for eat-in area? Possibly install peel and stick tiles everywhere?
- Curtains for windows?
Psst – To read why we’ve chosen these steps for Phase 1 (for example, why we’re painting the cabinets, why we’re not going to attempt to paint the linoleum, and what’s on the agenda for Phase 2) there’s lots of background info in this post for ya.
There are still a lot of uncrossed items, but we’re so excited about how far this room has come already! What were you guys up to this weekend?

Christina B. says
Ah…so nice. My parents’ home is filled with so much dark wood trim and faux wood panels. I’m still on the “Let’s paint them white” mission.
On another note, I feel like the gif is one of those find-the-differences photo games for kids!
YoungHouseLove says
I like how the drill moves ever so slightly between two pictures.
xo
s
Barbara says
SO much better. Could you tell me what paint sprayer you use? I always trust your recommendations and think I might just get a sprayer myself. Have many louvered doors in need of paint :-O
Thanks!
YoungHouseLove says
Sure! If you click the link in the post about spraying the doors and trim upstairs, there’s that info for ya!
xo
s
Amy E. says
i’d say “GREAT!” to your paint job, except that now those floors hurt just to look at ’em. before, they blended in with the paneling and now they’re all like “she’s a brick, nanana, house, nanana” playing at a moby concert.
is painting or replacing the linoleum (i assume that’s what it is) an option/idea for a phase 1 or not so much? obviously that much square footage is a challenge when trying to replace. but you guys have successfully stenciled more types of flooring than i could’ve thought possible already.
YoungHouseLove says
Haha! They really are singing brick house. In the bulleted list you can see that we’re debating peel and stick flooring, but we’re really on the fence about whether that’s a waste of money (might just bring in a big jute or outdoor rug for under the table and remind ourselves that someday we’ll redo the floor in glorious heated tile).
xo
s
Jennifer says
It’s beautiful! I’m jealous of your woodwork. My husband refused to let me install wainscot and crown. Why the two coats of primer? Isn’t one what is recommended? We are slowing painting builder oak trim on our house. The painting people I talked to said one coat primer.
YoungHouseLove says
Sometimes when something’s super dark (ex: blue trim, mauve trim, wood trim) it either takes 2 coats of primer + 2 coats of paint or 1 coat of primer + 3 coats of paint. So because paint is so much more expensive than primer, we have found the same amount of coverage and the same polished look from 2 of primer + 2 of paint is a better combo for us. Hope it helps!
xo
s
Cher says
This whole post helps me feel better about my decision to paint my wood trim kitchen. I wasn’t planning a reno just yet, but a cabinet collapsed last week, shattering and crushing EVERYTHING in its path to the floor (and that got nice and gouged too) so I’m diving headfirst into my very first BIG reno. Ironically, the only thing that is holding me back from starting is not knowing what paint color to use, so I can’t wait to see your options for yours.
YoungHouseLove says
OH NO Cher! I’m so sorry about that! Good luck with your kitchen! And as for our colors, we actually detailed those in a post that we linked to after our bulleted list. Hope they help!
xo
s
Farmer says
You should paint that flat garage door with chalkboard paint!!!
YoungHouseLove says
Sounds fun!
xo
s
Brittany Fry says
The change is amazing!!! Talk about a transformation, I love it!!! You guys are doing magic to this house
Laurie says
Looks like we both painted this weekend! Of course, I only did one wall but I’m still pretty pleased as I have also been running around the house getting it ready for Thanksgiving.
I’m so glad to hear you guys have the same experience with the dark trim and finding the cracks and holes after a coat of primer. I have the same thing. I worked so hard to putty up the nail holes but it wasn’t until I put on a coat of primer that I could see all the cracks in the corners and a bunch of staple holes that needed to be patched up too. It was a little discouraging because I thought I had finished that “phase.”
We need some kind of badge or certificate when we finish painting all the dark trim in our houses! I’m always a little disappointed when I finish one (this weekend it was the sliding glass door trim) and no one is there to applaud with me.
YoungHouseLove says
Haha, it’s true! Someone sound the trumpets! Release the ravens! We’ve finished painting the kitchen trim!
xo
s
Steph says
I have been waiting to see this picture and, WOW, what a difference! As a twenty-something lady with an 80’s house chock full of gold and versions of beige, aka within a single girl’s budget, your blog gives me so much hope and confidence to change what I hate. I painted my orange, oak, box of a kitchen’s cabinets white following your steps from your last house; 2 years now and they still look as fresh as the day I finished! Cheers to prep work!
YoungHouseLove says
Aw thanks Steph! Good luck with your place!
xo
s
Bailey says
I LOVE the before/after pics – it’s just unbelievable the difference that some bright white paint can make :)
Bailey
Chelsea @ two twenty one says
Looks sooo much better!
Sammy says
Wow! What a difference! It really does look so much bigger.
Sasha says
Looks amazing!!!! What a transformation, can’t wait to see how it’s gonna look with the painted cupboards down the line :)
Regarding your garage door, have you thought of using molding to create the effect of a paneled door?
YoungHouseLove says
That’s an awesome idea Sasha!
xo
s
Jenny says
Great work! You two have such patience for trim/window painting.
I’m impressed by the caulking, too. We’ve had pro work done at our house over the past few years (all the old, lead-painted windows replaced, and new floors/baseboards installed in one area) and the pros have not, in my experience, gone to that effort. I notice all the nailgun holes in the window sills, and in the new baseboards…and the older parts of our house (which is 80 years old) have tons of slightly-sloppy work where more caulking would have been far more polished.
So I guess my question is, in your experience are there pros who go to that level of detail, or is that one of the advantages of DIY’ing — that you can geek out and be as painstaking as you care to be to get the final result??
YoungHouseLove says
I think it really depends on who you get. We have hired folks to help with things who are completely obsessed with fully filling holes and sanding well and all of that jazz, and we’ve also seen people sort of go through the motions as fast as possible and miss things entirely. To be fair, a lot of the pros we hire are just doing part of the job for a reduced rate knowing we’ll go back in and finish things (ex: opening a doorway that was never there before, which we’ll then drywall and trim out and paint) so we don’t have as many experiences with people doing something all the way through. I would suggest asking people when you get quotes what those quotes entail, and if they ever say anything like nailing or screwing or making new drywall openings it’s nice to follow up by asking “will you fill those nail holes before priming and painting?” or “will you mud and sand those drywall openings?” – for example some electricians never do drywall work, so they’ll leave gaping holes for you to patch. So it helps to work that out first before someone begins!
xo
s
Jenny says
Thanks!
Ben says
Wow. Yea, that’s a touch brighter. Nicely done. It’s funny because you can’t tell how nice the trim is until it’s white. The blue and wood makes it look kind of sad… but it looks great in white.
The door to the garage can be an easy fix if it’s wood, you can just slap some molding (like the type used to make faux wainscoting squares / rectangles, or shelf trim custom cut) on to make it look like a 1 or 2 panel door. Even if it’s temporary, it makes a big difference. I used it to update some cheap hollow core doors here. and here
YoungHouseLove says
Thanks so much Ben! Love that link! As for the wood, you’re totally right. I think it’s so much more glorious and admirable with this fresh paint on it. The wood was dull and the blue and mauve trim were just so dingy looking. I like to think the wood trim and paneling are all like “ok, now I’m ready for my close up.” I’m weird like that.
xo
s
Emily says
Being a first time homeowner that bought a fixer upper, I TOTALLY understand the feeling of simple but huge upgrades so when I read this post, I couldn’t contain my excitement! Your kitchen looks like a completely different house already!!! It instantly (meaning after your 12 hours of hard work) looks brand new and so inviting. I can only imagine how excited you must be if I’m over here reading this post and smiling (in a totally non-creepy way, of course!). Congrats! Your Phase 1 upgrade is already looking awesome.
YoungHouseLove says
Aw thanks Emily! All the best with your fixer upper!
xo
s
Ami says
Whelp? Hahaha…that has me cracking up!
Nancy says
Just have to share the before and after of the kitchen in a rental house we worked on this month:
http://www.flickr.com/photos/minniepins/11051357215/
new hardware, too, and I wish I had close ups of the change there!
;-)
Nancy
YoungHouseLove says
Wow that looks awesome Nancy!
xo
s
Diana says
I’m just wondering why you didn’t paint the spot where the cabinet was?? Were the pictures taken before you took them down and then you did your computer picture magic??? Well, looks nice but can’t wait to see what you eventually do with it. Congrats on pregnancy (just thought I’d mention it bc I don’t comment often) You guys are awesome! oxox
YoungHouseLove says
We actually haven’t painted the walls yet, so that’s just what the walls looked like when we removed the wallpaper and those shelves (we’re planning to hang open shelving in those spots). Can’t wait to get some paint up there soon though!
xo
s
Vanana says
Even though it is a no brainer to expect a brighter room after dark paneling is painted, it is absolutely shocking to see the difference those 12 hours made to your kitchen. It is easy for me to say, but it was well worth the effort. Most any kitchen is the heart of the home, but you have just encouraged that ten times over-what a happy place to be!
YoungHouseLove says
Aw thanks Vanana!
xo
s
Kristy f says
Did you use the latex or original kilz? I have some dark trim to paint also!
Thanks
YoungHouseLove says
The latex one that says no-VOC and stainblocking. Love it!
xo
s
Gina says
LOOKING GREAT! We are in the midst of a major kitchen renovation ourselves! Come check it out if you’d like.
YoungHouseLove says
Oh man, that’s such an exciting stage! Looks awesome Gina!
xo
s
Nicole says
How do you guys manage to paint the windows without painting them shut? I really want to do mine but am scared to paint more than just the casing around them. A good tutorial might help me to convince my husband that I can do it!
YoungHouseLove says
When I do the windows in the living room I want to remember to make a video or take step by step pictures. I have a series of movements I do to all of them (open bottom, paint bottom, open top, paint top, close both, paint overlapping part, etc) but pics will make so much more sense! Hope it helps!
xo
s
Melissa says
Yes, please make a video/take pictures! I’d love to see the process. We have wood windows that are oak and I’d love to paint them crisp white.
YoungHouseLove says
Will try to remember to do that for sure! Thanks for the requests guys!
xo
s
Cheryl @ The Creative Me and My McG says
looks amazing! We are in the process of painting all the stained trim and doors in our home as well…I am loving how light and bright it is making the whole house – congrats on another step done!
YoungHouseLove says
Thanks Cheryl!
xo
s
Jenny says
Wow – looks fantastic. We have an old intercom system in our house too that remains untouched. I’m eager to see what you guys do with yours. Hopefully it’ll be a project you tackle soon? Do you think you’ll get rid of it completely or just upgrade?
YoungHouseLove says
We’re not quite sure yet. We’d love to hook up a new one with tunes in each room and a way to use it as a baby monitor (someone said they used theirs that way and it sounded genius) but we’re not sure how pricey a new set would be, so we have to look into it a little more. Will keep ya posted!
xo
s
Laura B. says
Beautiful!
Lena says
So, are your floors vinyl or linoleum? Because sometimes you write linoleum and sometimes vinyl and those two are completly different.
YoungHouseLove says
Ack, I always do that. I think they’re sheet vinyl. Not 100% sure though!
xo
s
Katie says
Wow, what a transformation! Beautiful!I can’t wait to see it fully painted.
Question: did y’all paint the ceiling in the foyer? Or does it just look darker because of all the new, bright and fresh paint? Gotta admit, I’m not crazy about the look if it was deliberate, kinda makes the room look…shorter?
YoungHouseLove says
Oh yes, we’re working on those details for you soon!
xo
s
Katherine says
Wow, you really made a believer out of me! I’m not a fan of painting wood in general but the kitchen looks SOOOO much better and brighter.
What color is your counter? In the before pictures it looks beige and in the after pictures it looks white.
YoungHouseLove says
Thanks Katherine! It’s sort of a yellow-y beige color. It’s almost the exact same color as our almond appliances.
xo
s
Rachel says
This looks fantastic! We ended up going with painting the paneling in our kitchen too! Although, we went with wallpaper in the room instead of paint ’cause our wallpaper had three layers and then paint on top of it. And they definitely hadn’t primed underneath it. By the time we removed it all, the walls were so gunked up we just opted to cover them back up with faux grasscloth instead of trying to smooth them out and paint them again. (Yes, can you tell I had wallpaper-removing-envy each time I read your recent posts about that?)
http://casamarcelli.com/2013/05/23/grasscloth-gorgeousness/
I think it looks stunning, though. I love the white paneling. And the room looks SO MUCH bigger!
YoungHouseLove says
Oh man, that sounds like a nightmare but it came out so nicely! Totally huggable wallpaper.
xo
s
Erica says
That white does look so much nicer! Normally I am a fan of stained woodwork, but sometimes, white is just so much nicer. Your kitchen is one example. It looks so much nicer with the white!
This weekend for me was very busy! My parents came down this weekend to help out with some things in my house. We replaced a light that I hung up 2 years ago because it shorted out and tried to burn down my house, so now I have a shiny new light that I found at Lowes for $42. I painted it ORB and we hung it up. I learned that maybe buying lights at the Habitat store may not be the best way to go. :-(
I also brought in a piece of furniture that has been sitting in my garage for 4 years now, and I’m excited to finish it up! It was an old stereo cabinet. My eventual plan is to take all the old stuff out of it and repurpose it as a cabinet to hold things like decorations, seasonal plates, etc… But for right now, I just want to replace the fabric panels on the doors with something more updated! :-)
I also bought a heat gun and am working on taking some of the old paint off the trim in my kitchen so I can paint it all pretty and smooth and white instead of yucky, drippy white! :-) I am so excited! Like you, I’m going to paint it all by hand.
YoungHouseLove says
Wahoo! Go Erica!
xo
s
Dalenna says
I haven’t read through all the kitchen post’s comments to find out if you answered this already but every time I read it I keep getting curiouser and curiouser … Do you not use your microwave daily and would have it in the pantry to pull out when needed or do you plan on plugging it in and using it in the pantry?
Sorry if that seems like a silly question.
YoungHouseLove says
Sorry to be unclear! It would be plugged into the pantry so we’d pop the door open and use it right in there. We don’t use it very much and had one in a vented cabinet in our last kitchen, so swinging open the door to occasionally use it isn’t too much trouble for us.
xo
s
Theresa says
I feel your paint pain. I was painting interior doors all this weekend and now off to do trim. Carpal tunnel is starting to sneak up on me. When I was pregnant with my son it sure was a bother, hope it’s not for Sherry.
Did you paint the ceiling in the entry?
YoungHouseLove says
Aw thanks Theresa! As for the foyer, we’re working on those details for you soon!
xo
s
Daniela s. says
Excellent progress. Quick questions about the primer: Why do you use stain blocking primer? And do you always use it when you paint over unpainted wood?
YoungHouseLove says
Yes, it keeps the wood from bleeding through and ruining your finish. If you don’t use stainblocking primer and just use regular primer or go straight to paint, it won’t hold as well and the brown oils in the wood can come through your paint job for a blurry and muddled result. Hope it helps!
xo
s
cora says
I spent the weekend painting trim and walls in my dining room, just in time to host Thanksgiving (if only I was done)! After two coats of primer and two coats of paint plus primer the wood is still showing through. It wasn’t until I read your post just now that I realized my mistake…my primer wasn’t stain blocking. Oops. Hopefully one more coat of paint will do it.
YoungHouseLove says
Oh no! Hope the last coat does the trick Cora!
xo
s
Kelly says
Wow, what a big change, it looks great!!!
I started a new project this weekend too… stripping and sanding the painted wood stair treads, and I’m planning to paint the risers white like you guys did. We’re still not into drywall yet so I’m excited to have something to make things look a little more finished for the time being. :)
YoungHouseLove says
Good luck Kelly!
xo
s
Cheryl D says
What you do to your houses can just be described as pure MAGIC. The transformation on your current house is fantastic. Not sure I would have bought this place after seeing all its BLUE trim. LOL Your Blog is hands down my favorite. Keep up the great job your doing. I recently bought your book too and LOVED it!!!!
YoungHouseLove says
Thanks so much Cheryl!
xo
s
Jessica says
Looks soooo good! What a breath of fresh air! Do I spy the foyer ceiling painted or is that just the lighting? Either way, gray would look nice!
YoungHouseLove says
Working on an update for you guys about that tomorrow!
xo
s
Mia says
I am still amazed every time at how amazing a paint job can be? Do I remember right? Weren’t the new owners of your 2nd home going to invite you back for a house crash?
YoungHouseLove says
After the New Year we’ve talked with the owners of our first home having us back there! So excited! We’d love to share what’s going on over there and show Clara around (we don’t think she’ll remember anything).
xo
s
Nichole says
I’m literally crying over the “you want thingamabobs? I’ve got twenty”! crackin’ me up today!!
Amazing transformation!
YoungHouseLove says
Seriously, I think we have 20 intercoms. There’s even one on the back porch and the front porch. Come on over. I got the hookup.
xo
s
Dena says
Love it! I have the same kitchen & paneling throughout the house. Great timing on your very helpful post since I’ll be painting the knotty pine trim and doors and some paneling in our sunroom/living room in the next 2 weeks. I think I’ll have Little Mermaid AND Aladdin running in the background while I work to keep me going!
YoungHouseLove says
Good idea! I hear Disney gives you magical paint powers…
xo
s
Carol says
We have the same flat fireproof door out to our garage as well…. Since the door is sandwiched between off white cabinetry, ended up painting it with black chalkboard paint to try to break up the “sea of off white” – we now use it as our command central. And since it’s metal, I use extra strong magnets that stay on even during an accidental slam of the door. Great for chalked notes or flyers to remind you of stuff just before you head out the door…
YoungHouseLove says
Love that!
xo
s
Lesley says
Hi guys,
Love your blog! As a newlywed and new homeowner we love to see what you guys are doing in a new house. It is the perfect way to give us inspiration in our own home.
Question: where did you get the white chairs in the kitchen? They seem awesome to have for kids and look pretty comfortable.
Thanks in advance!
YoungHouseLove says
Thanks Lesley! They’re from ebay around 7 years ago (they were orange but I primed and painted them white for a tiny studio in NY where I lived at the time). They’re still going strong!
xo
s
DanielleR says
HOLY CRAP! I wasn’t ready for that, it looks totally different! Great job!!!
Rachel D. says
WOW!!! So lovely!
Kirbee N says
This is incredible! I’ll lend my awesome kudos to you both for such diligence. Whooee. We have really, really yellow pine trim and paneling throughout our house, and I just haven’t worked up the nerve to tackle it. Especially all the windows — they make our house so much darker. Keep it up, and maybe I’ll finally work up the nerve to start painting our trim too :)
Sarah B says
I am wondering what you guys plan to do with the lighting situation. We have almost the same kitchen layout, I know you plan to change your up though. When replacing the flourescent fixture are you getting rid of it and doing pot lights, or just replacing that one with a prettier fixture? Do you plan some sort of pendents over the breakfast bar or will that be gone? if you put a new fixture over the table how will you make sure all three blend/match well? Sorry lots of questions but I have an electrician coming this week for bids and can’t figure out how to make it all work.
Thanks,
Sarah
YoungHouseLove says
I’m actually hunting for options right now and might share a mood board with you guys so we can see how everything mixes and matches and hopefully land on a few different fixtures for the room that work together!
xo
s
Carli says
What an INCREDIBLE difference!! Love transformations like these. Soooo gratifying when you’re looking at the before and afters. You guys must be so pleased!!
caroline says
Up where they walk, up where they run, up where they stayyy all dayyy in theee suuuun (which is what I’m sure you’re doing now you’ve got a lovely sunny kitchen).
Oh, and thank you for putting my favourite song in my head :)
YoungHouseLove says
High fives for Ariel on a Monday morning.
xo
s
Sally G. says
So much better! We’re starting to paint rooms in our house, and it makes such a difference. We’ve already taken care of the trashed walls in my office and I blogged about it last week. We did our main living space this weekend as well – photos to come soon, I hate that the sun sets at like 4:30 these days!
http://barksandbaking.wordpress.com/2013/11/21/office-progress/
YoungHouseLove says
Looks good in there! And you’re right about those early sunsets. So sad when it’s 5pm and pitch dark!
xo
s