Remember when the kitchen looked like this back when we first laid eyes on our house?
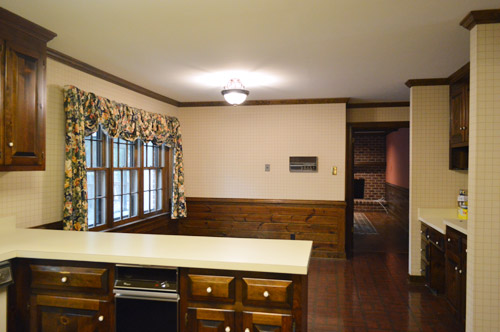
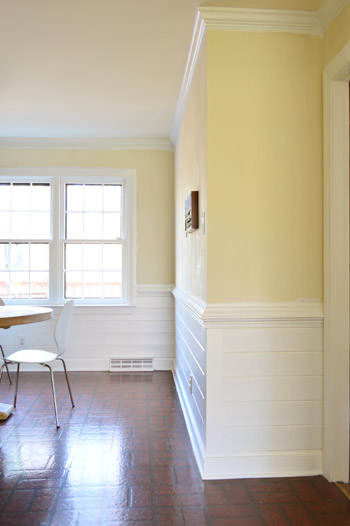
Whelp, now it looks like this…
It’s crazy how different certain angles look in person.
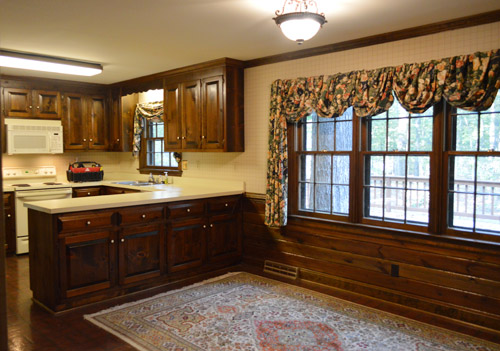
It’s like walking into the room and wondering who added five extra lights. It’s just so much brighter.
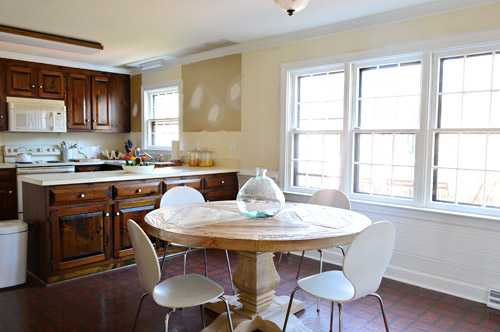
Yes, we dove headfirst into priming and painting the kitchen baseboards, crown molding, and window trim (52. freaking. panes.) and ended up just going all out and tackling the paneling and the doors to the pantry and the garage while we were at it. We have nothing against dark paneling, we just prefer the painted look for our house, especially after drooling over a few awesomely classic spaces that inspired us (like this one, this one, and this one).
I’m not going to lie – it was not an easy process. But it was SO WORTH IT. The room feels so much brighter and less heavy and we find ourselves actually looking out the windows now (when that trim was dark it stopped your eye, but now that it’s white, suddenly the outside world is the thing that’s emphasized, like a pretty little forest focal point).
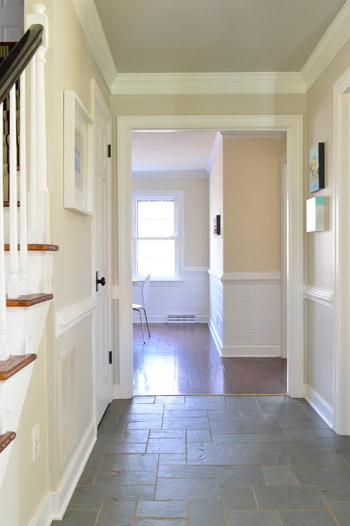
One of my favorite new views is from the front door. Here’s a shot we took during inspection (don’t mind the chaos, there were a few old furniture items being moved out by a crew at the same time).
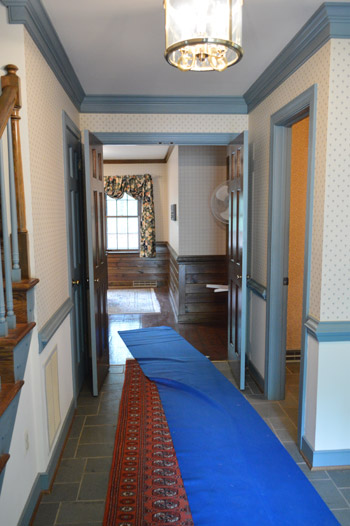
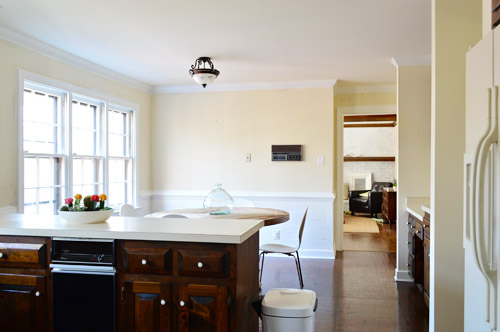
And here’s a shot we took yesterday afternoon. Ignore all the beige… we’re planning for some airy color on the kitchen walls to break things up (more details in this post). And the lower cabinets will end up nice and dark for contrast too. Eventually we also think we’ll end up with big dark (heated) tiles on the floor too, so that should help to balance/ground things. White paneling + softly colored walls + dark floors + a rustic wood table sounds like a nice mix.
All told, it took two coats of primer followed by two coats of paint applied by hand. We decided only to use the sprayer to paint things we could remove and take outside (like cabinet doors/drawers when we get to that stage) since we’ve used it once inside (to paint all of the baseboards/trim/doors upstairs while the carpeting was ripped up) and we noticed a pretty decent amount of overspray.
Based on that experience (and using it outside for things like painting the sunroom ceiling planks) we just think our type of sprayer is better for outdoor use unless we’re working in truly gutted indoor spaces. We’ve seen other folks tape off the entire room and spray every last inch of woodwork, but this room has four different doorways to other spaces that we’d need to fully block off (any paint seepage onto the wood floors in the dining room or living room scared us greatly) and we worried it wouldn’t save much time if it took us 10 hours to tape everything off anyway.
So John and I just chipped away at it over the past five days (Burger refused to lend a paw – that diva). Thankfully we found an awesome stainblocking primer that has no-VOCs but actually works so I could join in on the fun (some others gave us wood-bleed like you wouldn’t believe, but this one was awesome). It’s called Kilz Premium – just make sure you get the one with the label that says “no VOCs” and “stainblocking” since they have a bunch of different types. As for the paint, we’re still using Simply White (in semi-gloss) which has been our choice for all the trim and doors upstairs and in other rooms that we’ve tackled downstairs (like the foyer and the half bathroom). But we’ve got a round-up of other popular white paint colors you could choose from.
Gif time, baybay:
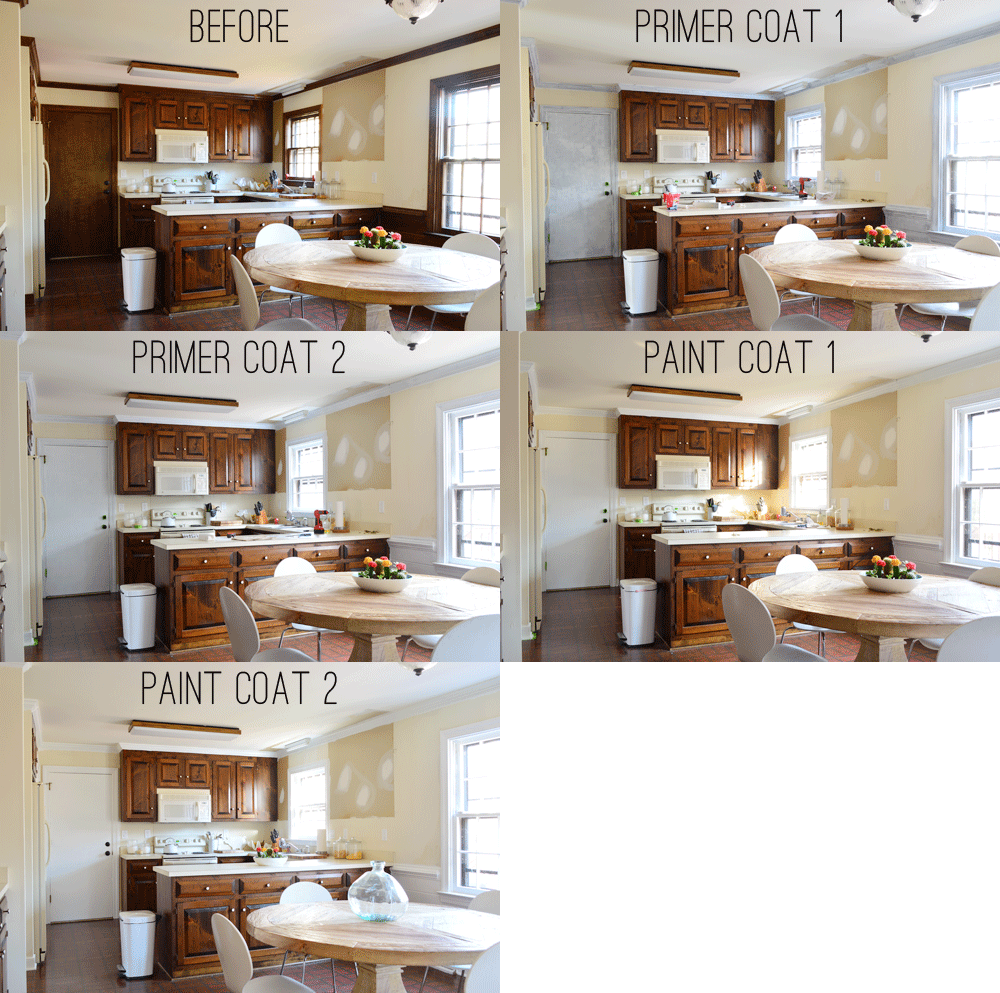
Two coats of the Kilz stuff followed by two coats of paint took us about 12 hours. The first coat is always the hardest (for some reason it just takes longer to get into all of those nooks and crannies and around all of those edges the first time, but your brush or roller seems to glide over them more easily as you go). So it was probably around 4 hours for the first coat and then 3 for the second coat and then 2.5 for the following two coats.
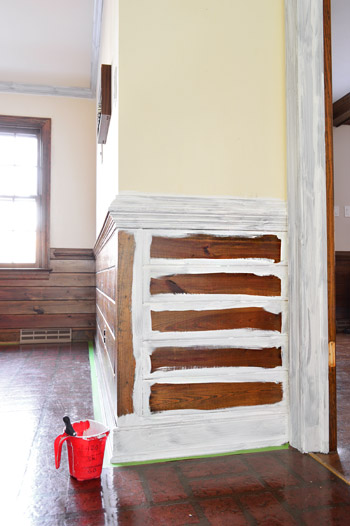
As for the application method, a regular old 2″ angled brush was what we both used to tag-team the trim as well as those window frames, and then we used a roller along with a brush on the paneling (a brush got into those crevices and then a roller could be passed over the fronts of each board to smooth them out). Here’s an example of what I did with a brush, and then John rolled the flat parts so it all blended in. Update: If your trim or paneling is super shiny and lacquered we always recommend sanding and using a liquid deglosser before the priming step. In our case it was chalky and dry wood without a thick layer of sealer, so we went right to primer and paint, which held nicely.
Now I’m like Jasmine rolling in there singing A whole neeeeeew world.*
*And then I see the intercom and turn into Ariel belting out You want thingamabobs? I’ve got twenty.
This corner. Huuuge difference.
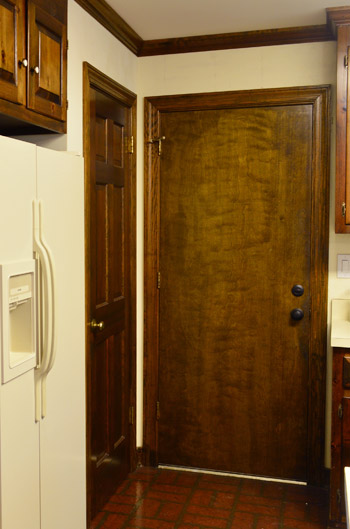
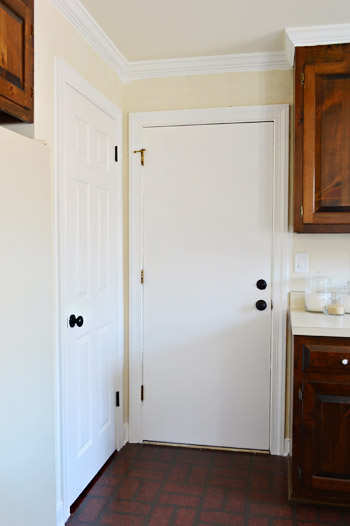
The door straight ahead leads out to the garage, and the one on the left is the pantry. Someday it would be awesome to have a paneled door that leads to the garage, but it’s wider than the other doors in our house (and needs to be fire-safe) so we might have to order one or miraculously find it at the ReStore or something. For now the white paint is a welcome upgrade.
We didn’t have to paint the pantry door since we had one upstairs in our storage room that we sprayed white back when we sprayed the other doors up there but had never rehung (it was the between our bathroom and sink nook, but it blocked things off so we’re happier without it). As for the garage door, we could have removed it and sprayed it outside, but that would have meant an exterior door being off the hinges for a few days (drafty + not secure) so we just painted that one in place. Still need to replace those brass hinges though…
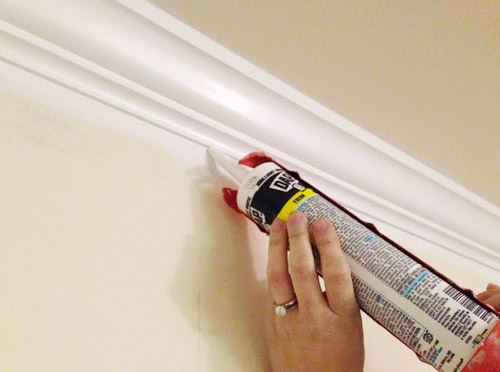
Oh and a quick tip for anyone tackling wood trim, paneling, or crown: it’s not unusual to see all sorts of dark cracks that need to be caulked after you get some primer and paint going on. Something about dark wood tones hides those cracks and shadows, but then when it’s painted they stand out. So our advice is to look for those after one or two coats of primer (you won’t be able to see them before you apply anything, since they only pop out at you as the wood gets lighter) and then fill ’em with paintable caulk (we like paintable Dap window & door caulk in white). As long as you get ‘er done before your final coat of paint, it should go over them for a nice seamless finish.
So now our to-do list in here looks a little something like this:
Remove wallpaperMove fridge cabinet forwardRemove upper cabinets on window wall to prep for open shelves
Reinstall crown molding(you can read about how we did those first four things here)
Prime & paint the pantry and the door to the garage
Prime & paint the trim, crown molding, & baseboardsPrime & paint the paneling- Patch and paint the ceiling
- Replace the florescent light in the cooking area and the pendant over the sink
- Replace and center the light over the dining table
- Paint the walls (you can read about the color we’re leaning towards here)
- Hang floating shelves on the window wall
- Possibly craigslist the existing microwave and get a countertop one (the we can put in the pantry?) and add a cheap range hood (we’ve seen some like this for $20 on craigslist) to lighten up that wall?
- Paint the cabinets (you can see the colors we’re leaning towards here)
- Update the old cabinet hinges and knobs
- Get a rug for eat-in area? Possibly install peel and stick tiles everywhere?
- Curtains for windows?
Psst – To read why we’ve chosen these steps for Phase 1 (for example, why we’re painting the cabinets, why we’re not going to attempt to paint the linoleum, and what’s on the agenda for Phase 2) there’s lots of background info in this post for ya.
There are still a lot of uncrossed items, but we’re so excited about how far this room has come already! What were you guys up to this weekend?

Erin says
Looks great! I love the updated look! Do you have any tips on cleaning white trim, especially around door frames? I have tried different methods but notice this dust build-up that is hard to get rid of in some of the fine lines. Thanks!
YoungHouseLove says
I like a damp microfiber cloth just rubbed over them regularly. One big tip is to paint them if they’re just caulked in some spots (caulk is like a dirt/dust magnet, but once you add semi-gloss paint over it, everything is a lot easier to wipe down).
xo
s
Lori Anderson says
What color did you use to paint the walls in the kitchen? It looks fun, fresh, and fabulous!
YoungHouseLove says
That’s just the color that was under the wallpaper! Haha! We can’t wait to paint it though!
xo
s
Sayward says
1. I still have my Jock Jams CD
2. This looks SO GOOD!!! I’m eating Thanksgiving dinner with my boyfriend’s family for the first time this year, and he gave me a heads up that during the meal everyone goes around the table and shares something they’re thankful for. I’ve been wracking my brain for something sweet but not TOO personal that I can share, and now I can hold my head high with a tear of gratefulness glimmering in the corner of my eye and say, “I’m thankful for John and Sherry’s painted trim and paneling.” You saved Thanksgiving!!!
YoungHouseLove says
Hilarious! I love it Sayward!
xo
s
Sara Wutzke says
Wow! So bright and beautiful!! I love, love the horizontal paneling, especially now that it looks so crisp. I also love the idea of open shelving. I’m just getting ready to add some open shelving in my kitchen for all of my flour/sugar etc to clear off the counters. I love watching your house progress. (And so excited to see your nursery!!!)
YoungHouseLove says
Thanks Sara! Good luck with your shelves. We’re such fans of how easy and casual they make things!
xo
s
Jeanna says
It really looks wonderful, much lighter :) I’ll bet it feels so much better to be in that room. But I did have a question………I know that the crown on top of the cabinets is part of the whole trim, but am I the only one that thinks the upper cabinets look shorter with the trim painted white? Would it look silly to paint the cabinet trim the same color as the cabinets so they look taller, or is it a rule of thumb that all trim gets the same treatment? Maybe it’s just the difference of the painted trim, and the yet unpainted cabinets? You know, just an eye thing, lol…………
YoungHouseLove says
Oh yes, once we paint the cabinets we think it’ll look a lot more normal! Typically if the crown runs around the entire room there’s not usually a good stopping point for the crown to change colors (for example, the cabinet over the fridge is built into a nook, so the crown goes all the way across that wall – we’d literally be just drawing random lines on the crown if we changed the color for it over that cabinet). Hard to explain, but I think when we get to cabinet painting it’ll come into context again!
xo
s
Lisa says
So exciting! It’s amazing how much it brightens up that room! I’m excited to see how much brighter that white paint will make the living room look!
I’m curious why you’re going to update all the cabinet hinges, when you’ll be getting new cabinets later on. I get the knobs, those are more in your faces are the hinges in bad shape? Our hinges on our cabinets are hidden so maybe your are more noticeable, or maybe old hinges are more unsightly than I’m thinking :) I love that you’ll be reusing the cabinets in the garage… and now that I typed that maybe that’s why you’re replacing the hinges because you’ll still be using those cabinets for the long haul in the garage! Ha!
YoungHouseLove says
In that sense, “update” just means they might get spray painted (springing for all new hinges wouldn’t be worth it to us either I don’t think). They’re gold right now, so $7 to upgrade all of them to ORB might be just the thing. We’re also considering just spray priming and painting them the base color of the cabinets, so they blend right in. So that’s another option we’re weighing!
xo
s
Krissy says
I’m torn. It does look so much brighter, and I know it’s your style so it totally works for you guys… but I love wood and everything in our house is rustic, so it makes my heart hurt a little to see all that wood getting covered.
Barbara says
Did I miss where it says why you didn’t paint the wall where the cabinet came down?
YoungHouseLove says
We actually haven’t painted the walls yet, but I can’t wait to get to that (and cover those annoying spackle spots!).
xo
s
Stephanie says
What an amazing transformation! Looks like a breath of fresh air!
I also had Jock Jams. Would play it loudly while practicing my foul shots in the driveway. Oh, memories…
YoungHouseLove says
Now I have a sweet mental picture of that. I love it.
xo
s
Christy says
I’m not sure, but I think I just heard angels singing…this is absolutely DIVINE work, Petersiks!
YoungHouseLove says
Haha, thanks Christy!
xo
s
Tania @ Run To Radiance says
Agh! It looks so good you guys!!! I think you just sold me on painting my bedroom a lighter color rather than darker. Random I know. :)
Susan says
Looking so good! What a huge accomplishment! I paint one window and I’m whining so I know how much work went into this. So worth it though…just beautiful!
Happy Thanksgiving to you and your family! XO
YoungHouseLove says
Thanks Susan! You too!
xo
s
Ann Marie says
I don’t know if this has been asked/answered but how did you make the decision to paint the crown above the cabinets? our crown/cabinets are the same way and I don’t know whether to make the crown the color of the cabinets or make it look like crown. Conundrum!
YoungHouseLove says
It looks a little strange to me, but I think once we paint the cabinets it’ll look a lot more normal! Typically if the crown runs around the entire room there’s not usually a good stopping point for it to change colors (for example, the cabinet over the fridge is built into a nook, and the crown goes all the way across that wall – so we’d literally be just drawing random lines on the crown if we changed the color for it over that cabinet). Hard to explain, but I think when we get to cabinet painting it’ll come into context again! Hope that helps!
xo
s
Erica Rose says
I. Am. SO EXCITED!!! We live in a 500sqft apartment while we save up to buy (gotta love living in a pricy SoCal beach town!), and all I want to do is demo and paint and put in shelves and all the thing you can’t do when you’re renting. I am 100% living vicariously through you guys, and I am so excited to see your progress!!!
Katie says
Sherry– I also have wood-cased windows with the same wood trim & I’ve been entertaining the idea of painting them white as well. The only thing is that some of the windows show signs of condensation that dripped onto the wood and has left dark marks/spots. My guess is that the wood hasn’t been sealed since it was built (1990) so these are likely water marks left by condensation dripping. Do you think it is ok to prime/paint over top of these spots– will the new paint act as a sealant for the wood in case condensation happens again?
Any suggestions welcomed! Thanks!
YoungHouseLove says
Sure! I would use a stainblocking primer so hopefully it blocks that and then when you semi-gloss paint over them it should be more protected (water has a tougher time penetrating new semi-gloss paint). Good luck!
xo
s
Nicole says
the transformations never cease to amaze me… and I wonder everytime, do you ever share any of these with the previous homeowners? I am sure they world be speechless!!!
YoungHouseLove says
We love when they find our blog (we’ve heard from the original owners of our first and second house). Would be awesome to hear from someone who lived here a while back too! I especially love hearing how they used certain rooms and seeing old photos they have!
xo
s
Samantha says
Wow! It’s amazing how some white paint can really brighten up the room. I’m looking forward to seeing how it looks with the walls painted.
amy says
Wondering where you got your kitchen table? LOVE IT!! Great work!
YoungHouseLove says
Thanks Amy! Here’s that post for ya: https://www.younghouselove.com/2013/10/im-still-laughing-about-blardware/
xo,
s
Laurel says
Looks great! You guys must be so psyched to slap some paint on those walls next! How does the blue color you’re considering differ from the blue paint in your old kitchen? It looks more gray maybe? The room seems like it will feel fairly done when you’re finished with phase 1. Are you considering leaving it for a few years after you finish phase 1 to save up, plan the design, and finish work on most of the rest of the house or is this just-for-now-I-can’t-live-with-this-for-more-than-a-year! work?
YoungHouseLove says
Our plan is just to do what we can on a budget to make it nice in there while we wait/plan/save our pennies for that someday makeover. We’re not sure if a full reno will be in the cards in a year or two (probably depends what cabinets/appliances we find and then how long it takes us to save up for them) but it’s so nice to just use affordable things like paint to upgrade a space – and a lot of these steps will actually roll over into the main makeover (for example, all the trim and paneling will stay, and it’s so nice to start that makeover with them already being white).
xo
s
Dolly says
I love all the white painted trim, molding and baseboards! It looks so much better.
Our kitchen has white-painted cabinets, but the previous owner skipped the primer. Now the original blue paint on the cabinets is starting to show through. I think they used eggshell finish because it isn’t very glossy. I think we will have to prime and paint them again. Do you recommend sanding them first before priming?
This weekend we hit up Home Depot and got parts to fix our kitchen faucet sprayer and also got parts to make our own cloth diaper sprayer for the bathroom. I found the tutorial here:
http://gidgetgoeshome.com/2008/08/25/diy-tutorial-make-your-own-diaper-sprayer/
The DIY diaper sprayer was really easy once we found the parts (that was the hardest part) and I love it!
YoungHouseLove says
Oh no! I would definitely sand them down and then use a liquid deglosser before priming (your foundation is only as strong as the previous one, so you want to get all that flaking paint off before starting again). Thanks for that tutorial too! So cool!
xo
s
Betsy Payne says
Huge difference! We have a contract on a 1970’s fixer upper as we speak– I noticed you have the same gigantic baseboard air vents as we have in the house– did you replace those or paint those? And if paint, what did you use? Thanks! Love the blog!
YoungHouseLove says
We just primed and painted those, although we do think about replacing them someday if we see pretty newer vents that will look nice and polished down there.
xo
s
Shaina says
Is the primer you reference really no smell? We slowly have tackled our wood trim, but still have the stairs left. We also now have a 7 month old, so I would like to ditch the smelly oil based primer for when I finally find the time to do that project.
YoungHouseLove says
The no-VOC primer has a very slight odor, sort of like finger paints when it’s wet, and then nothing when it’s dry. It’s actually less smelly than the no-VOC paint we use!
xo
s
Lindsay K says
This looks fantastic and so much brighter! Our kitchen cabinets and trim have a similar stain making things dark. I’ve been thinking of painting the trim to help brighten the room but, I’m not ready to paint the cabinets yet. I was worried the “in-between” would look unfinished or out of place, but this helps ease my mind.
Our house is dated similarly to yours (although the previous owner removed the wallpaper from all but one small room, thankfully). I’ve enjoyed your blog for a couple years, but since you’ve moved into this house I feel like I’m getting a more personal experience. You are making changes I’ve been wanting to since we moved into ours over 2 years ago. After seeing your results, I know similar changes will look good in my house and I have more courage to try them. Now I just have to talk the hubby into it!
YoungHouseLove says
Thanks for the kind words Lindsay! And all the best with your place!
xo
s
Ana Silva says
What a difference! I painted sheds and worked on several other small projects around the house. It’s non-stop around here by myself since my husband is deployed. There is not enough hours in a day for me at the moment. I am in the Army too so that keeps me busy as well.
-alex says
re: Get a rug for eat-in area? Possibly install peel and stick tiles everywhere?
I totally recommend a DIY floor cloth. I have one I made for our dining room 10 years ago. It’s bomb-proof. It took marine canvas, one coat of gesso, two coats of exterior oops paint, one coat of base color, craft paints for the design and two coats of poly for a top coat. Yes, it was involved, but it is completely wipeable and you can make it any size you need.
YoungHouseLove says
Thanks so much for the tip Alex! Sounds awesome!
xo
s
Megan says
Looks a billion times better! How are you guys holding back from not painting those walls yet. I would be itching. I’m itching just looking at these pictures. It’s going to feel so much better in there! And still laughing at the Ariel comment “You want thingamobobs, I’ve got 20 .”
YoungHouseLove says
I know, I’m laying in bed at night saying “let me at ’em!” – but we’re currently debating if cabinet painting makes sense before walls (might get stuff on the walls and new shelves if we do it the other way around…).
xo
s
Cheryl says
Love it! This raises a question – We have the same wood trim and doors throughout our entire 1980 house. I primed one room’s baseboards with stain blocking primer and it scratches right off when I run my fingernail along it. Then, a friend told us we would need to use oil based primer on wood trim because of the poly they put on it. I see you recommended sanding and deglossing shiny wood trim. Thoughts on which option works best, or is it a toss up on wood trim? Not looking forward to this process, but definitely looking forward to the finished product! The transformation is amazing!
YoungHouseLove says
Hmm, no matter what I’d say that you want to rough up that poly so your primer/paint grabs it. Picture it being covered with glossy goo, so no matter what type of primer you put over it, you’ll probably still be able to scrape it off if you don’t cut that glossiness first with sandpaper. Then to be extra careful you can use oil-based primer if you’d like! Hope it helps!
xo
s
Kady says
OMG! I love it! You guys constantly amaze me! It looks like a totally different space! Definitely makes me want to take a paint brush to the rest of my paneling!!
Christine says
You. GUYS! That looks FANTASTIC!! I love the shot from your front door–everything just flows now from room to room. What a great transformation…and you aren’t even done!
Nancy says
I think your house was a lovely example of the style at the time. But styles change. And I so appreciate your not insulting the style of the previous owners. Some bloggers do that which seems so insensitive considering the previous owners are probably following the updates!
Megan says
I just have to say how amazing the kitchen and home are looking. I love what paint can do to a room! Keep up the good work. I completely agree about living in a house and doing phases because you learn what you want or don’t want in your home without spending lots of money. I can not say how many times we have changed our minds in the 10 months we have lived in our home. But I love the lighter kitchen, amazing!!!
beth says
Oh my goodness! So thrilled for you guys! I got so excited seeing the before and after pictures i feel as if I live there with you. Great job! Cant wait to see the final product but very much enjoying watching you guys get things done in stages. I watched in anticipation your last homes transformation and just loved it all. Your guys decorating is simple,whimsical, classy and beautiful. Congrats on your pregnancy and thanks for sharing your lives with us. Take Care!!
YoungHouseLove says
Thanks so much Beth!
xo
s
Anne says
Yeah, that video was awesome!! My 7th grade jazz dance was to one of those songs. Takes me back.
The kitchen looks awesome! So much brighter.
Bethany @ Dwellings By DeVore says
I’m always amazed at the power of white paint! What a transformation already!
ErinY says
Oh my gosh! I totally forgot about jock jams! And as soon as I played it I was overcome with the sudden urge to start my middle school cheerleading routine…I somehow remember one of the sequences and since I’m at home, I totally indulged in dancing it out. I blame muscle memory! haha
YoungHouseLove says
Hmmm, maybe muscle memory is the same thing I can blame for knowing all of the moves from the Waterfalls video by TLC…
xo
s
Ameera says
Hi,
first time commenting on your blog but ive been following you for ages now!
Love the changes you have made to the kitchen! Your house makes me want to move to a country home.
Wondering where you got your dining table! I looked in the google search on your site and couldnt find anything about it!
YoungHouseLove says
Thanks Ameera! Here’s that post for ya: https://www.younghouselove.com/2013/10/im-still-laughing-about-blardware/
xo
s
Ameera says
Thank you so much Sherry! Great Find and a RH for 650!
Unbelievable!
Ellen says
Wow – looks great. You guys make it look so easy!!
We just finished our change to white trim in the dining room this weekend – you can see it here if you curious:
http://designingmainstreet.com/2013/11/25/ding-dong-the-dining-room-is-done/
Primer and three coats of paint = 3 months later for us!! :) :)
YoungHouseLove says
That’s awesome! They look great Ellen!
xo
s
Amber says
Super jealous of your guys panelling. It just adds so much character. :)
YoungHouseLove says
Thanks Amber! At first I was thinking “we’ll just paint it to make it go away” but we love it so much now that it’s white we’d actually add it to other rooms! It’s so funny how just some paint can change things like that for ya!
xo
s
Sarah | The Cyclist's Wife says
Wow! It’s kind of crazy that all that change just came from paint!
John @ Our Home from Scratch says
Your house looks awesome with the lighter paints. So bright and clean. That paneling looks incredible painted. We just bought our daughter the Little Mermaid DVD a few weeks ago so we’ve been quoting it plenty over here, too. I prefer to sing the french chef song myself.
YoungHouseLove says
Lessssss poissons, lesssssss poisssssons, how I looooooooove les poissons!
xo
s
Amanda S. says
SO LOVE THIS!!!! What a difference paint can make :)
Laurie Anne says
Great work and inspiration you guys! I am about to move into my first I own it myself home!!! It is inspiring to watch your progress–gives me ideas for how to personalize a town home that otherwise looks like everyone else’s. So thank you!! I know you’ve written about it before, but could you please tell me where you got your beautiful dining table and those chairs? I keep my eye on Craigslist, etc., but find little that I like. Keep up the good work! Thanks!!!
YoungHouseLove says
Aw thanks Laurie Anne! The table is from a local shop called The Decorating Outlet and the chairs are from ebay about 7 years ago (they were orange but I painted them white for my little studio). Still alive and well!
xo
s
Ashley J says
Love this! Ah white paint… so refreshing and clean!
Also, I had a question: where did you get your kitchen wastebasket? lol, yeah I know, totally random.
YoungHouseLove says
HomeGoods two years ago. I think they still have them though!
xo
s
Fiona@Jackadaw says
Ahhhh the transformative power of vision, paint and a whole lot of elbow grease! It’s looking like a different house, and much more you guys.
Megan says
Gorgeous!! This makes me giddy thinking about how huge a tranformation it will be when my wood cabinets go white next year. Can’t wait to see what you’re going to do next!
Stephanie says
Love how this kitchen is progressing. Here’s an idea for adding pizzaz to the door to the garage: How about painting a rectangle with chalkboard paint, and then framing it with some white molding (or perhaps turquoise or some other accent color)? Is the door metal? Even more fun! Would be a great “space” for the kids to play while you are cooking dinner and/or a space to write down your grocery list.
YoungHouseLove says
Love that!
xo
s
kmad18 says
hello! what are you thoughts about simply white for kitchen cabinets? we’re in the process of building a house and i was thinking simly white for the trim, but also perhaps the cabinets. we’re looking for a white-white, but not an blinding-hurt-your-eyes white. thoughts? in case in helps, we’ll have a pretty open kitchen/dining/living concept on our first floor and i plan to use a warmer/beige/tan-family neutral on the walls.
thanks so much!
YoungHouseLove says
Sounds really nice! It can read differently depending on your light so I’d grab a swatch, but in our house it’s not too blue or too yellow or too bright or too faded.
xo
s
Laura says
Love the beige paint color in the foyer. Can you tell me what color that is?
YoungHouseLove says
That’s Edgecomb Gray.
xo
s
Taylor says
EEEKKKKK!! It’s really quite insane how a little bit of paint can give a room that extra POW. Definitely worth the effort! Now I just need to find something I’m allowed to paint in my rental.
diane says
I have tons of wood trim and have slowly been painting it white also. Is it bad that I caulk AFTER its all painted? It gives such a perfect line that I can’t achieve if I painted the wall after caulking the trim. Am I doing this all wrong?
YoungHouseLove says
I would paint over the caulk if you can, just because caulk is like a dirt/dust magnet so paint on top of it makes it a lot less tacky/sticky so it’s wipeable and doesn’t attract dust and build-up.
xo
s