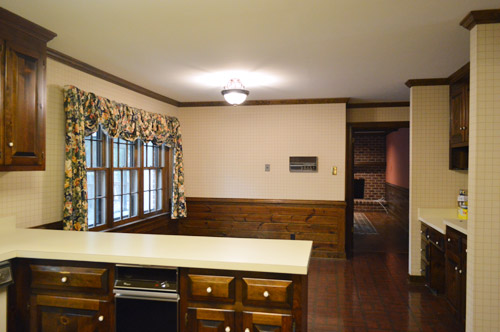
Remember when the kitchen looked like this back when we first laid eyes on our house?
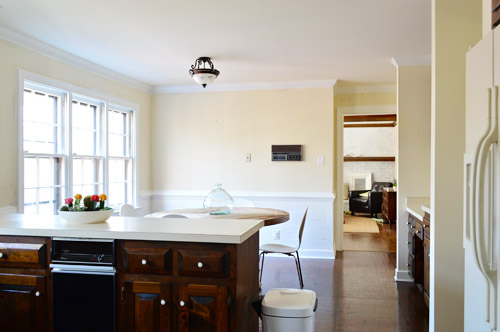
Whelp, now it looks like this…
It’s crazy how different certain angles look in person.
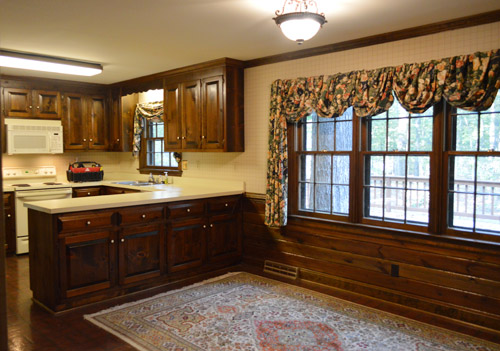
It’s like walking into the room and wondering who added five extra lights. It’s just so much brighter.
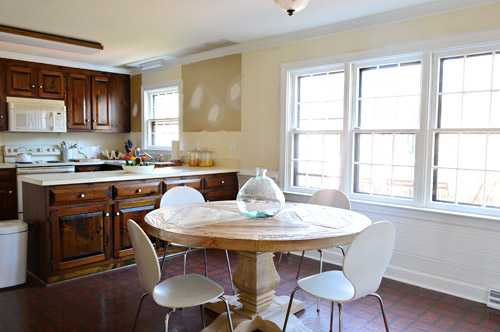
Yes, we dove headfirst into priming and painting the kitchen baseboards, crown molding, and window trim (52. freaking. panes.) and ended up just going all out and tackling the paneling and the doors to the pantry and the garage while we were at it. We have nothing against dark paneling, we just prefer the painted look for our house, especially after drooling over a few awesomely classic spaces that inspired us (like this one, this one, and this one).
I’m not going to lie – it was not an easy process. But it was SO WORTH IT. The room feels so much brighter and less heavy and we find ourselves actually looking out the windows now (when that trim was dark it stopped your eye, but now that it’s white, suddenly the outside world is the thing that’s emphasized, like a pretty little forest focal point).
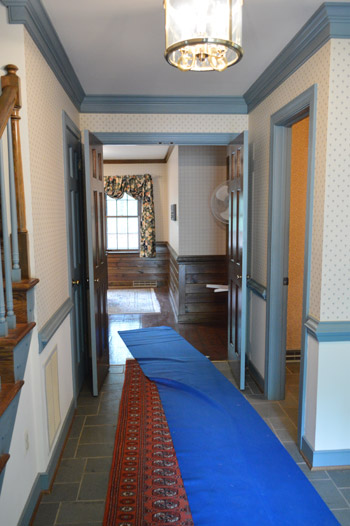
One of my favorite new views is from the front door. Here’s a shot we took during inspection (don’t mind the chaos, there were a few old furniture items being moved out by a crew at the same time).
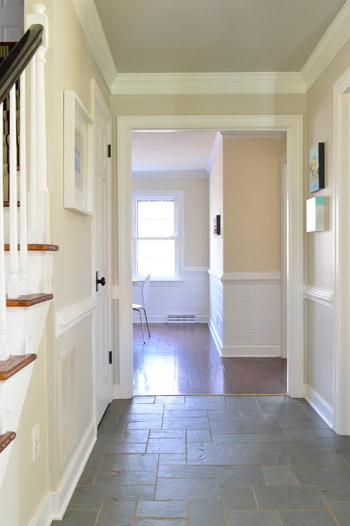
And here’s a shot we took yesterday afternoon. Ignore all the beige… we’re planning for some airy color on the kitchen walls to break things up (more details in this post). And the lower cabinets will end up nice and dark for contrast too. Eventually we also think we’ll end up with big dark (heated) tiles on the floor too, so that should help to balance/ground things. White paneling + softly colored walls + dark floors + a rustic wood table sounds like a nice mix.
All told, it took two coats of primer followed by two coats of paint applied by hand. We decided only to use the sprayer to paint things we could remove and take outside (like cabinet doors/drawers when we get to that stage) since we’ve used it once inside (to paint all of the baseboards/trim/doors upstairs while the carpeting was ripped up) and we noticed a pretty decent amount of overspray.
Based on that experience (and using it outside for things like painting the sunroom ceiling planks) we just think our type of sprayer is better for outdoor use unless we’re working in truly gutted indoor spaces. We’ve seen other folks tape off the entire room and spray every last inch of woodwork, but this room has four different doorways to other spaces that we’d need to fully block off (any paint seepage onto the wood floors in the dining room or living room scared us greatly) and we worried it wouldn’t save much time if it took us 10 hours to tape everything off anyway.
So John and I just chipped away at it over the past five days (Burger refused to lend a paw – that diva). Thankfully we found an awesome stainblocking primer that has no-VOCs but actually works so I could join in on the fun (some others gave us wood-bleed like you wouldn’t believe, but this one was awesome). It’s called Kilz Premium – just make sure you get the one with the label that says “no VOCs” and “stainblocking” since they have a bunch of different types. As for the paint, we’re still using Simply White (in semi-gloss) which has been our choice for all the trim and doors upstairs and in other rooms that we’ve tackled downstairs (like the foyer and the half bathroom). But we’ve got a round-up of other popular white paint colors you could choose from.
Gif time, baybay:
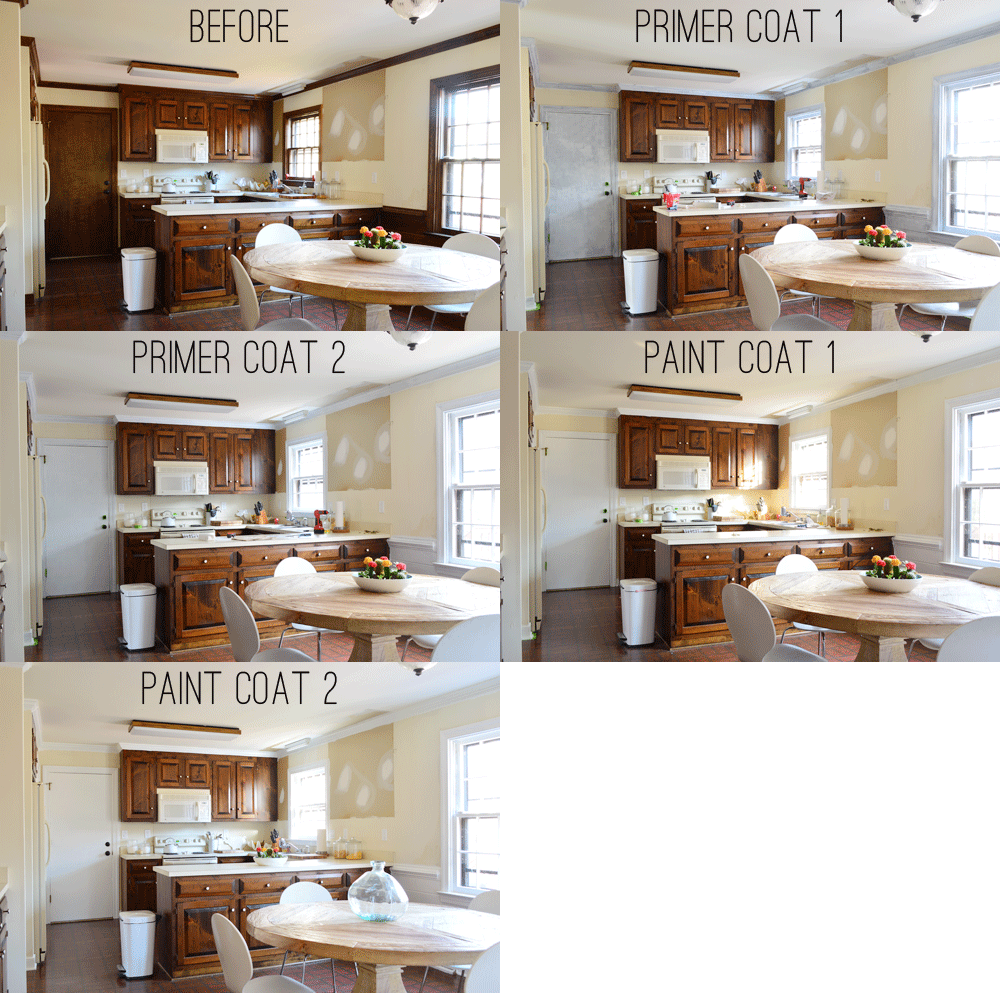
Two coats of the Kilz stuff followed by two coats of paint took us about 12 hours. The first coat is always the hardest (for some reason it just takes longer to get into all of those nooks and crannies and around all of those edges the first time, but your brush or roller seems to glide over them more easily as you go). So it was probably around 4 hours for the first coat and then 3 for the second coat and then 2.5 for the following two coats.
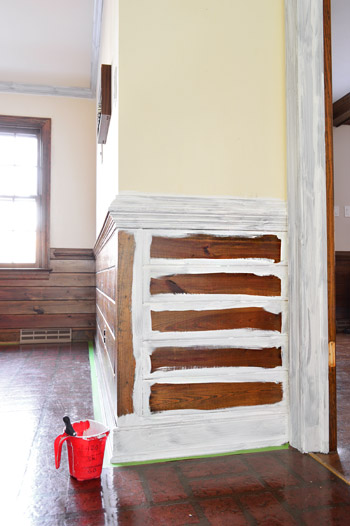
As for the application method, a regular old 2″ angled brush was what we both used to tag-team the trim as well as those window frames, and then we used a roller along with a brush on the paneling (a brush got into those crevices and then a roller could be passed over the fronts of each board to smooth them out). Here’s an example of what I did with a brush, and then John rolled the flat parts so it all blended in. Update: If your trim or paneling is super shiny and lacquered we always recommend sanding and using a liquid deglosser before the priming step. In our case it was chalky and dry wood without a thick layer of sealer, so we went right to primer and paint, which held nicely.
Now I’m like Jasmine rolling in there singing A whole neeeeeew world.*
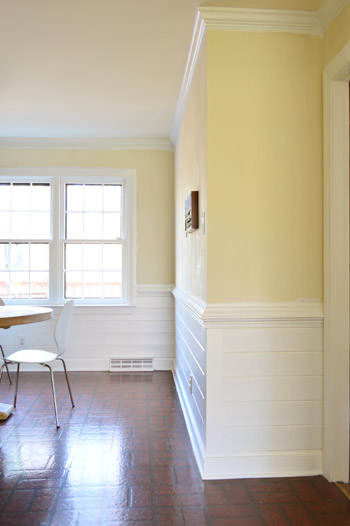
*And then I see the intercom and turn into Ariel belting out You want thingamabobs? I’ve got twenty.
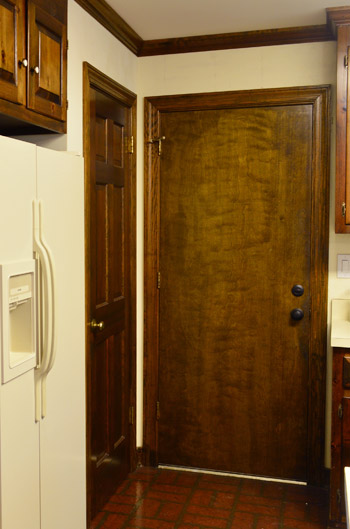
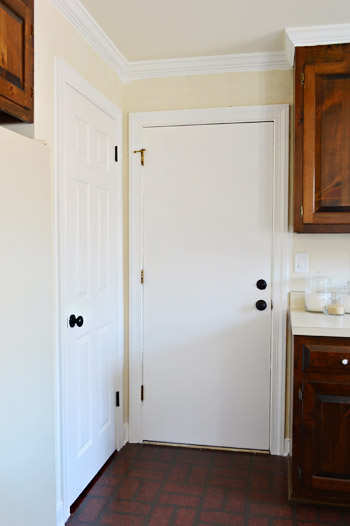
This corner. Huuuge difference.
The door straight ahead leads out to the garage, and the one on the left is the pantry. Someday it would be awesome to have a paneled door that leads to the garage, but it’s wider than the other doors in our house (and needs to be fire-safe) so we might have to order one or miraculously find it at the ReStore or something. For now the white paint is a welcome upgrade.
We didn’t have to paint the pantry door since we had one upstairs in our storage room that we sprayed white back when we sprayed the other doors up there but had never rehung (it was the between our bathroom and sink nook, but it blocked things off so we’re happier without it). As for the garage door, we could have removed it and sprayed it outside, but that would have meant an exterior door being off the hinges for a few days (drafty + not secure) so we just painted that one in place. Still need to replace those brass hinges though…
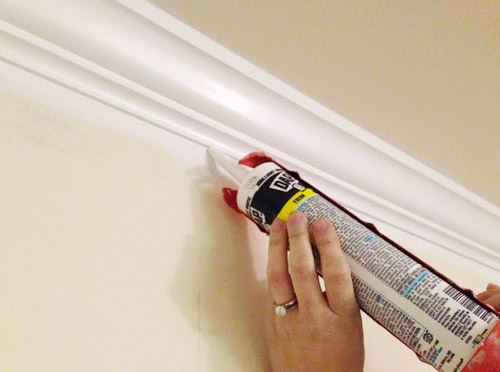
Oh and a quick tip for anyone tackling wood trim, paneling, or crown: it’s not unusual to see all sorts of dark cracks that need to be caulked after you get some primer and paint going on. Something about dark wood tones hides those cracks and shadows, but then when it’s painted they stand out. So our advice is to look for those after one or two coats of primer (you won’t be able to see them before you apply anything, since they only pop out at you as the wood gets lighter) and then fill ’em with paintable caulk (we like paintable Dap window & door caulk in white). As long as you get ‘er done before your final coat of paint, it should go over them for a nice seamless finish.
So now our to-do list in here looks a little something like this:
Remove wallpaperMove fridge cabinet forwardRemove upper cabinets on window wall to prep for open shelves
Reinstall crown molding(you can read about how we did those first four things here)
Prime & paint the pantry and the door to the garage
Prime & paint the trim, crown molding, & baseboardsPrime & paint the paneling- Patch and paint the ceiling
- Replace the florescent light in the cooking area and the pendant over the sink
- Replace and center the light over the dining table
- Paint the walls (you can read about the color we’re leaning towards here)
- Hang floating shelves on the window wall
- Possibly craigslist the existing microwave and get a countertop one (the we can put in the pantry?) and add a cheap range hood (we’ve seen some like this for $20 on craigslist) to lighten up that wall?
- Paint the cabinets (you can see the colors we’re leaning towards here)
- Update the old cabinet hinges and knobs
- Get a rug for eat-in area? Possibly install peel and stick tiles everywhere?
- Curtains for windows?
Psst – To read why we’ve chosen these steps for Phase 1 (for example, why we’re painting the cabinets, why we’re not going to attempt to paint the linoleum, and what’s on the agenda for Phase 2) there’s lots of background info in this post for ya.
There are still a lot of uncrossed items, but we’re so excited about how far this room has come already! What were you guys up to this weekend?

Ruth @eightsandsevens says
How exciting for you three (& baby bump) such a major transformation. This kitchen makeover might be that turning point when the house starts to feel totally like your home. Ours was in the kitchen too -http://eightsandsevens.com/blog/2013/11/kitchen-update/
Loving the progress!
YoungHouseLove says
Yes, I think you’re right! The kitchen tips the scales!
xo
s
Victoria says
Looks amazing! So worth the effort. I hadn’t realized that the paneling was horizontal and I love it now. I like the idea of putting trim on the flat panel door to mimic a raised panel door that was suggested by an earlier post. Anyway, I’m sure it feels like a breathe of fresh air now in the kitchen.
All this and getting ready for Thanksgiving too? As always, you guys shine.
YoungHouseLove says
Aw thanks Victoria! We are whirring around like wind-up toys, but it feels nice to check off some big boxes (might help us relax for the family stuff coming up, haha!).
xo
s
alg (amy) says
Looks AWESOME! Such a seemingly small thing, but makes a TON of difference :)
And you’re right, the dark wood did stop the eye, keeping the sight line inside the house, but now the white draws the eye right out to the lover-ly nature!
Well done! I don’t blame you for breaking into Disney song!
Kerrie says
Looks wonderful, great effort. Another idea for the garage door – I followed Jenny Komenda’s tips and trimmed a number of my internal hollow core doors and absolutely love the difference such an easy step makes. Cheers
YoungHouseLove says
That sounds awesome!
xo
s
Kaesey says
Wow, what a difference. I think the view from the front hall into the kitchen is the most dramatic change!
I see some comments on your windows and agree – keeping the old wood ones, if they’re in good shape, is worth the effort of painting them. Most of our windows are vinyl and they’re fine but lack charm. We do have an old 18-pane glass door, though, that’s a beast to paint but so lovely it’s worth all the effort!
I spent part of my weekend stripping paint. Blech. We have oil paint under several layers of latex and the latex is starting to separate from the oil paint in huge patches. Not sure why it waited for us instead of cursing previous homeowners, but…oh well. Citristrip takes it back down to the oil paint and doesn’t mean we have to evacuate the house all day. I’d need something stronger to remove the oil-based paint, so I’ll just do the deglossing and priming thing instead and then repaint.
On the up side, I finished some holiday craft stuff! Little santa ornaments, a pattern, most of the top of a quilt for my daughter…! A link for you, Miss Crafty :) http://kaesey.wordpress.com/2013/11/25/santa-baby/
YoungHouseLove says
Love it Kaesey! Thanks for sharing the link!
xo
s
Stacey C says
Beautiful transformation! Why do people make the choice to live in a dark cave? That’s what it looks like to me in your first picture – I’m walking into a cave. A little paint and a lot of hard work goes a long way!
Sarah @ House Made of Marital Glue says
Wow, it looks amazing!!!
This has made me feel motivated and inspired. We just finished a six-month renovation where we added new stairs (removed old ones), opened up a load-bearing wall, and lots of other little things. Now, we have trim that was filled in to match the old trim that is already primed, but the rest is 60-year old oak. I’m itching to paint it all white but am feeling overwhelmed. Seeing your transformation has given me the motivation I need to tackle it soon because it looks so amazing!
Any tips for painting the windows? Do you paint the door jambs?
YoungHouseLove says
Congrats on all those updates! As for our windows, they’re all wood with metal slides inside so we didn’t paint the metal slides but we did the sills, trim, faces, and millions. We didn’t tape off, just tried to keep from getting primer and paint all over the glass and just razored the stuff that did get on the glass off when we finished.
xo
s
Kim says
I definitely need to do the same in my kitchen. The baseboards and trim don’t seem to be quite as dark as yours were, but the kitchen feels dark in general and I can’t wait to lighten it up. Perhaps I’ll go to Home Depot and stock up on the supplies! Thanks for the primer info… I’ll be sure to pick that one up!
Oh and I love your little GIF “movie”. Great idea for showing the progress… I’m going to have to remember that one for photoshop fun!!
Cheyenne says
I’m most excited about the last bulletin. I have the same exact window set up in my living room that looks out onto a busy street. Getting a good balance of privacy and aesthetics has been so tough! So I’m curious to see what you guys do with your three single hungs in a row!! Kitchen looks great!
Gaidig says
I’m surprised you chose to paint the crown above the uppers the same as the rest of the crown in the room rather than matching the cabinets. I’m curious to hear your thoughts on the choice.
Also, as a person who has worked in the building industry, I think you should know that “No VOC” is a mis-nomer. What you are thinking of is no ADDED VOC, which doesn’t guarantee no VOC emissions (which is pretty much impossible – you and I emit small amounts of VOCs just from daily living!) What you want to look for are the 3rd party seals such as Greenguard indicating the level that the emissions were tested to. Also, paint, caulk, etc. emit those VOCs for you to breathe as they dry, cure, and off-gas, so having John caulk for 20 minutes then going back to work in the room isn’t doing much to limit your exposure. Just think of how long those “new car smell” VOCs last.
YoungHouseLove says
Thanks so much for the VOC info! As for the crown, it definitely looks a little strange to me, but I think once we paint the cabinets it’ll look a lot more normal! Typically if the crown runs around the entire room there’s not usually a good stopping point for it to change colors (for example, the cabinet over the fridge is built into a nook, and the crown goes all the way across that wall – so we’d literally be just drawing random lines on the crown if we changed the color for it over that cabinet). Hard to explain, but I think when we get to cabinet painting it’ll come into context again!
xo
s
Gaidig says
The inside corner in front of the cabinets IS a tricky detail to resolve. Looking forward to the final result!
Minnie says
It looks amazingly different! The rooms seem so much brighter, bigger, and happier!
jaclyn says
It always amazes me what some fresh paint can do for a space!
http://wednesdayswewearblack.blogspot.com/
Laura B. says
It is amazing what a difference the paint has made. Which white are you using again? Btw, I have used auto putty (the kind that comes in two small tubs and you kneed them together before use) to repair doors, a piano and various other wood items with missing parts or bad dents. It does not shrink like wood filler and paints nicely. The only thing you have to be careful of is to have it exactly the way you want it before it dries. It becomes very hard and resistant to sanding. I formed pieces of broken molding for my piano and also fixed those little round holes in hollow-core doors left by the stopper. Obviously, it will not stain. If I were painting my cabinets, I would mold new corners and fill in the dents.
YoungHouseLove says
That’s a great tip about the putty Laura! Thanks for sharing! As for the white, we’re using semi-gloss Simply White by BM. It has been awesome so far for trim, doors, etc.
xo
s
Anika says
Wow I had to look at those pictures several different times to be certain you hadn’t in fact painted the walls! The entire room just looks so much brighter: it’s definitely a dramatic difference. I imagine that’s one makeover that’s really nice to see each day.
Thanks for sharing each part of the evolution of a room process with us all: I always find it interesting what order things get done in as a room slowly comes together.
YoungHouseLove says
Thanks Anika! You’re so sweet! It was so surprising to hear from folks asking what color we painted the walls! So funny how much trim/paneling/doors can change everything!
xo
s
Isabel says
Just got a chance to stop by and so amazed by the kitchen transformation. Way to go and can’t wait to see the next step. The power of paint is truly magnificent! Oh, and of course, now I have Ariel in my head singing the next phrase of the song… (insert music) But who cares, no big deal, I want more!!!!!!
YoungHouseLove says
Clara loves the talked questions the best. Like “walking around on that… what’s that word again?… streeeeet!”
xo
s
Amy Beam says
Absolutely incredible transformation! I am totally impressed.
Diana says
WOW what a transformation! Looks so much better already!
ShellyP says
OMG. What an incredible improvement. Yes, a hard 12 hours of manual labor. But SO WORTH IT! I’m nearly 9 years in my 1976 home with dark woodwork just like yours. THe thought of painting out the wood makes me…. tired. But after seeing this post, I am inspired. I would love to walk into my kitchen and feel that fresh vibe that painted woodwork brings. So modern, fresh and uplifting. Whenever I am bummed out by my dark woodwork, I will revisit this post and tell myself it’s only 12 hours away from being transformed.
YoungHouseLove says
Good luck Shelly! You can do it!
xo
s
Pam the Goatherd says
When I saw the facebook post about painting the kitchen I said “WOW!” out loud, the change is so dramatic! It looks like a completely new room, even with the cream color still on the walls and the funky looking spot where you took the cabinets off the wall. It looks like a much happier place now!
YoungHouseLove says
Thanks so much Pam!
xo
s
Angela-Rose says
I spent last week doing the exact same thing in our family room! We’ve lived here for 2 years now & I’d finally had enough of the natural wood in there. The difference is amazing, it’s like a completely different room – so bright & airy. I also painted the walls in a pale cool grey/blue (it had been a dark tan that leaned toward green at times, gold at others…none of which complimented the orangey wood tones!)…the new color even managed to make the brick fireplace look better! Now it’s ready for the tree next Friday!
YoungHouseLove says
Sounds so pretty Angela-Rose! I bet the tree is going to look awesome in there.
xo
s
Sarah H. says
Looks so great!! What a difference some paint makes.
I can’t wait to see what, if anything, y’all do with the intercom situation. We’ve been living with a similar system, including a kitchen unit, that we tell people we’re keeping because “it’s vintage” but the real reason is because we have no idea how to deal with or get rid of it…!
YoungHouseLove says
Haha! We’re in the same boat. Not sure if we can update it with something cool (ipod dock in each room or something) but it might be too expensive, in which case we’ll probably just disconnect them and patch up all those holes. Will keep you posted!
xo
s
Cindy @Made2Style says
AHH!! Amazing!! What a huge difference…it looks sooo good!!
Casey says
What a transformation!! I really appreciate all the details you guys give especially your pics! On a different note, have we ever seen a picture of inside your pantry? Mine is a bit of a Black Hole, and I would love some organizational inspiration if you have any to share. Thank you!
YoungHouseLove says
Oh man, I think we shared one of our first house before we moved (we were trying to eat everything so we didn’t have to move it) and at one point there was a peek at the pull out cabinet thingie in our second house, so I bet there will be a shot of it sometime! I’d love to paint things in there and organize the shelves and all that someday!
xo
s
Danielle says
Did you use a specific shade of white paint? (And if you were planning to paint all or some of your kitchen cabinets white (I know you’re not), would you use the exact same white on your trim, paneling, etc as on your cabinets…)
YoungHouseLove says
Yes, if we were going with white cabinets we’d use the same color as the trim (don’t want one thing looking blue or yellow by comparison). It’s Simply White by BM (in semi-gloss). Hope it helps!
xo
s
Andrea says
Hey guys!! Looks great in there!! I hate to request anything (you guys do such a thorough job of explaining things!!), but would you mind doing a tutorial on how to paint the wooden windows?? I’ve been dying to paint mine white but when I moved in someone had done a poor job and painted half of them shut, so I’m afraid to paint the other half! Did you use the same 2 coats of primer and 2 paint? Any tips would be greatly appreciated!!! Love this site by the way, I (finally!) got the guts to re-do my bathroom after reading your blog. I’d post pics, but I don’t know how : ) Thanks for being so helpful!!!
YoungHouseLove says
We’d be happy to! A bunch of other folks have requested that so I’ll have to take a series of step by step photos or even make a video when we tackle the windows in the living room, office, or dining room.
xo
s
Sara says
I would love to hear in more detail how you went about painting the windows! We have a similar woody situation and yours looks AWESOME with the paint job!
YoungHouseLove says
Thanks Sara! Some other folks have asked for a video or a series of photos to share those steps, so when I tackle the living room, dining room, or office windows I’d love to put that together for ya!
xo
s
Tirsa says
Helloooo Sunshine! The difference is so great I actually thought you had painted the walls everywhere except near the window next to where you removed the cabinets. :)
Really enjoying all the Phase 1 projects.
p.s.
Did I miss the update about painting the ceiling in your entryway?
YoungHouseLove says
That’s on the agenda for this morning!
xo
s
Betsy says
All I know is, that is going to be the most rewarding room to put wall color in, after tons of the hard work done first! Can’t wait to see the walls painted (secretly hoping you do white cabinets up top instead of RP). Jealous of the crown all over this house, that caps and finishes your rooms so nicely.
YoungHouseLove says
Thanks Betsy! I love white uppers but with our cream counters and appliances we’re afraid it’ll make toes look dirty. Will have to see where we end up!
xo
s
Jasmin M says
Hey guys great job! Quick question- was it a difficult desicion to paint the windows??? Everyone i have ever talked to says painting the windows will distroy them! Were you worried? Do they open and close? Did you do this step in your old houses? I dont remember if you painted regular wood or previously painted wood windows. I love the look but always thought i would have to get them replaced.
YoungHouseLove says
There have been a bunch of requests for a window painting tutorial so when I do the ones in the dining room or office or living room I’m planning to take lots of photos or even make a video. It also depends if your windows are wood (ours are here and they were in our last house) which tends to take primer and paint really nicely. More details to come!
xo
s
mackenzie says
stop. you had me at “jock jams.” (AND then closed the deal with Ariel references and then the giveaway to “farmhouse/industrial” store :) love you guys! thanks :)
karen @ paperfancy.com says
What a difference some white paint can make!! Looks much larger, airier (if that’s a word) and happy…keep up the great work. ~ Karen
Amanda says
Looks great! Quick question. When you guys have painted paneling in the past, have you found over time that the spaces in between each panel (where you caulk)ever crack? I have a “pine palace” of a living room (wood on the floor and ceilings along with big ol’ beams) that I want to paint over but I have been warned against it with comments that as the wood breathes it will leave behind cracks. Now I’m afraid to do it!
YoungHouseLove says
Others have asked that too over the years (we painted the paneling in our first and second houses as well, both of which were vertical) and I’m happy to report that we never have had issues with it (we were in our first house for 3 years after painting it and it did great)! I think as long as you don’t paint on a super hot day (when wood is really swollen) you probably won’t have any issues with it getting much smaller, even when it gets cold – at least we have never run into that issue! Hope it helps!
xo
s
Kara says
Awesome – thanks for the blast from the past… what a great way to start my day! Oh, yeah… and the kitchen looks stellar too. ; ) I love how much more open and spacious a feel it gives your kitchen/front entry.
Katie {deranchification} says
What an awesome change! It is so much brighter – I bet it feels cleaner (always a plus for a kitchen!) and bigger as a result.
Trude says
It looks amazing! Sooo much brighter. Good lord that’s a lot of painful panes to paint (har har), but I bet that view is worth it! :)
MARY EGUIA says
how about a pantry door w glass?
YoungHouseLove says
I’d love that someday!
xo
s
Tiffany says
What color did you use on the walls in the kitchen and foyer? It is beautiful!
YoungHouseLove says
Thanks Tiffany! It’s Edgecomb Gray in the foyer. The kitchen is actually not painted yet, so it’s just the color we found under the wallpaper in there!
xo
s
Kelly says
Wow, what a difference! It looks great. Everything is looking so wonderful in the new house so far. You guys are the best! This blog is such a cheery part of my day and has been for so many years. And if I can’t get to it for a little while, I’m excited to get caught up on everything over a good cup of coffee. Kudos!
YoungHouseLove says
Aw thanks Kelly! You’re so sweet.
xo
s
Stephanie says
Love the painted trim and paneling!! Looks fabulous!
I have to ask about your kitchen table….where did you find it??
YoungHouseLove says
Thanks Stephanie! Here’s that post for ya: https://www.younghouselove.com/2013/10/im-still-laughing-about-blardware/
xo
s
LARY@Inspiration Nook says
Looks amazing! You guys are awesome!
Cara says
I’m curious how far out you think a phase 2 reno would be. I can’t imagine doing all of that work for just a year, and I love home improvements myself. I’m 8 months prego and I just last weekend installed horizontal planks on an accent in the soon-to-be nursery.
YoungHouseLove says
Good question! We’re not sure when Phase 2 will happen (it honestly depends what layout/cabinets/appliances we fall in love with and how long it’ll take us to save up for them) but since this is our forever house we really want to take our time. In our first house’s kitchen we did peel & stick tile, replaced all the hinges and hardware, painted the walls/trim, and painted the cabinets to tide us over before the big reno about a year later (this was before we even had a blog, haha!). It really did make an old dark room SO MUCH NICER to walk into everyday until the reno could become a reality. The nice thing about many elements of this phase are that they’ll be “paid forward” into Phase 2 (the painted cabinets will later move to the garage to create a workshop, we’ll be keeping the wall color and the new white trim/doors/paneling, even the light fixtures we buy will also be for that phase, etc. So it’s sort of like these updates are bridging the gap between the dark Before kitchen and the amazing renovated kitchen that we can tackle later, if that makes sense.
xo
s
Lindsay says
We put an offer in on a house this week that needs a lot of work. It has the same wood trim and doors as well as the same blue stone floors. straight out of the late 1970’s. I was beginning to doubt the decision.This post has re-motivated me to see beyond the dark wood doors & trim.
i am obsessed with all that you do. your patience is remarkable. I worry I will be miserable living in an outdated house and wont have the patience to work through the fixes.
You guys are such an inspiration!
YoungHouseLove says
Aw thanks Lindsay! All the best with everything!
xo
s
Jill Hilbrich says
I love the painted panelling!!! I knew it would look awesome when you were contemplating it for the living room. We’re in the middle of repainting and re flooring (yes, right up to the eve of Thanksgiving) our main floor and I decided I might as well paint the wood panel ceiling in the powder room while we were at it! I’ve been thinking about it all year, and figured that it was the perfect time since the floors were ripped out. You guys do amazing work, thanks for all of your inspiring posts and tutorials (love the stairs and runner too!)
YoungHouseLove says
Aw thanks Jill!
xo
s
Andrea says
Glad you didn’t have to sand & de-gloss too, that must’ve made it a lot easier! Speaking of de-glosser, I use the NEXT Low-VOC version and believe you guys did too. Much to my dismay, when I went to Lowe’s to pick some up, they no longer sold it–Home Depot was the same! Have you purchased any recently? Any other Low VOC de-glossers you recommend?
YoungHouseLove says
Boo! I’ve heard they were phasing it out. Haven’t needed a new container yet, but maybe try amazon? Or see if they sell a similar brand that’s biodegradable/eco at Home Depot? Anyone have other suggestions for a not too fumey deglosser?
xo
s
Heather says
Wondering on the window mullions…did you tape off or paint over and Rae with a razor blade, or another method? Every window in my house looks like your kitchen window. And while I am not against wood, it just makes the house SO dark (not situated for the best light anyway, so need to help anywhere I can). Thank you for the post; it helped my husband visualize what the trim would look like painted (he’s not the visual type). Happy Thanksgiving! Heathr
YoungHouseLove says
We didn’t tape off and just freehanded it as neatly as possible (of course some still got on the glass so then we scraped it with a razor).
xo
s
Tall Tee says
Dang! I was honestly uber-curious at how you were going to twerk the kitchen for Phase 1, but it turned out amazing. Man, it doesn’t even look like the same house…respect **does a Jamaican trill**
YoungHouseLove says
Ha! Thanks Tall Tee!
xo
s
Summer says
Wow! Looking fantastic (and especially with the walls painted… catching up and just read that too)! You’ve convinced me to paint our trim… Most of the trim in our house is medium-dark wood. I felt “guilty” painting over it because it’s old and kinda authentic… but realizing it doesn’t feel like us and I want to live in MY home :) Do you have any close ups of your windows before? Ours are kinda set in so there’s more than just the trim around to paint (if that makes sense) Yours kinda seem like that, but not positive, and I’m just wondering if there’s any trick about doing that or just dive in. Oh boy what a project ahead… :)
YoungHouseLove says
So many folks have asked for a window-painting tutorial (maybe with a video or step by step photos) so I’d love to do that for you guys the next time I tackle windows!
xo
s
Heather says
Looks great! I am wondering how you painted the window trim without painting the window shut. I have a few windows to do in our house and the one I have done already we couldn’t open. Any tips you have would be great!
YoungHouseLove says
So many people have asked for a tutorial on that, so I’ll have to take step by step photos or a video. It’s a series of movements for the window that I do as I go so they don’t get painted shut.
xo
s
Jenna says
I am sure this has been asked and posted 100 times, but I can’t find it! We are doing a complete remodel of our house and have lots of trim and walls to paint as well. We are hoping to get pregnant soon, but I’m worried about all the chemicals. What paint do you recommend for a pure white trim and for walls? The house is taking WAY longer than we thought and we don’t want to have to wait much longer to have a second little one!
YoungHouseLove says
There’s no-VOC primer and paint now, so that’s what I use when pregnant. I like Kilz no-VOC stainblocking primer (it’s latex/water based) and Benjamin Moore’s Natura paint (use semi-gloss for the trim and maybe eggshell for the walls?). Good luck!
xo
s
Amber says
Hi Sherry-sorry if I missed this in your post, but I was curious if you sanded in between coats of primer/paint. We have dark wood trim throughout our house. We’ve painted two bedrooms and started the great room, but it’s SO overwhelming. It’d be so nice to not have to sand in between coats.
Also, I LOVE the contrast between the white upper cabinets and the wood lower cabinets. The wood on the cabinets is really gorgeous!
YoungHouseLove says
We didn’t just because we did thin and even coats, so we didn’t have any drips to get out, and we didn’t want to worry about sawdust flying around and getting in our next coat of paint. We have used the thing-coats-no-sanding-between method for two other sets of cabinets with Advance paint (the office built-ins and the kitchen cabinets in our last house) and they both held up amazingly well, if that helps!
xo
s